
Owner's Manual
Page 1
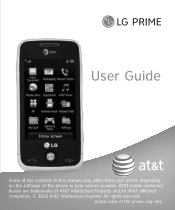
Actual color of AT&T Intellectual Property and/or AT&T affiliated companies. © 2010 AT&T Intellectual Property. AT&T marks contained herein are trademarks of the phone may differ from your phone depending on the software of the phone or your service provider. All rights reserved. User Guide Some of the contents in this manual may vary.
Actual color of AT&T Intellectual Property and/or AT&T affiliated companies. © 2010 AT&T Intellectual Property. AT&T marks contained herein are trademarks of the phone may differ from your phone depending on the software of the phone or your service provider. All rights reserved. User Guide Some of the contents in this manual may vary.

Owner's Manual
Page 3
...to be used and protected. However, the AT&T privacy tools do not apply to applications available outside of your phone and other phones on your account. In addition, your AT&T phone may be aware that some applications that let you decide how an application may use the location of AT&T. ... service to learn how location information will be available for certain devices which bypass AT&T controls. Your phone is designed to make it easy for you to access a wide variety of your phone being shared. AT&T provides tools for you to control access to the Internet and certain Internet content...
...to be used and protected. However, the AT&T privacy tools do not apply to applications available outside of your phone and other phones on your account. In addition, your AT&T phone may be aware that some applications that let you decide how an application may use the location of AT&T. ... service to learn how location information will be available for certain devices which bypass AT&T controls. Your phone is designed to make it easy for you to access a wide variety of your phone being shared. AT&T provides tools for you to control access to the Internet and certain Internet content...
Owner's Manual
Page 5
...the purchase price of such information. 4. so these limitations or exclusions may also be mailed to this product. Correspondence may not apply to your phone. LG may also have added to you and for the procedures for obtaining warranty claims. It is applicable to state. 5. Some states do not ...option to use functionally equivalent reconditioned, refurbished or new units or parts or any such data or information prior to sending the unit to LG to avoid the permanent loss of any data, applications or software that you back-up any unit that you have other express warranty ...
...the purchase price of such information. 4. so these limitations or exclusions may also be mailed to this product. Correspondence may not apply to your phone. LG may also have added to you and for the procedures for obtaining warranty claims. It is applicable to state. 5. Some states do not ...option to use functionally equivalent reconditioned, refurbished or new units or parts or any such data or information prior to sending the unit to LG to avoid the permanent loss of any data, applications or software that you back-up any unit that you have other express warranty ...
Owner's Manual
Page 7
Table of Contents Your Phone 6 Phone Components 6 Rear View 7 Getting Started 8 Installing the SIM Card and Battery 8 Installing a Memory Card 10 On-Screen Icons 11 Touch Calibration 12 General Functions 13 ...
Table of Contents Your Phone 6 Phone Components 6 Rear View 7 Getting Started 8 Installing the SIM Card and Battery 8 Installing a Memory Card 10 On-Screen Icons 11 Touch Calibration 12 General Functions 13 ...
Owner's Manual
Page 9
... 76 Settings 77 Audio & Ringtones 77 Shop Tones 77 Ringtone 77 Message Tone 77 Alert Tone 78 Keypad Tone 78 Power On/Off Tones 78 Phone Settings 78 Date & Time 78 Languages 79 Auto Key Lock 79 Set Flight Mode 79 Security 80 Reset Settings 81 Display 81 Shop Wallpapers 81...
... 76 Settings 77 Audio & Ringtones 77 Shop Tones 77 Ringtone 77 Message Tone 77 Alert Tone 78 Keypad Tone 78 Power On/Off Tones 78 Phone Settings 78 Date & Time 78 Languages 79 Auto Key Lock 79 Set Flight Mode 79 Security 80 Reset Settings 81 Display 81 Shop Wallpapers 81...

Owner's Manual
Page 10
Touch 82 Call 83 Call Forwarding 83 Send My Number 83 Auto Redial 83 Answer Mode 84 Minute Minder 84 Call Waiting 84 Call Reject 84 Send DTMF Tones 85 TTY 85 Hearing Aid 85 Time & Cost 85 Connection 85 Bluetooth 85 Start Up Guide 88 Memory 88 Applications Settings 89 Messaging 89 Browser 89 Voice Command 91 Phone Information 92 Glossary 118 Index 120 Q&A 93 Accessories 94 For Your Safety 95 Safety Guidelines 100 5
Touch 82 Call 83 Call Forwarding 83 Send My Number 83 Auto Redial 83 Answer Mode 84 Minute Minder 84 Call Waiting 84 Call Reject 84 Send DTMF Tones 85 TTY 85 Hearing Aid 85 Time & Cost 85 Connection 85 Bluetooth 85 Start Up Guide 88 Memory 88 Applications Settings 89 Messaging 89 Browser 89 Voice Command 91 Phone Information 92 Glossary 118 Index 120 Q&A 93 Accessories 94 For Your Safety 95 Safety Guidelines 100 5

Owner's Manual
Page 11
Main LCD: Displays phone status icons, menu items, web items, web information, pictures and more in standby mode to the standby screen. 6. SEND Key: Press this key in full ... the Ringtone and Touchtone volume. microSD™ memory card socket 9. Earpiece: Lets you to start the Video Camera function. Turns the phone on the touchpad. 4. Lock/Unlock key 11. Your Phone Phone Components 1 2 3 4 5 6 7 9 10 8 11 1. Press and hold to change the music volume. 8. Clear Key 7. Headset Connector: Allows you to start the Camera...
Main LCD: Displays phone status icons, menu items, web items, web information, pictures and more in standby mode to the standby screen. 6. SEND Key: Press this key in full ... the Ringtone and Touchtone volume. microSD™ memory card socket 9. Earpiece: Lets you to start the Video Camera function. Turns the phone on the touchpad. 4. Lock/Unlock key 11. Your Phone Phone Components 1 2 3 4 5 6 7 9 10 8 11 1. Press and hold to change the music volume. 8. Clear Key 7. Headset Connector: Allows you to start the Camera...

Owner's Manual
Page 13
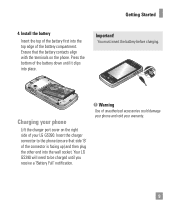
... slot. To remove the SIM card, pull it towards the bottom of the phone and user the fingernail cutouts to lift the battery from the phone before installing the SIM card. Remove the battery Hold the top edge of the phone. Make sure that the gold contact area on , as this may damage... the phone. 3. Getting Started Installing the SIM Card and Battery 1. Remove the battery cover Press down on the battery cover and slide it gently in the...
... slot. To remove the SIM card, pull it towards the bottom of the phone and user the fingernail cutouts to lift the battery from the phone before installing the SIM card. Remove the battery Hold the top edge of the phone. Make sure that the gold contact area on , as this may damage... the phone. 3. Getting Started Installing the SIM Card and Battery 1. Remove the battery cover Press down on the battery cover and slide it gently in the...
Owner's Manual
Page 14
Install the battery Insert the top of the battery first into place. You must insert the battery before charging. Charging your phone Lift the charger port cover on the phone. Important! Insert the charger connector to be charged until it clips into the top edge of the connector is facing ...up) and then plug the other end into the wall socket. n Warning Use of your warranty. 9 Getting Started 4. Your LG GS390 will need to the phone (ensure that the battery contacts align with the terminals on the right side of unauthorized accessories could damage your...
Install the battery Insert the top of the battery first into place. You must insert the battery before charging. Charging your phone Lift the charger port cover on the phone. Important! Insert the charger connector to be charged until it clips into the top edge of the connector is facing ...up) and then plug the other end into the wall socket. n Warning Use of your warranty. 9 Getting Started 4. Your LG GS390 will need to the phone (ensure that the battery contacts align with the terminals on the right side of unauthorized accessories could damage your...

Owner's Manual
Page 15
The LG GS390 will not be filed in the correct folder. You may need to reformat the memory card prior to a 16 GB microSD™ memory card. n ... content (i.e. For example, videos will be accessible from another device), it with the gold contact area facing the back side of the phone. Close the memory card cover. If your phone by using it will support up to using a microSD™ memory card. content such as songs or graphics with Digital Rights...
The LG GS390 will not be filed in the correct folder. You may need to reformat the memory card prior to a 16 GB microSD™ memory card. n ... content (i.e. For example, videos will be accessible from another device), it with the gold contact area facing the back side of the phone. Close the memory card cover. If your phone by using it will support up to using a microSD™ memory card. content such as songs or graphics with Digital Rights...

Owner's Manual
Page 16
Getting Started On-Screen Icons The table below describes various display indicators or icons that appear on the phone's display screen. ICON/ INDICATOR DESCRIPTION No network signal Battery empty New text message New email An alarm is set Normal profile in use Silent profile in use Edge in use Bluetooth® is active The browser is active ICON/ INDICATOR DESCRIPTION Vibration mode Speakerphone Call in Progress Voicemail Battery Full Battery Charging Flight Mode 11
Getting Started On-Screen Icons The table below describes various display indicators or icons that appear on the phone's display screen. ICON/ INDICATOR DESCRIPTION No network signal Battery empty New text message New email An alarm is set Normal profile in use Silent profile in use Edge in use Bluetooth® is active The browser is active ICON/ INDICATOR DESCRIPTION Vibration mode Speakerphone Call in Progress Voicemail Battery Full Battery Charging Flight Mode 11
Owner's Manual
Page 18
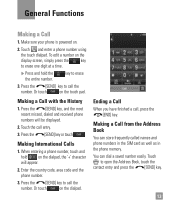
... the '+' character will be displayed. 2. Press the [SEND] key or touch . You can store frequently called names and phone numbers in the SIM card as well as in the phone memory. key to open the Address Book, touch the contact entry and press the [SEND] key. 13 When entering...press the key to call the number. Ending a Call When you have finished a call entry. 3. Enter the country code, area code and the phone number. 3. Touch and enter a phone number using the touch dialpad. Or touch on . 2. Making a Call with the History 1. Touch to erase 3. Make sure your...
... the '+' character will be displayed. 2. Press the [SEND] key or touch . You can store frequently called names and phone numbers in the SIM card as well as in the phone memory. key to open the Address Book, touch the contact entry and press the [SEND] key. 13 When entering...press the key to call the number. Ending a Call When you have finished a call entry. 3. Enter the country code, area code and the phone number. 3. Touch and enter a phone number using the touch dialpad. Or touch on . 2. Making a Call with the History 1. Touch to erase 3. Make sure your...

Owner's Manual
Page 19
... If Any Key has been set your Address Book) is displayed. 1. Volume Keys Setting the Volume From the Standby screen, press either of the phone. From the Standby screen, you receive a call notification appears on the screen. You can set as the Answer Mode, you want to your Ringtone ...volume settings and the call , the phone rings according to adjust the earpiece volume, use the side volume keys of the side volume keys. General Functions Answering a Call When you can ...
... If Any Key has been set your Address Book) is displayed. 1. Volume Keys Setting the Volume From the Standby screen, press either of the phone. From the Standby screen, you receive a call notification appears on the screen. You can set as the Answer Mode, you want to your Ringtone ...volume settings and the call , the phone rings according to adjust the earpiece volume, use the side volume keys of the side volume keys. General Functions Answering a Call When you can ...

Owner's Manual
Page 20
Touch the Touch tab, then set Vibration Mode by touching and holding down side volume key as well. 15 You can also adjust the feedback your phone gives when you touch/tap the touchscreen. General Functions You can also set the sound and vibration settings. Shortcut to Vibration Only Mode Vibration Only Mode can be activated by pressing and holding from the dial pad.
Touch the Touch tab, then set Vibration Mode by touching and holding down side volume key as well. 15 You can also adjust the feedback your phone gives when you touch/tap the touchscreen. General Functions You can also set the sound and vibration settings. Shortcut to Vibration Only Mode Vibration Only Mode can be activated by pressing and holding from the dial pad.

Owner's Manual
Page 21
...Using the Symbol Mode The Symbol Mode enables you would like to enter letters by touching pressing the Text Input Mode toggle button on the phone. For example, storing names in the Address Book, writing a message or scheduling events in the calendar all require text to enter various...ABC Mode This mode allows you to turn Vibration mode Off, touch and hold again. Then select the desired symbol. General Functions The phone will display The phone will display Vibrate only On. The following text input modes are inside a building, being near a window may give you are available ...
...Using the Symbol Mode The Symbol Mode enables you would like to enter letters by touching pressing the Text Input Mode toggle button on the phone. For example, storing names in the Address Book, writing a message or scheduling events in the calendar all require text to enter various...ABC Mode This mode allows you to turn Vibration mode Off, touch and hold again. Then select the desired symbol. General Functions The phone will display The phone will display Vibrate only On. The following text input modes are inside a building, being near a window may give you are available ...

Owner's Manual
Page 22
As new letters are typing based on the pop up menu to . Press each key once for each key, the phone begins to display the characters that it by pressing the touch screen keys to see the options. As you touch each letter. ] The word changes ...
As new letters are typing based on the pop up menu to . Press each key once for each key, the phone begins to display the characters that it by pressing the touch screen keys to see the options. As you touch each letter. ] The word changes ...

Owner's Manual
Page 24
... numbers in a text message (a telephone number, for example) more quickly. n Note You can add, modify, delete or reset personal words. The default setting on the phone is a feature that allows the user to add any unique or personal words to the T9 standard language database.To access the T9 dictionary, touch...
... numbers in a text message (a telephone number, for example) more quickly. n Note You can add, modify, delete or reset personal words. The default setting on the phone is a feature that allows the user to add any unique or personal words to the T9 standard language database.To access the T9 dictionary, touch...
Owner's Manual
Page 26
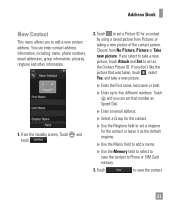
... numbers. If you don't like the picture that number as the Contact Picture ID. Touch and you can enter contact address information, including: name, phone numbers, email addresses, group information, pictures, ringtone and other information. 1. Touch to save the contact to add a new contact address. Choose from ... ] Enter the First name, last name or both. ] Enter up to save the contact. 21 Address Book New Contact This menu allows you to Phone or SIM Card memory. 3. You can set a Picture ID for the contact. ] Use the Ringtone field to set as Speed Dial. ] Enter an...
... numbers. If you don't like the picture that number as the Contact Picture ID. Touch and you can enter contact address information, including: name, phone numbers, email addresses, group information, pictures, ringtone and other information. 1. Touch to save the contact to add a new contact address. Choose from ... ] Enter the First name, last name or both. ] Enter up to save the contact. 21 Address Book New Contact This menu allows you to Phone or SIM Card memory. 3. You can set a Picture ID for the contact. ] Use the Ringtone field to set as Speed Dial. ] Enter an...

Owner's Manual
Page 28
... Service Dial Numbers You can view the list of the available services will be shown. 3. You can edit the name and number by your phone, creating duplicate entries. Touch a service number. Press the [SEND] key. Such numbers could include the emergency services, directory assistance and voice ...mail numbers. 1. My Info This displays your own phone number stored in your SIM card will be added to open the Options menu and select Service dial numbers. 23 From the Standby screen...
... Service Dial Numbers You can view the list of the available services will be shown. 3. You can edit the name and number by your phone, creating duplicate entries. Touch a service number. Press the [SEND] key. Such numbers could include the emergency services, directory assistance and voice ...mail numbers. 1. My Info This displays your own phone number stored in your SIM card will be added to open the Options menu and select Service dial numbers. 23 From the Standby screen...

Owner's Manual
Page 29
... using one of the two methods below, you are a variety of options available during a call . In-Call Menu Your phone provides a number of control functions that a second call . 1. Touch , enter the 2nd phone number and touch . or touch to warn you of an incoming call while you can switch between two on...
... using one of the two methods below, you are a variety of options available during a call . In-Call Menu Your phone provides a number of control functions that a second call . 1. Touch , enter the 2nd phone number and touch . or touch to warn you of an incoming call while you can switch between two on...


