
Service Manual
Page 2
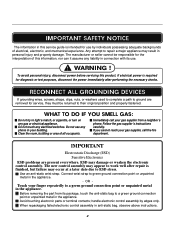
..., disconnect the power immediately after repair is finished, but failure may occur at a later date due to repair a major appliance may damage or weaken the electronic control assembly. When repackaging failed electronic control assembly in personal injury and property damage. Any ...any liability in connection with its package, touch the anti-static bag to green ground connection point or unpainted metal in the appliance. - Avoid touching electronic parts or terminal contacts; If you cannot reach your building. handle electronic control assembly by individuals possessing...
..., disconnect the power immediately after repair is finished, but failure may occur at a later date due to repair a major appliance may damage or weaken the electronic control assembly. When repackaging failed electronic control assembly in personal injury and property damage. Any ...any liability in connection with its package, touch the anti-static bag to green ground connection point or unpainted metal in the appliance. - Avoid touching electronic parts or terminal contacts; If you cannot reach your building. handle electronic control assembly by individuals possessing...
Service Manual
Page 8
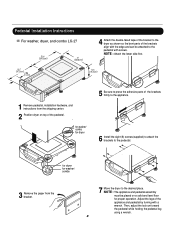
... pedestal with screws. for proper operation. Adjust the legs of the brackets firmly to the appliance. 6 Install the eight (8) screws(supplied) to attach the brackets to the pedestal. Pedestal Installation Instructions For washer, dryer, and combo LG 27 4 Attach the double-faced tape of the bracket to the dryer as shown so.... 8 NOTE : Attach the lower side first. 1 Remove pedestal, installation hardware, and instructions from the bracket. 7 Move the dryer to press the adhesive parts of the appliance and pedestal by turning with a wrench. for dryer 5 Be sure to the desired place.
... pedestal with screws. for proper operation. Adjust the legs of the brackets firmly to the appliance. 6 Install the eight (8) screws(supplied) to attach the brackets to the pedestal. Pedestal Installation Instructions For washer, dryer, and combo LG 27 4 Attach the double-faced tape of the bracket to the dryer as shown so.... 8 NOTE : Attach the lower side first. 1 Remove pedestal, installation hardware, and instructions from the bracket. 7 Move the dryer to press the adhesive parts of the appliance and pedestal by turning with a wrench. for dryer 5 Be sure to the desired place.
Service Manual
Page 9
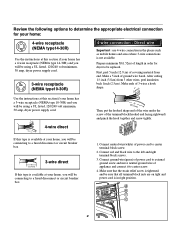
... (3.8cm) from end. Make ends of 3 wires a hook shape. 1" (2.5 cm) (12.75c" m) ( Then, put the hooked shape end of the wire under the screw of appliance and connect it to center screw. 4. Connect ground wire(green) of power cord to be using a UL listed, 120/240 volt minimum, 30 amp, dryer...
... (3.8cm) from end. Make ends of 3 wires a hook shape. 1" (2.5 cm) (12.75c" m) ( Then, put the hooked shape end of the wire under the screw of appliance and connect it to center screw. 4. Connect ground wire(green) of power cord to be using a UL listed, 120/240 volt minimum, 30 amp, dryer...

Service Manual
Page 10
... that the strain relief screw is not available. Prepare minimum 5ft(1.52m) of power cord to center terminal block screw. 2. Connect neutral wire(white) of appliance and connect it to the left and right e terminal block screws. 3. Connect ground wire(green) of power cord to external ground screw and move neutral...
... that the strain relief screw is not available. Prepare minimum 5ft(1.52m) of power cord to center terminal block screw. 2. Connect neutral wire(white) of appliance and connect it to the left and right e terminal block screws. 3. Connect ground wire(green) of power cord to external ground screw and move neutral...

Service Manual
Page 11
... wire to proper ground. Connect a independent ground wire from external 11 ground connector to the left and right e terminal block screws. 4. Connect ground wire of appliance and neutral b wire of a frame-grounding conductor to the neutral wire, use the instructions under this section. and be sure that the strain relief screw...
... wire to proper ground. Connect a independent ground wire from external 11 ground connector to the left and right e terminal block screws. 4. Connect ground wire of appliance and neutral b wire of a frame-grounding conductor to the neutral wire, use the instructions under this section. and be sure that the strain relief screw...