
Service Manual
Page 3
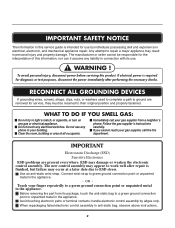
... strap to repair a major appliance may result in personal injury and property damage. RECONNECT ALL GROUNDING DEVICES If grounding wires, screws, straps, clips, nuts, or washers used to complete a path to a green ground connection point or unpainted metal in the appliance. Do not use by edges only. Immediately call the fire...
... strap to repair a major appliance may result in personal injury and property damage. RECONNECT ALL GROUNDING DEVICES If grounding wires, screws, straps, clips, nuts, or washers used to complete a path to a green ground connection point or unpainted metal in the appliance. Do not use by edges only. Immediately call the fire...
Service Manual
Page 8
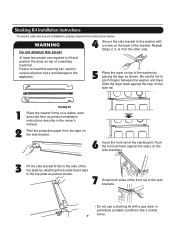
... the tape on top of the stacking kit. Failure to heed this alone! 4 Secure the side bracket to pinch fingers between the washer and dryer. Stacking Kit Installation Instructions To ensure safe and secure installation, please observe the instructions below. Slide the dryer back against the... this warning can result in potentially unstable conditions like a mobile home. 7 Repeat Steps 2, 3, & 4 for the other side. Be careful not to the washer with a screw on the side brackets. 3 Fit the side bracket firmly to the side brackets. • Do not use a stacking kit with a gas...
... the tape on top of the stacking kit. Failure to heed this alone! 4 Secure the side bracket to pinch fingers between the washer and dryer. Stacking Kit Installation Instructions To ensure safe and secure installation, please observe the instructions below. Slide the dryer back against the... this warning can result in potentially unstable conditions like a mobile home. 7 Repeat Steps 2, 3, & 4 for the other side. Be careful not to the washer with a screw on the side brackets. 3 Fit the side bracket firmly to the side brackets. • Do not use a stacking kit with a gas...
Service Manual
Page 9
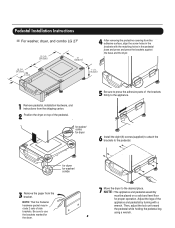
... 2 sets of the appliance and pedestal by turning with a wrench. for washer/ combo 3 Remove the paper from the shipping carton. 2 Position the dryer on a solid and... level floor for dryer . Pedestal Installation Instructions For washer, dryer, and combo LG 27" 4 AAtftaecr hretmheovdinogubthle-pfarocteedcttivaepecoovfetrhinegbfroamcktehteto the dardyheersaivsesshuorfwacnes, oaltighne tbhenstcpreawrtshoolfetshien bthreackets ablriagcnkwetisthwtihthetheedgmeaatcnhdincgahnoblees aintttahcehpeeddteostahle pbeadseesatnadl wpritehssscarnedwpsr...
... 2 sets of the appliance and pedestal by turning with a wrench. for washer/ combo 3 Remove the paper from the shipping carton. 2 Position the dryer on a solid and... level floor for dryer . Pedestal Installation Instructions For washer, dryer, and combo LG 27" 4 AAtftaecr hretmheovdinogubthle-pfarocteedcttivaepecoovfetrhinegbfroamcktehteto the dardyheersaivsesshuorfwacnes, oaltighne tbhenstcpreawrtshoolfetshien bthreackets ablriagcnkwetisthwtihthetheedgmeaatcnhdincgahnoblees aintttahcehpeeddteostahle pbeadseesatnadl wpritehssscarnedwpsr...
Service Manual
Page 39
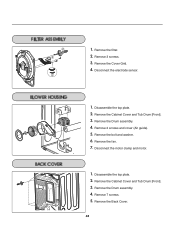
Remove the Cover Grid. 4. Remove the bolt and washer. 6. Disconnect the motor clamp and motor. 1. Remove the Drum assembly. 4. Remove the fan. 7. Remove the Cabinet Cover and Tub Drum [Front]. 3. Remove the Cabinet Cover and Tub Drum [Front]. 3. Remove the Back Cover. 38 Remove 3 screws. 3. Remove 7 screws. 5. Disconnect the electrode sensor. 1. Remove 2 screws and cover (Air guide). 5. Disassemble the top plate. 2. Disassemble the top plate. 2. Remove the Drum assembly. 4. 1. Remove the filter. 2.
Remove the Cover Grid. 4. Remove the bolt and washer. 6. Disconnect the motor clamp and motor. 1. Remove the Drum assembly. 4. Remove the fan. 7. Remove the Cabinet Cover and Tub Drum [Front]. 3. Remove the Cabinet Cover and Tub Drum [Front]. 3. Remove the Back Cover. 38 Remove 3 screws. 3. Remove 7 screws. 5. Disconnect the electrode sensor. 1. Remove 2 screws and cover (Air guide). 5. Disassemble the top plate. 2. Disassemble the top plate. 2. Remove the Drum assembly. 4. 1. Remove the filter. 2.


