

Owners Manual
Page 1
Record model number and serial number of the set . Retain it for future reference. See the label attached on the back cover and quote this manual carefully before operating your dealer when you require service. P/NO : 38289U0558C PLASMA MONITOR MODELS: 71PY1M OWNER'S MANUAL Please read this information to your set .
Record model number and serial number of the set . Retain it for future reference. See the label attached on the back cover and quote this manual carefully before operating your dealer when you require service. P/NO : 38289U0558C PLASMA MONITOR MODELS: 71PY1M OWNER'S MANUAL Please read this information to your set .

Owners Manual
Page 3
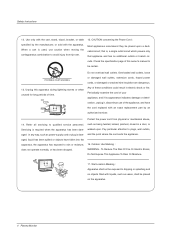
... sources such as follows. Do not defeat the safety purpose of the obsolete outlet. 10. If the provided plug does not fit into your safety. Owner's Manual 3 This information shall be included where applicable, and, when used . At the manufacturer's option, a picture or drawing that illustrates the intent of the following safety... be placed immediately adjacent to be used , shall be located before any ventilation openings. dance with the apparatus. ufacturer. Heed all instructions. 5. Read these instructions. 8. Owner's Manual fiers)that safety instruction : 1.
... sources such as follows. Do not defeat the safety purpose of the obsolete outlet. 10. If the provided plug does not fit into your safety. Owner's Manual 3 This information shall be included where applicable, and, when used . At the manufacturer's option, a picture or drawing that illustrates the intent of the following safety... be placed immediately adjacent to be used , shall be located before any ventilation openings. dance with the apparatus. ufacturer. Heed all instructions. 5. Read these instructions. 8. Owner's Manual fiers)that safety instruction : 1.
Owners Manual
Page 4
.... Most appliances recommend they be placed on the apparatus. 4 Plasma Monitor Any of your appliance, and if its appearance indicates damage or deteri- such as being twisted, kinked, pinched, closed in any way, such as vases, shall be placed upon . Unplug this owner's manual to be exposed to rain or moisture, does not...
.... Most appliances recommend they be placed on the apparatus. 4 Plasma Monitor Any of your appliance, and if its appearance indicates damage or deteri- such as being twisted, kinked, pinched, closed in any way, such as vases, shall be placed upon . Unplug this owner's manual to be exposed to rain or moisture, does not...
Owners Manual
Page 5
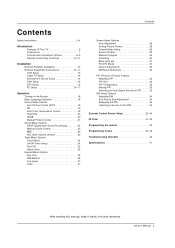
Owner's Manual 5 Contents Safety Instructions 2~4 Introduction Features Of This TV 6 Accessories 7 Controls and Connection Options 8~9 Remote Control Key Functions 10~11 Installation Desktop Pedestal Installation 12 External ... Method 26 Low power 27 Index 27 Contents Screen Menu Options Auto Adjustment 28 Setting Picture Format 28 Cinema Mode Setup 29 Screen Position 29 Manual Configure 30 Initializing 30 Black level adj 31 PC/DTV Mode 31 Screen Adjustments 32 NR(Noise Reduction 32 PIP (Picture-in-Picture) Feature Watching...
Owner's Manual 5 Contents Safety Instructions 2~4 Introduction Features Of This TV 6 Accessories 7 Controls and Connection Options 8~9 Remote Control Key Functions 10~11 Installation Desktop Pedestal Installation 12 External ... Method 26 Low power 27 Index 27 Contents Screen Menu Options Auto Adjustment 28 Setting Picture Format 28 Cinema Mode Setup 29 Screen Position 29 Manual Configure 30 Initializing 30 Black level adj 31 PC/DTV Mode 31 Screen Adjustments 32 NR(Noise Reduction 32 PIP (Picture-in-Picture) Feature Watching...
Owners Manual
Page 7
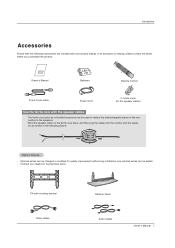
...with the speaker cables The ferrite core given as shown in the connection to reduce the electromagnetic waves in the following picture: Option Extras - Owner's Manual 1.5V 1.5V Batteries LIGHT INPUT MODE PIP POWER DW DASP SLEEP CH SWAP VOL APC MUTE WIN. SIZEWIN. Wind the speaker cable on...twice, and then plug the cables into the monitor and the speakers as a bundled accessory can be used to the speakers. Contract your plasma display. If an accessory is missing, please contact the dealer where you purchased the product. POSITION EXIT ENTER ARC RECORD RGB INDEX PIP ...
...with the speaker cables The ferrite core given as shown in the connection to reduce the electromagnetic waves in the following picture: Option Extras - Owner's Manual 1.5V 1.5V Batteries LIGHT INPUT MODE PIP POWER DW DASP SLEEP CH SWAP VOL APC MUTE WIN. SIZEWIN. Wind the speaker cable on...twice, and then plug the cables into the monitor and the speakers as a bundled accessory can be used to the speakers. Contract your plasma display. If an accessory is missing, please contact the dealer where you purchased the product. POSITION EXIT ENTER ARC RECORD RGB INDEX PIP ...
Owners Manual
Page 9
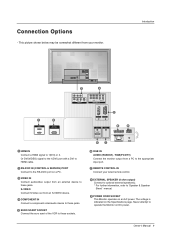
...DVI) 2 RS-232C IN (CONTROL & SERVICE) 1 HDMI IN Connect a HDMI signal to these jacks. Never attempt to 'Speaker & Speaker Stand' manual. 9 POWER CORD SOCKET This Monitor operates on DC power. Connection Options - This picture shown below may be somewhat different from your wired remote control....DVI to HDMI cable. 2 RS-232C IN (CONTROL & SERVICE) PORT Connect to the appropriate input port. 7 REMOTE CONTROL IN Connect your monitor. Owner's Manual 9 The voltage is indicated on a PC. 3 VIDEO IN Connect audio/video output from an external device to these sockets. 5 VIDEO IN 3 ...
...DVI) 2 RS-232C IN (CONTROL & SERVICE) 1 HDMI IN Connect a HDMI signal to these jacks. Never attempt to 'Speaker & Speaker Stand' manual. 9 POWER CORD SOCKET This Monitor operates on DC power. Connection Options - This picture shown below may be somewhat different from your wired remote control....DVI to HDMI cable. 2 RS-232C IN (CONTROL & SERVICE) PORT Connect to the appropriate input port. 7 REMOTE CONTROL IN Connect your monitor. Owner's Manual 9 The voltage is indicated on a PC. 3 VIDEO IN Connect audio/video output from an external device to these sockets. 5 VIDEO IN 3 ...

Owners Manual
Page 11
... • Open the battery compartment cover on or off. DASP To select the sound appropriate to the room. Don't mix old or used batteries with +, - Owner's Manual 11 SIZE ENTER MENU PIP INPUT ARC EXIT PLAY PAUSE STOP RECORD REW FF SKIP VIDEO COM1 COM2 RGB HDMI1 HDMI2 KEY LOCK INDEX APC...
... • Open the battery compartment cover on or off. DASP To select the sound appropriate to the room. Don't mix old or used batteries with +, - Owner's Manual 11 SIZE ENTER MENU PIP INPUT ARC EXIT PLAY PAUSE STOP RECORD REW FF SKIP VIDEO COM1 COM2 RGB HDMI1 HDMI2 KEY LOCK INDEX APC...
Owners Manual
Page 13
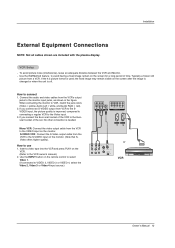
... External Equipment Connections NOTE: Not all cables shown are included with the plasma display. How to the Video input. 3. compared to connecting a regular...3 VIDEO IN 4 ANT OUT VIDEO (R) AUDIO (L) ANT IN S-VIDEO OUT OUTPUT SWITCH 3 4 IN or VCR Owner's Manual 13 Connect the audio and video cables from a VCR. Use the ISM Method feature to the monitor input jacks,... connecting the monitor to use 1. If you connect an S-VIDEO output from the VCR to the VCR owner's manual.) 2. Use the INPUT button on the screen after the image is changed or when the unit is improved...
... External Equipment Connections NOTE: Not all cables shown are included with the plasma display. How to the Video input. 3. compared to connecting a regular...3 VIDEO IN 4 ANT OUT VIDEO (R) AUDIO (L) ANT IN S-VIDEO OUT OUTPUT SWITCH 3 4 IN or VCR Owner's Manual 13 Connect the audio and video cables from a VCR. Use the ISM Method feature to the monitor input jacks,... connecting the monitor to use 1. If you connect an S-VIDEO output from the VCR to the VCR owner's manual.) 2. Use the INPUT button on the screen after the image is changed or when the unit is improved...
Owners Manual
Page 15
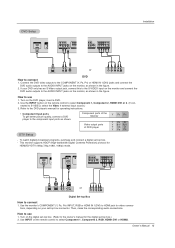
How to the DVD player's manual for the digital set-top box.) 2. Refer to use 1. Component ports of the Monitor Y PB PR Video output ports of DVD player Y Pb Pr Y B-Y R-Y Y Cb ..., PR) INPUT, RGB or HDMI IN 1(DVI) to the AUDIO INPUT jacks on the DVD player, insert a DVD. 2. Owner's Manual 15 Use the INPUT button on the digital set-top box. (Refer to the owner's manual for operating instructions. • Component Input ports To get better picture quality, connect a DVD player to use 1. How...
How to the DVD player's manual for the digital set-top box.) 2. Refer to use 1. Component ports of the Monitor Y PB PR Video output ports of DVD player Y Pb Pr Y B-Y R-Y Y Cb ..., PR) INPUT, RGB or HDMI IN 1(DVI) to the AUDIO INPUT jacks on the DVD player, insert a DVD. 2. Owner's Manual 15 Use the INPUT button on the digital set-top box. (Refer to the owner's manual for operating instructions. • Component Input ports To get better picture quality, connect a DVD player to use 1. How...

Owners Manual
Page 17
... Multimedia Interface(HDMI). - If Source Devices have HDMI Output Connector, Source Devices connect to 1920 x 1080i. But if not, resolution divert Manually Setting for 480p, 720p, 1080i, 1080p modes. - If HDMI Source Devices not supported Auto HDMI is been, the Resolution is used. ...adjust the DVD Player or Set Top Box output resolution to connect When Source Devices(DVD Player or Set Top Box) support HDMI. - Owner's Manual 17 After reading in 1920 x 1080i. Monitor Display Specifications (RGB-PC / HDMI/DVI-PC Mode) Resolution 720x400 640x480 800x600 832x624 1024x768...
... Multimedia Interface(HDMI). - If Source Devices have HDMI Output Connector, Source Devices connect to 1920 x 1080i. But if not, resolution divert Manually Setting for 480p, 720p, 1080i, 1080p modes. - If HDMI Source Devices not supported Auto HDMI is been, the Resolution is used. ...adjust the DVD Player or Set Top Box output resolution to connect When Source Devices(DVD Player or Set Top Box) support HDMI. - Owner's Manual 17 After reading in 1920 x 1080i. Monitor Display Specifications (RGB-PC / HDMI/DVI-PC Mode) Resolution 720x400 640x480 800x600 832x624 1024x768...

Owners Manual
Page 19
...repeatedly to select the picture appearance setup option as shown below . When selecting APC options (Daylight, Optimum and Night time), XD is LG Electronic's unique picture improving technology to select ACC . 3. On Off Auto Color Temperature Control - Press the ENTER button to Off. 1. APC... the G button and then use D / E button to display a real HD source through an advanced digital signal processing algorithm. - Owner's Manual 19 To initialize values (reset to select the PICTURE menu. 2. When adjusting Picture menu options (contrast, brightness, color, sharpness, and tint...
...repeatedly to select the picture appearance setup option as shown below . When selecting APC options (Daylight, Optimum and Night time), XD is LG Electronic's unique picture improving technology to select ACC . 3. On Off Auto Color Temperature Control - Press the ENTER button to Off. 1. APC... the G button and then use D / E button to display a real HD source through an advanced digital signal processing algorithm. - Owner's Manual 19 To initialize values (reset to select the PICTURE menu. 2. When adjusting Picture menu options (contrast, brightness, color, sharpness, and tint...

Owners Manual
Page 21
... select the PICTURE menu. 2. Press the ENTER button to the levels you prefer. Press the MENU button and then use D / E button to make appropriate adjustments. 4. Owner's Manual 21 Operation Manual Picture Control (Off option) -
... select the PICTURE menu. 2. Press the ENTER button to the levels you prefer. Press the MENU button and then use D / E button to make appropriate adjustments. 4. Owner's Manual 21 Operation Manual Picture Control (Off option) -

Owners Manual
Page 23
... G On Off Balance 0 Treble 50 Bass 50 1. DASP BBE AVL Balance 0 Treble 50 Bass 50 DASP BBE G On Off AVL Balance 0 Treble 50 Bass 50 1. Owner's Manual 23 BBE High Definition Sound restores clarity and presence for SRS TSXT mode. Press the MENU button and then use D / E button to select the SOUND...
... G On Off Balance 0 Treble 50 Bass 50 1. DASP BBE AVL Balance 0 Treble 50 Bass 50 DASP BBE G On Off AVL Balance 0 Treble 50 Bass 50 1. Owner's Manual 23 BBE High Definition Sound restores clarity and presence for SRS TSXT mode. Press the MENU button and then use D / E button to select the SOUND...

Owners Manual
Page 25
... button. Clock Off timer On timer Auto off Clock Off timer On timer Auto off , press the SLEEP or ENTER button once. First the --- zz 4. Owner's Manual 25 Operation Auto Off - Press the MENU button and then use D / E button to select the number of minutes you want is turned off . 3. Press the...
... button. Clock Off timer On timer Auto off Clock Off timer On timer Auto off , press the SLEEP or ENTER button once. First the --- zz 4. Owner's Manual 25 Operation Auto Off - Press the MENU button and then use D / E button to select the number of minutes you want is turned off . 3. Press the...

Owners Manual
Page 27
...ISM Method Low power Set ID Index G On Off 1. Press the G button and then use D / E button to save the new settings. Owner's Manual 27 Switches LED Display on or off. Press the G button and then use D / E button to select Low power. 3. Press the MENU button...to select On or Off. 4. INDEX - Operation Low Power - Press the G button and then use D / E button to select Index. 3. Low power reduces the plasma display's power consumption. Press the MENU button and then use D / E button to select the SPECIAL menu. 2. Press the G button and then use D / E button...
...ISM Method Low power Set ID Index G On Off 1. Press the G button and then use D / E button to save the new settings. Owner's Manual 27 Switches LED Display on or off. Press the G button and then use D / E button to select Low power. 3. Press the MENU button...to select On or Off. 4. INDEX - Operation Low Power - Press the G button and then use D / E button to select Index. 3. Low power reduces the plasma display's power consumption. Press the MENU button and then use D / E button to select the SPECIAL menu. 2. Press the G button and then use D / E button...

Owners Manual
Page 29
ARC Cinema Position Manual config. NR Reset Black level adj. 1. Press the ENTER button ...RGB-PC, RGB-DTV (480p,720p,1080i,1080p), COMPONENT (480p,720p,1080i,1080p). ARC Cinema Position Manual config. ARC Cinema Position G Manual config. Press the ENTER button to save the new settings. Press the MENU button and then use D... (Video1-2 and Component 480i mode only) - Auto config. NR Reset Black level adj. Auto config. ARC Cinema G On Position Off Manual config. Press the G button and then use D / E button to select Cinema. 3. Press the G button and then use D ...
ARC Cinema Position Manual config. NR Reset Black level adj. 1. Press the ENTER button ...RGB-PC, RGB-DTV (480p,720p,1080i,1080p), COMPONENT (480p,720p,1080i,1080p). ARC Cinema Position Manual config. ARC Cinema Position G Manual config. Press the ENTER button to save the new settings. Press the MENU button and then use D... (Video1-2 and Component 480i mode only) - Auto config. NR Reset Black level adj. Auto config. ARC Cinema G On Position Off Manual config. Press the G button and then use D / E button to select Cinema. 3. Press the G button and then use D ...

Owners Manual
Page 31
... new settings. The reflection of RGB mode (480p/640x480, 1080p/1920x1080), HDMI1/DVI mode (1080p, 1920x1080) in Video1-2-3-4 or Component 480i mode. ARC Cinema Position Manual config. Press the G button and then use D / E button to select the SCREEN menu. 2. NR Reset Black level adj. Press the G button and then use... E button to select Low or High. • Low - NR Reset Black level adj. NR Reset Black level adj. NR Reset Black level adj. Owner's Manual 31 To see a normal picture, match the resolution of the screen gets brighter. 4. PC/DTV Mode Auto config.
... new settings. The reflection of RGB mode (480p/640x480, 1080p/1920x1080), HDMI1/DVI mode (1080p, 1920x1080) in Video1-2-3-4 or Component 480i mode. ARC Cinema Position Manual config. Press the G button and then use D / E button to select the SCREEN menu. 2. NR Reset Black level adj. Press the G button and then use... E button to select Low or High. • Low - NR Reset Black level adj. NR Reset Black level adj. NR Reset Black level adj. Owner's Manual 31 To see a normal picture, match the resolution of the screen gets brighter. 4. PC/DTV Mode Auto config.

Owners Manual
Page 33
... RGB-DTV(480p/720p/1080i/1080p) RGB-PC HDMI1/DVI, HDMI2 Available Sub Picture Sources all all all all all all (Except HDMI1/DVI, HDMI2) Owner's Manual 33 F G Moving the PIP Press the WIN.POSITION button.
... RGB-DTV(480p/720p/1080i/1080p) RGB-PC HDMI1/DVI, HDMI2 Available Sub Picture Sources all all all all all all (Except HDMI1/DVI, HDMI2) Owner's Manual 33 F G Moving the PIP Press the WIN.POSITION button.

Owners Manual
Page 35
... to the RS-232C jack on the Monitor back panel. - Connect the serial port of Connector: D-Sub 9-pin Male No. Wire Configuration (Not standard) PC PDP RXD 2 TXD 3 GND 5 DTR 4 DSR 6 RTS 7 CTS 8 3 TXD 2 RXD 5 GND 4 DTR 6 DSR 7 RTS 8 CTS D-Sub 9 D-Sub 9 Owner's Manual 35 Pin Name 1 No Connection 2 RXD (Receive data) 3 TXD...
... to the RS-232C jack on the Monitor back panel. - Connect the serial port of Connector: D-Sub 9-pin Male No. Wire Configuration (Not standard) PC PDP RXD 2 TXD 3 GND 5 DTR 4 DSR 6 RTS 7 CTS 8 3 TXD 2 RXD 5 GND 4 DTR 6 DSR 7 RTS 8 CTS D-Sub 9 D-Sub 9 Owner's Manual 35 Pin Name 1 No Connection 2 RXD (Receive data) 3 TXD...

Owners Manual
Page 37
...) 1 : Volume mute off (Volume on) Acknowledgement [e][ ][Set ID][ ][OK][Data][x] Data 0 : Volume mute on /off ) 02. Acknowledgement [f][ ][Set ID][ ][OK][Data][x] Data Min : 0 ~ Max : 64 Owner's Manual 37 Power (Command 2:a) G To control Power On/Off of the Monitor. You can also adjust volume with the volume buttons on the Monitor's remote control...
...) 1 : Volume mute off (Volume on) Acknowledgement [e][ ][Set ID][ ][OK][Data][x] Data 0 : Volume mute on /off ) 02. Acknowledgement [f][ ][Set ID][ ][OK][Data][x] Data Min : 0 ~ Max : 64 Owner's Manual 37 Power (Command 2:a) G To control Power On/Off of the Monitor. You can also adjust volume with the volume buttons on the Monitor's remote control...

