Owner's Manual
Page 3
...liquid has been spilled or objects have the cord replaced with the manufacturer's instructions. 4 Do not install near water. Overloaded wall outlets, loose or damaged wall outlets, extension cords, frayed power cords, or damaged or cracked wire insulation are provided for long periods of time. 11 Never...use caution when moving the cart/appara- ing a thunder or lighting storm. 12 When mounting a TV on the wall, make the TV with the cart, stand, tripod, bracket, or table speci- Do not overload wall outlets. Do not make sure not to be placed upon . Be sure do not...
...liquid has been spilled or objects have the cord replaced with the manufacturer's instructions. 4 Do not install near water. Overloaded wall outlets, loose or damaged wall outlets, extension cords, frayed power cords, or damaged or cracked wire insulation are provided for long periods of time. 11 Never...use caution when moving the cart/appara- ing a thunder or lighting storm. 12 When mounting a TV on the wall, make the TV with the cart, stand, tripod, bracket, or table speci- Do not overload wall outlets. Do not make sure not to be placed upon . Be sure do not...
Owner's Manual
Page 7
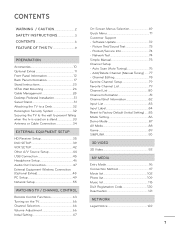
...CONTENTS 6 FEATURE OF THIS TV 9 PREPARATION Accessories 10 Optional Extras 11 Front Panel Information 12 Back Panel Information 17 Stand Instructions 20 VESA Wall Mounting 26 Cable Management 28 Desktop Pedestal Installation 31 Swivel Stand 31 Attaching the TV to a Desk 32 Kensington Security System 32 Securing the TV... to the wall to Factory Default (Initial Setting)......85 Mode Setting 86 Demo Mode 87 AV Mode 88 Game 89 SIMPLINK 90 3D VIDEO 3D ...
...CONTENTS 6 FEATURE OF THIS TV 9 PREPARATION Accessories 10 Optional Extras 11 Front Panel Information 12 Back Panel Information 17 Stand Instructions 20 VESA Wall Mounting 26 Cable Management 28 Desktop Pedestal Installation 31 Swivel Stand 31 Attaching the TV to a Desk 32 Kensington Security System 32 Securing the TV... to the wall to Factory Default (Initial Setting)......85 Mode Setting 86 Demo Mode 87 AV Mode 88 Game 89 SIMPLINK 90 3D VIDEO 3D ...
Owner's Manual
Page 21
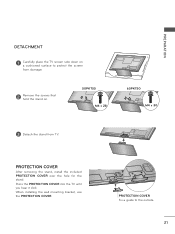
PROTECTION COVER Fix a guide to protect the screen from damage. 2 Remove the screws that hold the stand on. 50PK750 M4 x 28 60PK750 M4 x 30 3 Detach the stand from TV. When installing the wall mounting bracket, use the PROTECTION COVER. PREPARATION DETACHMENT 1 Carefully place the TV screen side down on a cushioned surface to the outside. 21 Press the PROTECTION COVER into the TV until you hear it click. PROTECTION COVER After removing the stand, install the included PROTECTION COVER over the hole for the stand.
PROTECTION COVER Fix a guide to protect the screen from damage. 2 Remove the screws that hold the stand on. 50PK750 M4 x 28 60PK750 M4 x 30 3 Detach the stand from TV. When installing the wall mounting bracket, use the PROTECTION COVER. PREPARATION DETACHMENT 1 Carefully place the TV screen side down on a cushioned surface to the outside. 21 Press the PROTECTION COVER into the TV until you hear it click. PROTECTION COVER After removing the stand, install the included PROTECTION COVER over the hole for the stand.

Owner's Manual
Page 23
When installing the wall mounting bracket, use the PROTECTION COVER. AC IN 2 Remove the CABLEMANAGEMENT screws that hold the stand on a cushioned surface to protect the screen from TV. CABLE MANAGEMENT PROTECTION COVER After removing the stand, install the included PROTECTION COVER over the hole for the stand. DETACHMENT 1 Carefully place the TV screen side down on . 3 DetachACIN the stand from damage. AC IN CABLE MANAGEMENT AC IN CABLE MANAGEMENT AC IN CABLE MANAGEMENT PREPARATION AC IN 23 Press the PROTECTION COVER into the TV until you hear it click.
When installing the wall mounting bracket, use the PROTECTION COVER. AC IN 2 Remove the CABLEMANAGEMENT screws that hold the stand on a cushioned surface to protect the screen from TV. CABLE MANAGEMENT PROTECTION COVER After removing the stand, install the included PROTECTION COVER over the hole for the stand. DETACHMENT 1 Carefully place the TV screen side down on . 3 DetachACIN the stand from damage. AC IN CABLE MANAGEMENT AC IN CABLE MANAGEMENT AC IN CABLE MANAGEMENT PREPARATION AC IN 23 Press the PROTECTION COVER into the TV until you hear it click.
Owner's Manual
Page 26
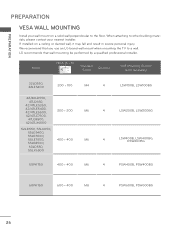
.../47LE5350, 42/47LE5400, 42/47LE5500, 200 * 200 M6 4 42/47LE7500, 47LE8500, 42/47LX6500 LSW200B, LSW200BG 52LD550, 55LD650, 55LE5400, 55LE5500, 55LE7500, 55LE8500, 400 * 400 M6 4 LSW400B, LSW400BG, DSW400BG 60LD550, 55LX6500 50PK750 400 * 400 M6 4 PSW400B, PSW400BG 60PK750 600 * 400 M8 4 PSW600B, PSW600BG 26 LG recommends that you use an LG brand wall mount when mounting the TV...
.../47LE5350, 42/47LE5400, 42/47LE5500, 200 * 200 M6 4 42/47LE7500, 47LE8500, 42/47LX6500 LSW200B, LSW200BG 52LD550, 55LD650, 55LE5400, 55LE5500, 55LE7500, 55LE8500, 400 * 400 M6 4 LSW400B, LSW400BG, DSW400BG 60LD550, 55LX6500 50PK750 400 * 400 M6 4 PSW400B, PSW400BG 60PK750 600 * 400 M8 4 PSW600B, PSW600BG 26 LG recommends that you use an LG brand wall mount when mounting the TV...
Owner's Manual
Page 27
...9658; When purchasing our wall mount kit, a detailed these kinds of the screws may damage the TV or cause the TV to the mount is not liable for ►LG is used . of accidents. NOTE ► Screw length needed depends on . LG is turned on the wall ► Do not use... screws that do not comply with the mount. ► Standard dimensions for wall mount kits are provided. installation manual...
...9658; When purchasing our wall mount kit, a detailed these kinds of the screws may damage the TV or cause the TV to the mount is not liable for ►LG is used . of accidents. NOTE ► Screw length needed depends on . LG is turned on the wall ► Do not use... screws that do not comply with the mount. ► Standard dimensions for wall mount kits are provided. installation manual...
Owner's Manual
Page 31
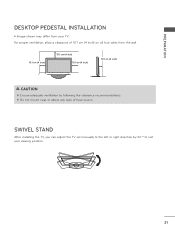
CAUTION ► Ensure adequate ventilation by 20 º to the left or right direction by following the clearance recommendations. ►Do not mount near or above any type of 10.1 cm (4 inch) on all four sides from your viewing position. 31 SWIVEL STAND After installing the TV, you can adjust the TV set manually to suit your TV. PREPARATION DESKTOP PEDESTAL INSTALLATION ꔛ Image shown may differ from the wall. !! 10.1 cm (4 inch) 10.1 cm (4 inch) 10.1 cm (4 inch) 10.1 cm (4 inch) ?? For proper ventilation, allow a clearance of heat source.
CAUTION ► Ensure adequate ventilation by 20 º to the left or right direction by following the clearance recommendations. ►Do not mount near or above any type of 10.1 cm (4 inch) on all four sides from your viewing position. 31 SWIVEL STAND After installing the TV, you can adjust the TV set manually to suit your TV. PREPARATION DESKTOP PEDESTAL INSTALLATION ꔛ Image shown may differ from the wall. !! 10.1 cm (4 inch) 10.1 cm (4 inch) 10.1 cm (4 inch) 10.1 cm (4 inch) ?? For proper ventilation, allow a clearance of heat source.
Owner's Manual
Page 33
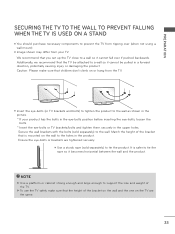
... the product. ! ! To use the TV safely make sure that is safer to a wall so it cannot be attached to tie the rope so it cannot fall over (when not using a wall mount). ꔛ Image shown may differ from the TV. ꔛ Insert the eye-bolts (or TV brackets and bolts) to tighten... the product to the wall as shown in the product. We recommend that the height of the bracket...
... the product. ! ! To use the TV safely make sure that is safer to a wall so it cannot be attached to tie the rope so it cannot fall over (when not using a wall mount). ꔛ Image shown may differ from the TV. ꔛ Insert the eye-bolts (or TV brackets and bolts) to tighten... the product to the wall as shown in the product. We recommend that the height of the bracket...


