Specification (English)
Page 2
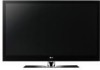
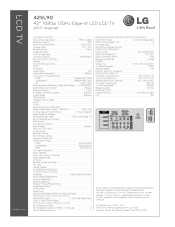
...Unified POWER Voltage, Hz 100V ~ 240V, 50/60 Hz On Mode (Average) 250W Stand-by Mode LCD TV 42SL90 42" 1080p 120Hz Edge-lit LED LCD TV (42.0" diagonal) LGusa.com LCD SPECIFICATION Native Display Resolution 1920 x 1080p Brightness (cd/m2) 500 Dynamic Contrast Ratio ...• Quick Setup Guide • e-Manual • Parental Control w/V-Chip • Key Lock • Closed Caption • LG SIMPLINK (HDMI CEC) • CONVENIENCE FEATURES Language English/Spanish/French Auto Tuning/Programming • Channel Add/Delete • Channel Labeling...
...Unified POWER Voltage, Hz 100V ~ 240V, 50/60 Hz On Mode (Average) 250W Stand-by Mode LCD TV 42SL90 42" 1080p 120Hz Edge-lit LED LCD TV (42.0" diagonal) LGusa.com LCD SPECIFICATION Native Display Resolution 1920 x 1080p Brightness (cd/m2) 500 Dynamic Contrast Ratio ...• Quick Setup Guide • e-Manual • Parental Control w/V-Chip • Key Lock • Closed Caption • LG SIMPLINK (HDMI CEC) • CONVENIENCE FEATURES Language English/Spanish/French Auto Tuning/Programming • Channel Add/Delete • Channel Labeling...

Owner's Manual (English)
Page 3
... from being walked on or pinched particularly at plugs, convenience receptacles, and the point where they exit from the apparatus. 2 Clean only with the cart, stand, tripod, bracket, or table specified by the manufacturer. 3 Do not block any heat sources such as power- Keep these instructions. Follow all warnings. bination to...
... from being walked on or pinched particularly at plugs, convenience receptacles, and the point where they exit from the apparatus. 2 Clean only with the cart, stand, tripod, bracket, or table specified by the manufacturer. 3 Do not block any heat sources such as power- Keep these instructions. Follow all warnings. bination to...
Owner's Manual (English)
Page 6
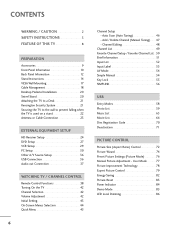
...Cable Management 18 Desktop Pedestal Installation 20 Swivel Stand 20 Attaching the TV to a Desk 21 Kensington Security System 21 Securing the TV to the wall to prevent falling when the TV is used on a stand 22 Antenna or Cable Connection 23 EXTERNAL ...EQUIPMENT SETUP HD Receiver Setup 24 DVD Setup 27 VCR Setup 29 PC Setup 30 Other A/V Source Setup 36 USB Connection 36 Audio out Connection 37 WATCHING TV / CHANNEL CONTROL Remote Control Functions 38 Turning On the TV 42 Channel Selection 42 Volume Adjustment 42...
...Cable Management 18 Desktop Pedestal Installation 20 Swivel Stand 20 Attaching the TV to a Desk 21 Kensington Security System 21 Securing the TV to the wall to prevent falling when the TV is used on a stand 22 Antenna or Cable Connection 23 EXTERNAL ...EQUIPMENT SETUP HD Receiver Setup 24 DVD Setup 27 VCR Setup 29 PC Setup 30 Other A/V Source Setup 36 USB Connection 36 Audio out Connection 37 WATCHING TV / CHANNEL CONTROL Remote Control Functions 38 Turning On the TV 42 Channel Selection 42 Volume Adjustment 42...
Owner's Manual (English)
Page 9
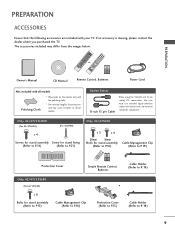
... all models Polishing Cloth * Wipe spots on the exterior only with your TV. Only 42/47/55LH90 (For 42/47LH90) (For 42LH90) x 4 Screws for stand assembly Screw for stand fixing (Refer to P.14) (Refer to P.21) Protection Cover Only 42/47SL90 x 3 x 4 20mm 16mm Bolts for stand assembly Cable Management Clip (Refer to P.16) (Refer to P.19) VOL...
... all models Polishing Cloth * Wipe spots on the exterior only with your TV. Only 42/47/55LH90 (For 42/47LH90) (For 42LH90) x 4 Screws for stand assembly Screw for stand fixing (Refer to P.14) (Refer to P.21) Protection Cover Only 42/47SL90 x 3 x 4 20mm 16mm Bolts for stand assembly Cable Management Clip (Refer to P.16) (Refer to P.19) VOL...
Owner's Manual (English)
Page 10
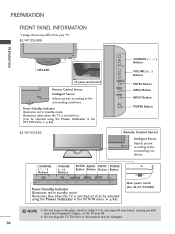
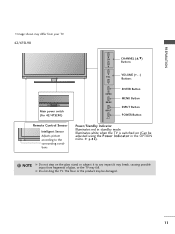
... differ from your TV. 42/47/55LH90 PREPARATION SPEAKER AC power control switch Remote Control Sensor, Intelligent Sensor Adjusts picture according to any impact.It may break, causing possible injury from fragments of glass, or the TV may be damaged. 10 Illuminates white when the TV is switched on ...Button Button Button VOL ENTER MENU INPUT Power/Standby Indicator Illuminates red in the OPTION menu. Illuminates blue when the TV is switched on the glass stand or subject it to the surrounding conditions Power/Standby Indicator Illuminates red in the OPTION menu. The floor or the...
... differ from your TV. 42/47/55LH90 PREPARATION SPEAKER AC power control switch Remote Control Sensor, Intelligent Sensor Adjusts picture according to any impact.It may break, causing possible injury from fragments of glass, or the TV may be damaged. 10 Illuminates white when the TV is switched on ...Button Button Button VOL ENTER MENU INPUT Power/Standby Indicator Illuminates red in the OPTION menu. Illuminates blue when the TV is switched on the glass stand or subject it to the surrounding conditions Power/Standby Indicator Illuminates red in the OPTION menu. The floor or the...
Owner's Manual (English)
Page 11
G p.84). ! Illuminates white when the TV is switched on the glass stand or subject it to any impact.It may break, causing possible injury from your TV. 42/47SL90 CH CHANNEL (D,E) Buttons VOLUME (+, -) VOL Buttons OFF ON Main power switch (For 42/47SL90) ENTER MENU INPUT ENTER Button MENU Button INPUT Button POWER Button Remote Control... the product may be adjusted using the Power Indicator in standby mode. NOTE G Do not step on (Can be damaged. 11 G Do not drag the TV. PREPARATION I Image shown may differ from fragments of glass, or the...
G p.84). ! Illuminates white when the TV is switched on the glass stand or subject it to any impact.It may break, causing possible injury from your TV. 42/47SL90 CH CHANNEL (D,E) Buttons VOLUME (+, -) VOL Buttons OFF ON Main power switch (For 42/47SL90) ENTER MENU INPUT ENTER Button MENU Button INPUT Button POWER Button Remote Control... the product may be adjusted using the Power Indicator in standby mode. NOTE G Do not step on (Can be damaged. 11 G Do not drag the TV. PREPARATION I Image shown may differ from fragments of glass, or the...
Owner's Manual (English)
Page 14
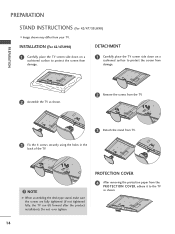
... the 4 screws securely using the holes in the back of the TV. ! Do not over tighten. PREPARATION 2 Assemble the TV as shown. 14 PREPARATION STAND INSTRUCTIONS (For 42/47/55LH90) I Image shown may differ from damage. INSTALLATION (For 42/47LH90) DETACHMENT 1 Carefully place the TV screen side down on a cushioned surface to protect the screen from...
... the 4 screws securely using the holes in the back of the TV. ! Do not over tighten. PREPARATION 2 Assemble the TV as shown. 14 PREPARATION STAND INSTRUCTIONS (For 42/47/55LH90) I Image shown may differ from damage. INSTALLATION (For 42/47LH90) DETACHMENT 1 Carefully place the TV screen side down on a cushioned surface to protect the screen from...
Owner's Manual (English)
Page 15
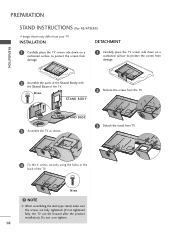
... STAND INSTRUCTIONS (For 42/47/55SL80) I Image shown may differ from the TV. INSTALLATION (Except 55SL80) DETACHMENT 1 Carefully place the TV screen side down on a cushioned surface to protect the screen from damage. 1 Carefully place the TV screen side down on a cushioned surface to protect the screen from TV... the PROTECTION COVER into the TV until you hear it click. ! STAND BASE 3 Assemble the TV as shown. 3 Detach the stand from damage. 2 Assemble the parts of the Stand Body with the Stand Base of the TV. NOTE G When assembling the desk type stand, make sure the screws are...
... STAND INSTRUCTIONS (For 42/47/55SL80) I Image shown may differ from the TV. INSTALLATION (Except 55SL80) DETACHMENT 1 Carefully place the TV screen side down on a cushioned surface to protect the screen from damage. 1 Carefully place the TV screen side down on a cushioned surface to protect the screen from TV... the PROTECTION COVER into the TV until you hear it click. ! STAND BASE 3 Assemble the TV as shown. 3 Detach the stand from damage. 2 Assemble the parts of the Stand Body with the Stand Base of the TV. NOTE G When assembling the desk type stand, make sure the screws are...
Owner's Manual (English)
Page 16
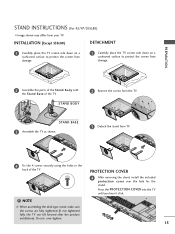
... STAND INSTRUCTIONS (For 42/47SL90) I Image shown may differ from damage. 2 Assemble the parts of the Stand Body with the Stand Base of the TV. 16 mm ! STAND BASE 3 Assemble the TV as shown. 3 Detach the stand from TV. 4 Fix the 4 screws securely using the holes in the back of the TV. 20 mm STAND BODY 2 Remove the screws from the TV...
... STAND INSTRUCTIONS (For 42/47SL90) I Image shown may differ from damage. 2 Assemble the parts of the Stand Body with the Stand Base of the TV. 16 mm ! STAND BASE 3 Assemble the TV as shown. 3 Detach the stand from TV. 4 Fix the 4 screws securely using the holes in the back of the TV. 20 mm STAND BODY 2 Remove the screws from the TV...

Owner's Manual (English)
Page 18
... EXTERNAL EQUIPMENT SETUP section. NOTE G Do not hold the CABLE MANAGEMENT CLIP when moving the TV. - If the TV is dropped, you may be injured or the product may differ from your TV. 42/47/55LH90 1 Connect the cables as shown. CABLE MANAGEMENT CLIP 2 Connect the cables as... necessary. PREPARATION CABLE MANAGEMENT I Image shown may be broken. 18 To connect additional equipment, see the EXTERNAL EQUIPMENT SETUP section. 42/47/55SL80 FOR DESK-TYPE STAND 1 Install ...
... EXTERNAL EQUIPMENT SETUP section. NOTE G Do not hold the CABLE MANAGEMENT CLIP when moving the TV. - If the TV is dropped, you may be injured or the product may differ from your TV. 42/47/55LH90 1 Connect the cables as shown. CABLE MANAGEMENT CLIP 2 Connect the cables as... necessary. PREPARATION CABLE MANAGEMENT I Image shown may be broken. 18 To connect additional equipment, see the EXTERNAL EQUIPMENT SETUP section. 42/47/55SL80 FOR DESK-TYPE STAND 1 Install ...

Owner's Manual (English)
Page 19
CABLE MANAGEMENT CLIP 2 Connect the cables as shown and bundle the cables. NOTE G Do not hold the CABLE MANAGEMENT CLIP when moving the TV. - To connect additional equipment, see the EXTERNAL EQUIPMENT SETUP section. CABLE HOLDER ! Install CABLE HOLDER as necessary. FOR WALL MOUNT 1 Connect the ...cables as shown. To connect additional equipment, see the EXTERNAL EQUIPMENT SETUP section. If the TV is dropped, you may be broken. 19 PREPARATION CABLE MANAGEMENT I Image shown may be injured or the product may differ from your...
CABLE MANAGEMENT CLIP 2 Connect the cables as shown and bundle the cables. NOTE G Do not hold the CABLE MANAGEMENT CLIP when moving the TV. - To connect additional equipment, see the EXTERNAL EQUIPMENT SETUP section. CABLE HOLDER ! Install CABLE HOLDER as necessary. FOR WALL MOUNT 1 Connect the ...cables as shown. To connect additional equipment, see the EXTERNAL EQUIPMENT SETUP section. If the TV is dropped, you may be broken. 19 PREPARATION CABLE MANAGEMENT I Image shown may be injured or the product may differ from your...

Owner's Manual (English)
Page 20
For proper ventilation, allow a clearance of heat source. PREPARATION PREPARATION DESKTOP PEDESTAL INSTALLATION I Image shown may differ from the wall. 4 inches 4 inches 4 inches 4 inches CAUTION G Ensure adequate ventilation by 20 degrees to suit your TV. SWIVEL STAND After installing the TV, you can adjust the TV set manually to the left or right direction by following the clearance recommendations. G Do not mount near or above any type of 4 inches on all four sides from your viewing position. 20
For proper ventilation, allow a clearance of heat source. PREPARATION PREPARATION DESKTOP PEDESTAL INSTALLATION I Image shown may differ from the wall. 4 inches 4 inches 4 inches 4 inches CAUTION G Ensure adequate ventilation by 20 degrees to suit your TV. SWIVEL STAND After installing the TV, you can adjust the TV set manually to the left or right direction by following the clearance recommendations. G Do not mount near or above any type of 4 inches on all four sides from your viewing position. 20
Owner's Manual (English)
Page 21
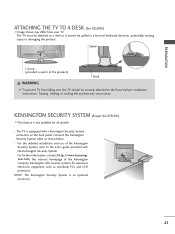
... Connect the Kensington Security System cable as notebook PCs and LCD projectors. For further information, contact http://www.kensington.com, the internet homepage of the product) Desk WARNING G To prevent TV from your TV. The TV must be securely attached to the floor/wall per installation ...instructions. NOTE: The Kensington Security System is an optional accessory. 21 Stand 1-Screw (provided as parts of the Kensington company.
... Connect the Kensington Security System cable as notebook PCs and LCD projectors. For further information, contact http://www.kensington.com, the internet homepage of the product) Desk WARNING G To prevent TV from your TV. The TV must be securely attached to the floor/wall per installation ...instructions. NOTE: The Kensington Security System is an optional accessory. 21 Stand 1-Screw (provided as parts of the Kensington company.

Owner's Manual (English)
Page 22
..., we recommend that children don't climb on or hang from the TV. PREPARATION PREPARATION SECURING THE TV TO THE WALL TO PREVENT FALLING WHEN THE TV IS USED ON A STAND I You should purchase necessary components to prevent the TV from your product has the bolts in the eye-bolts position before ...inserting the eye-bolts, loosen the bolts. * Insert the eye-bolts or TV brackets/bolts and tighten them securely...
..., we recommend that children don't climb on or hang from the TV. PREPARATION PREPARATION SECURING THE TV TO THE WALL TO PREVENT FALLING WHEN THE TV IS USED ON A STAND I You should purchase necessary components to prevent the TV from your product has the bolts in the eye-bolts position before ...inserting the eye-bolts, loosen the bolts. * Insert the eye-bolts or TV brackets/bolts and tighten them securely...
Owner's Manual (English)
Page 118
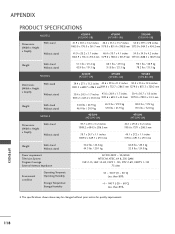
...1179.0 x 780.6 x 105.9 mm 1373.0 x 888.5 x 106.9 mm Weight With stand Without stand MODELS Dimensions (Width x Height x Depth) With stand Without stand Weight With stand Without stand MODELS Dimensions (Width x Height x Depth) With stand Without stand 51.1 lbs / 23.2 kg 42.9 lbs / 19.5 kg 60.1 lbs / 27.3 kg 51.8 lbs / 23.5 kg...54.8 lbs / 24.9 kg 46.0 lbs / 20.9 kg 65.9 lbs / 29.9 kg 57.0 lbs / 25.9 kg 82.0 lbs / 37.2 kg 70.5 lbs / 32.0 kg 42SL90 (42SL90-UA) 47SL90 (47SL90-UA) 39.7 x 27.3 x 11.2 inches 1009.2 x 694.5 x 286.5 mm 44.1 x 29.8 x 11.2 inches 1119.6 x 757.1 x 286.5 mm...
...1179.0 x 780.6 x 105.9 mm 1373.0 x 888.5 x 106.9 mm Weight With stand Without stand MODELS Dimensions (Width x Height x Depth) With stand Without stand Weight With stand Without stand MODELS Dimensions (Width x Height x Depth) With stand Without stand 51.1 lbs / 23.2 kg 42.9 lbs / 19.5 kg 60.1 lbs / 27.3 kg 51.8 lbs / 23.5 kg...54.8 lbs / 24.9 kg 46.0 lbs / 20.9 kg 65.9 lbs / 29.9 kg 57.0 lbs / 25.9 kg 82.0 lbs / 37.2 kg 70.5 lbs / 32.0 kg 42SL90 (42SL90-UA) 47SL90 (47SL90-UA) 39.7 x 27.3 x 11.2 inches 1009.2 x 694.5 x 286.5 mm 44.1 x 29.8 x 11.2 inches 1119.6 x 757.1 x 286.5 mm...


