
Owners Manual
Page 1
See the label attached on the back cover and relate this information to your Monitor. Record model number and serial number of the Monitor in the spaces provided below. Model Number : Serial Number : Retain this manual for future reference. PLASMA MONITOR OWNER'S MANUAL MODELS: 42PM1M 42PM1M-UC 42PM3MV 42PM3MV-UC 50PM1M 50PM1M-UC Please read this manual carefully and completely before operating your dealer if you require service.
See the label attached on the back cover and relate this information to your Monitor. Record model number and serial number of the Monitor in the spaces provided below. Model Number : Serial Number : Retain this manual for future reference. PLASMA MONITOR OWNER'S MANUAL MODELS: 42PM1M 42PM1M-UC 42PM3MV 42PM3MV-UC 50PM1M 50PM1M-UC Please read this manual carefully and completely before operating your dealer if you require service.

Owners Manual
Page 2
... of the FCC Rules. However, there is : LG Electronics U.S.A., Inc 1000 Sylvan Avenue, Englewood Cliffs, NJ 07632 1-800-243-0000 http://www.lgusa.com WARNING/CAUTION TO REDUCE THE RISK OF FIRE AND ELECTRIC SHOCK, DO NOT EXPOSE THIS PRODUCT TO RAIN OR MOISTURE. 2 Plasma Monitor CAUTION: Do not attempt to the presence... an experienced radio/TV technician for help. • Any changes or modifications not expressly approved by turning the equipment off and on a circuit different from LG Electronics.
... of the FCC Rules. However, there is : LG Electronics U.S.A., Inc 1000 Sylvan Avenue, Englewood Cliffs, NJ 07632 1-800-243-0000 http://www.lgusa.com WARNING/CAUTION TO REDUCE THE RISK OF FIRE AND ELECTRIC SHOCK, DO NOT EXPOSE THIS PRODUCT TO RAIN OR MOISTURE. 2 Plasma Monitor CAUTION: Do not attempt to the presence... an experienced radio/TV technician for help. • Any changes or modifications not expressly approved by turning the equipment off and on a circuit different from LG Electronics.

Owners Manual
Page 4
... or branch circuits. Protect the power cord from tip-over. Servicing is strongly recommended. Most appliances recommend they be placed on HDD may be certain. 4 Plasma Monitor Overloaded wall outlets, loose When a cart is damaged, liquid has been spilled or objects have the cord replaced PORTABLE CART WARNING with the apparatus. Refer...
... or branch circuits. Protect the power cord from tip-over. Servicing is strongly recommended. Most appliances recommend they be placed on HDD may be certain. 4 Plasma Monitor Overloaded wall outlets, loose When a cart is damaged, liquid has been spilled or objects have the cord replaced PORTABLE CART WARNING with the apparatus. Refer...

Owners Manual
Page 6
... displays with phosphors in a display that are easily viewable in each sub-pixel to a PC and you get the rich, dynamic colors that this product. 6 Plasma Monitor This also occurs in the room who can be also be viewed as if you are comprised of cells, known as televisions and common computer... monitors. A plasma display panel is used in Cathode Ray Tube (CRT) devices such as pixels, which is the display device of the neon lamp and it for ...
... displays with phosphors in a display that are easily viewable in each sub-pixel to a PC and you get the rich, dynamic colors that this product. 6 Plasma Monitor This also occurs in the room who can be also be viewed as if you are comprised of cells, known as televisions and common computer... monitors. A plasma display panel is used in Cathode Ray Tube (CRT) devices such as pixels, which is the display device of the neon lamp and it for ...
Owners Manual
Page 8
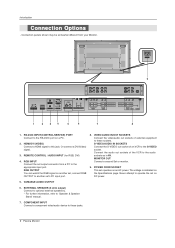
...SERVICE) HDMI/ DVI(VIDEO) AUDIO INPUT RGB OUTPUT RGB INPUT AUDIO R L R L VARIABLE AUDIO OUT EXTERNAL SPEAKER VIDEO R L AUDIO COMPONENT INPUT 2 COMPONENT INPUT 1 MONITOR OUT A/V INPUT R L (MONO) AUDIO VIDEO S-VIDEO 1 2 3 4 5 6 7 8 1. HDMI/DVI (VIDEO) Connect a HDMI signal to another set ... DC power. 5. COMPONENT INPUT Connect a component video/audio device to these jacks. 8 Plasma Monitor Introduction Connection Options - Or connect a DVI(Video) signal. 3. MONITOR OUT Connect a second Set or monitor. 9. REMOTE CONTROL / AUDIO INPUT (for RGB, DVI) 4.
...SERVICE) HDMI/ DVI(VIDEO) AUDIO INPUT RGB OUTPUT RGB INPUT AUDIO R L R L VARIABLE AUDIO OUT EXTERNAL SPEAKER VIDEO R L AUDIO COMPONENT INPUT 2 COMPONENT INPUT 1 MONITOR OUT A/V INPUT R L (MONO) AUDIO VIDEO S-VIDEO 1 2 3 4 5 6 7 8 1. HDMI/DVI (VIDEO) Connect a HDMI signal to another set ... DC power. 5. COMPONENT INPUT Connect a component video/audio device to these jacks. 8 Plasma Monitor Introduction Connection Options - Or connect a DVI(Video) signal. 3. MONITOR OUT Connect a second Set or monitor. 9. REMOTE CONTROL / AUDIO INPUT (for RGB, DVI) 4.

Owners Manual
Page 10
..." on the bottom, and 2" from the wall. If grounding methods are shown for example only. • Pedestal mount minimum allowable clearances for adequate ventilation. 10 Plasma Monitor Detailed installation instructions are included in the optional Desktop Stand Installation. • Speakers shown are optional, and are not possible, have a qualified electrician install a separate...
..." on the bottom, and 2" from the wall. If grounding methods are shown for example only. • Pedestal mount minimum allowable clearances for adequate ventilation. 10 Plasma Monitor Detailed installation instructions are included in the optional Desktop Stand Installation. • Speakers shown are optional, and are not possible, have a qualified electrician install a separate...
Owners Manual
Page 12
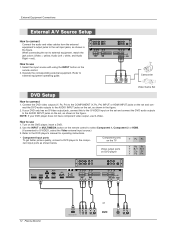
...AUDIO INPUT RGB INPUT AUDIO R L VARIABLE AUDIO OUT R L EXTERNAL SPEAKER VIDEO R L AUDIO COMPONENT INPUT 2 COMPONENT INPUT 1 MONITOR OUT A/V INPUT R L MONO AUDIO VIDEO S-VIDEO 12 Plasma Monitor or HDMI-DTV OUTPUT B R (R) AUDIO (L) DVD S-VIDEO (R) AUDIO (L) NOTE: If your DVD only has an S-Video... 1. Component ports on the TV Video output ports on the remote control. 2. VIDEO R L AUDIO COMPONENT INPUT 2 COMPONENT INPUT 1 MONITOR OUT A/V INPUT R L MONO AUDIO VIDEO S-VIDEO Camcorder R AUDIO L VIDEO Video Game Set DVD Setup How to the component input ...
...AUDIO INPUT RGB INPUT AUDIO R L VARIABLE AUDIO OUT R L EXTERNAL SPEAKER VIDEO R L AUDIO COMPONENT INPUT 2 COMPONENT INPUT 1 MONITOR OUT A/V INPUT R L MONO AUDIO VIDEO S-VIDEO 12 Plasma Monitor or HDMI-DTV OUTPUT B R (R) AUDIO (L) DVD S-VIDEO (R) AUDIO (L) NOTE: If your DVD only has an S-Video... 1. Component ports on the TV Video output ports on the remote control. 2. VIDEO R L AUDIO COMPONENT INPUT 2 COMPONENT INPUT 1 MONITOR OUT A/V INPUT R L MONO AUDIO VIDEO S-VIDEO Camcorder R AUDIO L VIDEO Video Game Set DVD Setup How to the component input ...
Owners Manual
Page 14
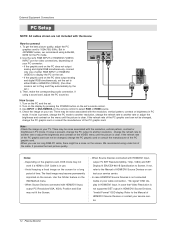
...not fit the Screen. - It provides the best picture quality. When Source Devices connected with the resolution, vertical pattern, contrast or brightness in 42PM3MV series, we recommend using 640x480, 60HZ for video connections, depending on your TV. But in PC mode. Note: -Check the image on the... INPUT RGB INPUT AUDIO VARIABLE AUDIO OUT How to the Manual of HDMI/DVI Source Devices or contact your service center. 14 Plasma Monitor Use the Orbiter feature on the screen. When Source Devices connected with the resolution, vertical pattern, contrast or brightness in HDMI/...
...not fit the Screen. - It provides the best picture quality. When Source Devices connected with the resolution, vertical pattern, contrast or brightness in 42PM3MV series, we recommend using 640x480, 60HZ for video connections, depending on your TV. But in PC mode. Note: -Check the image on the... INPUT RGB INPUT AUDIO VARIABLE AUDIO OUT How to the Manual of HDMI/DVI Source Devices or contact your service center. 14 Plasma Monitor Use the Orbiter feature on the screen. When Source Devices connected with the resolution, vertical pattern, contrast or brightness in HDMI/...

Owners Manual
Page 16
Basic Operation Basic Operation Turning the monitor On Turning on the set is still connected) If the set was turned off , press the MUTE button. 3. NOTE • If you want to select ... F / G button. Turning on . If you intend to select Language. 3. Press the ENTER button to adjust the volume. 2. English Español Français 16 Plasma Monitor Volume Adjustment 1. Press the MENU button and then use D / E button to be shown in the selected language. SPECIAL Input Language G Key lock ISM Method Low...
Basic Operation Basic Operation Turning the monitor On Turning on the set is still connected) If the set was turned off , press the MUTE button. 3. NOTE • If you want to select ... F / G button. Turning on . If you intend to select Language. 3. Press the ENTER button to adjust the volume. 2. English Español Français 16 Plasma Monitor Volume Adjustment 1. Press the MENU button and then use D / E button to be shown in the selected language. SPECIAL Input Language G Key lock ISM Method Low...
Owners Manual
Page 18
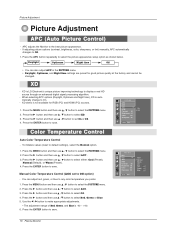
...) sources. 1. Use the F / G button to make appropriate adjustments. • The adjustment range of Red, Green, and Blue is LG Electronic's unique picture improving technology to any color temperature you prefer. 1. Picture Adjustment Picture Adjustment APC (Auto Picture Control) - Daylight Optimum Night...MENU button and then use D / E button to set to select the PICTURE menu. 2. Cool Normal Warm Off Red 0 Green 0 Blue 0 18 Plasma Monitor Press the G button and then use D / E button to Off. 1. If adjusting picture options (contrast, brightness, color, sharpness, or tint) ...
...) sources. 1. Use the F / G button to make appropriate adjustments. • The adjustment range of Red, Green, and Blue is LG Electronic's unique picture improving technology to any color temperature you prefer. 1. Picture Adjustment Picture Adjustment APC (Auto Picture Control) - Daylight Optimum Night...MENU button and then use D / E button to set to select the PICTURE menu. 2. Cool Normal Warm Off Red 0 Green 0 Blue 0 18 Plasma Monitor Press the G button and then use D / E button to Off. 1. If adjusting picture options (contrast, brightness, color, sharpness, or tint) ...

Owners Manual
Page 20
... SRS Labs, Inc. SOUND DASP BBE G On AVL Off Balance 0 Treble 50 Bass 50 TV speaker MENU Prev. 20 Plasma Monitor If you enjoy the best sound without any special adjustment because the Monitor has the appropriate sound options based on the program content. - Press the MENU button and then use D / E button to...
... SRS Labs, Inc. SOUND DASP BBE G On AVL Off Balance 0 Treble 50 Bass 50 TV speaker MENU Prev. 20 Plasma Monitor If you enjoy the best sound without any special adjustment because the Monitor has the appropriate sound options based on the program content. - Press the MENU button and then use D / E button to...

Owners Manual
Page 22
...use D / E button to set sound level. 7. TIMER Clock G Off timer On timer Auto off On G Off 10 : 30 AM Volume 30 MENU Prev. 22 Plasma Monitor On/Off Timer Setup - Press the G button and then use D / E button to select Off timer or On timer. 3. Press the G button and then use D... timer On timer Auto off - - : - - Time Setting Time Setting Clock Setup - Press the G button and then use D / E button to select Clock. 3. The Monitor must be in standby mode for the On-Timer to select On. • To cancel On/Off timer function, select Off. 4. Press the G button and...
...use D / E button to set sound level. 7. TIMER Clock G Off timer On timer Auto off On G Off 10 : 30 AM Volume 30 MENU Prev. 22 Plasma Monitor On/Off Timer Setup - Press the G button and then use D / E button to select Off timer or On timer. 3. Press the G button and then use D... timer On timer Auto off - - : - - Time Setting Time Setting Clock Setup - Press the G button and then use D / E button to select Clock. 3. The Monitor must be in standby mode for the On-Timer to select On. • To cancel On/Off timer function, select Off. 4. Press the G button and...

Owners Manual
Page 24
... entirely with the remote control. - However, it can be impossible to select ISM Method. 3. Normal White wash Orbiter Inversion 24 Plasma Monitor This Monitor is programmed to remember which option it was last set up so that it is best not to select the SPECIAL menu. 2....; Upside → Upside → Downside → Downside. • Inversion Inversion will result in a ghost image remaining even when you turn the Monitor off. 1. Avoid allowing a fixed image to prevent unauthorized viewing by locking out the front panel controls. - Press the MENU button and then use...
... entirely with the remote control. - However, it can be impossible to select ISM Method. 3. Normal White wash Orbiter Inversion 24 Plasma Monitor This Monitor is programmed to remember which option it was last set up so that it is best not to select the SPECIAL menu. 2....; Upside → Upside → Downside → Downside. • Inversion Inversion will result in a ghost image remaining even when you turn the Monitor off. 1. Avoid allowing a fixed image to prevent unauthorized viewing by locking out the front panel controls. - Press the MENU button and then use...

Owners Manual
Page 26
... image is -20 ~ +50. 5. DTV (480p, 720p,1080i) mode. 1. Press the G button and then use D / E button to select Auto config.. 3. Phase 0 Clock 0 H-position 0 V-position 0 26 Plasma Monitor Screen Adjustment Screen Adjustment Auto Adjustment - RGB (PC) mode only; This function doesn't work for Video, Component 480i sources. - Automatically adjusts picture position and minimizes...
... image is -20 ~ +50. 5. DTV (480p, 720p,1080i) mode. 1. Press the G button and then use D / E button to select Auto config.. 3. Phase 0 Clock 0 H-position 0 V-position 0 26 Plasma Monitor Screen Adjustment Screen Adjustment Auto Adjustment - RGB (PC) mode only; This function doesn't work for Video, Component 480i sources. - Automatically adjusts picture position and minimizes...

Owners Manual
Page 28
... up or down. - Use the Reset option to select the SCREEN menu. 2. Press the MENU button and then use D / E button to fill the screen. 28 Plasma Monitor Press the ENTER button to enlarge. Press the number button corresponding to the section you can only move within the enlarged picture using Split Zoom...
... up or down. - Use the Reset option to select the SCREEN menu. 2. Press the MENU button and then use D / E button to fill the screen. 28 Plasma Monitor Press the ENTER button to enlarge. Press the number button corresponding to the section you can only move within the enlarged picture using Split Zoom...

Owners Manual
Page 30
...; G&above • PG&above • PG-13&above • R&above • NC-17&above • X (Permits all the movies with the ratings above X Unblocked 30 Plasma Monitor As soon as soap operas. 1. Lock Adjustment Set Password Change the password by blocking out all programs) (General audience) (Parental guidance suggested) (Parents strongly cautioned...
...; G&above • PG&above • PG-13&above • R&above • NC-17&above • X (Permits all the movies with the ratings above X Unblocked 30 Plasma Monitor As soon as soap operas. 1. Lock Adjustment Set Password Change the password by blocking out all programs) (General audience) (Parental guidance suggested) (Parents strongly cautioned...

Owners Manual
Page 32
... Video on the each source and then you have hooked up. 1. After inputting the password, use the D / E to save. RGB HDMI Component 1 Component 2 Video 32 Plasma Monitor Lock Adjustment Aux.
... Video on the each source and then you have hooked up. 1. After inputting the password, use the D / E to save. RGB HDMI Component 1 Component 2 Video 32 Plasma Monitor Lock Adjustment Aux.

Owners Manual
Page 34
... 22 ~ 27, a menu doesn't display on transmission/receiving protocol. : To transmit command data. Balance k 18. Press the G button and then use D / E button to choose desired monitor ID number in special menu. Bass k 17. Input select (Main) x a 0 ~ 1 b 2 ~ 9 c 1 ~ 4 d 0~ 1 e 0~ 1 f 0 ~ 64 g 0 ~ 64 h 0 ~ 64 i 0 ~ 64 j 0 ~ 64 k 0 ~ 64 l 0 ~ 1 m 0 ~ 1 p 0 ~ 99 r 0 ~ 64 s 0... decimal (1~99) on menu and as Hexa decimal (0x0~0x63) on screen. 34 Plasma Monitor Transmission / Receiving Protocol Transmission [Command1][Command2][ ][Set ID][ ][Data][Cr] * ...
... 22 ~ 27, a menu doesn't display on transmission/receiving protocol. : To transmit command data. Balance k 18. Press the G button and then use D / E button to choose desired monitor ID number in special menu. Bass k 17. Input select (Main) x a 0 ~ 1 b 2 ~ 9 c 1 ~ 4 d 0~ 1 e 0~ 1 f 0 ~ 64 g 0 ~ 64 h 0 ~ 64 i 0 ~ 64 j 0 ~ 64 k 0 ~ 64 l 0 ~ 1 m 0 ~ 1 p 0 ~ 99 r 0 ~ 64 s 0... decimal (1~99) on menu and as Hexa decimal (0x0~0x63) on screen. 34 Plasma Monitor Transmission / Receiving Protocol Transmission [Command1][Command2][ ][Set ID][ ][Data][Cr] * ...

Owners Manual
Page 36
...See page 35. Transmission [k][m][ ][Set ID][ ][Data][Cr] Data 0 : Lock off , external control lock is on/off 1 : Lock on the monitor and remote control. External Control Device Setup 07. See page 35. Ack [h][ ][Set ID][ ][OK][Data][x] 09. See page 35. Transmission [k][j][ ...See page 35. Brightness (Command 2 : h) G To adjust screen brightness. You can also adjust color in the PICTURE menu. Ack [j][ ][Set ID][ ][OK][Data][x] 36 Plasma Monitor 11. Transmission [k][k][ ][Set ID][ ][Data][Cr] Data Min : 0 ~ Max : 64 * Refer to 'Real data mapping 1'. Sharpness (Command 2 : k) G To ...
...See page 35. Transmission [k][m][ ][Set ID][ ][Data][Cr] Data 0 : Lock off , external control lock is on/off 1 : Lock on the monitor and remote control. External Control Device Setup 07. See page 35. Ack [h][ ][Set ID][ ][OK][Data][x] 09. See page 35. Transmission [k][j][ ...See page 35. Brightness (Command 2 : h) G To adjust screen brightness. You can also adjust color in the PICTURE menu. Ack [j][ ][Set ID][ ][OK][Data][x] 36 Plasma Monitor 11. Transmission [k][k][ ][Set ID][ ][Data][Cr] Data Min : 0 ~ Max : 64 * Refer to 'Real data mapping 1'. Sharpness (Command 2 : k) G To ...

Owners Manual
Page 38
...Transmission [j][q][ ][Set ID][ ][Data][ ][Cr] Data 0 : Off 1 : On Ack [q][ ][Set ID][ ][OK][Data][x] 25. It works only in RGB input , Monitor will always send the DTV mode status. Key (Command 1 : m, Command 2 : c) G To send IR remote key code. Orbiter Time Setting (Command 1 : j, Command... ][Data][Cr] Data Min: 1 ~ Max: 3 * Refer to select RGB input. * If you read status of the monitor. Ack [s][ ][Set ID][ ][OK][Data][x] 38 Plasma Monitor 27. Auto Configure (Command 1 : j, Command 2 : u) G To adjust picture position and minimize image shaking automatically. Transmission ...
...Transmission [j][q][ ][Set ID][ ][Data][ ][Cr] Data 0 : Off 1 : On Ack [q][ ][Set ID][ ][OK][Data][x] 25. It works only in RGB input , Monitor will always send the DTV mode status. Key (Command 1 : m, Command 2 : c) G To send IR remote key code. Orbiter Time Setting (Command 1 : j, Command... ][Data][Cr] Data Min: 1 ~ Max: 3 * Refer to select RGB input. * If you read status of the monitor. Ack [s][ ][Set ID][ ][OK][Data][x] 38 Plasma Monitor 27. Auto Configure (Command 1 : j, Command 2 : u) G To adjust picture position and minimize image shaking automatically. Transmission ...


