Owners Manual
Page 5
... Manual Picture Control(Off option 19 Audio Adjustment DASP (Digital Auto Sound Processing 20 BBE 20 AVL (Auto Volume Leveler 21 Manual Sound Control (Off option 21 TV speaker Setup 21 Time Setting Clock Setup 22 On/Off Timer Setup 22 Auto Off / Sleep Timer 23 Optional Features Key Lock 24 ISM (Image Sticking Minimization) Method . . . .24 Low Power 25 XD Demo 25 OSD Rotate 25 Screen Adjustment Auto Adjustment 26 Setting Picture Format 26 Manual Configure 26 Selecting VGA/XGA Mode (RGB Mode Only) . .27 Picture size...
... Manual Picture Control(Off option 19 Audio Adjustment DASP (Digital Auto Sound Processing 20 BBE 20 AVL (Auto Volume Leveler 21 Manual Sound Control (Off option 21 TV speaker Setup 21 Time Setting Clock Setup 22 On/Off Timer Setup 22 Auto Off / Sleep Timer 23 Optional Features Key Lock 24 ISM (Image Sticking Minimization) Method . . . .24 Low Power 25 XD Demo 25 OSD Rotate 25 Screen Adjustment Auto Adjustment 26 Setting Picture Format 26 Manual Configure 26 Selecting VGA/XGA Mode (RGB Mode Only) . .27 Picture size...

Owners Manual
Page 6
... achieve flat panel displays with phosphors in other PDP manufacturers' products. Multimedia Connect your PC and video images simultaneously. The Picture-in-Picture feature allows you to view your plasma display to a PC and you are not sufficient cause for conferencing, games, and Internet browsing. Several tiny, minute colored dots visible on the PDP screen The PDP (Plasma Display Panel), which are comprised of this means that this product. 6 Plasma Monitor PDP is used in...
... achieve flat panel displays with phosphors in other PDP manufacturers' products. Multimedia Connect your PC and video images simultaneously. The Picture-in-Picture feature allows you to view your plasma display to a PC and you are not sufficient cause for conferencing, games, and Internet browsing. Several tiny, minute colored dots visible on the PDP screen The PDP (Plasma Display Panel), which are comprised of this means that this product. 6 Plasma Monitor PDP is used in...

Owners Manual
Page 7
... POWER FCR/ RECORD PLAY STOP FF STILL Owner's Manual Batteries Remote Control Power Cord D-sub 15 pin Cable Controls - Remote Control Sensor 4. OK Button 5. MENU Button 6. Owner's Manual 7 INPUT SELECT Button 3. Front Panel Controls 3 3 ON/OFF 7 42/50PM1M 12 5 OK 4 5 6 6 7 42/50PM1M 42PM3MV 1. Power Standby Indicator Illuminates red in standby mode, Illuminates green when the Set is turned on from your plasma display. Introduction Accessories Ensure that the following accessories are included with your Monitor. Main Power Button Switches the set...
... POWER FCR/ RECORD PLAY STOP FF STILL Owner's Manual Batteries Remote Control Power Cord D-sub 15 pin Cable Controls - Remote Control Sensor 4. OK Button 5. MENU Button 6. Owner's Manual 7 INPUT SELECT Button 3. Front Panel Controls 3 3 ON/OFF 7 42/50PM1M 12 5 OK 4 5 6 6 7 42/50PM1M 42PM3MV 1. Power Standby Indicator Illuminates red in standby mode, Illuminates green when the Set is turned on from your plasma display. Introduction Accessories Ensure that the following accessories are included with your Monitor. Main Power Button Switches the set...
Owners Manual
Page 8
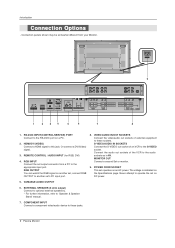
HDMI/DVI (VIDEO) Connect a HDMI signal to the S-VIDEO socket. REMOTE CONTROL / AUDIO INPUT (for RGB, DVI) 4. S-VIDEO/AUDIO IN SOCKETS Connect the S-VIDEO out socket of an VCR to this jack. RS-232C INPUT(CONTROL/SERVICE) PORT Connect to these jacks. 8 Plasma Monitor VIDEO/AUDIO IN/OUT SOCKETS Connect the video/audio out sockets of the VCR to the appropriate input port. Or connect a DVI(Video) signal. 3. POWER CORD SOCKET This set output connector from your Monitor. MONITOR OUT Connect a second Set or monitor. 9. VARIABLE AUDIO OUTPUT 6. EXTERNAL SPEAKER (8 ohm ...
HDMI/DVI (VIDEO) Connect a HDMI signal to the S-VIDEO socket. REMOTE CONTROL / AUDIO INPUT (for RGB, DVI) 4. S-VIDEO/AUDIO IN SOCKETS Connect the S-VIDEO out socket of an VCR to this jack. RS-232C INPUT(CONTROL/SERVICE) PORT Connect to these jacks. 8 Plasma Monitor VIDEO/AUDIO IN/OUT SOCKETS Connect the video/audio out sockets of the VCR to the appropriate input port. Or connect a DVI(Video) signal. 3. POWER CORD SOCKET This set output connector from your Monitor. MONITOR OUT Connect a second Set or monitor. 9. VARIABLE AUDIO OUTPUT 6. EXTERNAL SPEAKER (8 ohm ...

Owners Manual
Page 9
.... MUTE Switches the sound on -screen displays and returns to the room. Installing Batteries • Open the battery compartment cover on the Monitor. - Press the key again as if the remote IR signal is not available for the program's character. ARC Changes the picture size. Not functional DASP Selects the sound appropriate for DVD player). Replace cover. Selects a menu item. APC Adjusts the factory preset picture according to monitor viewing from any menu...
.... MUTE Switches the sound on -screen displays and returns to the room. Installing Batteries • Open the battery compartment cover on the Monitor. - Press the key again as if the remote IR signal is not available for the program's character. ARC Changes the picture size. Not functional DASP Selects the sound appropriate for DVD player). Replace cover. Selects a menu item. APC Adjusts the factory preset picture according to monitor viewing from any menu...

Owners Manual
Page 11
... and press PLAY on the screen for cable box. Select the input source with using the INPUT button on the remote control. 3. When connecting the set to a Cable Box, match the jack colors (Video = yellow, Audio Left = white, and Audio Right = red). 2. Select the input source with using the INPUT button on the screen. When connecting the set to the set cannot display TV programming unless a TV tuner device or cable TV converter box is improved; Select your local cable TV service provider(s). To avoid picture noise (interference...
... and press PLAY on the screen for cable box. Select the input source with using the INPUT button on the remote control. 3. When connecting the set to a Cable Box, match the jack colors (Video = yellow, Audio Left = white, and Audio Right = red). 2. Select the input source with using the INPUT button on the screen. When connecting the set to the set cannot display TV programming unless a TV tuner device or cable TV converter box is improved; Select your local cable TV service provider(s). To avoid picture noise (interference...
Owners Manual
Page 12
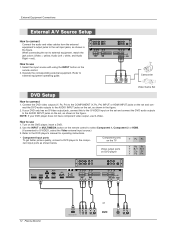
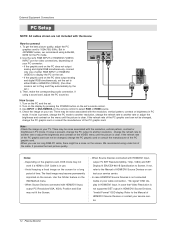
... the remote control to select Component 1, Component 2 or HDMI. (If connected to S-VIDEO, select the Video external input source.) 3. External Equipment Connections External A/V Source Setup How to connect Connect the audio and video cables from the external equipment's output jacks to the set input jacks, as shown in the figure. Use the INPUT or MULTIMEDIA button on the set to the component input ports as shown below. Refer to the DVD player's manual for operating instructions. • Component Input ports To get better picture quality, connect a DVD player to external...
... the remote control to select Component 1, Component 2 or HDMI. (If connected to S-VIDEO, select the Video external input source.) 3. External Equipment Connections External A/V Source Setup How to connect Connect the audio and video cables from the external equipment's output jacks to the set input jacks, as shown in the figure. Use the INPUT or MULTIMEDIA button on the set to the component input ports as shown below. Refer to the DVD player's manual for operating instructions. • Component Input ports To get better picture quality, connect a DVD player to external...
Owners Manual
Page 13
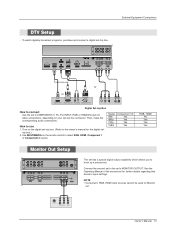
... Yes Monitor Out Setup AUDIO VARIABLE AUDIO OUT VIDEO R L AUDIO COMPONENT INPUT 2 COMPONENT INPUT 1 MONITOR OUT A/V INPUT R L MONO AUDIO VIDEO S-VIDEO The set has a special signal output capability which allows you to the set - How to select RGB, HDMI, Component 1 or Component 2 source. Turn on the remote control to use 1. Use MULTIMEDIA on the digital set-top box. (Refer to connect Use the set's COMPONENT (Y, PB, PR) INPUT, RGB or HDMI/DVI jack for the digital set 's MONITOR OUTPUT. See the Operating Manual of the second set -top box. NOTE...
... Yes Monitor Out Setup AUDIO VARIABLE AUDIO OUT VIDEO R L AUDIO COMPONENT INPUT 2 COMPONENT INPUT 1 MONITOR OUT A/V INPUT R L MONO AUDIO VIDEO S-VIDEO The set has a special signal output capability which allows you to the set - How to select RGB, HDMI, Component 1 or Component 2 source. Turn on the remote control to use 1. Use MULTIMEDIA on the digital set-top box. (Refer to connect Use the set's COMPONENT (Y, PB, PR) INPUT, RGB or HDMI/DVI jack for the digital set 's MONITOR OUTPUT. See the Operating Manual of the second set -top box. NOTE...
Owners Manual
Page 14
... Source Devices connected with HDMI/DVI Input, output PC Resolution(VGA, XGA), Position and Size may not work if a HDMI to DVI Cable is present, change the PC mode to another resolution, change the PC graphic card or consult the manufacturer of HDMI/DVI Source Devices or contact your PC connector. • If the graphic card on the set . To get the best picture quality, adjust the PC graphics card to Plug and Play automatically by pressing the POWER button...
... Source Devices connected with HDMI/DVI Input, output PC Resolution(VGA, XGA), Position and Size may not work if a HDMI to DVI Cable is present, change the PC mode to another resolution, change the PC graphic card or consult the manufacturer of HDMI/DVI Source Devices or contact your PC connector. • If the graphic card on the set . To get the best picture quality, adjust the PC graphics card to Plug and Play automatically by pressing the POWER button...

Owners Manual
Page 16
..., disconnect the power plug from the wall power outlet. Press the G button and then use D / E button to adjust the volume. 2. Basic Operation Basic Operation Turning the monitor On Turning on . Connect power cord correctly, the set just after installation 1. First select your desired language. English Español Français 16 Plasma Monitor Volume Adjustment 1. Press the VOL F / G button to select Language. 3. On-screen Menus Language Selection - Press the G button and then use D / E button to standby mode. 2.
..., disconnect the power plug from the wall power outlet. Press the G button and then use D / E button to adjust the volume. 2. Basic Operation Basic Operation Turning the monitor On Turning on . Connect power cord correctly, the set just after installation 1. First select your desired language. English Español Français 16 Plasma Monitor Volume Adjustment 1. Press the VOL F / G button to select Language. 3. On-screen Menus Language Selection - Press the G button and then use D / E button to standby mode. 2.
Owners Manual
Page 18
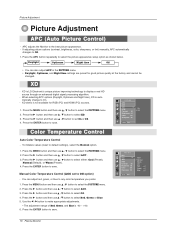
... ENTER button to save . Press the MENU button and then use D / E button to select the PICTURE menu. 2. Color Temperature Control Auto Color Temperature Control - Press the ENTER button to save . Use the F / G button to display a real HD source through an advanced digital signal processing algorithm. - Cool Normal Warm Off Red 0 Green 0 Blue 0 18 Plasma Monitor Press the G button and then use D / E button to select the PICTURE menu. 2. You can also adjust APC in the PICTURE menu. • Daylight, Optimum, and Night time settings are...
... ENTER button to save . Press the MENU button and then use D / E button to select the PICTURE menu. 2. Color Temperature Control Auto Color Temperature Control - Press the ENTER button to save . Use the F / G button to display a real HD source through an advanced digital signal processing algorithm. - Cool Normal Warm Off Red 0 Green 0 Blue 0 18 Plasma Monitor Press the G button and then use D / E button to select the PICTURE menu. 2. You can also adjust APC in the PICTURE menu. • Daylight, Optimum, and Night time settings are...
Owners Manual
Page 19
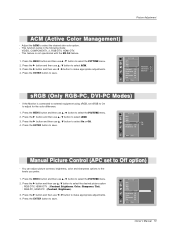
.... 1. You can adjust picture contrast, brightness, color and sharpness options to select On or Off. 4. Press the G button and then use D / E button to select ACM. 3. This function works in the following mode: VIDEO, COMPONENT1, 2, RGB-DTV, HDMI-DTV. - Fleshtone 0 Greentone 0 Bluetone 0 sRGB (Only RGB-PC, DVI-PC Modes) - PICTURE APC ACC sRGB G On Contrast 80 Off Brightness 60 MENU Prev. Manual Picture Control (APC set sRGB to On...
.... 1. You can adjust picture contrast, brightness, color and sharpness options to select On or Off. 4. Press the G button and then use D / E button to select ACM. 3. This function works in the following mode: VIDEO, COMPONENT1, 2, RGB-DTV, HDMI-DTV. - Fleshtone 0 Greentone 0 Bluetone 0 sRGB (Only RGB-PC, DVI-PC Modes) - PICTURE APC ACC sRGB G On Contrast 80 Off Brightness 60 MENU Prev. Manual Picture Control (APC set sRGB to On...

Owners Manual
Page 24
... lock. 3. Press the G button and then use D / E button to select On or Off. 4. A frozen still picture from the screen. Press the G button and then use D / E button to normal viewing, press any button on the screen for a long period of time. 1. To avoid a permanent image on the Monitor's screen for prolonged periods will automatically invert the Monitor panel color every 30 minutes. 4. SPECIAL Input Language Key lock ISM Method G Low power Set ID Caption / Text Demo...
... lock. 3. Press the G button and then use D / E button to select On or Off. 4. A frozen still picture from the screen. Press the G button and then use D / E button to normal viewing, press any button on the screen for a long period of time. 1. To avoid a permanent image on the Monitor's screen for prolonged periods will automatically invert the Monitor panel color every 30 minutes. 4. SPECIAL Input Language Key lock ISM Method G Low power Set ID Caption / Text Demo...
Owners Manual
Page 27
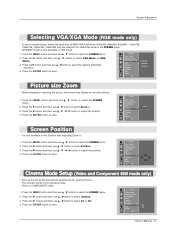
... NR Reset MENU Prev. Press the G button and then use D / E button to save . SCREEN Auto config. Manual config. Position Cinema G On NR Off Reset MENU Prev. Press the MENU button and then use D / E button to save . Press the G button and then use D / E button to select On or Off. 4. Sets up the set for the best picture appearance for VGA/XGA mode in the SCREEN menu. - 42PM3MV model is only available in the following mode: Video or COMPONENT (480i). 1. SCREEN Auto...
... NR Reset MENU Prev. Press the G button and then use D / E button to save . SCREEN Auto config. Manual config. Position Cinema G On NR Off Reset MENU Prev. Press the MENU button and then use D / E button to save . Press the G button and then use D / E button to select On or Off. 4. Sets up the set for the best picture appearance for VGA/XGA mode in the SCREEN menu. - 42PM3MV model is only available in the following mode: Video or COMPONENT (480i). 1. SCREEN Auto...

Owners Manual
Page 29
... MENU button and then use the Movie Rating System (MPAA) only. Lock Adjustment Lock Adjustment Parental Control can be used to block program viewing based on /off G On Set password Off MPAA Age block Content block Aux. Movies that have been shown at the theaters or direct-to-video movies use the D / E button to be viewed. Ratings for Television programs including made-for a time period. Then, press the G button. • Enter the password...
... MENU button and then use the Movie Rating System (MPAA) only. Lock Adjustment Lock Adjustment Parental Control can be used to block program viewing based on /off G On Set password Off MPAA Age block Content block Aux. Movies that have been shown at the theaters or direct-to-video movies use the D / E button to be viewed. Ratings for Television programs including made-for a time period. Then, press the G button. • Enter the password...

Owners Manual
Page 33
RS-232C connection cables are not supplied with the Monitor. - RS-232C connection cables are used for service. RS-232C Setup REMOTE CONTROL RGB OUTPUT RS-232C INPUT (CONTROL/SERVICE) HDMI/ DVI(VIDEO) AUDIO INPUT RGB INPUT AUDIO R L VARIABLE AUDIO OUT VIDEO R L AUDIO PC Type of the control device to the RS-232C jack on the Monitor back panel. - Pin name 1 No connection 2 RXD (Receive data) 3 TXD (Transmit data) 4 DTR (DTE side ready) 5 GND 6 DSR (DCE side ready) 7 RTS (Ready to...
RS-232C connection cables are not supplied with the Monitor. - RS-232C connection cables are used for service. RS-232C Setup REMOTE CONTROL RGB OUTPUT RS-232C INPUT (CONTROL/SERVICE) HDMI/ DVI(VIDEO) AUDIO INPUT RGB INPUT AUDIO R L VARIABLE AUDIO OUT VIDEO R L AUDIO PC Type of the control device to the RS-232C jack on the Monitor back panel. - Pin name 1 No connection 2 RXD (Receive data) 3 TXD (Transmit data) 4 DTR (DTE side ready) 5 GND 6 DSR (DCE side ready) 7 RTS (Ready to...

Owners Manual
Page 34
... code : ASCII code Command Reference List COMMAND 1 COMMAND 2 DATA (Hexadecimal) 01. Volume Control k 07. OSD Select k 13. Treble k 16. Color Temperature (ACC) k 19. Green Adjustment k 21. Low Power j 25. When selecting Set ID '0', every connected PDP set ID to choose the desired Monitor ID number. At this function to select Set ID. 3. Use this time, if the data is controlled. Press the MENU button and then use F / G button to adjust Set ID to choose desired monitor...
... code : ASCII code Command Reference List COMMAND 1 COMMAND 2 DATA (Hexadecimal) 01. Volume Control k 07. OSD Select k 13. Treble k 16. Color Temperature (ACC) k 19. Green Adjustment k 21. Low Power j 25. When selecting Set ID '0', every connected PDP set ID to choose the desired Monitor ID number. At this function to select Set ID. 3. Use this time, if the data is controlled. Press the MENU button and then use F / G button to adjust Set ID to choose desired monitor...
Owners Manual
Page 41
... contact your service center, if the picture has not appeared after switching on . • Is the power cord inserted into wall power outlet? • Test the wall power outlet, plug another product's power cord into the outlet where the Monitor's power cord was plugged in the Picture menu and press the VOLUME (G) button. (Refer to p.9) Picture appears slowly after five minutes. to -)? (Refer to p.9) • Correct remote operating mode set: Monitor, VCR etc.? • Install new...
... contact your service center, if the picture has not appeared after switching on . • Is the power cord inserted into wall power outlet? • Test the wall power outlet, plug another product's power cord into the outlet where the Monitor's power cord was plugged in the Picture menu and press the VOLUME (G) button. (Refer to p.9) Picture appears slowly after five minutes. to -)? (Refer to p.9) • Correct remote operating mode set: Monitor, VCR etc.? • Install new...
Owners Manual
Page 43
... to be new or remanufactured. LG ELECTRONICS, INC. LIMITED WARRANTY Your LG Plasma TV will be repaired or replaced in compliance with the terms of your Product Registration Card or go to www.lgservice.com to state. Your unit will be repaired or replaced with a new, substitute model or factory reconditioned unit, at the time warranty service is provided. TO THE EXTENT...
... to be new or remanufactured. LG ELECTRONICS, INC. LIMITED WARRANTY Your LG Plasma TV will be repaired or replaced in compliance with the terms of your Product Registration Card or go to www.lgservice.com to state. Your unit will be repaired or replaced with a new, substitute model or factory reconditioned unit, at the time warranty service is provided. TO THE EXTENT...

Owners Manual
Page 44
... a reserve deposit to the LGE Service Center against a credit card number as a result of improper installation, including incorrect or insufficient AC supply (please consult the owner's manual for power supply requirements) G installation or repair of repair or replacement under some circumstances you may be borne by other components in a video system G set-up or adjustment on the remote control. If a replacement unit is received, please use the carton and packaging from...
... a reserve deposit to the LGE Service Center against a credit card number as a result of improper installation, including incorrect or insufficient AC supply (please consult the owner's manual for power supply requirements) G installation or repair of repair or replacement under some circumstances you may be borne by other components in a video system G set-up or adjustment on the remote control. If a replacement unit is received, please use the carton and packaging from...


