
Owner's Manual (English)
Page 29
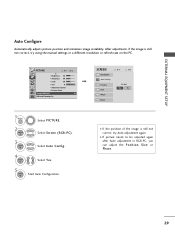
... still not correct, try using the manual settings or a different resolution or refresh rate on the PC. Select Auto Config.. 4 ENTER Select Y e s. 5 ENTER Start Auto Configuration. PICTURE Move Enter E • Brightness 50 • Sharpness 50 • Color 50 • Tint 0R G • Advanced Control • Picture Reset Screen (RGB-PC... the image is still not correct, try Auto adjustment again. To Set Yes No 1 MENU 2 ENTER 3 ENTER Select PICTURE. EXTERNAL EQUIPMENT SETUP Auto Configure Automatically adjusts picture position and minimizes image instability.
... still not correct, try using the manual settings or a different resolution or refresh rate on the PC. Select Auto Config.. 4 ENTER Select Y e s. 5 ENTER Start Auto Configuration. PICTURE Move Enter E • Brightness 50 • Sharpness 50 • Color 50 • Tint 0R G • Advanced Control • Picture Reset Screen (RGB-PC... the image is still not correct, try Auto adjustment again. To Set Yes No 1 MENU 2 ENTER 3 ENTER Select PICTURE. EXTERNAL EQUIPMENT SETUP Auto Configure Automatically adjusts picture position and minimizes image instability.
Owner's Manual (English)
Page 77
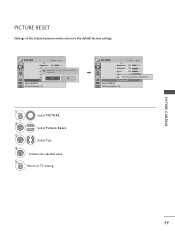
PICTURE CONTROL 77 PICTURE RESET Settings of the selected picture modes return to TV viewing. PICTURE Move Enter E • Brightness 50 • Sharpness 70 • Color? All picture settings will be resetted. Contin5u0e? &#...LED Local Dimming : On PICTURE Move Enter E • Brightness 50 • Sharpness 70 • Color 60 • Tint 0R G • Advancei d RCeosnetttrionlg video configuration... • Picture Reset Screen (RGB-PC) LED Local Dimming : On 1 MENU Select PICTURE. 2 ENTER Select Picture Reset. 3 ENTER Select Y e s. 4 ENTER Initialize...
PICTURE CONTROL 77 PICTURE RESET Settings of the selected picture modes return to TV viewing. PICTURE Move Enter E • Brightness 50 • Sharpness 70 • Color? All picture settings will be resetted. Contin5u0e? &#...LED Local Dimming : On PICTURE Move Enter E • Brightness 50 • Sharpness 70 • Color 60 • Tint 0R G • Advancei d RCeosnetttrionlg video configuration... • Picture Reset Screen (RGB-PC) LED Local Dimming : On 1 MENU Select PICTURE. 2 ENTER Select Picture Reset. 3 ENTER Select Y e s. 4 ENTER Initialize...

Owner's Manual (English)
Page 87
...3 ENTER Initialize the adjusted value. 4 MENU Return to the default factory settings. AUDIO RESET Settings of the selected Sound Mode return to TV viewing. SOUND & LANGUAGE CONTROL 87 AUDIO Move Enter E • Level 3- + Balance 0L R Sound Mode : Standard • ... Treble 50 • Bass 50 • Reset TV Speaker : On AUDIO Move Enter E • Level 3- + Balance 0L R Sound Mode : Standard • SRS TruSurround XT: Off • Treble 50 i Resetting audio configuration... • Bass 50 • Reset TV Speaker : On 1 MENU 2 ENTER Select AUDIO.
...3 ENTER Initialize the adjusted value. 4 MENU Return to the default factory settings. AUDIO RESET Settings of the selected Sound Mode return to TV viewing. SOUND & LANGUAGE CONTROL 87 AUDIO Move Enter E • Level 3- + Balance 0L R Sound Mode : Standard • ... Treble 50 • Bass 50 • Reset TV Speaker : On AUDIO Move Enter E • Level 3- + Balance 0L R Sound Mode : Standard • SRS TruSurround XT: Off • Treble 50 i Resetting audio configuration... • Bass 50 • Reset TV Speaker : On 1 MENU 2 ENTER Select AUDIO.

Owner's Manual (English)
Page 110
.... APPENDIX 110 Press MUTE button. I Sound muted? Vertical bar or stripe on or off and does not indicate a fault with the broadcast. I Activate the Auto configure or adjust size, phase, or H/V position. (Option) Screen color is not available for all models. There is a problem in menu option. No output from one...
.... APPENDIX 110 Press MUTE button. I Sound muted? Vertical bar or stripe on or off and does not indicate a fault with the broadcast. I Activate the Auto configure or adjust size, phase, or H/V position. (Option) Screen color is not available for all models. There is a problem in menu option. No output from one...
Owner's Manual (English)
Page 115
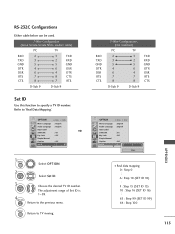
... number. MENU Return to the previous menu. The adjustment range of Set ID is 1~ 99. Return to TV viewing. RXD TXD GND DTR DSR RTS CTS 3-Wire Configurations (Not standard) PC TV 2 3 3 2 5 5 4 6 6 4 7 7 8 8 D-Sub 9 D-Sub 9 TXD RXD GND DTR DSR RTS CTS APPENDIX OPTION Move ...) 10 : Step 16 (SET ID 16) 63 : Step 99 (SET ID 99) 64 : Step 100 115 RS-232C Configurations Either cable below can be used. 7-Wire Configuration (Serial female-female NULL modem cable) PC TV RXD 2 TXD 3 GND 5 DTR 4 DSR 6 RTS 7 CTS 8 3 TXD 2 RXD 5 GND 6 DSR 4 DTR 8...
... number. MENU Return to the previous menu. The adjustment range of Set ID is 1~ 99. Return to TV viewing. RXD TXD GND DTR DSR RTS CTS 3-Wire Configurations (Not standard) PC TV 2 3 3 2 5 5 4 6 6 4 7 7 8 8 D-Sub 9 D-Sub 9 TXD RXD GND DTR DSR RTS CTS APPENDIX OPTION Move ...) 10 : Step 16 (SET ID 16) 63 : Step 99 (SET ID 99) 64 : Step 100 115 RS-232C Configurations Either cable below can be used. 7-Wire Configuration (Serial female-female NULL modem cable) PC TV RXD 2 TXD 3 GND 5 DTR 4 DSR 6 RTS 7 CTS 8 3 TXD 2 RXD 5 GND 6 DSR 4 DTR 8...
Owner's Manual (English)
Page 116
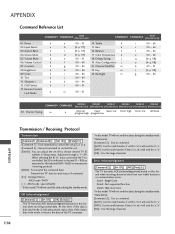
... Input Select x 03. Brightness k 09. Channel Add/Del m h 00 ~ 64 22. Tint k 11. Treble k b (G p.117) 15. Power k 02. Auto Configuration j g 00 ~ 64 21. Transmit the 'FF' data to read mode, it will send the 'a', 'b'. [OK] : Use the large character. Screen Mute k 05. ...b 00 ~ 01 c (G p.119) g 00 ~ 64 20. Data1: Illegal Code Data2: Not supported function Data3: Wait more time * In this model, TV will not send the status during the standby mode. * Data Format [Command 2] : Use as Hexa decimal (0x0~0x63) on menu and as command. [Set ID...
... Input Select x 03. Brightness k 09. Channel Add/Del m h 00 ~ 64 22. Tint k 11. Treble k b (G p.117) 15. Power k 02. Auto Configuration j g 00 ~ 64 21. Transmit the 'FF' data to read mode, it will send the 'a', 'b'. [OK] : Use the large character. Screen Mute k 05. ...b 00 ~ 01 c (G p.119) g 00 ~ 64 20. Data1: Illegal Code Data2: Not supported function Data3: Wait more time * In this model, TV will not send the status during the standby mode. * Data Format [Command 2] : Use as Hexa decimal (0x0~0x63) on menu and as command. [Set ID...
Owner's Manual (English)
Page 118
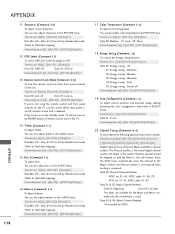
... AUDIO menu. Acknowledgement [s][ ][Set ID][ ][OK/NG][Data][x] 16. Color Temperature (Command: k u) To adjust color temperature. off , remote control lock is on the TV, use this mode. Auto Configuration (Command: j u) To adjust picture position and minimize image shaking automatically. The Physical number is the actual digital channel number, the Major is the...
... AUDIO menu. Acknowledgement [s][ ][Set ID][ ][OK/NG][Data][x] 16. Color Temperature (Command: k u) To adjust color temperature. off , remote control lock is on the TV, use this mode. Auto Configuration (Command: j u) To adjust picture position and minimize image shaking automatically. The Physical number is the actual digital channel number, the Major is the...