
Specification (English)
Page 1
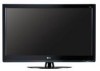
TV • TruMotion 120Hz • Intelligent Sensor Mode • Full HD 1080p HD Resolution • 70,000:1 Dynamic Contrast Ratio • 2.7ms Response Time (GTG) • ...; 1 Composite Input (rear) • 1 Digital Audio Out (Optical) (rear) • USB 2.0 (JPEG, MP3) (side) • PC Connectivity (D-sub 15pin) • RF Antenna Input LGusa.com LCD TV 42LH40 42" Full HD 1080p 120Hz LCD TV (42.0" diagonal) Full HD 1080p performance, a robust feature set and Smart Energy Savings make the LH40 Series a standout.
TV • TruMotion 120Hz • Intelligent Sensor Mode • Full HD 1080p HD Resolution • 70,000:1 Dynamic Contrast Ratio • 2.7ms Response Time (GTG) • ...; 1 Composite Input (rear) • 1 Digital Audio Out (Optical) (rear) • USB 2.0 (JPEG, MP3) (side) • PC Connectivity (D-sub 15pin) • RF Antenna Input LGusa.com LCD TV 42LH40 42" Full HD 1080p 120Hz LCD TV (42.0" diagonal) Full HD 1080p performance, a robust feature set and Smart Energy Savings make the LH40 Series a standout.
Specification (English)
Page 2
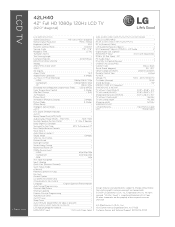
LCD TV 42LH40 42" Full HD 1080p 120Hz LCD TV (42.0" diagonal) LGusa.com LCD SPECIFICATION Screen Size (Class) 42" Class (42.0" diagonal) Native Display Resolution 1920 x 1080p Brightness (cd/m2) 500 Dynamic Contrast Ratio 70,000:1 Viewing...Previous Channel) • Quick Setup Guide • e-Manual • Parental Control w/V-Chip • Key Lock • Closed Caption • LG SIMPLINK (HDMI CEC) • CONVENIENCE FEATURES Language English/Spanish/French/Korean Auto Tuning/Programming • Channel Add/Delete • Channel Labeling •...
LCD TV 42LH40 42" Full HD 1080p 120Hz LCD TV (42.0" diagonal) LGusa.com LCD SPECIFICATION Screen Size (Class) 42" Class (42.0" diagonal) Native Display Resolution 1920 x 1080p Brightness (cd/m2) 500 Dynamic Contrast Ratio 70,000:1 Viewing...Previous Channel) • Quick Setup Guide • e-Manual • Parental Control w/V-Chip • Key Lock • Closed Caption • LG SIMPLINK (HDMI CEC) • CONVENIENCE FEATURES Language English/Spanish/French/Korean Auto Tuning/Programming • Channel Add/Delete • Channel Labeling •...

Owner's Manual (English)
Page 1
...-3026 USA, Commercial User 1-888-542-2623 CANADA LG Customer Information Center P/NO : SAC33601903 (0904-REV03) www.lgusa.com / www.lg.ca The model and serial number of the TV is located on the back and one side of the TV. LCD TV OWNER'S MANUAL 32LH40 37LH40 42LH40 47LH40 55LH40 32LH41 37LH41 42LH41 47LH41 55LH41 37LH55 42LH55...
...-3026 USA, Commercial User 1-888-542-2623 CANADA LG Customer Information Center P/NO : SAC33601903 (0904-REV03) www.lgusa.com / www.lg.ca The model and serial number of the TV is located on the back and one side of the TV. LCD TV OWNER'S MANUAL 32LH40 37LH40 42LH40 47LH40 55LH40 32LH41 37LH41 42LH41 47LH41 55LH41 37LH55 42LH55...
Owner's Manual (English)
Page 2
... proper grounding and, in a residential installation. Reorient or relocate the receiving antenna. - Consult the dealer or an experienced radio/TV technician for compliance could void the user's authority to operate this device which the receiver is no guarantee that may cause harmful ...any interference received, including interference that the cable ground shall be determined by turning the equipment off and on a circuit different from LG Electronics. NO USER SERVICEABLE PARTS INSIDE. However, there is connected. - Operation is intended to alert the user to the presence of...
... proper grounding and, in a residential installation. Reorient or relocate the receiving antenna. - Consult the dealer or an experienced radio/TV technician for compliance could void the user's authority to operate this device which the receiver is no guarantee that may cause harmful ...any interference received, including interference that the cable ground shall be determined by turning the equipment off and on a circuit different from LG Electronics. NO USER SERVICEABLE PARTS INSIDE. However, there is connected. - Operation is intended to alert the user to the presence of...

Owner's Manual (English)
Page 3
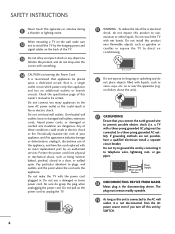
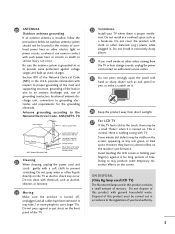
bination to avoid injury from tip-over. 4 Do not install near water. 6 Protect the power cord from being walked on or pinched particularly at plugs, convenience receptacles, and the point where they exit from the apparatus. 2 Clean only with dry cloth. 7 Only use attachments/accessories specified by the manufacturer, or sold with one wider than the other apparatus (including amplifiers) that produce heat. 9 Unplug this apparatus near any ventilation openings. A grounding type plug has two blades and a third grounding prong, The wide blade or the third prong are provided...
bination to avoid injury from tip-over. 4 Do not install near water. 6 Protect the power cord from being walked on or pinched particularly at plugs, convenience receptacles, and the point where they exit from the apparatus. 2 Clean only with dry cloth. 7 Only use attachments/accessories specified by the manufacturer, or sold with one wider than the other apparatus (including amplifiers) that produce heat. 9 Unplug this apparatus near any ventilation openings. A grounding type plug has two blades and a third grounding prong, The wide blade or the third prong are provided...
Owner's Manual (English)
Page 4
...could result in . Any of this unit is connected to the AC wall outlet, it , discontinue use a damaged or loose power cord. a TV with something. 14 CAUTION concerning the Power Cord: It is not disconnected from physical or mechanical abuse, such as vases, cups, etc. Pay particular...cords, frayed power cords, or damaged or cracked wire insulation are not possible, have the cord replaced with wet hands. When mounting a TV on shelves above the unit). 17 GROUNDING Ensure that appliance and has no additional outlets or branch circuits. Protect the power cord from the ...
...could result in . Any of this unit is connected to the AC wall outlet, it , discontinue use a damaged or loose power cord. a TV with something. 14 CAUTION concerning the Power Cord: It is not disconnected from physical or mechanical abuse, such as vases, cups, etc. Pay particular...cords, frayed power cords, or damaged or cracked wire insulation are not possible, have the cord replaced with wet hands. When mounting a TV on shelves above the unit). 17 GROUNDING Ensure that appliance and has no additional outlets or branch circuits. Protect the power cord from the ...
Owner's Manual (English)
Page 5
...conductors, location of time. Do not install in this product with general household waste. However, they have been removed. ON DISPOSAL (Only Hg lamp used LCD TV) The fluorescent lamp used in excessively dusty places. 24 If you smell smoke or other electric light or power circuits, or where it for the...such as nail, pencil or pen, or make a scratch on it. 26 Keep the product away from direct sunlight. 27 For LCD TV If the TV feels cold to carry larger TVs. It may produce some protection against it can occur. Doing so may take 2 or more people to the touch, there may be...
...conductors, location of time. Do not install in this product with general household waste. However, they have been removed. ON DISPOSAL (Only Hg lamp used LCD TV) The fluorescent lamp used in excessively dusty places. 24 If you smell smoke or other electric light or power circuits, or where it for the...such as nail, pencil or pen, or make a scratch on it. 26 Keep the product away from direct sunlight. 27 For LCD TV If the TV feels cold to carry larger TVs. It may produce some protection against it can occur. Doing so may take 2 or more people to the touch, there may be...

Owner's Manual (English)
Page 6
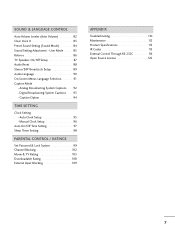
... Power Indicator 80 Demo Mode 81 Auto Scan (Auto Tuning 48 - CONTENTS WARNING / CAUTION 2 SAFETY INSTRUCTIONS 3 FEATURE OF THIS TV 8 PREPARATION Accessories 9 Front Panel Information 10 Back Panel Information 12 Stand Instruction 14 VESA Wall Mounting 18 Cable Management 19 Desktop Pedestal...VCR Setup 30 Other A/V Source Setup 32 PC Setup 33 USB Connection 40 Audio out Connection 41 WATCHING TV / CHANNEL CONTROL Remote Control Functions 42 Turning On TV 44 Channel Selection 44 Volume Adjustment 44 Initial Setting 45 On-Screen Menus Selection 46 Quick Menu 47 6 ...
... Power Indicator 80 Demo Mode 81 Auto Scan (Auto Tuning 48 - CONTENTS WARNING / CAUTION 2 SAFETY INSTRUCTIONS 3 FEATURE OF THIS TV 8 PREPARATION Accessories 9 Front Panel Information 10 Back Panel Information 12 Stand Instruction 14 VESA Wall Mounting 18 Cable Management 19 Desktop Pedestal...VCR Setup 30 Other A/V Source Setup 32 PC Setup 33 USB Connection 40 Audio out Connection 41 WATCHING TV / CHANNEL CONTROL Remote Control Functions 42 Turning On TV 44 Channel Selection 44 Volume Adjustment 44 Initial Setting 45 On-Screen Menus Selection 46 Quick Menu 47 6 ...
Owner's Manual (English)
Page 7
...On/Off Time Setting 97 Sleep Timer Setting 98 PARENTAL CONTROL / RATINGS Set Password & Lock System 99 Channel Blocking 102 Movie & TV Rating 103 Downloadable Rating 108 External Input Blocking 109 APPENDIX Troubleshooting 110 Maintenance 112 Product Specifications 113 IR Codes 115 External Control Through ...RS-232C 116 Open Source License 122 7 Caption Option 94 TIME SETTING Clock Setting - User Mode 85 Balance 86 TV Speakers On/Off Setup 87 Audio Reset 88 Stereo/SAP Broadcasts Setup 89 Audio Language 90 On-Screen Menus Language Selection 91 Caption ...
...On/Off Time Setting 97 Sleep Timer Setting 98 PARENTAL CONTROL / RATINGS Set Password & Lock System 99 Channel Blocking 102 Movie & TV Rating 103 Downloadable Rating 108 External Input Blocking 109 APPENDIX Troubleshooting 110 Maintenance 112 Product Specifications 113 IR Codes 115 External Control Through ...RS-232C 116 Open Source License 122 7 Caption Option 94 TIME SETTING Clock Setting - User Mode 85 Balance 86 TV Speakers On/Off Setup 87 Audio Reset 88 Stereo/SAP Broadcasts Setup 89 Audio Language 90 On-Screen Menus Language Selection 91 Caption ...

Owner's Manual (English)
Page 8
...resolution digital television broadcast and playback system composed of roughly a million or more stable structure for a crisper picture. LG TV include a unique invisible speaker system, tuned by combining advanced 120Hz technology with scanning backlight. logos, screen menus, ...clean, polished look, and enhanced audio by increasing the "sweet spot", giving a wider and richer sound field. This TV contains the detailed calibrations necessary for LCD, 1 or more detailed picture. The result is displayed on the screen. I Image burn can be accessible by the...
...resolution digital television broadcast and playback system composed of roughly a million or more stable structure for a crisper picture. LG TV include a unique invisible speaker system, tuned by combining advanced 120Hz technology with scanning backlight. logos, screen menus, ...clean, polished look, and enhanced audio by increasing the "sweet spot", giving a wider and richer sound field. This TV contains the detailed calibrations necessary for LCD, 1 or more detailed picture. The result is displayed on the screen. I Image burn can be accessible by the...
Owner's Manual (English)
Page 9
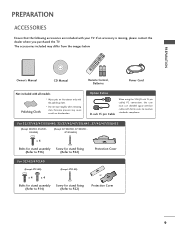
...47/55LH55) x 4 Bolts for stand assembly Screw for stand fixing (Refer to P.16) (Refer to P.22) Protection Cover For 32/42/47CL40 (Except 47CL40) (Except 47CL40) x 4 x 4 Bolts for stand assembly Screw for stand fixing (Refer to P.14) (Refer ...to maintain standards compliance. The accessories included may cause scratch or discoloration. If an accessory is missing, please contact the dealer where you purchased the TV. Excessive pressure may differ from the images below. Q. MESNLUEEPRATIO MENU POWER ENERGYINSAVPINUG T RETURN INFO ENTER VOL FAMVARK AV MODE 1 4 MUTE 2 CH P...
...47/55LH55) x 4 Bolts for stand assembly Screw for stand fixing (Refer to P.16) (Refer to P.22) Protection Cover For 32/42/47CL40 (Except 47CL40) (Except 47CL40) x 4 x 4 Bolts for stand assembly Screw for stand fixing (Refer to P.14) (Refer ...to maintain standards compliance. The accessories included may cause scratch or discoloration. If an accessory is missing, please contact the dealer where you purchased the TV. Excessive pressure may differ from the images below. Q. MESNLUEEPRATIO MENU POWER ENERGYINSAVPINUG T RETURN INFO ENTER VOL FAMVARK AV MODE 1 4 MUTE 2 CH P...
Owner's Manual (English)
Page 10
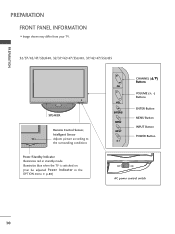
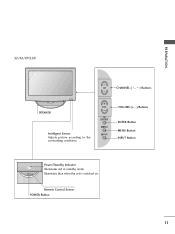
Illuminates blue when the TV is switched on. (Can be adjusted Power Indicator in standby mode. G p.80) CH VOL ENTER MENU INPUT CHANNEL (D,E) Buttons VOLUME (+, -) Buttons ENTER Button MENU Button INPUT Button POWER Button OFF ON AC power control switch 10 PREPARATION PREPARATION FRONT PANEL INFORMATION I Image shown may differ from your TV. 32/37/42/47/55LH40, 32/37/42/47/55LH41, 37/42/47/55LH55 SPEAKER Remote Control Sensor, Intelligent Sensor Adjusts picture according to the surrounding conditions Power/Standby Indicator Illuminates red in the OPTION menu.
Illuminates blue when the TV is switched on. (Can be adjusted Power Indicator in standby mode. G p.80) CH VOL ENTER MENU INPUT CHANNEL (D,E) Buttons VOLUME (+, -) Buttons ENTER Button MENU Button INPUT Button POWER Button OFF ON AC power control switch 10 PREPARATION PREPARATION FRONT PANEL INFORMATION I Image shown may differ from your TV. 32/37/42/47/55LH40, 32/37/42/47/55LH41, 37/42/47/55LH55 SPEAKER Remote Control Sensor, Intelligent Sensor Adjusts picture according to the surrounding conditions Power/Standby Indicator Illuminates red in the OPTION menu.
Owner's Manual (English)
Page 11
Remote Control Sensor POWER Button 11 PREPARATION 32/42/47CL40 CH CHANNEL ( , ) Buttons SPEAKER Intelligent Sensor Adjusts picture according to the surrounding conditions VOL ENTER MENU INPUT VOLUME (+, -) Buttons ENTER Button MENU Button INPUT Button Power/Standby Indicator Illuminates red in standby mode. Illuminates blue when the set is switched on.
Remote Control Sensor POWER Button 11 PREPARATION 32/42/47CL40 CH CHANNEL ( , ) Buttons SPEAKER Intelligent Sensor Adjusts picture according to the surrounding conditions VOL ENTER MENU INPUT VOLUME (+, -) Buttons ENTER Button MENU Button INPUT Button Power/Standby Indicator Illuminates red in standby mode. Illuminates blue when the set is switched on.

Owner's Manual (English)
Page 13
.... Caution: Never attempt to DVI cable (not included). 3 RGB IN (PC) Analog PC Connection. Accepts DVI video using an adapter or HDMI to operate the TV on DC power. 13 Connect cable signals to MP3s. 9 Power Cord Socket For operation with amps and home theater systems. Note: In standby mode, this...
.... Caution: Never attempt to DVI cable (not included). 3 RGB IN (PC) Analog PC Connection. Accepts DVI video using an adapter or HDMI to operate the TV on DC power. 13 Connect cable signals to MP3s. 9 Power Cord Socket For operation with amps and home theater systems. Note: In standby mode, this...
Owner's Manual (English)
Page 14
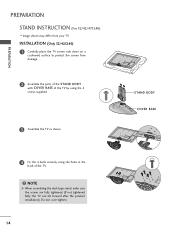
...tilt forward after the product installation). INSTALLATION (Only 32/42CL40) 1 Carefully place the TV screen side down on a cushioned surface to protect the screen from your TV. PREPARATION PREPARATION STAND INSTRUCTION (For 32/42/47CL40) I Image shown may differ from damage. 2 Assemble the parts of the ...STAND BODY with COVER BASE of the TV by using the 4 screws supplied. 3 Assemble the TV as shown. 4 Fix the 4 bolts...
...tilt forward after the product installation). INSTALLATION (Only 32/42CL40) 1 Carefully place the TV screen side down on a cushioned surface to protect the screen from your TV. PREPARATION PREPARATION STAND INSTRUCTION (For 32/42/47CL40) I Image shown may differ from damage. 2 Assemble the parts of the ...STAND BODY with COVER BASE of the TV by using the 4 screws supplied. 3 Assemble the TV as shown. 4 Fix the 4 bolts...

Owner's Manual (English)
Page 15
Press the PROTECTION COVER into the TV until you hear it click. 15 PROTECTION COVER After removing the stand, install the included protection cover over the hole for the stand. PREPARATION DETACHMENT 1 Carefully place the TV screen side down on a cushioned surface to protect the screen from damage. 2 Loose the bolts from TV. 3 Detach the stand from TV.
Press the PROTECTION COVER into the TV until you hear it click. 15 PROTECTION COVER After removing the stand, install the included protection cover over the hole for the stand. PREPARATION DETACHMENT 1 Carefully place the TV screen side down on a cushioned surface to protect the screen from damage. 2 Loose the bolts from TV. 3 Detach the stand from TV.
Owner's Manual (English)
Page 16
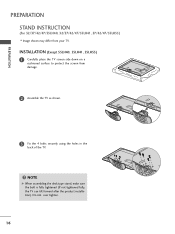
Do not over tighten. 16 PREPARATION PREPARATION STAND INSTRUCTION (For 32/37/42/47/55LH40, 32/37/42/47/55LH41, 37/42/47/55LH55) I Image shown may differ from damage. 2 Assemble the TV as shown. 3 Fix the 4 bolts securely using the holes in the back of the TV. ! NOTE G When assembling the desk type stand, make sure the bolt is fully tightened (If not tightened fully, the TV can tilt forward after the product installation). INSTALLATION (Except 55LH40, 55LH41, 55LH55) 1 Carefully place the TV screen side down on a cushioned surface to protect the screen from your TV.
Do not over tighten. 16 PREPARATION PREPARATION STAND INSTRUCTION (For 32/37/42/47/55LH40, 32/37/42/47/55LH41, 37/42/47/55LH55) I Image shown may differ from damage. 2 Assemble the TV as shown. 3 Fix the 4 bolts securely using the holes in the back of the TV. ! NOTE G When assembling the desk type stand, make sure the bolt is fully tightened (If not tightened fully, the TV can tilt forward after the product installation). INSTALLATION (Except 55LH40, 55LH41, 55LH55) 1 Carefully place the TV screen side down on a cushioned surface to protect the screen from your TV.
Owner's Manual (English)
Page 17
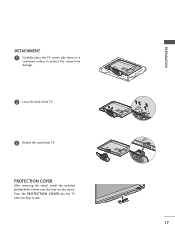
Press the PROTECTION COVER into the TV until you hear it click. 17 PREPARATION DETACHMENT 1 Carefully place the TV screen side down on a cushioned surface to protect the screen from damage. 2 Loose the bolts from TV. 3 Detach the stand from TV. PROTECTION COVER After removing the stand, install the included protection cover over the hole for the stand.
Press the PROTECTION COVER into the TV until you hear it click. 17 PREPARATION DETACHMENT 1 Carefully place the TV screen side down on a cushioned surface to protect the screen from damage. 2 Loose the bolts from TV. 3 Detach the stand from TV. PROTECTION COVER After removing the stand, install the included protection cover over the hole for the stand.
Owner's Manual (English)
Page 18
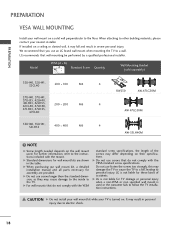
...on the wall mount used or the consumer fails to follow the TV installation instructions. Model VESA (A * B) A B Standard Screw Quantity Wall Mounting Bracket (sold separately) 32LH40, 32LH41, 32CL40 200 * 100 M4 4 RW230 AW-47LG30M 37LH40, 37LH41, 37LH55, 42LH40, 42LH41, 42LH55, 42CL40, 47LH40, 200 * 200 M6 4 47LH41... for wall mount kits are provided. Do not use an LG brand wall mount when mounting the TV to the instructions included with the mount. It may damage the TV or cause the TV to the TV. PREPARATION PREPARATION VESA WALL MOUNTING Install your wall mount on ...
...on the wall mount used or the consumer fails to follow the TV installation instructions. Model VESA (A * B) A B Standard Screw Quantity Wall Mounting Bracket (sold separately) 32LH40, 32LH41, 32CL40 200 * 100 M4 4 RW230 AW-47LG30M 37LH40, 37LH41, 37LH55, 42LH40, 42LH41, 42LH55, 42CL40, 47LH40, 200 * 200 M6 4 47LH41... for wall mount kits are provided. Do not use an LG brand wall mount when mounting the TV to the instructions included with the mount. It may damage the TV or cause the TV to the TV. PREPARATION PREPARATION VESA WALL MOUNTING Install your wall mount on ...
Owner's Manual (English)
Page 19
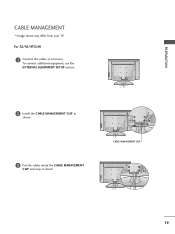
To connect additional equipment, see the EXTERNAL EQUIPMENT SETUP section. 2 Install the CABLE MANAGEMENT CLIP as necessary. CABLE MANAGEMENT CLIP 19 PREPARATION CABLE MANAGEMENT I Image shown may differ from your TV. For 32/42/47CL40 1 Connect the cables as shown. 3 Put the cables inside the CABLE MANAGEMENT CLIP and snap it closed.
To connect additional equipment, see the EXTERNAL EQUIPMENT SETUP section. 2 Install the CABLE MANAGEMENT CLIP as necessary. CABLE MANAGEMENT CLIP 19 PREPARATION CABLE MANAGEMENT I Image shown may differ from your TV. For 32/42/47CL40 1 Connect the cables as shown. 3 Put the cables inside the CABLE MANAGEMENT CLIP and snap it closed.
