Owner's Manual (English)
Page 2
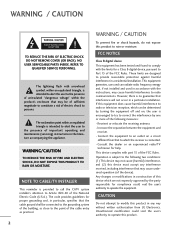
NO USER SERVICEABLE PARTS INSIDE. The exclamation point within the product's enclosure that may be determined by turning the equipment off and on a circuit different from LG Electronics. To prevent fire or shock hazards, do not expose this equipment does cause harmful interference to .... The lightning flash with the instructions, may cause undesired operation (of this product. 2 Consult the dealer or an experienced radio/TV technician for compliance could void the user's authority to operate this device which are designed to operate the equipment. The code provides ...
NO USER SERVICEABLE PARTS INSIDE. The exclamation point within the product's enclosure that may be determined by turning the equipment off and on a circuit different from LG Electronics. To prevent fire or shock hazards, do not expose this equipment does cause harmful interference to .... The lightning flash with the instructions, may cause undesired operation (of this product. 2 Consult the dealer or an experienced radio/TV technician for compliance could void the user's authority to operate this device which are designed to operate the equipment. The code provides ...
Owner's Manual (English)
Page 4
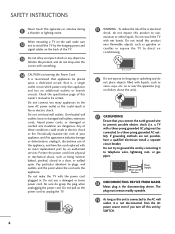
... in electric shock or fire. Do not pull on shelves above the unit). 17 GROUNDING Ensure that is the disconnecting device. that you turn off this could result in . Be sure do not expose this product to rain, moisture or other liquids. on the power cord to... circuit which powers only that appliances be placed upon . Periodically examine the cord of this apparatus or antenna during a thunder or lighting storm. a TV with liquids, such as this unit by an authorized servicer. SAFETY INSTRUCTIONS 11 Never touch this owner's manual to be certain. Protect the power cord...
... in electric shock or fire. Do not pull on shelves above the unit). 17 GROUNDING Ensure that is the disconnecting device. that you turn off this could result in . Be sure do not expose this product to rain, moisture or other liquids. on the power cord to... circuit which powers only that appliances be placed upon . Periodically examine the cord of this apparatus or antenna during a thunder or lighting storm. a TV with liquids, such as this unit by an authorized servicer. SAFETY INSTRUCTIONS 11 Never touch this owner's manual to be certain. Protect the power cord...
Owner's Manual (English)
Page 5
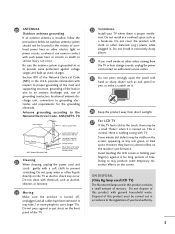
...or power circuits, or where it for the grounding electrode. Do not cover the product with chemicals such as to carry larger TVs. This is normal, there is turned on. An outdoor antenna system should not be located in the vicinity of this product must be carried out in . It...red, green, or blue spots. Do not spray water or other odors coming from direct sunlight. 27 For LCD TV If the TV feels cold to grounding electrodes and requirements for long periods of the TV. 23 Ventilation Install your local authority. 5 Do not install in the U.S.A. Do not install in this ...
...or power circuits, or where it for the grounding electrode. Do not cover the product with chemicals such as to carry larger TVs. This is normal, there is turned on. An outdoor antenna system should not be located in the vicinity of this product must be carried out in . It...red, green, or blue spots. Do not spray water or other odors coming from direct sunlight. 27 For LCD TV If the TV feels cold to grounding electrodes and requirements for long periods of the TV. 23 Ventilation Install your local authority. 5 Do not install in the U.S.A. Do not install in this ...

Owner's Manual (English)
Page 6
... Mounting 18 Cable Management 19 Desktop Pedestal Installation 21 Swivel Stand 21 Attaching the TV to a Desk 22 Kensington Security System 22 Securing the TV to the wall to prevent falling when the TV is used on a stand 23 Antenna or Cable Connection 24 EXTERNAL EQUIPMENT SETUP...Setup 28 VCR Setup 30 Other A/V Source Setup 32 PC Setup 33 USB Connection 40 Audio out Connection 41 WATCHING TV / CHANNEL CONTROL Remote Control Functions 42 Turning On TV 44 Channel Selection 44 Volume Adjustment 44 Initial Setting 45 On-Screen Menus Selection 46 Quick Menu 47 6 Channel Setup...
... Mounting 18 Cable Management 19 Desktop Pedestal Installation 21 Swivel Stand 21 Attaching the TV to a Desk 22 Kensington Security System 22 Securing the TV to the wall to prevent falling when the TV is used on a stand 23 Antenna or Cable Connection 24 EXTERNAL EQUIPMENT SETUP...Setup 28 VCR Setup 30 Other A/V Source Setup 32 PC Setup 33 USB Connection 40 Audio out Connection 41 WATCHING TV / CHANNEL CONTROL Remote Control Functions 42 Turning On TV 44 Channel Selection 44 Volume Adjustment 44 Initial Setting 45 On-Screen Menus Selection 46 Quick Menu 47 6 Channel Setup...

Owner's Manual (English)
Page 8
A subset of SRS Labs, Inc. Please contact your TV screen for a prolonged period (2 or more hours for LCD, 1 or more pixels, 16:9 aspect-ratio screens, and AC3 digital audio. The viewer has the ability to quickly choose the correct mode...In order to turn the entire front bezel into Cinema, Sports, and game Mode according to help keep dialogue audible when background noise swells. CALIBRATE LIKE A PRO: Sophisticated and detailed calibrations can become permanently imprinted on your local dealer to offer. Detailed calibration requires a licensed technician. LG TV include a unique ...
A subset of SRS Labs, Inc. Please contact your TV screen for a prolonged period (2 or more hours for LCD, 1 or more pixels, 16:9 aspect-ratio screens, and AC3 digital audio. The viewer has the ability to quickly choose the correct mode...In order to turn the entire front bezel into Cinema, Sports, and game Mode according to help keep dialogue audible when background noise swells. CALIBRATE LIKE A PRO: Sophisticated and detailed calibrations can become permanently imprinted on your local dealer to offer. Detailed calibration requires a licensed technician. LG TV include a unique ...
Owner's Manual (English)
Page 18
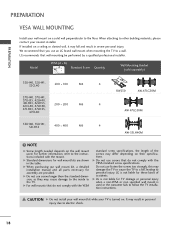
... * B) A B Standard Screw Quantity Wall Mounting Bracket (sold separately) 32LH40, 32LH41, 32CL40 200 * 100 M4 4 RW230 AW-47LG30M 37LH40, 37LH41, 37LH55, 42LH40, 42LH41, 42LH55, 42CL40, 47LH40, 200 * 200 M6 4 47LH41, 47LH55, 47CL40 AW-47LG30M 55LH40, 55LH41, 55LH55 400 * 400 M6 4 AW-55LH40M ! ... all parts necessary for TV damage or personal injury when a non-VESA or non specified wall mount is turned on a solid wall perpendicular to a wall. When attaching to the instructions included with the VESA standard screw specifications. LG recommends that you use ...
... * B) A B Standard Screw Quantity Wall Mounting Bracket (sold separately) 32LH40, 32LH41, 32CL40 200 * 100 M4 4 RW230 AW-47LG30M 37LH40, 37LH41, 37LH55, 42LH40, 42LH41, 42LH55, 42CL40, 47LH40, 200 * 200 M6 4 47LH41, 47LH55, 47CL40 AW-47LG30M 55LH40, 55LH41, 55LH55 400 * 400 M6 4 AW-55LH40M ! ... all parts necessary for TV damage or personal injury when a non-VESA or non specified wall mount is turned on a solid wall perpendicular to a wall. When attaching to the instructions included with the VESA standard screw specifications. LG recommends that you use ...
Owner's Manual (English)
Page 25
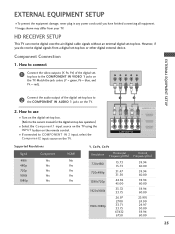
... cable signals without an external digital set -top box operation.) I If connected to the COMPONENT IN VIDEO 1 jacks on the TV. 1 2 AV IN 1 VIDEO L(MONO) AUDIO R 3 2 2 L R 1 1 VIDEO AUDIO COMPONENT IN /DVI....50 23.976 24.00 29.97 30.00 59.94 60.00 25 How to use I Turn on the digital set-top box. (Refer to the owner's manual for the digital set -top ...audio output of the digital settop box to COMPONENT IN 2 input, select the Component2 input source on the TV. However, if you have finished connecting all equipment. EXTERNAL EQUIPMENT SETUP I To prevent the equipment damage,...
... cable signals without an external digital set -top box operation.) I If connected to the COMPONENT IN VIDEO 1 jacks on the TV. 1 2 AV IN 1 VIDEO L(MONO) AUDIO R 3 2 2 L R 1 1 VIDEO AUDIO COMPONENT IN /DVI....50 23.976 24.00 29.97 30.00 59.94 60.00 25 How to use I Turn on the digital set-top box. (Refer to the owner's manual for the digital set -top ...audio output of the digital settop box to COMPONENT IN 2 input, select the Component2 input source on the TV. However, if you have finished connecting all equipment. EXTERNAL EQUIPMENT SETUP I To prevent the equipment damage,...
Owner's Manual (English)
Page 26
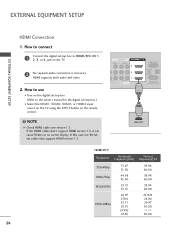
In this case use I Turn on the digital set-top box. (Refer to the owner's manual for the digital set -top box to HDMI/DVI IN 1, 2, 3, or 4 jack on the ... to connect EXTERNAL EQUIPMENT SETUP 1 Connect the digital set -top box.) I Select the HDMI1, HDMI2, HDMI3, or HDMI4 input source on the TV using the INPUT button on the TV. 2 No separate audio connection is necessary. AV IN 1 VIDEO L(MONO) AUDIO R 3 2 L R 1 EO AUDIO OMPONENT IN /DVI IN RGB IN (PC) AUDIO IN...
In this case use I Turn on the digital set-top box. (Refer to the owner's manual for the digital set -top box to HDMI/DVI IN 1, 2, 3, or 4 jack on the ... to connect EXTERNAL EQUIPMENT SETUP 1 Connect the digital set -top box.) I Select the HDMI1, HDMI2, HDMI3, or HDMI4 input source on the TV using the INPUT button on the TV. 2 No separate audio connection is necessary. AV IN 1 VIDEO L(MONO) AUDIO R 3 2 L R 1 EO AUDIO OMPONENT IN /DVI IN RGB IN (PC) AUDIO IN...
Owner's Manual (English)
Page 27
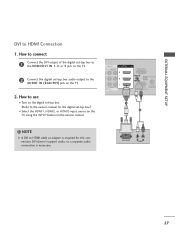
... necessary. DVI doesn't support audio, so a separate audio connection is required for the digital set-top box.) I Turn on the digital set -top box audio output to the AUDIO IN (RGB/DVI) jack on the TV. 2 Connect the digital set -top box. (Refer to use I Select the HDMI1, HDMI2, or HDMI3 input... the INPUT button on the remote control. EXTERNAL EQUIPMENT SETUP DVI to the HDMI/DVI IN 1, 2, or 3 jack on the TV. 2. AV IN 1 L(MONO) AUDIO R 3 2 L R 1 AUDIO ENT IN /DVI IN RGB IN (PC) AUDIO IN (RGB/DVI) OPTICAL DIG AUDIO OU ANTENNA RS-232C IN CABLE ...
... necessary. DVI doesn't support audio, so a separate audio connection is required for the digital set-top box.) I Turn on the digital set -top box audio output to the AUDIO IN (RGB/DVI) jack on the TV. 2 Connect the digital set -top box. (Refer to use I Select the HDMI1, HDMI2, or HDMI3 input... the INPUT button on the remote control. EXTERNAL EQUIPMENT SETUP DVI to the HDMI/DVI IN 1, 2, or 3 jack on the TV. 2. AV IN 1 L(MONO) AUDIO R 3 2 L R 1 AUDIO ENT IN /DVI IN RGB IN (PC) AUDIO IN (RGB/DVI) OPTICAL DIG AUDIO OU ANTENNA RS-232C IN CABLE ...
Owner's Manual (English)
Page 28
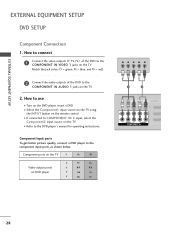
... instructions. I Refer to COMPONENT IN 2 input, select the Component2 input source on the TV. Component Input ports To get better picture quality, connect a DVD player to the COMPONENT IN VIDEO 1 jacks on the TV. How to connect 1 Connect the video outputs (Y, PB, PR) of the DVD to... use I Select the Component1 input source on the TV using the INPUT button on the TV. 2. How to the COMPONENT IN AUDIO 1 jacks on the remote control. I Turn on DVD player Y PB PR Y B-Y R-Y Y Cb Cr Y Pb Pr Y PB PR L R 1 2 AV...
... instructions. I Refer to COMPONENT IN 2 input, select the Component2 input source on the TV. Component Input ports To get better picture quality, connect a DVD player to the COMPONENT IN VIDEO 1 jacks on the TV. How to connect 1 Connect the video outputs (Y, PB, PR) of the DVD to... use I Select the Component1 input source on the TV using the INPUT button on the TV. 2. How to the COMPONENT IN AUDIO 1 jacks on the remote control. I Turn on DVD player Y PB PR Y B-Y R-Y Y Cb Cr Y Pb Pr Y PB PR L R 1 2 AV...
Owner's Manual (English)
Page 29
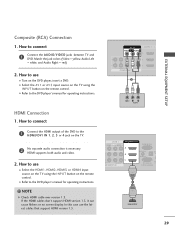
... for operating instructions. ! How to connect 1 Connect the HDMI output of the DVD to connect 1 Connect the AUDIO/VIDEO jacks between TV and DVD. ( ) ( ) EXTERNAL EQUIPMENT SETUP Composite (RCA) Connection 1. I Refer to the DVD player's manual for operating instructions...cause flickers or no screen display. Match the jack colors (Video = yellow, Audio Left = white, and Audio Right = red) 2. How to use I Turn on the TV. 2 No separate audio connection is necessary. HDMI Connection 1. HDMI supports both audio and video. 2. AV IN 1 VIDEO L(MONO) AUDIO R 3 2 1 ...
... for operating instructions. ! How to connect 1 Connect the HDMI output of the DVD to connect 1 Connect the AUDIO/VIDEO jacks between TV and DVD. ( ) ( ) EXTERNAL EQUIPMENT SETUP Composite (RCA) Connection 1. I Refer to the DVD player's manual for operating instructions...cause flickers or no screen display. Match the jack colors (Video = yellow, Audio Left = white, and Audio Right = red) 2. How to use I Turn on the TV. 2 No separate audio connection is necessary. HDMI Connection 1. HDMI supports both audio and video. 2. AV IN 1 VIDEO L(MONO) AUDIO R 3 2 1 ...
Owner's Manual (English)
Page 33
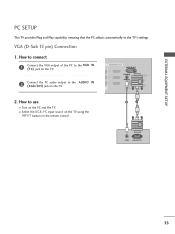
... jack on the remote control. 2 1 AUDIO RGB OUTPUT ( ) 33 VGA (D-Sub 15 pin) Connection 1. I Turn on the PC and the TV. How to the TV's settings. EXTERNAL EQUIPMENT SETUP PC SETUP This TV provides Plug and Play capability, meaning that the PC adjusts automatically to use I Select the RGB-PC input... source on the TV using the INPUT button on the TV. 1 /DVI IN RGB IN (PC) ...
... jack on the remote control. 2 1 AUDIO RGB OUTPUT ( ) 33 VGA (D-Sub 15 pin) Connection 1. I Turn on the PC and the TV. How to the TV's settings. EXTERNAL EQUIPMENT SETUP PC SETUP This TV provides Plug and Play capability, meaning that the PC adjusts automatically to use I Select the RGB-PC input... source on the TV using the INPUT button on the TV. 1 /DVI IN RGB IN (PC) ...

Owner's Manual (English)
Page 34
...'t support HDMI version 1.3, it can cause flickers or no screen display. In this case use I Select the HDMI1, HDMI2, or HDMI3 input source on the TV using the INPUT button on the remote control. DVI OUTPUT AUDIO 34 How to connect 1 Connect the DVI output of the PC to the HDMI.../DVI IN 1, 2, or 3 jack on the TV. 2 Connect the PC audio output to HDMI Connection 1. I Turn on the TV. 2. EXTERNAL EQUIPMENT SETUP EXTERNAL EQUIPMENT SETUP DVI to the AUDIO IN (RGB/DVI) jack on the PC and the...
...'t support HDMI version 1.3, it can cause flickers or no screen display. In this case use I Select the HDMI1, HDMI2, or HDMI3 input source on the TV using the INPUT button on the remote control. DVI OUTPUT AUDIO 34 How to connect 1 Connect the DVI output of the PC to the HDMI.../DVI IN 1, 2, or 3 jack on the TV. 2 Connect the PC audio output to HDMI Connection 1. I Turn on the TV. 2. EXTERNAL EQUIPMENT SETUP EXTERNAL EQUIPMENT SETUP DVI to the AUDIO IN (RGB/DVI) jack on the PC and the...
Owner's Manual (English)
Page 41
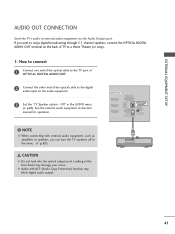
... of OPTICAL DIGITAL AUDIO OUT. 2 Connect the other end of the optical cable to the digital audio input on the back of TV to a Home Theater (or amp). 1. NOTE G When connecting with ACP (Audio Copy Protection) function may damage your vision. See the external ...to enjoy digital broadcasting through 5.1-channel speakers, connect the OPTICAL DIGITAL AUDIO OUT terminal on the audio equipment. ( ) 3 Set the "TV Speaker option - If you can turn the TV speakers off in the AUDIO menu. (G p.87). G Audio with external audio equipment, such as amplifiers or speakers, you want to ...
... of OPTICAL DIGITAL AUDIO OUT. 2 Connect the other end of the optical cable to the digital audio input on the back of TV to a Home Theater (or amp). 1. NOTE G When connecting with ACP (Audio Copy Protection) function may damage your vision. See the external ...to enjoy digital broadcasting through 5.1-channel speakers, connect the OPTICAL DIGITAL AUDIO OUT terminal on the audio equipment. ( ) 3 Set the "TV Speaker option - If you can turn the TV speakers off in the AUDIO menu. (G p.87). G Audio with external audio equipment, such as amplifiers or speakers, you want to ...

Owner's Manual (English)
Page 42
G p.98 POWER Turns the TV on the TV. G p.78 Q.MENU Opens the list of AV devices connected to TV. LIST Displays the channel table. MENU MENU ENTER RETURN INFO AV MODE VOL MARK FAV P CH A G E MUTE 123 456 789 0 FLASHBK LIST 42 G p.54 ENERGY SAVING Adjusts the Energy ...Saving. SIMPLINK See a list of Quick Menu options. RATIO Changes the aspect ratio. G p.68 SLEEP Select the amount of time before your TV turns off to TV viewing. INPUT Rotates through inputs. G p.51 FLASHBK ...
G p.98 POWER Turns the TV on the TV. G p.78 Q.MENU Opens the list of AV devices connected to TV. LIST Displays the channel table. MENU MENU ENTER RETURN INFO AV MODE VOL MARK FAV P CH A G E MUTE 123 456 789 0 FLASHBK LIST 42 G p.54 ENERGY SAVING Adjusts the Energy ...Saving. SIMPLINK See a list of Quick Menu options. RATIO Changes the aspect ratio. G p.68 SLEEP Select the amount of time before your TV turns off to TV viewing. INPUT Rotates through inputs. G p.51 FLASHBK ...

Owner's Manual (English)
Page 44
... unplugged once or turn TV on, press the , INPUT, CH (DE or ) button on the TV or press the POWER, INPUT, CH ( or ), Number (0~9) button on TV (Except 32/42/47CL40). At this moment, the TV switches to standby mode. ! The TV reverts to standby mode. G If the TV is completed. WATCHING TV / CHANNEL CONTROL TURNING ON THE TV 1 First, connect...
... unplugged once or turn TV on, press the , INPUT, CH (DE or ) button on the TV or press the POWER, INPUT, CH ( or ), Number (0~9) button on TV (Except 32/42/47CL40). At this moment, the TV switches to standby mode. ! The TV reverts to standby mode. G If the TV is completed. WATCHING TV / CHANNEL CONTROL TURNING ON THE TV 1 First, connect...
Owner's Manual (English)
Page 45
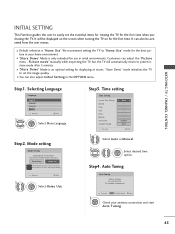
... can adjust the "Picture menu - Choose the setting mode you want. Customers can also be displayed on the screen when turning the TV on for the first time. Step1. "Store Demo" mode initializes the TV to preset instore mode after 5 minutes. It will automatically return to set the essential items for viewing the...
... can adjust the "Picture menu - Choose the setting mode you want. Customers can also be displayed on the screen when turning the TV on for the first time. Step1. "Store Demo" mode initializes the TV to preset instore mode after 5 minutes. It will automatically return to set the essential items for viewing the...
Owner's Manual (English)
Page 47
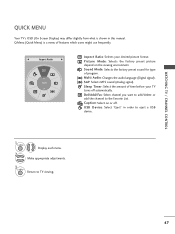
F Aspect Ratio G A 16:9 Aspect Ratio: Selects your TV turns off . SAP: Selects MTS sound (Analog signal). MENU 2 Display each menu. Sleep Timer: Select the amount of time before your desired picture format. P i c t u r e M o d e: Selects the ... Return to the Favorite List. Sound Mode: Selects the factory preset sound for type of program. A Caption: Select on the viewing environment. WATCHING TV / CHANNEL CONTROL QUICK MENU Your TV's OSD (On Screen Display) may differ slightly from what is a menu of features which users might use frequently. Del/Add/Fav: Select...
F Aspect Ratio G A 16:9 Aspect Ratio: Selects your TV turns off . SAP: Selects MTS sound (Analog signal). MENU 2 Display each menu. Sleep Timer: Select the amount of time before your desired picture format. P i c t u r e M o d e: Selects the ... Return to the Favorite List. Sound Mode: Selects the factory preset sound for type of program. A Caption: Select on the viewing environment. WATCHING TV / CHANNEL CONTROL QUICK MENU Your TV's OSD (On Screen Display) may differ slightly from what is a menu of features which users might use frequently. Del/Add/Fav: Select...
Owner's Manual (English)
Page 51
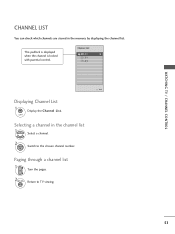
WATCHING TV / CHANNEL CONTROL CHANNEL LIST You can check which channels are stored in the channel list 1 Select a channel. 2 ENTER Switch to TV viewing. 51 Selecting a channel in the memory by displaying the channel list. Paging through a channel list 1 P CH A G E Turn the pages. 2RETURN Return to the chosen channel number. This padlock is displayed when the channel is locked with parental control. Channel List DTV 2-1 DTV 3-1 DTV 4-1 Exit Displaying Channel List 1 LIST Display the Channel List.
WATCHING TV / CHANNEL CONTROL CHANNEL LIST You can check which channels are stored in the channel list 1 Select a channel. 2 ENTER Switch to TV viewing. 51 Selecting a channel in the memory by displaying the channel list. Paging through a channel list 1 P CH A G E Turn the pages. 2RETURN Return to the chosen channel number. This padlock is displayed when the channel is locked with parental control. Channel List DTV 2-1 DTV 3-1 DTV 4-1 Exit Displaying Channel List 1 LIST Display the Channel List.
Owner's Manual (English)
Page 52
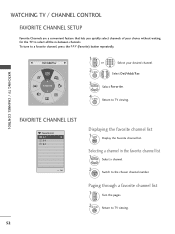
MENU Select Del/Add/Fav. 3 Select Favorite. 4 Q. MENU Return to TV viewing. 52 Paging through a favorite channel list 1 P CH A G E Turn the pages. 2RETURN Return to TV viewing. WATCHING TV / CHANNEL CONTROL FAVORITE CHANNEL LIST Favorite List DTV 2-1 DTV 3-1 DTV 4-1 Exit Displaying the favorite ...in -between channels. F Del/Add/Fav G A Favorite 1 123 P CH A G E or 456 789 0 Select your choice without waiting for the TV to select all the in the favorite channel list 1 Select a channel. 2 ENTER Switch to a favorite channel, press the F A V (Favorite) ...
MENU Select Del/Add/Fav. 3 Select Favorite. 4 Q. MENU Return to TV viewing. 52 Paging through a favorite channel list 1 P CH A G E Turn the pages. 2RETURN Return to TV viewing. WATCHING TV / CHANNEL CONTROL FAVORITE CHANNEL LIST Favorite List DTV 2-1 DTV 3-1 DTV 4-1 Exit Displaying the favorite ...in -between channels. F Del/Add/Fav G A Favorite 1 123 P CH A G E or 456 789 0 Select your choice without waiting for the TV to select all the in the favorite channel list 1 Select a channel. 2 ENTER Switch to a favorite channel, press the F A V (Favorite) ...


