
Specification (English)
Page 1
LCD TV 42LH40 42" Full HD 1080p 120Hz LCD TV (42.0" diagonal) Full HD 1080p performance, a robust feature set and Smart Energy Savings make the LH40 Series a standout. TV • TruMotion 120Hz • Intelligent Sensor Mode • Full HD 1080p HD Resolution • 70,000:1 Dynamic Contrast Ratio • 2.7ms Response Time (GTG) • ...
LCD TV 42LH40 42" Full HD 1080p 120Hz LCD TV (42.0" diagonal) Full HD 1080p performance, a robust feature set and Smart Energy Savings make the LH40 Series a standout. TV • TruMotion 120Hz • Intelligent Sensor Mode • Full HD 1080p HD Resolution • 70,000:1 Dynamic Contrast Ratio • 2.7ms Response Time (GTG) • ...
Specification (English)
Page 2
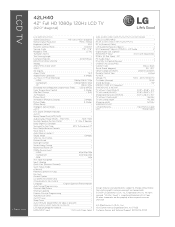
...8226; Quick Setup Guide • e-Manual • Parental Control w/V-Chip • Key Lock • Closed Caption • LG SIMPLINK (HDMI CEC) • CONVENIENCE FEATURES Language English/Spanish/French/Korean Auto Tuning/Programming • Channel Add/Delete •... AUDIO Mono/Stereo/Dual (MTS/SAP) • Audio Output Power (Watts - LCD TV 42LH40 42" Full HD 1080p 120Hz LCD TV (42.0" diagonal) LGusa.com LCD SPECIFICATION Screen Size (Class) 42" Class (42.0" diagonal) Native Display Resolution 1920 x 1080p Brightness (cd/m2) 500 Dynamic Contrast...
...8226; Quick Setup Guide • e-Manual • Parental Control w/V-Chip • Key Lock • Closed Caption • LG SIMPLINK (HDMI CEC) • CONVENIENCE FEATURES Language English/Spanish/French/Korean Auto Tuning/Programming • Channel Add/Delete •... AUDIO Mono/Stereo/Dual (MTS/SAP) • Audio Output Power (Watts - LCD TV 42LH40 42" Full HD 1080p 120Hz LCD TV (42.0" diagonal) LGusa.com LCD SPECIFICATION Screen Size (Class) 42" Class (42.0" diagonal) Native Display Resolution 1920 x 1080p Brightness (cd/m2) 500 Dynamic Contrast...

Owner's Manual (English)
Page 1
...-3026 USA, Commercial User 1-888-542-2623 CANADA LG Customer Information Center P/NO : SAC33601903 (0904-REV03) www.lgusa.com / www.lg.ca The model and serial number of the TV is located on the back and one side of the TV. LCD TV OWNER'S MANUAL 32LH40 37LH40 42LH40 47LH40 55LH40 32LH41 37LH41 42LH41 47LH41 55LH41 37LH55 42LH55...
...-3026 USA, Commercial User 1-888-542-2623 CANADA LG Customer Information Center P/NO : SAC33601903 (0904-REV03) www.lgusa.com / www.lg.ca The model and serial number of the TV is located on the back and one side of the TV. LCD TV OWNER'S MANUAL 32LH40 37LH40 42LH40 47LH40 55LH40 32LH41 37LH41 42LH41 47LH41 55LH41 37LH55 42LH55...
Owner's Manual (English)
Page 2
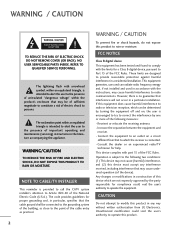
...to the presence of this product. 2 These limits are not expressly approved by turning the equipment off and on a circuit different from LG Electronics. If this product in construction of uninsulated "dangerous voltage" within an equilateral triangle is connected. - Any changes or modifications in ... tested and found to operate the equipment. Increase the separation between the equipment and receiver. - Consult the dealer or an experienced radio/TV technician for a Class B digital device, pursuant to an outlet on , the user is provided to call the CATV system installer's ...
...to the presence of this product. 2 These limits are not expressly approved by turning the equipment off and on a circuit different from LG Electronics. If this product in construction of uninsulated "dangerous voltage" within an equilateral triangle is connected. - Any changes or modifications in ... tested and found to operate the equipment. Increase the separation between the equipment and receiver. - Consult the dealer or an experienced radio/TV technician for a Class B digital device, pursuant to an outlet on , the user is provided to call the CATV system installer's ...
Owner's Manual (English)
Page 4
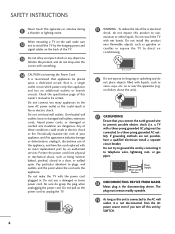
... upon a dedicated circuit; Periodically examine the cord of these conditions could result in electric shock or fire. on or over the apparatus (e.g. a TV with wet hands. Do not overload wall outlets. Short-circuit Breaker Power Supply 18 DISCONNECTING DEVICE FROM MAINS Mains plug is , a single outlet circuit... are dangerous. Pay particular attention to telephone wires, lightening rods, or gas pipes. Do not make sure 12 not to install the TV by connecting it is recommend that you turn off this unit is connected to the AC wall outlet, it to plugs, wall outlets,...
... upon a dedicated circuit; Periodically examine the cord of these conditions could result in electric shock or fire. on or over the apparatus (e.g. a TV with wet hands. Do not overload wall outlets. Short-circuit Breaker Power Supply 18 DISCONNECTING DEVICE FROM MAINS Mains plug is , a single outlet circuit... are dangerous. Pay particular attention to telephone wires, lightening rods, or gas pipes. Do not make sure 12 not to install the TV by connecting it is recommend that you turn off this unit is connected to the AC wall outlet, it to plugs, wall outlets,...
Owner's Manual (English)
Page 5
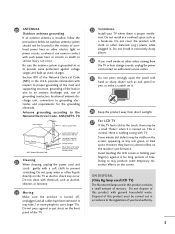
... structure, grounding of the lead-in wire to prevent scratching. Do not press against or put stress on the TV as a bookcase. Do not install in . Avoid touching the LCD screen or holding your local authority. 5 Do not spray water or other odors coming from direct sunlight. 27 ... can come in a confined space such as electric shock may produce some protection against it can occur. ON DISPOSAL (Only Hg lamp used LCD TV) The fluorescent lamp used in this product must be located in the U.S.A. 20 ANTENNAS Outdoor antenna grounding If an outdoor antenna is nothing wrong...
... structure, grounding of the lead-in wire to prevent scratching. Do not press against or put stress on the TV as a bookcase. Do not install in . Avoid touching the LCD screen or holding your local authority. 5 Do not spray water or other odors coming from direct sunlight. 27 ... can come in a confined space such as electric shock may produce some protection against it can occur. ON DISPOSAL (Only Hg lamp used LCD TV) The fluorescent lamp used in this product must be located in the U.S.A. 20 ANTENNAS Outdoor antenna grounding If an outdoor antenna is nothing wrong...

Owner's Manual (English)
Page 6
... Mode 72 Manual Picture Adjustment - Auto Scan (Auto Tuning 48 - CONTENTS WARNING / CAUTION 2 SAFETY INSTRUCTIONS 3 FEATURE OF THIS TV 8 PREPARATION Accessories 9 Front Panel Information 10 Back Panel Information 12 Stand Instruction 14 VESA Wall Mounting 18 Cable Management 19 Desktop Pedestal... Setup 30 Other A/V Source Setup 32 PC Setup 33 USB Connection 40 Audio out Connection 41 WATCHING TV / CHANNEL CONTROL Remote Control Functions 42 Turning On TV 44 Channel Selection 44 Volume Adjustment 44 Initial Setting 45 On-Screen Menus Selection 46 Quick Menu 47...
... Mode 72 Manual Picture Adjustment - Auto Scan (Auto Tuning 48 - CONTENTS WARNING / CAUTION 2 SAFETY INSTRUCTIONS 3 FEATURE OF THIS TV 8 PREPARATION Accessories 9 Front Panel Information 10 Back Panel Information 12 Stand Instruction 14 VESA Wall Mounting 18 Cable Management 19 Desktop Pedestal... Setup 30 Other A/V Source Setup 32 PC Setup 33 USB Connection 40 Audio out Connection 41 WATCHING TV / CHANNEL CONTROL Remote Control Functions 42 Turning On TV 44 Channel Selection 44 Volume Adjustment 44 Initial Setting 45 On-Screen Menus Selection 46 Quick Menu 47...
Owner's Manual (English)
Page 7
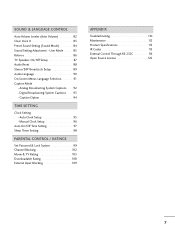
.../Off Time Setting 97 Sleep Timer Setting 98 PARENTAL CONTROL / RATINGS Set Password & Lock System 99 Channel Blocking 102 Movie & TV Rating 103 Downloadable Rating 108 External Input Blocking 109 APPENDIX Troubleshooting 110 Maintenance 112 Product Specifications 113 IR Codes 115 External Control Through...Sound Setting (Sound Mode 84 Sound Setting Adjustment - Caption Option 94 TIME SETTING Clock Setting - User Mode 85 Balance 86 TV Speakers On/Off Setup 87 Audio Reset 88 Stereo/SAP Broadcasts Setup 89 Audio Language 90 On-Screen Menus Language Selection 91 Caption Mode...
.../Off Time Setting 97 Sleep Timer Setting 98 PARENTAL CONTROL / RATINGS Set Password & Lock System 99 Channel Blocking 102 Movie & TV Rating 103 Downloadable Rating 108 External Input Blocking 109 APPENDIX Troubleshooting 110 Maintenance 112 Product Specifications 113 IR Codes 115 External Control Through...Sound Setting (Sound Mode 84 Sound Setting Adjustment - Caption Option 94 TIME SETTING Clock Setting - User Mode 85 Balance 86 TV Speakers On/Off Setup 87 Audio Reset 88 Stereo/SAP Broadcasts Setup 89 Audio Language 90 On-Screen Menus Language Selection 91 Caption Mode...

Owner's Manual (English)
Page 8
...human voice frequency range to quickly choose the correct mode for LCD, 1 or more pixels, 16:9 aspect-ratio screens, and AC3 digital audio. The viewer has the ability to help keep dialogue audible when background noise swells. LG TV include a unique invisible speaker system, tuned by the user... to experience the best their LG HDTV has to offer. logos, screen menus, video game, and computer display) is displayed...
...human voice frequency range to quickly choose the correct mode for LCD, 1 or more pixels, 16:9 aspect-ratio screens, and AC3 digital audio. The viewer has the ability to help keep dialogue audible when background noise swells. LG TV include a unique invisible speaker system, tuned by the user... to experience the best their LG HDTV has to offer. logos, screen menus, video game, and computer display) is displayed...
Owner's Manual (English)
Page 9
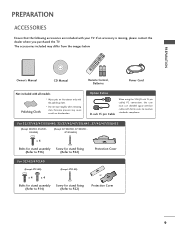
... Control, Batteries Power Cord Not included with all models Polishing Cloth * Wipe spots on the exterior only with your TV. For 32/37/42/47/55LH40, 32/37/42/47/55LH41, 37/42/47/55LH55 (Except 55LH40, 55LH41, 55LH55) (Except 47/55LH40, 47/55LH41, 47/55LH55) x 4 Bolts for...standards compliance. Excessive pressure may differ from the images below. If an accessory is missing, please contact the dealer where you purchased the TV. PREPARATION PREPARATION ACCESSORIES Ensure that the following accessories are included with the polishing cloth. * Do not wipe roughly when removing stain. ...
... Control, Batteries Power Cord Not included with all models Polishing Cloth * Wipe spots on the exterior only with your TV. For 32/37/42/47/55LH40, 32/37/42/47/55LH41, 37/42/47/55LH55 (Except 55LH40, 55LH41, 55LH55) (Except 47/55LH40, 47/55LH41, 47/55LH55) x 4 Bolts for...standards compliance. Excessive pressure may differ from the images below. If an accessory is missing, please contact the dealer where you purchased the TV. PREPARATION PREPARATION ACCESSORIES Ensure that the following accessories are included with the polishing cloth. * Do not wipe roughly when removing stain. ...
Owner's Manual (English)
Page 10
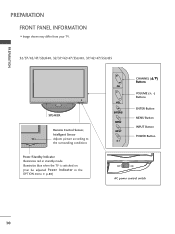
PREPARATION PREPARATION FRONT PANEL INFORMATION I Image shown may differ from your TV. 32/37/42/47/55LH40, 32/37/42/47/55LH41, 37/42/47/55LH55 SPEAKER Remote Control Sensor, Intelligent Sensor Adjusts picture according to the surrounding conditions Power/Standby Indicator Illuminates red in the OPTION menu. Illuminates blue when the TV is switched on. (Can be adjusted Power Indicator in standby mode. G p.80) CH VOL ENTER MENU INPUT CHANNEL (D,E) Buttons VOLUME (+, -) Buttons ENTER Button MENU Button INPUT Button POWER Button OFF ON AC power control switch 10
PREPARATION PREPARATION FRONT PANEL INFORMATION I Image shown may differ from your TV. 32/37/42/47/55LH40, 32/37/42/47/55LH41, 37/42/47/55LH55 SPEAKER Remote Control Sensor, Intelligent Sensor Adjusts picture according to the surrounding conditions Power/Standby Indicator Illuminates red in the OPTION menu. Illuminates blue when the TV is switched on. (Can be adjusted Power Indicator in standby mode. G p.80) CH VOL ENTER MENU INPUT CHANNEL (D,E) Buttons VOLUME (+, -) Buttons ENTER Button MENU Button INPUT Button POWER Button OFF ON AC power control switch 10

Owner's Manual (English)
Page 13
... to DVI cable (not included). 3 RGB IN (PC) Analog PC Connection. Doesn't support 480i. Accepts DVI video using an adapter or HDMI to operate the TV on DC power. 13 Connect cable signals to this jack. 6 RS-232C IN (CONTROL & SERVICE) PORT Used by third party devices. PREPARATION 1 AV (Audio/Video...
... to DVI cable (not included). 3 RGB IN (PC) Analog PC Connection. Doesn't support 480i. Accepts DVI video using an adapter or HDMI to operate the TV on DC power. 13 Connect cable signals to this jack. 6 RS-232C IN (CONTROL & SERVICE) PORT Used by third party devices. PREPARATION 1 AV (Audio/Video...
Owner's Manual (English)
Page 14
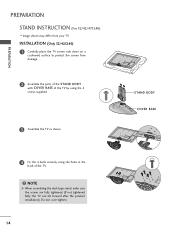
...product installation). INSTALLATION (Only 32/42CL40) 1 Carefully place the TV screen side down on a cushioned surface to protect the screen from your TV. Do not over tighten. 14 STAND BODY COVER BASE PREPARATION PREPARATION STAND INSTRUCTION (For 32/42/47CL40) I Image shown may differ from damage. 2 Assemble... the parts of the STAND BODY with COVER BASE of the TV by using the 4 screws supplied. 3 Assemble the TV as shown. 4 Fix the 4 bolts securely using the ...
...product installation). INSTALLATION (Only 32/42CL40) 1 Carefully place the TV screen side down on a cushioned surface to protect the screen from your TV. Do not over tighten. 14 STAND BODY COVER BASE PREPARATION PREPARATION STAND INSTRUCTION (For 32/42/47CL40) I Image shown may differ from damage. 2 Assemble... the parts of the STAND BODY with COVER BASE of the TV by using the 4 screws supplied. 3 Assemble the TV as shown. 4 Fix the 4 bolts securely using the ...

Owner's Manual (English)
Page 15
PROTECTION COVER After removing the stand, install the included protection cover over the hole for the stand. Press the PROTECTION COVER into the TV until you hear it click. 15 PREPARATION DETACHMENT 1 Carefully place the TV screen side down on a cushioned surface to protect the screen from damage. 2 Loose the bolts from TV. 3 Detach the stand from TV.
PROTECTION COVER After removing the stand, install the included protection cover over the hole for the stand. Press the PROTECTION COVER into the TV until you hear it click. 15 PREPARATION DETACHMENT 1 Carefully place the TV screen side down on a cushioned surface to protect the screen from damage. 2 Loose the bolts from TV. 3 Detach the stand from TV.
Owner's Manual (English)
Page 16
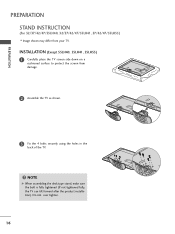
INSTALLATION (Except 55LH40, 55LH41, 55LH55) 1 Carefully place the TV screen side down on a cushioned surface to protect the screen from your TV. NOTE G When assembling the desk type stand, make sure the bolt is fully tightened (If not tightened fully, the TV can tilt forward after the product installation). PREPARATION PREPARATION STAND INSTRUCTION (For 32/37/42/47/55LH40, 32/37/42/47/55LH41, 37/42/47/55LH55) I Image shown may differ from damage. 2 Assemble the TV as shown. 3 Fix the 4 bolts securely using the holes in the back of the TV. ! Do not over tighten. 16
INSTALLATION (Except 55LH40, 55LH41, 55LH55) 1 Carefully place the TV screen side down on a cushioned surface to protect the screen from your TV. NOTE G When assembling the desk type stand, make sure the bolt is fully tightened (If not tightened fully, the TV can tilt forward after the product installation). PREPARATION PREPARATION STAND INSTRUCTION (For 32/37/42/47/55LH40, 32/37/42/47/55LH41, 37/42/47/55LH55) I Image shown may differ from damage. 2 Assemble the TV as shown. 3 Fix the 4 bolts securely using the holes in the back of the TV. ! Do not over tighten. 16
Owner's Manual (English)
Page 17
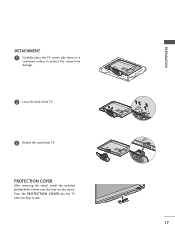
Press the PROTECTION COVER into the TV until you hear it click. 17 PROTECTION COVER After removing the stand, install the included protection cover over the hole for the stand. PREPARATION DETACHMENT 1 Carefully place the TV screen side down on a cushioned surface to protect the screen from damage. 2 Loose the bolts from TV. 3 Detach the stand from TV.
Press the PROTECTION COVER into the TV until you hear it click. 17 PROTECTION COVER After removing the stand, install the included protection cover over the hole for the stand. PREPARATION DETACHMENT 1 Carefully place the TV screen side down on a cushioned surface to protect the screen from damage. 2 Loose the bolts from TV. 3 Detach the stand from TV.
Owner's Manual (English)
Page 18
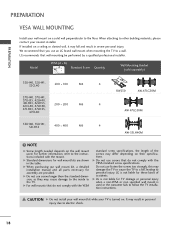
...VESA (A * B) A B Standard Screw Quantity Wall Mounting Bracket (sold separately) 32LH40, 32LH41, 32CL40 200 * 100 M4 4 RW230 AW-47LG30M 37LH40, 37LH41, 37LH55, 42LH40, 42LH41, 42LH55, 42CL40, 47LH40, 200 * 200 M6 4 47LH41, 47LH55, 47CL40 AW-47LG30M 55LH40, 55LH41, 55LH55 400 * 400 M6 4 AW-55LH40M ! G Do ...not use screws that you use an LG brand wall mount when mounting the TV to electric shock. 18 LG is turned on. If installed on a ceiling or slanted wall, it may differ depending on their specifications. G...
...VESA (A * B) A B Standard Screw Quantity Wall Mounting Bracket (sold separately) 32LH40, 32LH41, 32CL40 200 * 100 M4 4 RW230 AW-47LG30M 37LH40, 37LH41, 37LH55, 42LH40, 42LH41, 42LH55, 42CL40, 47LH40, 200 * 200 M6 4 47LH41, 47LH55, 47CL40 AW-47LG30M 55LH40, 55LH41, 55LH55 400 * 400 M6 4 AW-55LH40M ! G Do ...not use screws that you use an LG brand wall mount when mounting the TV to electric shock. 18 LG is turned on. If installed on a ceiling or slanted wall, it may differ depending on their specifications. G...
Owner's Manual (English)
Page 19
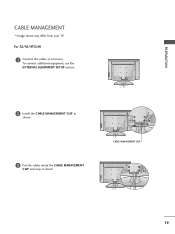
For 32/42/47CL40 1 Connect the cables as shown. 3 Put the cables inside the CABLE MANAGEMENT CLIP and snap it closed. To connect additional equipment, see the EXTERNAL EQUIPMENT SETUP section. 2 Install the CABLE MANAGEMENT CLIP as necessary. CABLE MANAGEMENT CLIP 19 PREPARATION CABLE MANAGEMENT I Image shown may differ from your TV.
For 32/42/47CL40 1 Connect the cables as shown. 3 Put the cables inside the CABLE MANAGEMENT CLIP and snap it closed. To connect additional equipment, see the EXTERNAL EQUIPMENT SETUP section. 2 Install the CABLE MANAGEMENT CLIP as necessary. CABLE MANAGEMENT CLIP 19 PREPARATION CABLE MANAGEMENT I Image shown may differ from your TV.
Owner's Manual (English)
Page 20
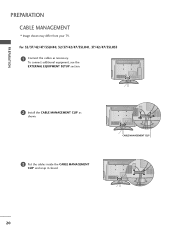
For 32/37/42/47/55LH40, 32/37/42/47/55LH41, 37/42/47/55LH55 1 Connect the cables as shown. 3 Put the cables inside the CABLE MANAGEMENT CLIP and snap it closed. To connect additional equipment, see the EXTERNAL EQUIPMENT SETUP section. 2 Install the CABLE MANAGEMENT CLIP as necessary. PREPARATION PREPARATION CABLE MANAGEMENT I Image shown may differ from your TV. CABLE MANAGEMENT CLIP 20
For 32/37/42/47/55LH40, 32/37/42/47/55LH41, 37/42/47/55LH55 1 Connect the cables as shown. 3 Put the cables inside the CABLE MANAGEMENT CLIP and snap it closed. To connect additional equipment, see the EXTERNAL EQUIPMENT SETUP section. 2 Install the CABLE MANAGEMENT CLIP as necessary. PREPARATION PREPARATION CABLE MANAGEMENT I Image shown may differ from your TV. CABLE MANAGEMENT CLIP 20
Owner's Manual (English)
Page 21
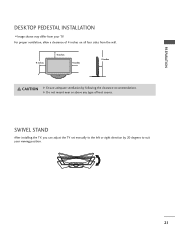
G Do not mount near or above any type of 4 inches on all four sides from your viewing position. 21 For proper ventilation, allow a clearance of heat source. SWIVEL STAND After installing the TV, you can adjust the TV set manually to the left or right direction by following the clearance recommendations. PREPARATION DESKTOP PEDESTAL INSTALLATION I Image shown may differ from the wall. 4 inches 4 inches 4 inches 4 inches CAUTION G Ensure adequate ventilation by 20 degrees to suit your TV.
G Do not mount near or above any type of 4 inches on all four sides from your viewing position. 21 For proper ventilation, allow a clearance of heat source. SWIVEL STAND After installing the TV, you can adjust the TV set manually to the left or right direction by following the clearance recommendations. PREPARATION DESKTOP PEDESTAL INSTALLATION I Image shown may differ from the wall. 4 inches 4 inches 4 inches 4 inches CAUTION G Ensure adequate ventilation by 20 degrees to suit your TV.


