Owners Manual
Page 6
... IR Codes 87 Add / Delete Channel (Manual Scan 37 - EZ Picture - Preset 45 - Picture Improvement Technology 49 Advanced - Setting up Your Password 74 Set Password 75 Lock System 75 Channel Blocking 76 External Input Blocking 76 Movie & TV Rating 77 - Auto Scan (EZ Scan 36 - ...Color Tone - User Mode 48 XD - Black (Darkness) Level 51 4 Picture Reset 52 Low-Power Picture Mode 52 Image Sticking Minimization( ISM) Method 53 SOUND...
... IR Codes 87 Add / Delete Channel (Manual Scan 37 - EZ Picture - Preset 45 - Picture Improvement Technology 49 Advanced - Setting up Your Password 74 Set Password 75 Lock System 75 Channel Blocking 76 External Input Blocking 76 Movie & TV Rating 77 - Auto Scan (EZ Scan 36 - ...Color Tone - User Mode 48 XD - Black (Darkness) Level 51 4 Picture Reset 52 Low-Power Picture Mode 52 Image Sticking Minimization( ISM) Method 53 SOUND...
Owners Manual
Page 12
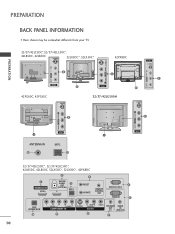
... . ( ) RESET 5 SERVICE ONLY REMOTE CONTROL UPDATE OUT RGB IN 6 ( ) RJP INTERFACE 10 VIDEO AUDIO COMPONENT IN 9 S-VIDEO (MONO) AUDIO AV IN 1 8 VIDEO SPEAKER AUDIO OUT IN 8 (RGB, DVI) 7 10 M.P.I. 13 AV IN 2 11 ( ) 32/37/42LC5DC*, 32/37/42LC50C*, 42LB5DC, ...DIGITAL ( ) AUDIO OUT (OPTICAL) 2 3 M.P.I . PREPARATION BACK PANEL INFORMATION ■ Here shown may be somewhat different from your TV. 32/37/42LC5DC*,32/37/42LC50C*, 42LB5DC, 42LB50C S-VIDEO 32LX5DC*, 32LX50C* 42PX8DC S-VIDEO R AUDIO L/MONO VIDEO R VIDEO L/MONO AUDIO R PREPARATION 8 11 AV ...
... . ( ) RESET 5 SERVICE ONLY REMOTE CONTROL UPDATE OUT RGB IN 6 ( ) RJP INTERFACE 10 VIDEO AUDIO COMPONENT IN 9 S-VIDEO (MONO) AUDIO AV IN 1 8 VIDEO SPEAKER AUDIO OUT IN 8 (RGB, DVI) 7 10 M.P.I. 13 AV IN 2 11 ( ) 32/37/42LC5DC*, 32/37/42LC50C*, 42LB5DC, ...DIGITAL ( ) AUDIO OUT (OPTICAL) 2 3 M.P.I . PREPARATION BACK PANEL INFORMATION ■ Here shown may be somewhat different from your TV. 32/37/42LC5DC*,32/37/42LC50C*, 42LB5DC, 42LB50C S-VIDEO 32LX5DC*, 32LX50C* 42PX8DC S-VIDEO R AUDIO L/MONO VIDEO R VIDEO L/MONO AUDIO R PREPARATION 8 11 AV ...
Owners Manual
Page 13
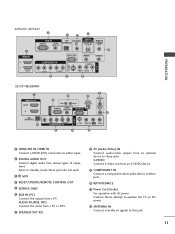
...external device to these jacks. 10 RJP INTERFACE 11 Power Cord Socket For operation with AC power. Caution: Never attempt to operate the TV on DC power. 12 ANTENNA IN Connect over-the air signals to this jack. 11 S-VIDEO Connect S-Video out from various types ...8 2 DIGITAL AUDIO OUT REMOTE CONTROL OPTICAL OUT 1 4 HDMI IN SERVICE ONLY RESET UPDATE S-VIDEO AV IN 1 2 1 DVI IN COMPONENT IN L R VIDEO 9 AUDIO 5 AUDIO VIDEO L(MONO) R 8 32/37/42LG500H 1 HDMI/DVI IN 1(DVI) 2 RJP INTERFACE 10 4 2 6 RESET UPDATE OPTICAL DIGITAL AUDIO OUT RGB(PC) AUDIO (RGB/DVI) RS-232C IN...
...external device to these jacks. 10 RJP INTERFACE 11 Power Cord Socket For operation with AC power. Caution: Never attempt to operate the TV on DC power. 12 ANTENNA IN Connect over-the air signals to this jack. 11 S-VIDEO Connect S-Video out from various types ...8 2 DIGITAL AUDIO OUT REMOTE CONTROL OPTICAL OUT 1 4 HDMI IN SERVICE ONLY RESET UPDATE S-VIDEO AV IN 1 2 1 DVI IN COMPONENT IN L R VIDEO 9 AUDIO 5 AUDIO VIDEO L(MONO) R 8 32/37/42LG500H 1 HDMI/DVI IN 1(DVI) 2 RJP INTERFACE 10 4 2 6 RESET UPDATE OPTICAL DIGITAL AUDIO OUT RGB(PC) AUDIO (RGB/DVI) RS-232C IN...
Owners Manual
Page 25
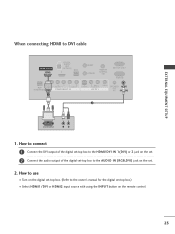
... 2 jack on the set. 2 Connect the audio output of the digital set-top box to DVI cable HDMI/DVI IN 1(DVI) DIGITAL AUDIO OUT (OPTICAL) 2 M.P.I. RESET UPDATE REMOTE CONTROL OUT SERVICE ONLY RGB IN RJP INTERFACE 1 VIDEO AUDIO COMPONENT IN S-VIDEO (MONO) AUDIO AV IN 1 VIDEO SPEAKER AUDIO OUT IN 8 (RGB...
... 2 jack on the set. 2 Connect the audio output of the digital set-top box to DVI cable HDMI/DVI IN 1(DVI) DIGITAL AUDIO OUT (OPTICAL) 2 M.P.I. RESET UPDATE REMOTE CONTROL OUT SERVICE ONLY RGB IN RJP INTERFACE 1 VIDEO AUDIO COMPONENT IN S-VIDEO (MONO) AUDIO AV IN 1 VIDEO SPEAKER AUDIO OUT IN 8 (RGB...

Owners Manual
Page 27
... to the HDMI/DVI IN 1(DVI) or 2 jack on the remote control. ( ) ( ■ Refer to the DVD player's manual for operating instructions. 1 2 GITAL UDIO OUT RESET TICAL) M.P.I ■ Select HDMI1/DVI or HDMI2 input source with using the INPUT button on the remote control. ■ If connected to AV IN2, select...
... to the HDMI/DVI IN 1(DVI) or 2 jack on the remote control. ( ) ( ■ Refer to the DVD player's manual for operating instructions. 1 2 GITAL UDIO OUT RESET TICAL) M.P.I ■ Select HDMI1/DVI or HDMI2 input source with using the INPUT button on the remote control. ■ If connected to AV IN2, select...

Owners Manual
Page 29
... CONTROL UPDATE OUT ■ Insert a video tape into the VCR and press PLAY on the VCR. (Refer to connect M.P.I . How to use 1 2 GITAL AUDIO OUT RESET PTICAL) M.P.I . 1 Connect the S-VIDEO output of the VCR to the VCR owner's manual.) ■ Select A V 1 input source with an S-Video cable ANT OUT... set . 2. AUDIO ENT IN S-VIDEO (MONO) AUDIO AV IN 1 VIDEO SPEAK OUT 8 ■ If connected to connect 1 Connect the AUDIO/VIDEO jacks between TV and VCR. In the event that you have a mono VCR, connect the audio cable from the VCR to the AUDIO L/MONO jack of the VCR...
... CONTROL UPDATE OUT ■ Insert a video tape into the VCR and press PLAY on the VCR. (Refer to connect M.P.I . How to use 1 2 GITAL AUDIO OUT RESET PTICAL) M.P.I . 1 Connect the S-VIDEO output of the VCR to the VCR owner's manual.) ■ Select A V 1 input source with an S-Video cable ANT OUT... set . 2. AUDIO ENT IN S-VIDEO (MONO) AUDIO AV IN 1 VIDEO SPEAK OUT 8 ■ If connected to connect 1 Connect the AUDIO/VIDEO jacks between TV and VCR. In the event that you have a mono VCR, connect the audio cable from the VCR to the AUDIO L/MONO jack of the VCR...

Owners Manual
Page 37
... VIDEO SETUP VIDEO AUDIO TIME OPTION SCREEN LOCK EZ Picture Color Temperature XD Advanced Reset AUDIO SETUP Audio Language VIDEO EZ SoundRite AUDIO EZ Sound TIME Balance 0 OPTION TV Speakers SCREEN LOCK WATCHING TV / CHANNEL CONTROL LOCK For USA SETUP VIDEO AUDIO TIME OPTION SCREEN LOCK Lock... System Set Password Block Channel Movie Rating TV Rating-Children TV Rating-General Aux. XGA Mode Reset TIME SETUP VIDEO AUDIO TIME OPTION SCREEN LOCK Auto Clock Manual Clock Off Timer On Timer Auto Off OPTION...
... VIDEO SETUP VIDEO AUDIO TIME OPTION SCREEN LOCK EZ Picture Color Temperature XD Advanced Reset AUDIO SETUP Audio Language VIDEO EZ SoundRite AUDIO EZ Sound TIME Balance 0 OPTION TV Speakers SCREEN LOCK WATCHING TV / CHANNEL CONTROL LOCK For USA SETUP VIDEO AUDIO TIME OPTION SCREEN LOCK Lock... System Set Password Block Channel Movie Rating TV Rating-Children TV Rating-General Aux. XGA Mode Reset TIME SETUP VIDEO AUDIO TIME OPTION SCREEN LOCK Auto Clock Manual Clock Off Timer On Timer Auto Off OPTION...
Owners Manual
Page 47
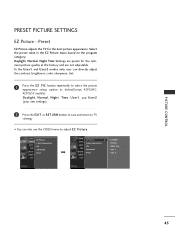
... models): Daylight, Normal, Night Time, User1, and User2 (your own settings). 2 Press the EXIT or RETURN button to save and return to TV viewing. ■ You can also use the VIDEO menu to adjust EZ Picture. PRESET PICTURE SETTINGS EZ Picture - Select the preset value in the... AUDIO TIME OPTION SCREEN LOCK EZ Picture G Color Temperature XD Advanced Reset Daylight Normal Night time User 1 User 2 PICTURE CONTROL 45 Daylight, Normal, Night Time Settings are not adjustable. Preset EZ Picture adjusts the TV for the optimum picture quality at the factory and are preset for ...
... models): Daylight, Normal, Night Time, User1, and User2 (your own settings). 2 Press the EXIT or RETURN button to save and return to TV viewing. ■ You can also use the VIDEO menu to adjust EZ Picture. PRESET PICTURE SETTINGS EZ Picture - Select the preset value in the... AUDIO TIME OPTION SCREEN LOCK EZ Picture G Color Temperature XD Advanced Reset Daylight Normal Night time User 1 User 2 PICTURE CONTROL 45 Daylight, Normal, Night Time Settings are not adjustable. Preset EZ Picture adjusts the TV for the optimum picture quality at the factory and are preset for ...

Owners Manual
Page 48
... button to return to the previous menu. SETUP VIDEO AUDIO TIME OPTION SCREEN LOCK EZ Picture Color Temperature XD Advanced Reset 1 SETUP EZ Picture VIDEO Color Temperature G AUDIO XD TIME Advanced OPTION Reset SCREEN LOCK Cool Normal Warm User 23 PICTURE CONTROL 46 ing or press MENU button to return to... TV view- Set to warm to enhance hotter colors such as red, or set to cool to see less intense colors with ...
... button to return to the previous menu. SETUP VIDEO AUDIO TIME OPTION SCREEN LOCK EZ Picture Color Temperature XD Advanced Reset 1 SETUP EZ Picture VIDEO Color Temperature G AUDIO XD TIME Advanced OPTION Reset SCREEN LOCK Cool Normal Warm User 23 PICTURE CONTROL 46 ing or press MENU button to return to... TV view- Set to warm to enhance hotter colors such as red, or set to cool to see less intense colors with ...
Owners Manual
Page 49
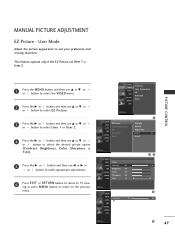
... CONTROL 1 SETUP EZ Picture Daylight VIDEO Color Temperature Normal AUDIO XD Night Time TIME Advanced User 1 G OPTION Reset User 2 SCREEN LOCK SETUP VIDEO User1 AUDIO Contrast 85 TIME Brightness 50 OPTION Color 50 SCREEN Sharpness 50 LOCK Tint 0 R 23 G G SETUP VIDEO AUDIO TIME ..., or Tint). 5 Press the G or button and then use F or G or or button to make appropriate adjustments. 6 Press EXIT or RETURN button to return to TV viewing or press MENU button to return to suit your preference and viewing situations.
... CONTROL 1 SETUP EZ Picture Daylight VIDEO Color Temperature Normal AUDIO XD Night Time TIME Advanced User 1 G OPTION Reset User 2 SCREEN LOCK SETUP VIDEO User1 AUDIO Contrast 85 TIME Brightness 50 OPTION Color 50 SCREEN Sharpness 50 LOCK Tint 0 R 23 G G SETUP VIDEO AUDIO TIME ..., or Tint). 5 Press the G or button and then use F or G or or button to make appropriate adjustments. 6 Press EXIT or RETURN button to return to TV viewing or press MENU button to return to suit your preference and viewing situations.

Owners Manual
Page 50
ing or press MENU button to return to TV view- PICTURE CONTROL 1 Press the MENU button and then use D or E or or button to select the VIDEO menu. 2 Press the G or button and then ... to the previous menu. 48 SETUP VIDEO AUDIO TIME OPTION SCREEN LOCK EZ Picture Color Temperature XD Advanced Reset 1 SETUP EZ Picture VIDEO Color Temperature Cool AUDIO XD Normal TIME Advanced Warm OPTION Reset User G SCREEN LOCK SETUP VIDEO User AUDIO Red 0 TIME Green 0 OPTION Blue 0 SCREEN LOCK 23 G 4 SETUP VIDEO Red...
ing or press MENU button to return to TV view- PICTURE CONTROL 1 Press the MENU button and then use D or E or or button to select the VIDEO menu. 2 Press the G or button and then ... to the previous menu. 48 SETUP VIDEO AUDIO TIME OPTION SCREEN LOCK EZ Picture Color Temperature XD Advanced Reset 1 SETUP EZ Picture VIDEO Color Temperature Cool AUDIO XD Normal TIME Advanced Warm OPTION Reset User G SCREEN LOCK SETUP VIDEO User AUDIO Red 0 TIME Green 0 OPTION Blue 0 SCREEN LOCK 23 G 4 SETUP VIDEO Red...
Owners Manual
Page 51
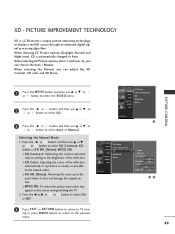
...and User 2), you can choose the Auto / Manual. ing or press MENU button to return to TV view- When selecting EZ Picture options (Daylight, Normal and Night time), XD is LG Electronic's unique picture improving technology to display a real HD source through an advanced digital signal processing ... may appear on the screen during watching the TV. 2. PICTURE CONTROL SETUP VIDEO AUDIO TIME OPTION SCREEN LOCK EZ Picture Color Temperature XD Advanced Reset 1 SETUP VIDEO AUDIO TIME OPTION SCREEN LOCK EZ Picture Color Temperature XD Advanced Reset G Auto Manual XD Contrast On XD Color...
...and User 2), you can choose the Auto / Manual. ing or press MENU button to return to TV view- When selecting EZ Picture options (Daylight, Normal and Night time), XD is LG Electronic's unique picture improving technology to display a real HD source through an advanced digital signal processing ... may appear on the screen during watching the TV. 2. PICTURE CONTROL SETUP VIDEO AUDIO TIME OPTION SCREEN LOCK EZ Picture Color Temperature XD Advanced Reset 1 SETUP VIDEO AUDIO TIME OPTION SCREEN LOCK EZ Picture Color Temperature XD Advanced Reset G Auto Manual XD Contrast On XD Color...

Owners Manual
Page 52
...Cinema. 4 Press the G or button and then use D or E or or button to select O n or O f f. 5 Press EXIT or RETURN button to return to TV viewing or press MENU button to return to 30 fps video for viewing movies. When you operate Cinema (3:2 Pull-Down Mode or Cinema Correction Mode...), the TV will adjust 24 fps video from movies to the previous menu. SETUP VIDEO AUDIO TIME OPTION SCREEN LOCK EZ Picture Color Temperature XD Advanced Reset 1 SETUP VIDEO AUDIO TIME OPTION SCREEN LOCK EZ Picture Color Temperature XD ...
...Cinema. 4 Press the G or button and then use D or E or or button to select O n or O f f. 5 Press EXIT or RETURN button to return to TV viewing or press MENU button to return to 30 fps video for viewing movies. When you operate Cinema (3:2 Pull-Down Mode or Cinema Correction Mode...), the TV will adjust 24 fps video from movies to the previous menu. SETUP VIDEO AUDIO TIME OPTION SCREEN LOCK EZ Picture Color Temperature XD Advanced Reset 1 SETUP VIDEO AUDIO TIME OPTION SCREEN LOCK EZ Picture Color Temperature XD ...

Owners Manual
Page 53
... the contrast and the brightness of the screen using the black level of the screen. ing or press MENU button to return to TV view- SETUP VIDEO AUDIO TIME OPTION SCREEN LOCK EZ Picture Color Temperature XD Advanced Reset 1 SETUP VIDEO AUDIO TIME OPTION SCREEN LOCK EZ Picture Color Temperature XD Advanced...
... the contrast and the brightness of the screen using the black level of the screen. ing or press MENU button to return to TV view- SETUP VIDEO AUDIO TIME OPTION SCREEN LOCK EZ Picture Color Temperature XD Advanced Reset 1 SETUP VIDEO AUDIO TIME OPTION SCREEN LOCK EZ Picture Color Temperature XD Advanced...
Owners Manual
Page 54
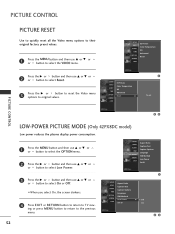
... to original values. ing or press MENU button to return to TV view- SETUP VIDEO AUDIO TIME OPTION SCREEN LOCK EZ Picture Color Temperature XD Advanced Reset SETUP VIDEO AUDIO TIME OPTION SCREEN LOCK EZ Picture Color Temperature XD Advanced Reset G 1 To set PICTURE CONTROL 23 LOW-POWER PICTURE MODE ...Off On 23 52 Press the G or button and then use D or E or or button to select the VIDEO menu. PICTURE CONTROL PICTURE RESET Use to quickly reset all the Video menu options to their original factory preset values. 1 Press the MENU button and then use D or E or 2 or button...
... to original values. ing or press MENU button to return to TV view- SETUP VIDEO AUDIO TIME OPTION SCREEN LOCK EZ Picture Color Temperature XD Advanced Reset SETUP VIDEO AUDIO TIME OPTION SCREEN LOCK EZ Picture Color Temperature XD Advanced Reset G 1 To set PICTURE CONTROL 23 LOW-POWER PICTURE MODE ...Off On 23 52 Press the G or button and then use D or E or or button to select the VIDEO menu. PICTURE CONTROL PICTURE RESET Use to quickly reset all the Video menu options to their original factory preset values. 1 Press the MENU button and then use D or E or 2 or button...
Owners Manual
Page 68
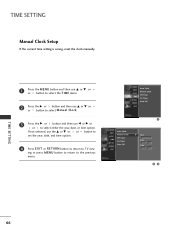
... SCREEN LOCK Auto Clock Manual Clock Off Timer On Timer Auto Off G Year - - - - TIME SETTING Manual Clock Setup If the current time setting is wrong, reset the clock manually. 1 Press the MENU button and then use D or E or or button to select the TIME menu. 2 Press the G or button and then... button and then use the D or E or or button to set the year, date, and time option. 4 Press EXIT or RETURN button to return to TV view- Date -- / -- Time -- : -- -- 23 TIME SETTING 66 Once selected, use F or G or or to the previous menu.
... SCREEN LOCK Auto Clock Manual Clock Off Timer On Timer Auto Off G Year - - - - TIME SETTING Manual Clock Setup If the current time setting is wrong, reset the clock manually. 1 Press the MENU button and then use D or E or or button to select the TIME menu. 2 Press the G or button and then... button and then use the D or E or or button to set the year, date, and time option. 4 Press EXIT or RETURN button to return to TV view- Date -- / -- Time -- : -- -- 23 TIME SETTING 66 Once selected, use F or G or or to the previous menu.
Owners Manual
Page 72
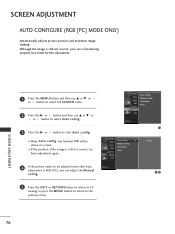
...c o n f i g .. 5 Press the EXIT or RETURN button to return to TV viewing or press the MENU button to return to start Auto config.. ■ When Auto config. Manual config. XGA Mode Reset SETUP Auto config. SCREEN ADJUSTMENT AUTO CONFIGURE (RGB [PC] MODE ONLY) Automatically adjusts picture ...position and minimizes image shaking. G VIDEO Manual config. AUDIO XGA Mode TIME Reset OPTION SCREEN LOCK 1 To set is still not correct, try Auto adjustment again. 4 If the picture needs to be shown on screen....
...c o n f i g .. 5 Press the EXIT or RETURN button to return to TV viewing or press the MENU button to return to start Auto config.. ■ When Auto config. Manual config. XGA Mode Reset SETUP Auto config. SCREEN ADJUSTMENT AUTO CONFIGURE (RGB [PC] MODE ONLY) Automatically adjusts picture ...position and minimizes image shaking. G VIDEO Manual config. AUDIO XGA Mode TIME Reset OPTION SCREEN LOCK 1 To set is still not correct, try Auto adjustment again. 4 If the picture needs to be shown on screen....
Owners Manual
Page 73
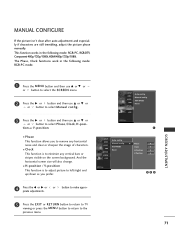
... V-Position 0 SCREEN LOCK 23 4 SCREEN ADJUSTMENT 71 or button to make appro- 5 Press the EXIT or RETURN button to return to TV viewing or press the MENU button to return to left/right and up/down as you to remove any vertical bars or stripes visible on ... background. MANUAL CONFIGURE If the picture isn't clear after auto adjustment and especially if characters are still trembling, adjust the picture phase manually. XGA Mode Reset 1 SETUP Auto config. This function works in the following mode: RGB-PC, RGB-DTV, Component 480p/720p/1080i, HDMI 480p/720p/1080i. SETUP ...
... V-Position 0 SCREEN LOCK 23 4 SCREEN ADJUSTMENT 71 or button to make appro- 5 Press the EXIT or RETURN button to return to TV viewing or press the MENU button to return to left/right and up/down as you to remove any vertical bars or stripes visible on ... background. MANUAL CONFIGURE If the picture isn't clear after auto adjustment and especially if characters are still trembling, adjust the picture phase manually. XGA Mode Reset 1 SETUP Auto config. This function works in the following mode: RGB-PC, RGB-DTV, Component 480p/720p/1080i, HDMI 480p/720p/1080i. SETUP ...

Owners Manual
Page 74
SETUP VIDEO AUDIO TIME OPTION SCREEN LOCK Auto config. ing or press M E NU button to return to select the desired XGA resolu- XGA Mode Reset G 1024 x 768 1280 x 768 1360 x 768 1366 x 768 23 SCREEN ADJUSTMENT 72 Manual config. If you select the 1600x1200, 1920x1200 resolution, uXGA mode is displayed....3 Press the G or button and then use D or E or or button to the previous menu. tion. 4 Press EXIT or RETURN button to return to TV view- SCREEN ADJUSTMENT SELECTING XGA MODE To see a normal picture, match the resolution of RGB mode and selection of XGA mode. XGA Mode...
SETUP VIDEO AUDIO TIME OPTION SCREEN LOCK Auto config. ing or press M E NU button to return to select the desired XGA resolu- XGA Mode Reset G 1024 x 768 1280 x 768 1360 x 768 1366 x 768 23 SCREEN ADJUSTMENT 72 Manual config. If you select the 1600x1200, 1920x1200 resolution, uXGA mode is displayed....3 Press the G or button and then use D or E or or button to the previous menu. tion. 4 Press EXIT or RETURN button to return to TV view- SCREEN ADJUSTMENT SELECTING XGA MODE To see a normal picture, match the resolution of RGB mode and selection of XGA mode. XGA Mode...
Owners Manual
Page 75
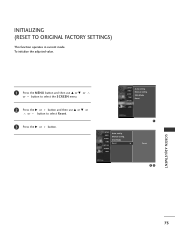
XGA Mode Reset SETUP Auto config. To initialize the adjusted value. 1 Press the M E N U button and then use D or E or or button to select the SCREEN menu. 2 Press the G or button and then use D or E or or button to select Reset. 3 Press the G or button. VIDEO Manual config. AUDIO XGA Mode TIME Reset G OPTION SCREEN LOCK 1 To set 23 SCREEN ADJUSTMENT 73 Manual config. INITIALIZING (RESET TO ORIGINAL FACTORY SETTINGS) This function operates in current mode. SETUP VIDEO AUDIO TIME OPTION SCREEN LOCK Auto config.
XGA Mode Reset SETUP Auto config. To initialize the adjusted value. 1 Press the M E N U button and then use D or E or or button to select the SCREEN menu. 2 Press the G or button and then use D or E or or button to select Reset. 3 Press the G or button. VIDEO Manual config. AUDIO XGA Mode TIME Reset G OPTION SCREEN LOCK 1 To set 23 SCREEN ADJUSTMENT 73 Manual config. INITIALIZING (RESET TO ORIGINAL FACTORY SETTINGS) This function operates in current mode. SETUP VIDEO AUDIO TIME OPTION SCREEN LOCK Auto config.


