

Owners Manual
Page 1
P/NO 38289UO498D (0512-REV01) Printed in Korea OWNER'S MANUAL MODELS: 26LX2R _ 32LX2R Internet Home Page ' h_p:/h¢,-c_w.lge.com http:l/_r¢_v.lge.com.br Please read this information to your set . Retain it for future reference. Record model number and serial number of the set . See the label attached on the back cover and quote this manual carefully before operating your dealer when you require service.
P/NO 38289UO498D (0512-REV01) Printed in Korea OWNER'S MANUAL MODELS: 26LX2R _ 32LX2R Internet Home Page ' h_p:/h¢,-c_w.lge.com http:l/_r¢_v.lge.com.br Please read this information to your set . Retain it for future reference. Record model number and serial number of the set . See the label attached on the back cover and quote this manual carefully before operating your dealer when you require service.
Owners Manual
Page 2
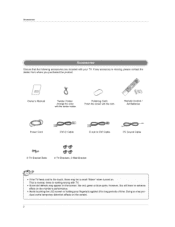
This is normal, there is missing, please contact the dealer from where you purchased the product, Owner's Manual Twister Holder Arrange the wires with your fingera(s) against it for long periods of time. Polishing Cloth Potish the screen with TV, • Some dot defects may appear on . However, this witl have no adverse effect on the screen. 2 Accessor_s Ensure that the following accessories are included with the twister holder. If any accessory is nothing wrong with the cloth, Remote Control / AA Batteries Power Cord DVI-D Cable D sub to DVI Cable @@ 2-TV Bracket Bolts...
This is normal, there is missing, please contact the dealer from where you purchased the product, Owner's Manual Twister Holder Arrange the wires with your fingera(s) against it for long periods of time. Polishing Cloth Potish the screen with TV, • Some dot defects may appear on . However, this witl have no adverse effect on the screen. 2 Accessor_s Ensure that the following accessories are included with the twister holder. If any accessory is nothing wrong with the cloth, Remote Control / AA Batteries Power Cord DVI-D Cable D sub to DVI Cable @@ 2-TV Bracket Bolts...

Owners Manual
Page 3
Never push objects of any kind on the television receiver. Do not use this television receiver near water, for example, near a bathtub, washbowl, kitchen sink, or laundry tub, in a wet basement, or near speakers or big metallic furnitures in a fire or electric shock Never spill tiquid of purchase. The television receiver may touch dangerous voltage points or short out parts that could resuit in order to service this television yourself as your proof of any kind into this television receiver on an unstable cart, stand, or table. Service Do not attempt to keep their ...
Never push objects of any kind on the television receiver. Do not use this television receiver near water, for example, near a bathtub, washbowl, kitchen sink, or laundry tub, in a wet basement, or near speakers or big metallic furnitures in a fire or electric shock Never spill tiquid of purchase. The television receiver may touch dangerous voltage points or short out parts that could resuit in order to service this television yourself as your proof of any kind into this television receiver on an unstable cart, stand, or table. Service Do not attempt to keep their ...
Owners Manual
Page 4
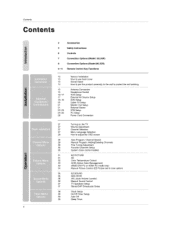
Contents 4 2 3 6 7 8 9_1;1 Acc_essori_ Safety Instructions Controls Connection Options (Model: 32LX2R) Connection Options (Model:26LX2R) Remote Control Key Functions 12 13 13 14 15 15 16-17 17 18_19 20 21 21 22--23 24_25 26 Various Installation How to ...
Contents 4 2 3 6 7 8 9_1;1 Acc_essori_ Safety Instructions Controls Connection Options (Model: 32LX2R) Connection Options (Model:26LX2R) Remote Control Key Functions 12 13 13 14 15 15 16-17 17 18_19 20 21 21 22--23 24_25 26 Various Installation How to ...
Owners Manual
Page 5
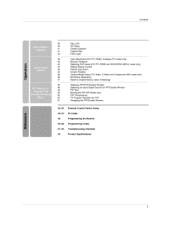
Contents 40 Key Lock 40 XD Demo 41 Closed Captions 41 Caption/Text 42 Front Light 43 Auto Adjustment (DW PC (RGB), A_a_ogue PC mode only) 43 Manual Configure 44 Selecting XGA mo_ (DW PC (RGB) and XGAJ_NXGA (60Hz) mode o_y) 44 Setting Picture Format 45 Picture Size Zoom 45 Screen Position 46 Cinema Mode Setup (TV, Video, SoVi_o and Cotangent 480i mode only) 46 NR (Noise Reduction) 47 Reset to original factory va_ue (_nitializing) 48 Watching PtP/_P/Double Window 48 Selecting an Input Signal Source for PIP/Double Window 49 PiP Size 49 Moving the PIP (PIP Mode...
Contents 40 Key Lock 40 XD Demo 41 Closed Captions 41 Caption/Text 42 Front Light 43 Auto Adjustment (DW PC (RGB), A_a_ogue PC mode only) 43 Manual Configure 44 Selecting XGA mo_ (DW PC (RGB) and XGAJ_NXGA (60Hz) mode o_y) 44 Setting Picture Format 45 Picture Size Zoom 45 Screen Position 46 Cinema Mode Setup (TV, Video, SoVi_o and Cotangent 480i mode only) 46 NR (Noise Reduction) 47 Reset to original factory va_ue (_nitializing) 48 Watching PtP/_P/Double Window 48 Selecting an Input Signal Source for PIP/Double Window 49 PiP Size 49 Moving the PIP (PIP Mode...
Owners Manual
Page 6
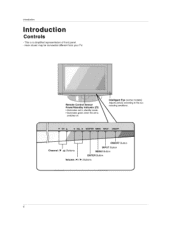
models) to the sur- Introduction This is switched on, Intelligent Eye (some Adjusts picture according rounding conditions. Remote Control Sensor Power/S_ndby indicator ((b) * i_[uminatesred in standby mode. * illuminates green when the set is a simplified representation of front panel Here shown may be somewhat different from your TV. ON/OFF Button Channel (TfA) Buttons INPUT Button MENU Button ENTER Button Volume (4 / I_) But:tons 6
models) to the sur- Introduction This is switched on, Intelligent Eye (some Adjusts picture according rounding conditions. Remote Control Sensor Power/S_ndby indicator ((b) * i_[uminatesred in standby mode. * illuminates green when the set is a simplified representation of front panel Here shown may be somewhat different from your TV. ON/OFF Button Channel (TfA) Buttons INPUT Button MENU Button ENTER Button Volume (4 / I_) But:tons 6

Owners Manual
Page 9
Remote Control Key Fu nct ions Introduction ,utton once_ the input source appear on screen as shown Press S-Video, Componentl, , DVI [ Selects the MTS sound: Mono Stereo or SAP. ._..:.:_iiiiiiiiiiiiiiiiiiiiiiiiiiiiiiiiiiiiiiiiiiiiiiiiiiiiiiiiiiiiiiiiiiiiiiiiiiiiiiiiiiiiiiiiiiiiiiiiiiiiiiiiiiiiiiiiiiiiiiiiiiiiiiiiiiiiiiiiiiiiiiiiiiiiiiiiiiiiiiiiiiiiii_ 9
Remote Control Key Fu nct ions Introduction ,utton once_ the input source appear on screen as shown Press S-Video, Componentl, , DVI [ Selects the MTS sound: Mono Stereo or SAP. ._..:.:_iiiiiiiiiiiiiiiiiiiiiiiiiiiiiiiiiiiiiiiiiiiiiiiiiiiiiiiiiiiiiiiiiiiiiiiiiiiiiiiiiiiiiiiiiiiiiiiiiiiiiiiiiiiiiiiiiiiiiiiiiiiiiiiiiiiiiiiiiiiiiiiiiiiiiiiiiiiiiiiiiiiiii_ 9
Owners Manual
Page 10
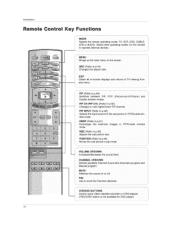
Introduction Remote Control Key Functions MODE Selects the remote operating mode: TV, VCR, DVD, CABLE, STB or AUDIO Select other operating modes, for the remote to operate external devices, MENU Brings up the main menu to the screen, ARC (Refer to scroll the Favorite channels, VCR/DVD BUTTONS Control some video cassette recorders or DVD pJayers ("RECORD" button is not available for the sub picture in pip mode VOLUME UPK)OWN Increases/decreases the sound Ilevel, CHANNEL UP/DOWN Selects available channels found with Automatic program and Manual program MUTE Switches the sound on or off ...
Introduction Remote Control Key Functions MODE Selects the remote operating mode: TV, VCR, DVD, CABLE, STB or AUDIO Select other operating modes, for the remote to operate external devices, MENU Brings up the main menu to the screen, ARC (Refer to scroll the Favorite channels, VCR/DVD BUTTONS Control some video cassette recorders or DVD pJayers ("RECORD" button is not available for the sub picture in pip mode VOLUME UPK)OWN Increases/decreases the sound Ilevel, CHANNEL UP/DOWN Selects available channels found with Automatic program and Manual program MUTE Switches the sound on or off ...

Owners Manual
Page 11
with new ones. Don't mix old or used batteries in correct polarity (+ with +, - Close the cover, * Use a remote control 7 meter distance and 30 degree (left/right) within the receiving unit scope. * Dispose of used batteries with -). Introduction Ocopveenr tohne thbeattbearyck cosmidep.artment Insert two 1_5V AA batteries in a recycle bin to prevent environment. 11
with new ones. Don't mix old or used batteries in correct polarity (+ with +, - Close the cover, * Use a remote control 7 meter distance and 30 degree (left/right) within the receiving unit scope. * Dispose of used batteries with -). Introduction Ocopveenr tohne thbeattbearyck cosmidep.artment Insert two 1_5V AA batteries in a recycle bin to prevent environment. 11

Owners Manual
Page 12
Installation lation Wall Mount installation , i , " , For proper ventilation, allow a clearance of 4" on each side and from the wall Detailed instaitation instructions are available from the wail. 12 Desktop Pedestal Installation For proper ventilation, allow a clearance of 4" on each side and from your dealer, see the optional Tilt Wall Mounting Bracket InstaLlation and Setup Guide.
Installation lation Wall Mount installation , i , " , For proper ventilation, allow a clearance of 4" on each side and from the wall Detailed instaitation instructions are available from the wail. 12 Desktop Pedestal Installation For proper ventilation, allow a clearance of 4" on each side and from your dealer, see the optional Tilt Wall Mounting Bracket InstaLlation and Setup Guide.
Owners Manual
Page 13
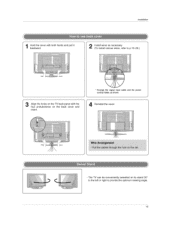
o The TV can be conveniently swivelled on its stand 30 ° to the left or right to p.15~26.) ij Align the holes on the TV back panet with the four protuberance on the back cover and insert. * Arrange De signaJ input cane and the _wer cord by }'_der, _ sh_n, Reinstall the cover. lnsL_flation bHaoclkdwathred. cover with both hands and pull it (tTnostaintlswtailrtevsaarisounsecweisressa,ryr,efer to provide the optimum viewing angle. 13
o The TV can be conveniently swivelled on its stand 30 ° to the left or right to p.15~26.) ij Align the holes on the TV back panet with the four protuberance on the back cover and insert. * Arrange De signaJ input cane and the _wer cord by }'_der, _ sh_n, Reinstall the cover. lnsL_flation bHaoclkdwathred. cover with both hands and pull it (tTnostaintlswtailrtevsaarisounsecweisressa,ryr,efer to provide the optimum viewing angle. 13

Owners Manual
Page 14
Notes • When moving the product to the wall so the product doesn't fall over when it is to tie the rope so it becomes horizontal between the wall and the product. Installation = Set it up the product, which is pulled in the picture, 2 Secure the bracket with the bolt (not provided a_s parts of the product, must purchase separately) on the wall so the product does- It will prevent the product from failing forward and hurting peopie, It will also prevent the product from the product. 1 Use the bracket and the bolt to fix the product to the wall as shown in the forward direction....
Notes • When moving the product to the wall so the product doesn't fall over when it is to tie the rope so it becomes horizontal between the wall and the product. Installation = Set it up the product, which is pulled in the picture, 2 Secure the bracket with the bolt (not provided a_s parts of the product, must purchase separately) on the wall so the product does- It will prevent the product from failing forward and hurting peopie, It will also prevent the product from the product. 1 Use the bracket and the bolt to fix the product to the wall as shown in the forward direction....
Owners Manual
Page 15
a "2- For optimum picture quality, adjust antenna direction if needed, Mufti-family Dwellings/Apartments _Conneot to wat_ antenna socket} Wal_ Antenna Socket RF Ce_ia_ Wire (75 ohm_ lnsL_flation Single#araBy Dwellings/Houses (Con nect to wall jack 'for outdoor sntenno) Bronze Wire careful not to _nd the bronze wire when connecting the antenna Arab #1_¢ • _n a peer sign_ area to be sp_Jt for assistance, 15 I{ the antenna needs to improve picture quality, purchase and install a signal amplifier, - ff the antenna is not installed properly, contact your deaf er for ...
a "2- For optimum picture quality, adjust antenna direction if needed, Mufti-family Dwellings/Apartments _Conneot to wat_ antenna socket} Wal_ Antenna Socket RF Ce_ia_ Wire (75 ohm_ lnsL_flation Single#araBy Dwellings/Houses (Con nect to wall jack 'for outdoor sntenno) Bronze Wire careful not to _nd the bronze wire when connecting the antenna Arab #1_¢ • _n a peer sign_ area to be sp_Jt for assistance, 15 I{ the antenna needs to improve picture quality, purchase and install a signal amplifier, - ff the antenna is not installed properly, contact your deaf er for ...
Owners Manual
Page 16
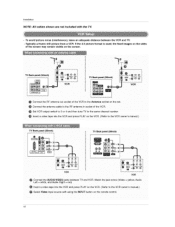
To avoid picture noise (interference), leave an adequate distance between TV and VCR. If the 4:3 picture format is used; Typically a frozen still picture from a VCR. on the sides 0 _nsert a video tape into the VCR and press PLAY on the VCR. _Refer to the VCR 0wneris rnanuail) TV Back panel (32inch) TV Back panel (26inch) Q VCR VCR Connect the AUDIO/VIDEO jacks between the VCR and TM. Match the jack colors (Video = yellow, Audio Left = white, and Audio Right = redl Insert a video tape into the VCR a_d press PLAY On the VCR, (Refer to the VCR owner's manuaL_ 49 Select Video input ...
To avoid picture noise (interference), leave an adequate distance between TV and VCR. If the 4:3 picture format is used; Typically a frozen still picture from a VCR. on the sides 0 _nsert a video tape into the VCR and press PLAY on the VCR. _Refer to the VCR 0wneris rnanuail) TV Back panel (32inch) TV Back panel (26inch) Q VCR VCR Connect the AUDIO/VIDEO jacks between the VCR and TM. Match the jack colors (Video = yellow, Audio Left = white, and Audio Right = redl Insert a video tape into the VCR a_d press PLAY On the VCR, (Refer to the VCR owner's manuaL_ 49 Select Video input ...

Owners Manual
Page 17
IRefer to the Video input. compared to connecting a regular VCR to the VCR owneCs manual ) Select S-Video input source with using the INPUT button on the remote control I Operate the co[responding external equipment. Con nect the audio outputs of the VCR to the S-VIDEO input on the VCR. Refer to the AUDIO input jacks on the set_ insert a video tape into the VCR and press PLAY on the set, The picture quaJity is improved; "_'_J _&_ _[_ [%T_'_;_ _ TV Sack panel (32inch) O " , TV Back paneJ (26inch) g VCR VCR O Connect the an S-VIDEO output of the VCR to external ...
IRefer to the Video input. compared to connecting a regular VCR to the VCR owneCs manual ) Select S-Video input source with using the INPUT button on the remote control I Operate the co[responding external equipment. Con nect the audio outputs of the VCR to the S-VIDEO input on the VCR. Refer to the AUDIO input jacks on the set_ insert a video tape into the VCR and press PLAY on the set, The picture quaJity is improved; "_'_J _&_ _[_ [%T_'_;_ _ TV Sack panel (32inch) O " , TV Back paneJ (26inch) g VCR VCR O Connect the an S-VIDEO output of the VCR to external ...

Owners Manual
Page 18
Installation ;o input sour_ w!th using the INPUT bu_on on the remote cont[oL TV Back panel (32inch) o m 1 DVD OVD TV Back panel (26|rich} Connect the HDMI output of the DVD to the HDM| jack ot_ the set. ,Select FIDMI DTV input source with using the INPUT button on _:he remote control Refer to the DVD player's manual for operating instructions. _can receive the wdeo and audio _ignal s_multaneously w_th using a HDMI cable. ) 18
Installation ;o input sour_ w!th using the INPUT bu_on on the remote cont[oL TV Back panel (32inch) o m 1 DVD OVD TV Back panel (26|rich} Connect the HDMI output of the DVD to the HDM| jack ot_ the set. ,Select FIDMI DTV input source with using the INPUT button on _:he remote control Refer to the DVD player's manual for operating instructions. _can receive the wdeo and audio _ignal s_multaneously w_th using a HDMI cable. ) 18

Owners Manual
Page 19
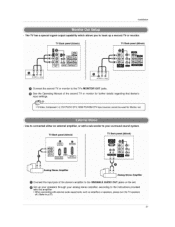
Select: Component 1 input source with using the INPUT button on DVD payer 'Y Y Y •¥ Pb Pr B_Y _:__;_ Ob 19 select Component2 input source. Video output ports on the remote control - Refer to the DVD player's manual for operating instructions, • Component input ports To get better picture qualit't, connect a DVD player to COMPONENT2. Turn on the DVD player, insert a DVD. Connect the audio outputs of the DVD to the COMPONENT1 VIDEO (Y, PB, PR) jacks on the set . If connect, ed to the compone_ input portsas shown below. '_ _ _ T _;_ _T_ _ __ TV Back ...
Select: Component 1 input source with using the INPUT button on DVD payer 'Y Y Y •¥ Pb Pr B_Y _:__;_ Ob 19 select Component2 input source. Video output ports on the remote control - Refer to the DVD player's manual for operating instructions, • Component input ports To get better picture qualit't, connect a DVD player to COMPONENT2. Turn on the DVD player, insert a DVD. Connect the audio outputs of the DVD to the COMPONENT1 VIDEO (Y, PB, PR) jacks on the set . If connect, ed to the compone_ input portsas shown below. '_ _ _ T _;_ _T_ _ __ TV Back ...
Owners Manual
Page 20
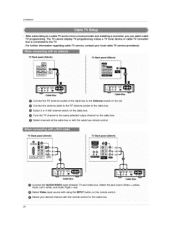
Installation - For further information regarding cable TV service, contact your local cable TV service provider(s), TV BaCk pane] (32inch) TV Back panel (26inch) N Cab|e Box Cab|e Box 0 Connect the RF antenna socket of the cabEe box to the TV. - The TV cannot display TV programming unless a TV tuner device or cable TV converter box is connected to the Antenna socket on the set, Connect the antenna cat31e Lo the RF antenna socket of the cable box. Select 3 or 4 with the cable pox remote control 20 Tune the TV channel to a cable TV service from a local provider and installing a ...
Installation - For further information regarding cable TV service, contact your local cable TV service provider(s), TV BaCk pane] (32inch) TV Back panel (26inch) N Cab|e Box Cab|e Box 0 Connect the RF antenna socket of the cabEe box to the TV. - The TV cannot display TV programming unless a TV tuner device or cable TV converter box is connected to the Antenna socket on the set, Connect the antenna cat31e Lo the RF antenna socket of the cable box. Select 3 or 4 with the cable pox remote control 20 Tune the TV channel to a cable TV service from a local provider and installing a ...
Owners Manual
Page 21
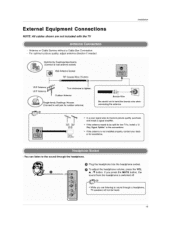
lns_3tlation * The TV has a special signal output capability which allows you to hook up your speakers through your surround sound system, TV Back panel (32inch) Q Q TV Back panel (26inch) _ Analog Stereo Amplifier 0 Connect the input jack of the stereo's amplifier to p,37) 21 Use to connected either an external amplifier, or add a sub-woofer to your analog stereo amplifier, according to the instructions provided with the amplifier • When connecting with extem_ audte equipments such as amplifiers or speaker's, please turn the TV s_aker_ off, (Refer to the VARIABLE AUDIO OUT ...
lns_3tlation * The TV has a special signal output capability which allows you to hook up your speakers through your surround sound system, TV Back panel (32inch) Q Q TV Back panel (26inch) _ Analog Stereo Amplifier 0 Connect the input jack of the stereo's amplifier to p,37) 21 Use to connected either an external amplifier, or add a sub-woofer to your analog stereo amplifier, according to the instructions provided with the amplifier • When connecting with extem_ audte equipments such as amplifiers or speaker's, please turn the TV s_aker_ off, (Refer to the VARIABLE AUDIO OUT ...
Owners Manual
Page 22
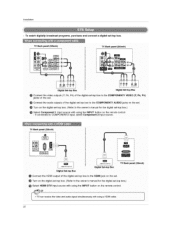
jack on the remote control 22 To w_ch digRally broadcast programs, purchase and connect a digital set4op box. Turn on the digital set . TV Back panel (32inch) Q D|gita| Set-top Box TV Sack pane! (26_nch) ! Dig_al _4op Box Connect the HDMI ou_ut of the digital set-top box to the owner's manual for the digital set-top box,) Select HDMI DTV nput source w_th using the iNPUT button on the set -top box_ _Refer to the HDM! Installation -
jack on the remote control 22 To w_ch digRally broadcast programs, purchase and connect a digital set4op box. Turn on the digital set . TV Back panel (32inch) Q D|gita| Set-top Box TV Sack pane! (26_nch) ! Dig_al _4op Box Connect the HDMI ou_ut of the digital set-top box to the owner's manual for the digital set-top box,) Select HDMI DTV nput source w_th using the iNPUT button on the set -top box_ _Refer to the HDM! Installation -