
Owners Manual
Page 18
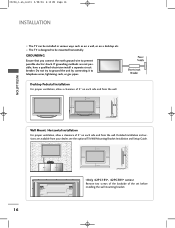
... INSTALLATION INSTALLATION I The TV is designed to be installed in various ways such as on a wall, or on each side and from your dealer, see the optional Tilt Wall Mounting Bracket Installation and Setup Guide. 4 inches 4 inches 4 inches 4 inches 4 inches Remove two... screws of the backside of the set before installing the wall mounting bracket. 16 If grounding methods are available from the wall. Detailed installation instructions are not possible, have a qualified electrician install a separate circuit breaker. Do not try...
... INSTALLATION INSTALLATION I The TV is designed to be installed in various ways such as on a wall, or on each side and from your dealer, see the optional Tilt Wall Mounting Bracket Installation and Setup Guide. 4 inches 4 inches 4 inches 4 inches 4 inches Remove two... screws of the backside of the set before installing the wall mounting bracket. 16 If grounding methods are available from the wall. Detailed installation instructions are not possible, have a qualified electrician install a separate circuit breaker. Do not try...
Owners Manual
Page 19
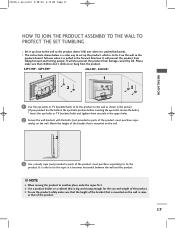
...to another place undo the ropes first. rately) on or hang from the product. 42PC1RV*, 42PC3RV* 26LC2R*, 32LC2R* 1 1 2 2 1 Use the eye-bolts or TV brackets/bolts to fix the product to the wall as shown in the picture. (If your product has the bolts in the eye-bolts position before ...bolts.) * Insert the eye-bolts or TV brackets/bolts and tighten them securely in the forward direction. G Use a product holder or a cabinet that is mounted on the wall. 3 3 Use a sturdy rope (not provided as parts of the product, must purchase sepa- I Set it up the product, which is to fix ...
...to another place undo the ropes first. rately) on or hang from the product. 42PC1RV*, 42PC3RV* 26LC2R*, 32LC2R* 1 1 2 2 1 Use the eye-bolts or TV brackets/bolts to fix the product to the wall as shown in the picture. (If your product has the bolts in the eye-bolts position before ...bolts.) * Insert the eye-bolts or TV brackets/bolts and tighten them securely in the forward direction. G Use a product holder or a cabinet that is mounted on the wall. 3 3 Use a sturdy rope (not provided as parts of the product, must purchase sepa- I Set it up the product, which is to fix ...


