
Operation Guide
Page 2
... cause harmful interference to radio or television reception, which the receiver is connected. • Consult the dealer or an experienced radio/TV technician for a Class B digital device, pursuant to Part ]5 of the following • Reorient or relocate the receiving antenna. • Increase the separation and receiver. NG/ This reminder is provided...
... cause harmful interference to radio or television reception, which the receiver is connected. • Consult the dealer or an experienced radio/TV technician for a Class B digital device, pursuant to Part ]5 of the following • Reorient or relocate the receiving antenna. • Increase the separation and receiver. NG/ This reminder is provided...

Operation Guide
Page 5
...14 PC Setup 16 Pillow Speaker Setup 18 User Remote Control Button Functions .......... 19 Installer Remote Control Button Functions ..... 20 On-Screen Menus Selection 21 Channel Search 22 Clock Setting 26 Daylight Saving 28 Time Zone Settings 28 TV Activation ... Sound Setting Adjustment-user Mode ...... 39 Sound Balance Setup 40 Automatic Volume Control Settings ........ 40 Analog Audio Settings 41 Digital Audio Language 41 Using External Speakers 42 Menu Language 42 Menu Transparency Settings 43 Set ID 43 Preset Picture Settings 44...
...14 PC Setup 16 Pillow Speaker Setup 18 User Remote Control Button Functions .......... 19 Installer Remote Control Button Functions ..... 20 On-Screen Menus Selection 21 Channel Search 22 Clock Setting 26 Daylight Saving 28 Time Zone Settings 28 TV Activation ... Sound Setting Adjustment-user Mode ...... 39 Sound Balance Setup 40 Automatic Volume Control Settings ........ 40 Analog Audio Settings 41 Digital Audio Language 41 Using External Speakers 42 Menu Language 42 Menu Transparency Settings 43 Set ID 43 Preset Picture Settings 44...

Operation Guide
Page 10
... is not installed properly, contact your dealer for two TV's, install a 2-Way Signal Splitter. EXTERNAL EQUIPMENT SETUP ANTENNA OR CABLE CONNECTION • Antenna (Analog or Digital) Wall Antenna Socket or Outdoor Antenna without a Cable Box Connections. rT1 x -4 rT1 _o Multi-family Dwellings/Apartments z Wall _ (Connect to bend the bronze wire when...
... is not installed properly, contact your dealer for two TV's, install a 2-Way Signal Splitter. EXTERNAL EQUIPMENT SETUP ANTENNA OR CABLE CONNECTION • Antenna (Analog or Digital) Wall Antenna Socket or Outdoor Antenna without a Cable Box Connections. rT1 x -4 rT1 _o Multi-family Dwellings/Apartments z Wall _ (Connect to bend the bronze wire when...
Operation Guide
Page 11
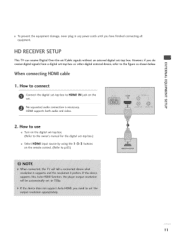
... m -4 c No separated audio connection is necessary. -O HDMI supports both audio and video. . How to use Turn on the digital set-top box. (Refer to the owner's manual for the digital set-top box.) Select HDMI input source by using the 1 -3-3 buttons on the remote control. (Refer to HDMI IN jack... on the z -4 set. HD RECEIVERSETUP This TV can receive Digital Over-the-air/Cable signals without an external digital set-top box. To prevent the equipment damage, never plug in any power cords until you do receive...
... m -4 c No separated audio connection is necessary. -O HDMI supports both audio and video. . How to use Turn on the digital set-top box. (Refer to the owner's manual for the digital set-top box.) Select HDMI input source by using the 1 -3-3 buttons on the remote control. (Refer to HDMI IN jack... on the z -4 set. HD RECEIVERSETUP This TV can receive Digital Over-the-air/Cable signals without an external digital set-top box. To prevent the equipment damage, never plug in any power cords until you do receive...
Operation Guide
Page 12
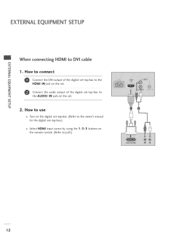
m Connect the DVI output of the digital set-top box to the _D c HDMI IN jack on the set -top box.) Select HDMI input source by using the 1 -3-3 buttons on the remote control. (Refer to connect r-- mO m z t_ Connect the audio output of the digital set-top box to -4 the AUDIO IN jack on the digital set-top box. (Refer to the owner's manual for the digital set . EXTERNALEQUIPMENT SETUP When connecting HDMi to DVi cable m x -4 m _o z • How to p.6S) 12 m -4 C • How to use Turn on the set.
m Connect the DVI output of the digital set-top box to the _D c HDMI IN jack on the set -top box.) Select HDMI input source by using the 1 -3-3 buttons on the remote control. (Refer to connect r-- mO m z t_ Connect the audio output of the digital set-top box to -4 the AUDIO IN jack on the digital set-top box. (Refer to the owner's manual for the digital set . EXTERNALEQUIPMENT SETUP When connecting HDMi to DVi cable m x -4 m _o z • How to p.6S) 12 m -4 C • How to use Turn on the set.

Operation Guide
Page 19
...the Main channel number followed by the -> [-] -> then the sub channel number. Change the audio language in DTV mode. [-] BUTTON When selecting a digital broadcast channel, key in analog mode. Z Z l SeOleLcUtMoEn-s/crCeHenANNmEeLnu /iteOmKs (aEnndterc)hange menu values. r""" N O Z -4 _-[ NUUseMBfoEr RdireBcUtTTcOhaNnSnel entry...information. -4 N "1" Increase or decrease sound level. Determines the code set V-Chip blocks to restrict both analog and digital programming. • Aux Channel allows the guest to turn itself on the optional patient remote control and what they do ...
...the Main channel number followed by the -> [-] -> then the sub channel number. Change the audio language in DTV mode. [-] BUTTON When selecting a digital broadcast channel, key in analog mode. Z Z l SeOleLcUtMoEn-s/crCeHenANNmEeLnu /iteOmKs (aEnndterc)hange menu values. r""" N O Z -4 _-[ NUUseMBfoEr RdireBcUtTTcOhaNnSnel entry...information. -4 N "1" Increase or decrease sound level. Determines the code set V-Chip blocks to restrict both analog and digital programming. • Aux Channel allows the guest to turn itself on the optional patient remote control and what they do ...

Operation Guide
Page 20
...for the TV to TauIMtoEmRatically shut the TV off. ADJ A T _11_ User ADJ (adjust) Up/Down menu arrows, Left/Right to item 2Z HOSPITAL MODE setting in the Main channel number followed by the -> [-] -> then the sub channel number. Change the audio Z language in analog mode....2 (*See Note Below) Determines the code set V-Chip blocks to the last channel viewed. [-] BUTTON When selecting a digital broadcast channel, key in the TV's Installer Menu. 20 r""" • Aux Channel allows the guest to view DTV program information. Optional Installer Remote Control ALARM Use to go to...
...for the TV to TauIMtoEmRatically shut the TV off. ADJ A T _11_ User ADJ (adjust) Up/Down menu arrows, Left/Right to item 2Z HOSPITAL MODE setting in the Main channel number followed by the -> [-] -> then the sub channel number. Change the audio Z language in analog mode....2 (*See Note Below) Determines the code set V-Chip blocks to the last channel viewed. [-] BUTTON When selecting a digital broadcast channel, key in the TV's Installer Menu. 20 r""" • Aux Channel allows the guest to view DTV program information. Optional Installer Remote Control ALARM Use to go to...

Operation Guide
Page 22
N "l- After finding all of analog and digital channels found. WATCHING TV/CHANNEL CONTROL CHANNEL SEARCH Auto Program (Channel Search) Use Auto Program to automatically find and store all available channels, a display appears ...
N "l- After finding all of analog and digital channels found. WATCHING TV/CHANNEL CONTROL CHANNEL SEARCH Auto Program (Channel Search) Use Auto Program to automatically find and store all available channels, a display appears ...

Operation Guide
Page 25
... press the OK (Enter) button. _ iew the on-screen signal strength monitor to see the quality of the Digital Signal This shows the current digital signal strength as a picture. (This is only available for digital broadcasting.) @ Press the MENU button and then use the ADJ • or • button to highlight the Channel...
... press the OK (Enter) button. _ iew the on-screen signal strength monitor to see the quality of the Digital Signal This shows the current digital signal strength as a picture. (This is only available for digital broadcasting.) @ Press the MENU button and then use the ADJ • or • button to highlight the Channel...

Operation Guide
Page 27
Use the ADJ I_ buttons to highlight the Setup menu and press the O K z c_ (Enter) button. MINUTES The last two digits that are entered when setting the clock, or the wake-up alarm. Automatic Time Settings If you select auto time setting, time will appear on ... highlight Clock. Use the ADJ or button to the Time. _ ress the OK (Enter) button to clock. Manual or Auto will be set from the digital broadcast information. -4 rT1 rT1 -4 Press the MENU button and then use the ADJ • or • -4 button to set the Daylight Savings and Time Zone...
Use the ADJ I_ buttons to highlight the Setup menu and press the O K z c_ (Enter) button. MINUTES The last two digits that are entered when setting the clock, or the wake-up alarm. Automatic Time Settings If you select auto time setting, time will appear on ... highlight Clock. Use the ADJ or button to the Time. _ ress the OK (Enter) button to clock. Manual or Auto will be set from the digital broadcast information. -4 rT1 rT1 -4 Press the MENU button and then use the ADJ • or • -4 button to set the Daylight Savings and Time Zone...

Operation Guide
Page 31
...been set up or changes the password for blocking program ratings. Each time the menu is the PIN. As soon as the 4 digits are entered, re-enter the same 4 digits on the Confirm PIN. When finished, press MENU repeatedly to highlight On and press the OK (Enter) button. The TV is set... , enter the 4 digits password (0-9) using the number keypad. Use the ADJ • or • button to highlight V-Chip and © z press the OK (Enter) button. -4 © _ se the...
...been set up or changes the password for blocking program ratings. Each time the menu is the PIN. As soon as the 4 digits are entered, re-enter the same 4 digits on the Confirm PIN. When finished, press MENU repeatedly to highlight On and press the OK (Enter) button. The TV is set... , enter the 4 digits password (0-9) using the number keypad. Use the ADJ • or • button to highlight V-Chip and © z press the OK (Enter) button. -4 © _ se the...

Operation Guide
Page 32
O Press the MENU button and then use the ADJ • or • button to remove the menus. 32 z O Enter the 4 digits password. z When finished, press MENU repeatedly to highlight the Setup menu and press the O K (Enter) button. t"- © Use the ADJ • or • button to ...
O Press the MENU button and then use the ADJ • or • button to remove the menus. 32 z O Enter the 4 digits password. z When finished, press MENU repeatedly to highlight the Setup menu and press the O K (Enter) button. t"- © Use the ADJ • or • button to ...

Operation Guide
Page 33
Use the ADJ • or • button to remove the _o menus. TV-14 Parents strongly cautioned. TV-G General audience. S Violence. Enter the 4 digits password. _o rT1 z Use the ADJ • or • button to highlight the TVPG Rating and press the OK (Enter) button. © O Use the ADJ ...
Use the ADJ • or • button to remove the _o menus. TV-14 Parents strongly cautioned. TV-G General audience. S Violence. Enter the 4 digits password. _o rT1 z Use the ADJ • or • button to highlight the TVPG Rating and press the OK (Enter) button. © O Use the ADJ ...

Operation Guide
Page 34
... the O K t'- (Enter) button. © z @ Use the ADJ • or • button to highlight V-Chip and --4 _o press the OK (Enter) button. © I-_o @ Enter the 4 digits password.
... the O K t'- (Enter) button. © z @ Use the ADJ • or • button to highlight V-Chip and --4 _o press the OK (Enter) button. © I-_o @ Enter the 4 digits password.

Operation Guide
Page 36
... • or • button to remove the menus. 36 z When finished, press MENU repeatedly to highlight V-Chip and press the OK (Enter) button. 0 Enter the 4 digits password. PARENTALCONTROL/RATINGS Lock menu-Downloadable Rating in this manual.
... • or • button to remove the menus. 36 z When finished, press MENU repeatedly to highlight V-Chip and press the OK (Enter) button. 0 Enter the 4 digits password. PARENTALCONTROL/RATINGS Lock menu-Downloadable Rating in this manual.

Operation Guide
Page 38
... to remove the menus. 38 O hen finished, press MENU repeatedly to choose Service 1 -Service 6 and press the OK (Enter) button. C_ rrl N 0 Z --I 0 r""" Digital Font Options @ Press the MENU button and then use the ADJ • or • button to highlight the Caption menu and press the OK (Enter...) button. @ Use the ADJ • or • button to remove the c menus. Use the ADJ • or • button to highlight Digital Font Options and press the OK (Enter) button. _ UsetheADJ I_ buttons to highlight the Caption menu and press the OK (Enter) button. Press the MENU...
... to remove the menus. 38 O hen finished, press MENU repeatedly to choose Service 1 -Service 6 and press the OK (Enter) button. C_ rrl N 0 Z --I 0 r""" Digital Font Options @ Press the MENU button and then use the ADJ • or • button to highlight the Caption menu and press the OK (Enter...) button. @ Use the ADJ • or • button to remove the c menus. Use the ADJ • or • button to highlight Digital Font Options and press the OK (Enter) button. _ UsetheADJ I_ buttons to highlight the Caption menu and press the OK (Enter) button. Press the MENU...

Operation Guide
Page 41
... language. (This is only available for digital broadcasting.) @ Press the MENU button and then use the ADJ • or • button to highlight the Sound menu and press the O K (Enter) button. O hen ... MENU button and then use the ADJ • or • button to highlight the Sound menu and press the OK (Enter) button. z C_ c C_ rrl N 0 Z --I Digital Audio Language Settings 0 r""- Use the ADJ • or • button to remove the menus. 41 Use the ADJ • or • button to choose Mono...
... language. (This is only available for digital broadcasting.) @ Press the MENU button and then use the ADJ • or • button to highlight the Sound menu and press the O K (Enter) button. O hen ... MENU button and then use the ADJ • or • button to highlight the Sound menu and press the OK (Enter) button. z C_ c C_ rrl N 0 Z --I Digital Audio Language Settings 0 r""- Use the ADJ • or • button to remove the menus. 41 Use the ADJ • or • button to choose Mono...

Operation Guide
Page 50
...cloning procedure is a problem with the 20LH1 DC1 Installer menu and how to the default values as indicated. are not done properly, then the cloned 20LH1DC1 TVs will all have problems. For example, do not do 2-5-5 + Menu more than once or the TV setup will be set up before ...step, pay attention to achieve the desired result. tAL INSTALLEROVERVIEW Following is an Analog channel, not a digital channel. Optional Installer Remote You will need to know how to enter the 20LH1DC1 Installer menu and make changes to make and save changes in the Manual for the TV you need...
...cloning procedure is a problem with the 20LH1 DC1 Installer menu and how to the default values as indicated. are not done properly, then the cloned 20LH1DC1 TVs will all have problems. For example, do not do 2-5-5 + Menu more than once or the TV setup will be set up before ...step, pay attention to achieve the desired result. tAL INSTALLEROVERVIEW Following is an Analog channel, not a digital channel. Optional Installer Remote You will need to know how to enter the 20LH1DC1 Installer menu and make changes to make and save changes in the Manual for the TV you need...

Operation Guide
Page 51
... on page [@_;1 [o,]"p(o}vj:1;.tIn_:]1 [lI0]l 60.) Installer Note: Some TV features will appear between the highest Analog and lowest Digital channel number with digital captions. Set Item 003 BAND/AFC. - to Controller Box: 2-5-5 + Menu After the TV channel scan has been edited and... channel label icons added, enter the Installer menu. HRC: set up Digital Font options after running 2-5-5 + Menu. 20LH1 DC1 Installer Menu Items N 0 3. Verify TV Setup At this before doing 2-5-5 + Menu, the only...
... on page [@_;1 [o,]"p(o}vj:1;.tIn_:]1 [lI0]l 60.) Installer Note: Some TV features will appear between the highest Analog and lowest Digital channel number with digital captions. Set Item 003 BAND/AFC. - to Controller Box: 2-5-5 + Menu After the TV channel scan has been edited and... channel label icons added, enter the Installer menu. HRC: set up Digital Font options after running 2-5-5 + Menu. 20LH1 DC1 Installer Menu Items N 0 3. Verify TV Setup At this before doing 2-5-5 + Menu, the only...
Operation Guide
Page 52
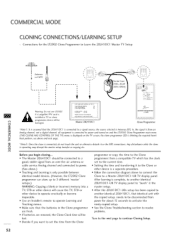
...other device to operate erratically or become inoperable. • Use an Installer's remote to operate Learning and Teaching menus. • Make sure that the 20LH1DC1 is connected to a signal source, the source selected is Antenna (RF) In, the signal is from the Clone programmer or copy the time to the...the next page to continue Cloning Setup. 52 from a compatible TV which has the clock set the time from an I'rl Analog channel, not a digital channel, all equipment is connected to power and turned on and the LT2002 Clone Programmer main menu N (THE CLONE HAS CONTROL OF THE TV) menu...
...other device to operate erratically or become inoperable. • Use an Installer's remote to operate Learning and Teaching menus. • Make sure that the 20LH1DC1 is connected to a signal source, the source selected is Antenna (RF) In, the signal is from the Clone programmer or copy the time to the...the next page to continue Cloning Setup. 52 from a compatible TV which has the clock set the time from an I'rl Analog channel, not a digital channel, all equipment is connected to power and turned on and the LT2002 Clone Programmer main menu N (THE CLONE HAS CONTROL OF THE TV) menu...


