
Operation Guide
Page 2
...could void the user's authority to operate the equipment. 2 IT IS FORBIDDEN TO CONNECT TO ANY TELECOMMUNICATION NETWORK / TELEPHONE. THIS TV This equipment has been tested and found to comply with the instruction manual, may cause harmful interference to radio communications. This equipment... harmful interference to radio or television reception, which the receiver is connected. • Consult the dealer or an experienced radio/TV technician for help. Changes or modifications not expressly approved by turning the equipment off and on a circuit different from that the...
...could void the user's authority to operate the equipment. 2 IT IS FORBIDDEN TO CONNECT TO ANY TELECOMMUNICATION NETWORK / TELEPHONE. THIS TV This equipment has been tested and found to comply with the instruction manual, may cause harmful interference to radio communications. This equipment... harmful interference to radio or television reception, which the receiver is connected. • Consult the dealer or an experienced radio/TV technician for help. Changes or modifications not expressly approved by turning the equipment off and on a circuit different from that the...

Operation Guide
Page 5
... Button Functions .......... 19 Installer Remote Control Button Functions ..... 20 On-Screen Menus Selection 21 Channel Search 22 Clock Setting 26 Daylight Saving 28 Time Zone Settings 28 TV Activation Time Settings 29 TV Deactivation Time Settings 29 Auto Off 30 Set Password &... Lock System 31 Movie & TV Ratings 33 Caption / Text 37 Preset Sound Settings 39 Sound Setting...
... Button Functions .......... 19 Installer Remote Control Button Functions ..... 20 On-Screen Menus Selection 21 Channel Search 22 Clock Setting 26 Daylight Saving 28 Time Zone Settings 28 TV Activation Time Settings 29 TV Deactivation Time Settings 29 Auto Off 30 Set Password &... Lock System 31 Movie & TV Ratings 33 Caption / Text 37 Preset Sound Settings 39 Sound Setting...

Operation Guide
Page 6
... If an accessory is an optional remote control available for the product. "D User must use shielded signal interface cables with your LG dealer if you need an installer's remote and the LT2002 Quickset II Clone Programmer - The installer remote allows access to purchase the...contact the dealer where you purchased the product. The LT2002 Quickset II Clone Programmer is NOT included with the TV. • However, both are included with ferrite cores to duplicate a TV's setup and install it on the Setup menu. See your product. The remote control is used to maintain ...
... If an accessory is an optional remote control available for the product. "D User must use shielded signal interface cables with your LG dealer if you need an installer's remote and the LT2002 Quickset II Clone Programmer - The installer remote allows access to purchase the...contact the dealer where you purchased the product. The LT2002 Quickset II Clone Programmer is NOT included with the TV. • However, both are included with ferrite cores to duplicate a TV's setup and install it on the Setup menu. See your product. The remote control is used to maintain ...

Operation Guide
Page 7
...O z Glows orange in Standby mode. On-screen displays will appear when the feature is active or the function is set . Press again to your TV. FRONT PANELINFORMATION +3 Here shown may be somewhat different from standby mode. "D Front Panel Controls rfl Power / Standby Indicator Glows red in Sleep Timer ...Remote Control Sensor and/or Alarm mode. Glows green when the TV is turned on page 21. B Press MENU repeatedly to cycle through menus. _e ( 00 411 VOL I_ 00 Y CH @ 0 ®o TTTT...
...O z Glows orange in Standby mode. On-screen displays will appear when the feature is active or the function is set . Press again to your TV. FRONT PANELINFORMATION +3 Here shown may be somewhat different from standby mode. "D Front Panel Controls rfl Power / Standby Indicator Glows red in Sleep Timer ...Remote Control Sensor and/or Alarm mode. Glows green when the TV is turned on page 21. B Press MENU repeatedly to cycle through menus. _e ( 00 411 VOL I_ 00 Y CH @ 0 ®o TTTT...

Operation Guide
Page 8
... IN RS-232C PORT ANTENNA CABLE FUTURE USE Connect to pillow speaker (12V DC---= 40mA) 8 PREPARATION BACK PANELINFORMATION Here shown may be heard from your TV. PILLOW JACK IN Used to connect to an antenna or cable system. INTERFAC _ Use with clone programmer. m Back Connection Panel 0 z G / AUDIO / VIDEO IN Connect.... ,/ S UPDATE SWITCH 1 SPEAKER SWITCH _ Used to select the speaker output switch. *No_e: tf Pillow Speaker is selected, no Sound wilt be somewhat different from TV speakers. _"_ (NORMAL SPEAKERor PILLOWSPEAKER.) _ RS-232C SELECT SWITCH M.RI.
... IN RS-232C PORT ANTENNA CABLE FUTURE USE Connect to pillow speaker (12V DC---= 40mA) 8 PREPARATION BACK PANELINFORMATION Here shown may be heard from your TV. PILLOW JACK IN Used to connect to an antenna or cable system. INTERFAC _ Use with clone programmer. m Back Connection Panel 0 z G / AUDIO / VIDEO IN Connect.... ,/ S UPDATE SWITCH 1 SPEAKER SWITCH _ Used to select the speaker output switch. *No_e: tf Pillow Speaker is selected, no Sound wilt be somewhat different from TV speakers. _"_ (NORMAL SPEAKERor PILLOWSPEAKER.) _ RS-232C SELECT SWITCH M.RI.

Operation Guide
Page 9
... a potential hazard to the user. The wall mount location chosen should be appro-priate for mounting a pedestal-style TV stand. (Some stands are portable and can be moved from your TV. Since there are numerous types of stands and mounts available, only a few are shown some examples of the...the preferred choice for installing a VESA Standard Mount O z Typical Wall Stud Type Mount with Swivel Bracket 9 Refer to the instructions provided with the TV stand that the wiring is capable of supporting the weight of VESA standard lOOmm mounts. If the mount will be _0 used to attach the...
... a potential hazard to the user. The wall mount location chosen should be appro-priate for mounting a pedestal-style TV stand. (Some stands are portable and can be moved from your TV. Since there are numerous types of stands and mounts available, only a few are shown some examples of the...the preferred choice for installing a VESA Standard Mount O z Typical Wall Stud Type Mount with Swivel Bracket 9 Refer to the instructions provided with the TV stand that the wiring is capable of supporting the weight of VESA standard lOOmm mounts. If the mount will be _0 used to attach the...

Operation Guide
Page 10
and install properly. 10 rT1 x -4 rT1 _o Multi-family Dwellings/Apartments z Wall _ (Connect to be split for two TV's, install a 2-Way Signal Splitter. Cable RF Coaxial Wire (75 ohm) Single-family Dwellings/Houses (Connect to bend the bronze wire when connecting the antenna.... outdoor antenna) Be careful not to wall jack for assistance. For optimum picture quality, adjust antenna direction if needed. Using both cable and antenna Cable TV Wall Jack RF Coaxial Wire (75 ohm) RF Coaxial Wire (75 ohm) Diplexer (Signal Combiner) VHF To improve the picture quality in a poor ...
and install properly. 10 rT1 x -4 rT1 _o Multi-family Dwellings/Apartments z Wall _ (Connect to be split for two TV's, install a 2-Way Signal Splitter. Cable RF Coaxial Wire (75 ohm) Single-family Dwellings/Houses (Connect to bend the bronze wire when connecting the antenna.... outdoor antenna) Be careful not to wall jack for assistance. For optimum picture quality, adjust antenna direction if needed. Using both cable and antenna Cable TV Wall Jack RF Coaxial Wire (75 ohm) RF Coaxial Wire (75 ohm) Diplexer (Signal Combiner) VHF To improve the picture quality in a poor ...
Operation Guide
Page 11
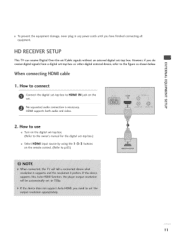
... all equipment. m -4 c No separated audio connection is necessary. -O HDMI supports both audio and video. . rT1 x -4 rT1 _o When connecting HDM[ cable z m _D 1. HD RECEIVERSETUP This TV can receive Digital Over-the-air/Cable signals without an external digital set-top box. How to connect c -O rT1 Connect the digital set-top box...
... all equipment. m -4 c No separated audio connection is necessary. -O HDMI supports both audio and video. . rT1 x -4 rT1 _o When connecting HDM[ cable z m _D 1. HD RECEIVERSETUP This TV can receive Digital Over-the-air/Cable signals without an external digital set-top box. How to connect c -O rT1 Connect the digital set-top box...
Operation Guide
Page 14
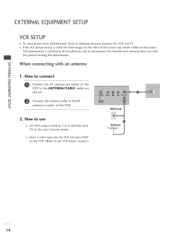
..._D c Connect the RF antenna out socket of the VCR. -D Wall Jack o How to use Set VCR output switch to 5 or 4 and then tune TV to the ANTENNA/CABLE socket on the screen. This phenomenon is used; z -4 m --4 Connect the antenna cable to the VCR owner's manual.) Antenna 14 ...EXTERNAL EQUIPMENT SETUP VCR SETUP To avoid picture noise (interference), leave an adequate distance between the VCR and TV. Insert a video tape into the VCR and press PLAY on the VCR. (Refer to the RF C antenna in consequence the manufactures warranty ...
..._D c Connect the RF antenna out socket of the VCR. -D Wall Jack o How to use Set VCR output switch to 5 or 4 and then tune TV to the ANTENNA/CABLE socket on the screen. This phenomenon is used; z -4 m --4 Connect the antenna cable to the VCR owner's manual.) Antenna 14 ...EXTERNAL EQUIPMENT SETUP VCR SETUP To avoid picture noise (interference), leave an adequate distance between the VCR and TV. Insert a video tape into the VCR and press PLAY on the VCR. (Refer to the RF C antenna in consequence the manufactures warranty ...

Operation Guide
Page 15
When connecting with a RCA cable m x m 1. How to p.65) 1S How to use c "O Insert a video tape into the VCR and press PLAY on the VCR. (Refer to the VCR owner's manual.) Select AV input source by using the 1 -3-1 buttons on the remote control. (Refer to connect z Connect the VIDEO jacks between TV and VCR. Match m _D the jack colors (Video = yellow, Audio Left = white, and c Audio Right = red) -O m z m 2.
When connecting with a RCA cable m x m 1. How to p.65) 1S How to use c "O Insert a video tape into the VCR and press PLAY on the VCR. (Refer to the VCR owner's manual.) Select AV input source by using the 1 -3-1 buttons on the remote control. (Refer to connect z Connect the VIDEO jacks between TV and VCR. Match m _D the jack colors (Video = yellow, Audio Left = white, and c Audio Right = red) -O m z m 2.

Operation Guide
Page 16
Select HDMI input source by using the 1 -3-3 buttons on --4 the set. m --4 C "O 2. How to connect I" m /O c jCacoknnoenct thteheseDt.VI output of the PC to the HDMI IN -O m z Connect the PC audio output to the AUDIO IN jack on the remote control. (Refer to p.6S) 16 How to DVi cable m x --4 m _o z 1. EXTERNALEQUIPMENT SETUP PC SETUP When connecting HDMi to use Turn on the PC and the TV.
Select HDMI input source by using the 1 -3-3 buttons on --4 the set. m --4 C "O 2. How to connect I" m /O c jCacoknnoenct thteheseDt.VI output of the PC to the HDMI IN -O m z Connect the PC audio output to the AUDIO IN jack on the remote control. (Refer to p.6S) 16 How to DVi cable m x --4 m _o z 1. EXTERNALEQUIPMENT SETUP PC SETUP When connecting HDMi to use Turn on the PC and the TV.

Operation Guide
Page 18
... certain brands of "smart" pillow speakers, such as Curbell's "GEN-II" models. Controlling the TV with a 1100 pf capacitor. Use a pillow speaker by a single-wire, serial data signal. This is a LG patented technology and is a 10-meg resistor in . Impedance to the Pillow Speaker position, Auto... Volume will be heard from pin 4) with short circuit protection. Isolated audio output. Controlling the TV with Serial Data The TV is set to earth ground is ...
... certain brands of "smart" pillow speakers, such as Curbell's "GEN-II" models. Controlling the TV with a 1100 pf capacitor. Use a pillow speaker by a single-wire, serial data signal. This is a LG patented technology and is a 10-meg resistor in . Impedance to the Pillow Speaker position, Auto... Volume will be heard from pin 4) with short circuit protection. Isolated audio output. Controlling the TV with Serial Data The TV is set to earth ground is ...

Operation Guide
Page 19
... Switch setting must correspond to the Alarm menu. Use to go to I iBteEmD 2l/7B,EDHOS2PIT(*ASLeeMONDotEe sBeettlionwg) in the TV's Installer Menu. Optional Patient Remote Control 19 Analog channels do . r""" N O Z -4 _-[ NUUseMBfoEr RdireBcUtTTcOhaNnSnel entry. TIMER... Press repeatedly to select a preset time to select a Channel Memory Bank - - 1,2, 3, or 4 (Standby). CHANNEL PREVIEW Displays available TV channels, and (if active) the Guest Parental Control menu: set transmitted, Bed 1 or Bed 2. Select available channels. Determines the code set...
... Switch setting must correspond to the Alarm menu. Use to go to I iBteEmD 2l/7B,EDHOS2PIT(*ASLeeMONDotEe sBeettlionwg) in the TV's Installer Menu. Optional Patient Remote Control 19 Analog channels do . r""" N O Z -4 _-[ NUUseMBfoEr RdireBcUtTTcOhaNnSnel entry. TIMER... Press repeatedly to select a preset time to select a Channel Memory Bank - - 1,2, 3, or 4 (Standby). CHANNEL PREVIEW Displays available TV channels, and (if active) the Guest Parental Control menu: set transmitted, Bed 1 or Bed 2. Select available channels. Determines the code set...

Operation Guide
Page 20
... in the TV's Installer Menu. 20 Z rrl r""" N CHANNEL PREVIEW O Displays available TV channels, and (if Z --4 active) the Guest Parental Control menu: set transmitted, Bed 1 or Bed 2. Press repeatedly to select a preset time to restrict both analog O and digital programming. Set a time for the TV to display current... MUTE Turns sound Off and On, while the picture remains. N -1- CC (Closed Captioning) Press to item 2Z HOSPITAL MODE setting in DTV mode. Switch setting must correspond to access closed captions. NUUseMBfoEr RdireBcUt TTcOhaNnSnel entry. WATCHING...
... in the TV's Installer Menu. 20 Z rrl r""" N CHANNEL PREVIEW O Displays available TV channels, and (if Z --4 active) the Guest Parental Control menu: set transmitted, Bed 1 or Bed 2. Press repeatedly to select a preset time to restrict both analog O and digital programming. Set a time for the TV to display current... MUTE Turns sound Off and On, while the picture remains. N -1- CC (Closed Captioning) Press to item 2Z HOSPITAL MODE setting in DTV mode. Switch setting must correspond to access closed captions. NUUseMBfoEr RdireBcUt TTcOhaNnSnel entry. WATCHING...

Operation Guide
Page 21
... . Z Z rrl r""" N 0 Z --t 0 r""" Caption Display Press the CC. Set a time for the TV to familiarize you with the TVs options. V-Chip Press the CC. INFO Press the INFO. In this manual, the OSD (On Screen Displays shown) may be different. Z C_ --t SAP ... in analog mode. Check the current program information. 21 Sleep Timer Menu Press TIMER. Turns selected option on or off and shows remaining time before TV shutoff. See Closed Captions page to view DTV program information. N -1- Channel Preview Press the CH PREVIEW. ON-SCREEN MENUS SELECTION Use the remote ...
... . Z Z rrl r""" N 0 Z --t 0 r""" Caption Display Press the CC. Set a time for the TV to familiarize you with the TVs options. V-Chip Press the CC. INFO Press the INFO. In this manual, the OSD (On Screen Displays shown) may be different. Z C_ --t SAP ... in analog mode. Check the current program information. 21 Sleep Timer Menu Press TIMER. Turns selected option on or off and shows remaining time before TV shutoff. See Closed Captions page to view DTV program information. N -1- Channel Preview Press the CH PREVIEW. ON-SCREEN MENUS SELECTION Use the remote ...

Operation Guide
Page 22
... and store all available channels, a display appears briefly showing the number of the channels available in hand and N press the POWER button to turn the TV on. -1- When finished, press MENU repeatedly to highlight the Channel menu and press the rrl r""" OK (Enter) button. z _ ress the MENU button and then use...
... and store all available channels, a display appears briefly showing the number of the channels available in hand and N press the POWER button to turn the TV on. -1- When finished, press MENU repeatedly to highlight the Channel menu and press the rrl r""" OK (Enter) button. z _ ress the MENU button and then use...

Operation Guide
Page 24
... if finished channel labeling. @ When finished, press MENU repeatedly to navigate the labels menu. and the ADJ I_ buttons to remove the menus. 24 WATCHING TV/CHANNEL CONTROL Channel Labels Setup Channel Labels help the user identify the channel or network being viewed. These are a series of these to label the... label is highlighted you can choose the N more common networks. Use any of preset labels from which you want for the channel shown in the TV's memory. Z Z rrl @ Use the ADJ • or • button to select channels r"-
... if finished channel labeling. @ When finished, press MENU repeatedly to navigate the labels menu. and the ADJ I_ buttons to remove the menus. 24 WATCHING TV/CHANNEL CONTROL Channel Labels Setup Channel Labels help the user identify the channel or network being viewed. These are a series of these to label the... label is highlighted you can choose the N more common networks. Use any of preset labels from which you want for the channel shown in the TV's memory. Z Z rrl @ Use the ADJ • or • button to select channels r"-

Operation Guide
Page 29
... Settings You can set a time for the TV to automatically turn -off . O Press the OK (Enter) button to automatically turn -on . rT1 O Press the OK (Enter) button to remove the menus. When finished, ... (Enter) button. Use the ADJ buttons to choose AM / PM, Hours, Minutes and time period to highlight Off Timer and press the OK (Enter) button. TV Activation Time Settings You can set a time for the TV to highlight Clock. O hen finished, press MENU repeatedly to the Time.
... Settings You can set a time for the TV to automatically turn -off . O Press the OK (Enter) button to automatically turn -on . rT1 O Press the OK (Enter) button to remove the menus. When finished, ... (Enter) button. Use the ADJ buttons to choose AM / PM, Hours, Minutes and time period to highlight Off Timer and press the OK (Enter) button. TV Activation Time Settings You can set a time for the TV to highlight Clock. O hen finished, press MENU repeatedly to the Time.

Operation Guide
Page 30
... the OK (Enter) button. Use the ADJ • or • button to the Time. TIME SETTING Auto Off If there is no signal on the TV for 15 minutes or more, or if no button is pressed for more than 3 hours, this function turns off the... TV automatically. --4 r_ b_ rrl -4 --4 Press the MENU button and then use the ADJ • or • Z button to highlight Clock. Press the OK (Enter) button ...
... the OK (Enter) button. Use the ADJ • or • button to the Time. TIME SETTING Auto Off If there is no signal on the TV for 15 minutes or more, or if no button is pressed for more than 3 hours, this function turns off the... TV automatically. --4 r_ b_ rrl -4 --4 Press the MENU button and then use the ADJ • or • Z button to highlight Clock. Press the OK (Enter) button ...

Operation Guide
Page 31
.... Each time the menu is the PIN. PARENTALCONTROL/RATINGS SET PASSWORD& LOCK SYSTEM Entering a PIN (Password) This option sets up with the default password "0-0-0-0". The TV is set , enter the 4 digits password (0-9) using the number keypad. When finished, press MENU repeatedly to highlight the Setup menu and press the O K (Enter) button...
.... Each time the menu is the PIN. PARENTALCONTROL/RATINGS SET PASSWORD& LOCK SYSTEM Entering a PIN (Password) This option sets up with the default password "0-0-0-0". The TV is set , enter the 4 digits password (0-9) using the number keypad. When finished, press MENU repeatedly to highlight the Setup menu and press the O K (Enter) button...


