

6053ci Series Operation Guide
Page 7
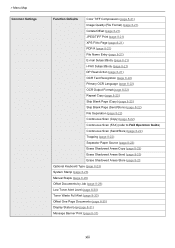
... the USB Drive Information 5-73 Removing USB Drive 5-73 Using the Internet Browser 5-74 Launching and Exiting the Browser 5-74 Using the Browser Screen 5-75 Manual Staple ...5-76 6 Using Various Functions 6-1 Functions Available on the Machine 6-2 About Functions Available on the Machine 6-2 How to Select Functions 6-2 Copy ...6-2 Send ...6-5 Custom Box (Store...
... the USB Drive Information 5-73 Removing USB Drive 5-73 Using the Internet Browser 5-74 Launching and Exiting the Browser 5-74 Using the Browser Screen 5-75 Manual Staple ...5-76 6 Using Various Functions 6-1 Functions Available on the Machine 6-2 About Functions Available on the Machine 6-2 How to Select Functions 6-2 Copy ...6-2 Send ...6-5 Custom Box (Store...

6053ci Series Operation Guide
Page 24
... machine information and configure settings Print data from a Web browser on your network printing system (the machine) with information Print without using the ID card. KYOCERA Net Direct Print Operation Guide Explains how to load paper and perform copy, print and scan operations, and indicates default settings and other information. Card... the PRESCRIBE command functions and control for each type of Adobe Reader to use the printer function. FAX Operation Guide Explains how to view the manuals on the network Scan images and save scanned documents.
... machine information and configure settings Print data from a Web browser on your network printing system (the machine) with information Print without using the ID card. KYOCERA Net Direct Print Operation Guide Explains how to load paper and perform copy, print and scan operations, and indicates default settings and other information. Card... the PRESCRIBE command functions and control for each type of Adobe Reader to use the printer function. FAX Operation Guide Explains how to view the manuals on the network Scan images and save scanned documents.
6053ci Series Operation Guide
Page 43
... Areas-Copy (page 8-23) Erase Shadowed Areas-Send (page 8-23) Erase Shadowed Areas-Store (page 8-23 Optional Keyboard Type (page 8-23) System Stamp (page 8-23) Manual Staple (page 8-29) Offset Documents by Job (page 8-29) Low Toner Alert Level (page 8-30) Toner Waste Full Alert (page 8-30) Offset One Page Documents...
... Areas-Copy (page 8-23) Erase Shadowed Areas-Send (page 8-23) Erase Shadowed Areas-Store (page 8-23 Optional Keyboard Type (page 8-23) System Stamp (page 8-23) Manual Staple (page 8-29) Offset Documents by Job (page 8-29) Low Toner Alert Level (page 8-30) Toner Waste Full Alert (page 8-30) Offset One Page Documents...
6053ci Series Operation Guide
Page 56
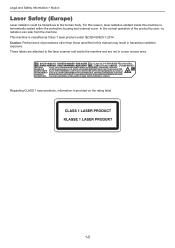
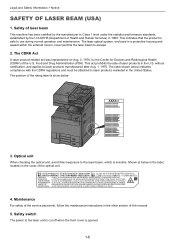
... attached to the human body. These labels are not in hazardous radiation exposure. In the normal operation of procedures other than those specified in this manual may result in a user access area. Legal and Safety Information > Notice Laser Safety (Europe) Laser radiation could be hazardous to the laser scanner unit inside...
... attached to the human body. These labels are not in hazardous radiation exposure. In the normal operation of procedures other than those specified in this manual may result in a user access area. Legal and Safety Information > Notice Laser Safety (Europe) Laser radiation could be hazardous to the laser scanner unit inside...
6053ci Series Operation Guide
Page 57
Food and Drug Administration (FDA). The position of this manual. 5. without certification, and applies to the laser beam, which is invisible. XXXXci 3. Maintenance For safety of the service personnel, follow the maintenance instructions in the ...
Food and Drug Administration (FDA). The position of this manual. 5. without certification, and applies to the laser beam, which is invisible. XXXXci 3. Maintenance For safety of the service personnel, follow the maintenance instructions in the ...

6053ci Series Operation Guide
Page 74
Installing and Setting up the Machine > Part Names (With Optional Equipments Attached) Part Names (With Optional Equipments Attached) 12 1 11 10 3 2 4 5 9 23 96 7 8 5 1 Tray 1 to 7 (tray 1 is the top tray) 2 Tray A 3 Tray B 4 Job Separator Tray 5 Folding Tray 6 Cassette 3 Optional Equipment (page 11-2) *1 JS-7100 is standard on 2553ci. 7 6 7 Cassette 4 8 Cassette 5 9 Finisher Tray 10 Job Separator Tray*1 11 Original Cover 12 Control Section of the Finisher Manual Staple (page 5-76) 2-5
Installing and Setting up the Machine > Part Names (With Optional Equipments Attached) Part Names (With Optional Equipments Attached) 12 1 11 10 3 2 4 5 9 23 96 7 8 5 1 Tray 1 to 7 (tray 1 is the top tray) 2 Tray A 3 Tray B 4 Job Separator Tray 5 Folding Tray 6 Cassette 3 Optional Equipment (page 11-2) *1 JS-7100 is standard on 2553ci. 7 6 7 Cassette 4 8 Cassette 5 9 Finisher Tray 10 Job Separator Tray*1 11 Original Cover 12 Control Section of the Finisher Manual Staple (page 5-76) 2-5
6053ci Series Operation Guide
Page 100
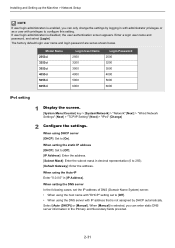
...user name and login password are set to [Off]. • When using the Auto-IP Enter "0.0.0.0" in with privileges to configure this setting. When [Manual] is disabled, the user authentication screen appears. When setting the static IP address [DHCP]: Set to [Off]. [IP Address]: Enter the address. [... change the settings by DHCP automatically. Enter a login user name and password, and select [Login]. Model Name 2553ci 3253ci 3553ci 4053ci 5053ci 6053ci Login User Name 2500 3200 3500 4000 5000 6000 Login Password 2500 3200 3500 4000 5000 6000 IPv4 setting 1 Display the screen. [System ...
...user name and login password are set to [Off]. • When using the Auto-IP Enter "0.0.0.0" in with privileges to configure this setting. When [Manual] is disabled, the user authentication screen appears. When setting the static IP address [DHCP]: Set to [Off]. [IP Address]: Enter the address. [... change the settings by DHCP automatically. Enter a login user name and password, and select [Login]. Model Name 2553ci 3253ci 3553ci 4053ci 5053ci 6053ci Login User Name 2500 3200 3500 4000 5000 6000 Login Password 2500 3200 3500 4000 5000 6000 IPv4 setting 1 Display the screen. [System ...
6053ci Series Operation Guide
Page 199
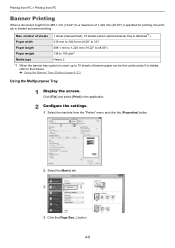
....03") is specified for printing, the print job is used, up to 10 sheets of sheets Paper width Paper length Paper weight Media type 1 sheet (manual feed), 10 sheets (when optional banner tray is attached*1) 210 mm to 304.8 mm (8.26" to 12") 488.1 mm to 1,220 mm (19.22" to...
....03") is specified for printing, the print job is used, up to 10 sheets of sheets Paper width Paper length Paper weight Media type 1 sheet (manual feed), 10 sheets (when optional banner tray is attached*1) 210 mm to 304.8 mm (8.26" to 12") 488.1 mm to 1,220 mm (19.22" to...
6053ci Series Operation Guide
Page 213
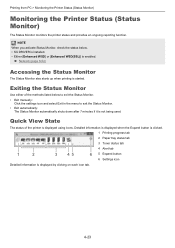
... displayed by clicking on each icon tab. 4-23 NOTE When you activate Status Monitor, check the status below to exit the Status Monitor. • Exit manually: Click the settings icon and select Exit in the menu to exit the Status Monitor. • Exit automatically: The Status Monitor automatically shuts down after...
... displayed by clicking on each icon tab. 4-23 NOTE When you activate Status Monitor, check the status below to exit the Status Monitor. • Exit manually: Click the settings icon and select Exit in the menu to exit the Status Monitor. • Exit automatically: The Status Monitor automatically shuts down after...
6053ci Series Operation Guide
Page 217
... the USB Drive Information 5-73 Removing USB Drive 5-73 Using the Internet Browser 5-74 Launching and Exiting the Browser 5-74 Using the Browser Screen 5-75 Manual Staple 5-76
... the USB Drive Information 5-73 Removing USB Drive 5-73 Using the Internet Browser 5-74 Launching and Exiting the Browser 5-74 Using the Browser Screen 5-75 Manual Staple 5-76
6053ci Series Operation Guide
Page 223
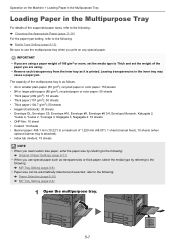
... Tray Loading Paper in the inner tray may cause a paper jam. Leaving transparencies in the Multipurpose Tray For details of 1,220 mm (48.03"): 1 sheet (manual feed), 10 sheets (when optional banner tray is printed.
... Tray Loading Paper in the inner tray may cause a paper jam. Leaving transparencies in the Multipurpose Tray For details of 1,220 mm (48.03"): 1 sheet (manual feed), 10 sheets (when optional banner tray is printed.
6053ci Series Operation Guide
Page 292
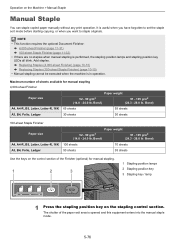
... want to staple originals. Bond) 100 sheets 70 sheets 50 sheets 35 sheets Use the keys on the control section of the Finisher (optional) for manual stapling 4,000-sheet Finisher Paper size Paper weight 52 - 90 g/m2 (14.0 - 24.0 lb. Bond) 91 - 105 g/m2 (24.3 - 28.0 lb. Bond... g/m2 (24.3 - 28.0 lb. Replacing Staples (4,000-sheet Finisher) (page 10-13) Replacing Staples (100-sheet Staple Finisher) (page 10-15) • Manual stapling cannot be executed when the machine is performed, the stapling position lamps and stapling position key LEDs all blink. It is opened and this...
... want to staple originals. Bond) 100 sheets 70 sheets 50 sheets 35 sheets Use the keys on the control section of the Finisher (optional) for manual stapling 4,000-sheet Finisher Paper size Paper weight 52 - 90 g/m2 (14.0 - 24.0 lb. Bond) 91 - 105 g/m2 (24.3 - 28.0 lb. Bond... g/m2 (24.3 - 28.0 lb. Replacing Staples (4,000-sheet Finisher) (page 10-13) Replacing Staples (100-sheet Staple Finisher) (page 10-15) • Manual stapling cannot be executed when the machine is performed, the stapling position lamps and stapling position key LEDs all blink. It is opened and this...

6053ci Series Operation Guide
Page 293
... while the stapling position lamps are away from the paper while stapling is automatically exited can be stapled, place the paper against the back guide (B). Manual Staple (page 8-29) 5-77 B A If the near side of the paper ( ) will be stapled, place the paper against the front guide (A). NOTE ... paper. 4 Staple the paper. Let go of the paper exit area closes. Stapling finishes and the output is properly placed. Operate after which manual staple mode is in the shutter opening of the paper ( ) will be changed. Once the paper is placed, the stapling position key cannot be...
... while the stapling position lamps are away from the paper while stapling is automatically exited can be stapled, place the paper against the back guide (B). Manual Staple (page 8-29) 5-77 B A If the near side of the paper ( ) will be stapled, place the paper against the front guide (A). NOTE ... paper. 4 Staple the paper. Let go of the paper exit area closes. Stapling finishes and the output is properly placed. Operate after which manual staple mode is in the shutter opening of the paper ( ) will be changed. Once the paper is placed, the stapling position key cannot be...
6053ci Series Operation Guide
Page 334
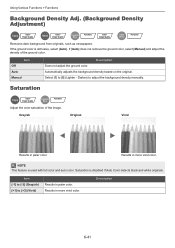
.... Grayish Original Vivid Results in paler color. Description 6-41 Item [-1] to [-3] (Grayish) [+1] to adjust the background density manually. NOTE This feature is disabled if Auto Color detects black and white originals. Item Off Auto Manual Description Does not adjust the ground color. Darker) to [+3] (Vivid) Results in paler color. Saturation is used...
.... Grayish Original Vivid Results in paler color. Description 6-41 Item [-1] to [-3] (Grayish) [+1] to adjust the background density manually. NOTE This feature is disabled if Auto Color detects black and white originals. Item Off Auto Manual Description Does not adjust the ground color. Darker) to [+3] (Vivid) Results in paler color. Saturation is used...

6053ci Series Operation Guide
Page 337
Using Various Functions > Functions Zoom Entry Manually reduces or enlarges the original image in 1% increments) Auto, 400% Max., 200% STMT>>Ledger, 154% STMT>>Legal, 129% Letter>>Ledger, 121% Legal>>Ledger, 100%, 78% ...
Using Various Functions > Functions Zoom Entry Manually reduces or enlarges the original image in 1% increments) Auto, 400% Max., 200% STMT>>Ledger, 154% STMT>>Legal, 129% Letter>>Ledger, 121% Legal>>Ledger, 100%, 78% ...

6053ci Series Operation Guide
Page 341
... can set the margin width and the back page margin. In addition, you can set a different margin than the front on Left]. When [Manual] is installed. *3 Not displayed when printing from the original size. Centering: Centers the original image on Left]. Select [# Keys] to enter ...the margins for the front. Back Page Auto, Manual For duplex copying, select [Back Page] and select [Auto] or [Manual]. The setting selections are the same as for "Left/ Right" and "Top/Bottom". Select [Original Orientation] to...
... can set the margin width and the back page margin. In addition, you can set a different margin than the front on Left]. When [Manual] is installed. *3 Not displayed when printing from the original size. Centering: Centers the original image on Left]. Select [# Keys] to enter ...the margins for the front. Back Page Auto, Manual For duplex copying, select [Back Page] and select [Auto] or [Manual]. The setting selections are the same as for "Left/ Right" and "Top/Bottom". Select [Original Orientation] to...

6053ci Series Operation Guide
Page 354
...when the optional OCR Scan Activation Kit is selected. *3 This function can be numbered. Last Page Auto, Manual (-10 to 0) If you require blank pages to be changed manually. Select [# Keys] to use the numeric keys for entry. Text (Text Stamp) (page 8-23) Set... the font size of page number. Select [Denominator #] and select [Manual]. Using Various Functions > Functions Item Value Description -1-, P.1, Count Blank ― 1/n Page*1 When a scanned document contains blank pages, add a check mark...
...when the optional OCR Scan Activation Kit is selected. *3 This function can be numbered. Last Page Auto, Manual (-10 to 0) If you require blank pages to be changed manually. Select [# Keys] to use the numeric keys for entry. Text (Text Stamp) (page 8-23) Set... the font size of page number. Select [Denominator #] and select [Manual]. Using Various Functions > Functions Item Value Description -1-, P.1, Count Blank ― 1/n Page*1 When a scanned document contains blank pages, add a check mark...

6053ci Series Operation Guide
Page 392
... to check details. Status/Job Cancel > Checking Job History Displaying Job History Screen 1 Display the screen. Sending the Log History You can either send it manually as needed or have it sent automatically whenever a set number of the selected job is reached. You can send the log history by E-mail. NOTE...
... to check details. Status/Job Cancel > Checking Job History Displaying Job History Screen 1 Display the screen. Sending the Log History You can either send it manually as needed or have it sent automatically whenever a set number of the selected job is reached. You can send the log history by E-mail. NOTE...
6053ci Series Operation Guide
Page 400
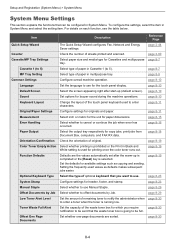
...Original/Paper Settings Measurement Error Handling Paper Output Orientation Confirmation Color Toner Empty Action Function Defaults Optional Keyboard Type System Stamp Manual Staple Offset Documents by Job. Select type of the touch panel keyboard used for Cassettes and multipurpose tray. Set options ...page 8-30 page 8-30 8-4 To configure the settings, select the item in Cassette 1 (to 5). Set the language to use Manual Staple. Select the output tray respectively for available settings such as defaults makes subsequent jobs easier. Select the screen appearing right after the ...
...Original/Paper Settings Measurement Error Handling Paper Output Orientation Confirmation Color Toner Empty Action Function Defaults Optional Keyboard Type System Stamp Manual Staple Offset Documents by Job. Select type of the touch panel keyboard used for Cassettes and multipurpose tray. Set options ...page 8-30 page 8-30 8-4 To configure the settings, select the item in Cassette 1 (to 5). Set the language to use Manual Staple. Select the output tray respectively for available settings such as defaults makes subsequent jobs easier. Select the screen appearing right after the ...
6053ci Series Operation Guide
Page 416
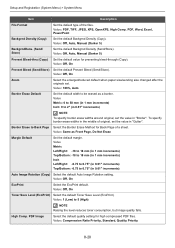
Value: Off, On Toner Save Level (EcoPrint) Select the default Toner Save Level (EcoPrint). High Comp. Value: Off, Auto, Manual (Darker 5) BackgrndDens. (Send/ Store) Set the default Backgrnd Density (Send/Store). Value: Off, On Prevent Bleed (Send/Store) Set the ...0.75" (in 0.01" increments) Top/Bottom: -0.75 to 5 (High) NOTE Raising the level reduces toner consumption, but image quality falls. Value: Off, Auto, Manual (Darker 5) Prevent Bleed-thru (Copy) Set the default value for preventing bleed-through (Copy). Value Metric: 0 to 50 mm (in "Border". Value: Off, On ...
Value: Off, On Toner Save Level (EcoPrint) Select the default Toner Save Level (EcoPrint). High Comp. Value: Off, Auto, Manual (Darker 5) BackgrndDens. (Send/ Store) Set the default Backgrnd Density (Send/Store). Value: Off, On Prevent Bleed (Send/Store) Set the ...0.75" (in 0.01" increments) Top/Bottom: -0.75 to 5 (High) NOTE Raising the level reduces toner consumption, but image quality falls. Value: Off, Auto, Manual (Darker 5) Prevent Bleed-thru (Copy) Set the default value for preventing bleed-through (Copy). Value Metric: 0 to 50 mm (in "Border". Value: Off, On ...


