
3212i/4012i KX Driver Operation Guide
Page 11
... Print tab as default After installation is successful, the Windows Printer Test Page, containing your computer name and information on the Finished page you can manually select your own printing system model and port name. Printer Driver 1-4 After clicking Finish, fix any issues and retry the installation. The installation continues. 8 When...
... Print tab as default After installation is successful, the Windows Printer Test Page, containing your computer name and information on the Finished page you can manually select your own printing system model and port name. Printer Driver 1-4 After clicking Finish, fix any issues and retry the installation. The installation continues. 8 When...

3212i/4012i KX Driver Operation Guide
Page 30
... the driver are unavailable to print. Prompt for name This option prompts the user for every print job. If this feature, an administrator can be manually registered at the printing system's operation panel.
... the driver are unavailable to print. Prompt for name This option prompts the user for every print job. If this feature, an administrator can be manually registered at the printing system's operation panel.

3212i/4012i KX Driver Operation Guide
Page 60
... pages to print on each sheet of measurement in all dialog boxes. Layout Scaling Gutter 6-2 An administrator can ensure that enlarges the margins to accommodate manual stapling or manual hole punch.
... pages to print on each sheet of measurement in all dialog boxes. Layout Scaling Gutter 6-2 An administrator can ensure that enlarges the margins to accommodate manual stapling or manual hole punch.

3212i/4012i KX Driver Operation Guide
Page 83
..., and type the box number and password. Custom boxes must be deleted after printing, or job retention date has passed Optional When printed from When manually operation panel deleted Custom Box With this feature, you can be set , type the password. If a password Printer Driver 10-2 Select Prompt for each user... Hard disk Hard disk Hard disk Access code required When job is printed When job is deleted from memory Optional password When printed from When manually operation panel deleted or up for box number, and click OK.
..., and type the box number and password. Custom boxes must be deleted after printing, or job retention date has passed Optional When printed from When manually operation panel deleted Custom Box With this feature, you can be set , type the password. If a password Printer Driver 10-2 Select Prompt for each user... Hard disk Hard disk Hard disk Access code required When job is printed When job is deleted from memory Optional password When printed from When manually operation panel deleted or up for box number, and click OK.

3212i/4012i KX Driver Operation Guide
Page 84
... job so that you need additional copies at the printing system's operation panel. The driver searches for each login user, and click OK. You can manually delete a job at the operation panel. When the designated number of jobs is set at short notice. Jobs are prompted to type a box number and...
... job so that you need additional copies at the printing system's operation panel. The driver searches for each login user, and click OK. You can manually delete a job at the operation panel. When the designated number of jobs is set at short notice. Jobs are prompted to type a box number and...

3212i/4012i KX Driver Operation Guide
Page 85
... Proof and hold or Quick copy jobs that saves jobs on the storage device after printing. You can manually delete a job at the operation panel. The number of the storage device. You can manually delete a job at the operation panel. To prevent this , select Use job name + date and time under Overwrite...
... Proof and hold or Quick copy jobs that saves jobs on the storage device after printing. You can manually delete a job at the operation panel. The number of the storage device. You can manually delete a job at the operation panel. To prevent this , select Use job name + date and time under Overwrite...

3212i/4012i KX Driver Operation Guide
Page 86
.... You also have the option of the storage device. When the access code is used, the job is a Job storage (e-MPS) option that you can manually delete a job at the printing system's operation panel. If you want to use the same access codes for print jobs, clear Prompt for access code... boxes. 10-5 User Guide The number of Job storage jobs that appears. 4 Click OK in the Job Storage dialog box that need to be removed manually from unauthorized printing by using an access code. When you click OK in the Print dialog box, type the access code in all dialog boxes...
.... You also have the option of the storage device. When the access code is used, the job is a Job storage (e-MPS) option that you can manually delete a job at the printing system's operation panel. If you want to use the same access codes for print jobs, clear Prompt for access code... boxes. 10-5 User Guide The number of Job storage jobs that appears. 4 Click OK in the Job Storage dialog box that need to be removed manually from unauthorized printing by using an access code. When you click OK in the Print dialog box, type the access code in all dialog boxes...

3212i/4012i Operation Guide
Page 7
... the USB Memory Information 5-67 Removing USB Memory 5-67 Using the Internet Browser 5-68 Launching and Exiting the Browser 5-68 Using the Browser Screen 5-69 Manual Staple ...5-70 6 Using Various Functions 6-1 Functions Available on the Machine 6-2 About Functions Available on the Machine 6-2 How to Select Functions 6-2 Copy ...6-2 Send ...6-5 Custom Box (Store...
... the USB Memory Information 5-67 Removing USB Memory 5-67 Using the Internet Browser 5-68 Launching and Exiting the Browser 5-68 Using the Browser Screen 5-69 Manual Staple ...5-70 6 Using Various Functions 6-1 Functions Available on the Machine 6-2 About Functions Available on the Machine 6-2 How to Select Functions 6-2 Copy ...6-2 Send ...6-5 Custom Box (Store...

3212i/4012i Operation Guide
Page 21
...from a computer Directly print a PDF file Monitor the machine and printers on the network Scan images and save scanned documents. KYOCERA Net Direct Print Operation Guide Explains how to check and change settings. PRESCRIBE Commands Command Reference Describes the native printer language (...PRESCRIBE commands). Install the following versions of emulation. Version 8.0 or later xx KYOCERA Net Viewer User Guide Explains how to view the manuals on the DVD. > Guides Provided with the Machine Guides (PDF) on the DVD (Product Library) Use...
...from a computer Directly print a PDF file Monitor the machine and printers on the network Scan images and save scanned documents. KYOCERA Net Direct Print Operation Guide Explains how to check and change settings. PRESCRIBE Commands Command Reference Describes the native printer language (...PRESCRIBE commands). Install the following versions of emulation. Version 8.0 or later xx KYOCERA Net Viewer User Guide Explains how to view the manuals on the DVD. > Guides Provided with the Machine Guides (PDF) on the DVD (Product Library) Use...

3212i/4012i Operation Guide
Page 40
...) (page 8-21) Continuous Scan (FAX) (refer to FAX Operation Guide) Continuous Scan (Send/Store) (page 8-21) Optional Keyboard Type (page 8-21) System Stamp (page 8-22) Manual Staple (page 8-28) Offset Documents by Job (page 8-28) Low Toner Alert (page 8-29) Offset One Page Documents (page 8-29) Display Status/Log (page 8-29...
...) (page 8-21) Continuous Scan (FAX) (refer to FAX Operation Guide) Continuous Scan (Send/Store) (page 8-21) Optional Keyboard Type (page 8-21) System Stamp (page 8-22) Manual Staple (page 8-28) Offset Documents by Job (page 8-28) Low Toner Alert (page 8-29) Offset One Page Documents (page 8-29) Display Status/Log (page 8-29...

3212i/4012i Operation Guide
Page 54
... safety of the service personnel, follow the maintenance instructions in the other section of laser products in 1968. This act prohibits the sale of this manual. 4. Safety switch The power to laser products manufactured after Aug. 1, 1976. Legal and Safety Information > Notice SAFETY OF LASER BEAM (USA) 1. Safety of Health and...
... safety of the service personnel, follow the maintenance instructions in the other section of laser products in 1968. This act prohibits the sale of this manual. 4. Safety switch The power to laser products manufactured after Aug. 1, 1976. Legal and Safety Information > Notice SAFETY OF LASER BEAM (USA) 1. Safety of Health and...

3212i/4012i Operation Guide
Page 71
Installing and Setting up the Machine > Part Names (With Optional Equipments Attached) Part Names (With Optional Equipments Attached) 1 3 2 5 4 9 8 1 Tray 1 to 7 (tray 1 is the top tray) 2 Tray A 3 Tray B 4 Job Separator Tray 5 Finisher Tray Optional Equipment (page 11-2) 6 7 7 6 6 Cassette 3 7 Cassette 4 8 Control Section of the Finisher Manual Staple (page 5-70) 9 Original Cover 2-5
Installing and Setting up the Machine > Part Names (With Optional Equipments Attached) Part Names (With Optional Equipments Attached) 1 3 2 5 4 9 8 1 Tray 1 to 7 (tray 1 is the top tray) 2 Tray A 3 Tray B 4 Job Separator Tray 5 Finisher Tray Optional Equipment (page 11-2) 6 7 7 6 6 Cassette 3 7 Cassette 4 8 Control Section of the Finisher Manual Staple (page 5-70) 9 Original Cover 2-5

3212i/4012i Operation Guide
Page 191
... Monitor Use either of the printer is started. NOTE When you activate Status Monitor, check the status below to exit the Status Monitor. • Exit manually: Click the settings icon and select Exit in the menu to exit the Status Monitor. • Exit automatically: The Status Monitor automatically shuts down after...
... Monitor Use either of the printer is started. NOTE When you activate Status Monitor, check the status below to exit the Status Monitor. • Exit manually: Click the settings icon and select Exit in the menu to exit the Status Monitor. • Exit automatically: The Status Monitor automatically shuts down after...

3212i/4012i Operation Guide
Page 195
... the USB Memory Information 5-67 Removing USB Memory 5-67 Using the Internet Browser 5-68 Launching and Exiting the Browser .. 5-68 Using the Browser Screen 5-69 Manual Staple 5-70
... the USB Memory Information 5-67 Removing USB Memory 5-67 Using the Internet Browser 5-68 Launching and Exiting the Browser .. 5-68 Using the Browser Screen 5-69 Manual Staple 5-70
3212i/4012i Operation Guide
Page 264
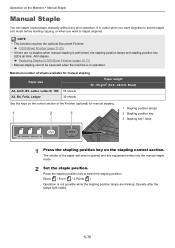
... g/m2 (14.0 - 24.0 lb. The shutter of the paper exit area is not possible while the stapling position lamps are no staples when manual stapling is performed, the stapling position lamps and stapling position key LEDs all blink. Operation is opened and this equipment enters into the...Set the staple position. Add staples. Press the stapling position key to staple originals. Replacing Staples (3,000-Sheet Finisher) (page 10-11) • Manual stapling cannot be executed when the machine is useful when you have forgotten to set the staple sort mode before starting copying, or when you ...
... g/m2 (14.0 - 24.0 lb. The shutter of the paper exit area is not possible while the stapling position lamps are no staples when manual stapling is performed, the stapling position lamps and stapling position key LEDs all blink. Operation is opened and this equipment enters into the...Set the staple position. Add staples. Press the stapling position key to staple originals. Replacing Staples (3,000-Sheet Finisher) (page 10-11) • Manual stapling cannot be executed when the machine is useful when you have forgotten to set the staple sort mode before starting copying, or when you ...

3212i/4012i Operation Guide
Page 265
...Press the stapling position key before you place the paper. If it does not light, replace the paper. 4 Staple the paper. CAUTION Be sure that manual stapling is delivered to the center point between the two side guides (A and B). If the near side of the paper ( ) will be automatically finished... operation is in the shutter opening of the paper ( ) will be stapled, place the paper against the front guide (A). Stapling starts. Finishing the manual staple mode Press the stapling position key several times until the stapling position lamps turn off. Operation on the Machine...
...Press the stapling position key before you place the paper. If it does not light, replace the paper. 4 Staple the paper. CAUTION Be sure that manual stapling is delivered to the center point between the two side guides (A and B). If the near side of the paper ( ) will be automatically finished... operation is in the shutter opening of the paper ( ) will be stapled, place the paper against the front guide (A). Stapling starts. Finishing the manual staple mode Press the stapling position key several times until the stapling position lamps turn off. Operation on the Machine...

3212i/4012i Operation Guide
Page 297
... density based on the original. If the ground color is obtrusive, select [Auto]. Select [1] to adjust the background density manually. Prevent Bleed-thru Copy Image Quality Send Color/ Image Quality Custom Box Functions Image Quality Color/ Image Quality Hides background colors and... image bleed-through when scanning thin original. (Value: [Off] / [On]) USB Memory Functions 6-32 Item Off Auto Manual Description Does not adjust the ground color. Using Various Functions > Functions Background Density Adj. (Background Density Adjustment) Copy Image Quality ...
... density based on the original. If the ground color is obtrusive, select [Auto]. Select [1] to adjust the background density manually. Prevent Bleed-thru Copy Image Quality Send Color/ Image Quality Custom Box Functions Image Quality Color/ Image Quality Hides background colors and... image bleed-through when scanning thin original. (Value: [Off] / [On]) USB Memory Functions 6-32 Item Off Auto Manual Description Does not adjust the ground color. Using Various Functions > Functions Background Density Adj. (Background Density Adjustment) Copy Image Quality ...

3212i/4012i Operation Guide
Page 298
Standard Zoom Auto Adjusts the image to enter the any magnification. 6-33 Use the numeric keys or select [+] or [-] to match the paper size. Zoom Entry Manually reduces or enlarges the original image in 1% increments between 25% and 400%. Functions USB Memory Functions Copying The following zoom options are available. A3: 141% A4 A5: 70% Standard Zoom Reduces or enlarges at preset magnifications. Using Various Functions > Functions Zoom Copy Layout/Edit Send Advanced Setup Custom Box Adjust the zoom to reduce or enlarge the image.
Standard Zoom Auto Adjusts the image to enter the any magnification. 6-33 Use the numeric keys or select [+] or [-] to match the paper size. Zoom Entry Manually reduces or enlarges the original image in 1% increments between 25% and 400%. Functions USB Memory Functions Copying The following zoom options are available. A3: 141% A4 A5: 70% Standard Zoom Reduces or enlarges at preset magnifications. Using Various Functions > Functions Zoom Copy Layout/Edit Send Advanced Setup Custom Box Adjust the zoom to reduce or enlarge the image.

3212i/4012i Operation Guide
Page 303
... on Left]. Centering: Centers the original image on Left, Auto*2 Set the margin width.*1 Select [+] or [-] to +0.75" (in 0.01" increments) Auto, Manual Top Edge on Top, Top Edge on Left, Auto*2 Top Edge on Top, Top Edge on the paper when copying onto paper different from the...) Inch: -0.75" to enter the margins for "Left/Right" and "Top/Bottom". For duplex copying, select [Back Page] and select [Auto] or [Manual]. Select [Original Orientation] to choose orientation of the original document top edge to use the numeric keys for the front page and a binding orientation. In...
... on Left]. Centering: Centers the original image on Left, Auto*2 Set the margin width.*1 Select [+] or [-] to +0.75" (in 0.01" increments) Auto, Manual Top Edge on Top, Top Edge on Left, Auto*2 Top Edge on Top, Top Edge on the paper when copying onto paper different from the...) Inch: -0.75" to enter the margins for "Left/Right" and "Top/Bottom". For duplex copying, select [Back Page] and select [Auto] or [Manual]. Select [Original Orientation] to choose orientation of the original document top edge to use the numeric keys for the front page and a binding orientation. In...

3212i/4012i Operation Guide
Page 315
...total number of the original document top edge to scan correct direction. Original Orientation Top Edge on Top, Top Edge on Left]. Select [Manual] and select [+] or [-] to specify the final page to be numbered (a negative number of page number. Text (Text Stamp) (page..., White Set the color of pages and select [OK]. Select [# Keys] to use the numeric keys for entry. Select [Denominator #] and select [Manual]. Using Various Functions > Functions Item Value Description -1-, P.1, Count Blank ― 1/n Page*1 When a scanned document contains blank pages, add a check ...
...total number of the original document top edge to scan correct direction. Original Orientation Top Edge on Top, Top Edge on Left]. Select [Manual] and select [+] or [-] to specify the final page to be numbered (a negative number of page number. Text (Text Stamp) (page..., White Set the color of pages and select [OK]. Select [# Keys] to use the numeric keys for entry. Select [Denominator #] and select [Manual]. Using Various Functions > Functions Item Value Description -1-, P.1, Count Blank ― 1/n Page*1 When a scanned document contains blank pages, add a check ...


