KM-NET Viewer Operation Guide Rev-5.3 2011.7
Page 25
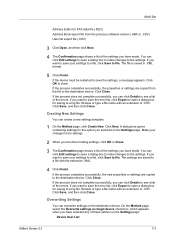
...2 Enter the name of the contact in the dialog box. 3 Select one or more contacts or groups. 2 Click the Delete icon, then click Yes to confirm. Adding a Contact to a Group You can be slow depending on the printing system's operation panel. Each step requires communication with the device, which may be... click Add. 4 Click OK in the address book can be unique. 3 Click OK to send the information to the device. KMnet Viewer 5.3 3-3 Device Internet FAX You can create One Touch keys to let you access address book entries by selecting it from the Group Settings dialog box and clicking the...
...2 Enter the name of the contact in the dialog box. 3 Select one or more contacts or groups. 2 Click the Delete icon, then click Yes to confirm. Adding a Contact to a Group You can be slow depending on the printing system's operation panel. Each step requires communication with the device, which may be... click Add. 4 Click OK in the address book can be unique. 3 Click OK to send the information to the device. KMnet Viewer 5.3 3-3 Device Internet FAX You can create One Touch keys to let you access address book entries by selecting it from the Group Settings dialog box and clicking the...
KM-NET Viewer Operation Guide Rev-5.3 2011.7
Page 58
... settings. If you want to save your settings to a file, click Save to use. Only one source device from device. Click Next. 3 The Confirmation page shows a list of the settings you want to save the error list, click Export to open a dialog box to make changes to see a ...Create from the current software version (.XML) 3 Click Open, and then click Next. 4 The Confirmation page shows a list of the errors. Click Next. Browse or type a file name with information about print, copy, scan and FAX counts. On the Settings page, select the category of .CSV. Click Finish. Account List This...
... settings. If you want to save your settings to a file, click Save to use. Only one source device from device. Click Next. 3 The Confirmation page shows a list of the settings you want to save the error list, click Export to open a dialog box to make changes to see a ...Create from the current software version (.XML) 3 Click Open, and then click Next. 4 The Confirmation page shows a list of the errors. Click Next. Browse or type a file name with information about print, copy, scan and FAX counts. On the Settings page, select the category of .CSV. Click Finish. Account List This...
KM-NET Viewer Operation Guide Rev-5.3 2011.7
Page 72
Only one source device from the list. Click Next. 3 The Confirmation page shows a list of groups. If you want to save the error list, click Export to open a dialog box for group authorization, and enabling/disabling ... can click Details to see a list of settings to copy to copy, follow these settings depends upon the device. Device Document Box Users' custom and FAX boxes. You have made. Device Address Book Number, name, furigana (if applicable), e-mail, FTP address, SMB address...
Only one source device from the list. Click Next. 3 The Confirmation page shows a list of groups. If you want to save the error list, click Export to open a dialog box for group authorization, and enabling/disabling ... can click Details to see a list of settings to copy to copy, follow these settings depends upon the device. Device Document Box Users' custom and FAX boxes. You have made. Device Address Book Number, name, furigana (if applicable), e-mail, FTP address, SMB address...
KM-NET Viewer Operation Guide Rev-5.3 2011.7
Page 73
...opens containing settings for the option you can click Details to see a list of .CSV. If you have made . Multi-Set Address Editor for FAX data file (.FED) Address Book export file from the file to the destination device. If the process completes successfully, the properties or settings are ...The settings are copied from the previous software version (.ABF or .CSV) User list export file (.CSV) 3 Click Open, and then click Next. 4 The Confirmation page shows a list of the settings you want to save the error list, click Export to open a dialog box for saving to see a list of...
...opens containing settings for the option you can click Details to see a list of .CSV. If you have made . Multi-Set Address Editor for FAX data file (.FED) Address Book export file from the file to the destination device. If the process completes successfully, the properties or settings are ...The settings are copied from the previous software version (.ABF or .CSV) User list export file (.CSV) 3 Click Open, and then click Next. 4 The Confirmation page shows a list of the settings you want to save the error list, click Export to open a dialog box for saving to see a list of...
Kyocera Command Center Operation Guide Rev 6.4
Page 11
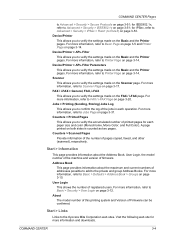
... to FAX / i-FAX Page on the Basic and the Printer pages. Scanner This allows you to verify the settings made on page 3-14. Jobs > Printing (Sending, Storing) Jobs Log This allows you to verify the settings made on page 3-12. Counters > Scanned Pages Provide information of the number of Firmware can be confirmed... the Printer pages. For more information and downloads. For more information, refer to the private and group Address Books. For more information, refer to the Kyocera Mita Corporation web sites. Start > Links Links to Scanner Page on page 3-14.
... to FAX / i-FAX Page on the Basic and the Printer pages. Scanner This allows you to verify the settings made on page 3-14. Jobs > Printing (Sending, Storing) Jobs Log This allows you to verify the settings made on page 3-12. Counters > Scanned Pages Provide information of the number of Firmware can be confirmed... the Printer pages. For more information and downloads. For more information, refer to the private and group Address Books. For more information, refer to the Kyocera Mita Corporation web sites. Start > Links Links to Scanner Page on page 3-14.
Kyocera Command Center Operation Guide Rev 6.4
Page 15
... after which the system enters the low power mode, where it reduces the power consumption. After you have changed the setting, you to confirm the destination to be usable during the time of day specified by time of the machine by Unusable Time. Low Power Timer Specifies the ...increases. If this code, comprised of four digits from 1 to normal mode, after the interrupt copy mode has been engaged. Except, the received FAXes are cleared automatically. Additional Information You can change the file name for the scan data or the job name for the jobs on model. Unlock...
... after which the system enters the low power mode, where it reduces the power consumption. After you have changed the setting, you to confirm the destination to be usable during the time of day specified by time of the machine by Unusable Time. Low Power Timer Specifies the ...increases. If this code, comprised of four digits from 1 to normal mode, after the interrupt copy mode has been engaged. Except, the received FAXes are cleared automatically. Additional Information You can change the file name for the scan data or the job name for the jobs on model. Unlock...

Kyocera Command Center Operation Guide Rev 6.4
Page 16
... 2 Click the number or name of the address to be displayed by default on the print system's display while using send or FAX mode. You can confirm the addresses to edit.The Address Book Contacts Edit page appears. 3 Modify the information of Number is not installed. 4 Click Submit.... Default Screen (Send/FAX) You can specify a FAX number and i-FAX address even if the FAX System is selected, all contacts displayed on the left side of...
... 2 Click the number or name of the address to be displayed by default on the print system's display while using send or FAX mode. You can confirm the addresses to edit.The Address Book Contacts Edit page appears. 3 Modify the information of Number is not installed. 4 Click Submit.... Default Screen (Send/FAX) You can specify a FAX number and i-FAX address even if the FAX System is selected, all contacts displayed on the left side of...

Kyocera Command Center Operation Guide Rev 6.4
Page 26
Scanner > Send and Forward When sending a FAX, FTP, SMB or a E-mail job, Send and Forward automatically forwards the same job to activate Send ... as follows: 1 Click Import Contacts. 2 The address book opens. Delete To delete a destination from the following section provides a summary of either FAX, FTP, SMB or E-mail to a destination specified. Enter the Host Name, Port Number, path to an accessible FTP server. Add Adds a ... Send and Forward on Microsoft Windows network. Check the check box for forwarding. Check that you accept the confirming prompt, click Delete.
Scanner > Send and Forward When sending a FAX, FTP, SMB or a E-mail job, Send and Forward automatically forwards the same job to activate Send ... as follows: 1 Click Import Contacts. 2 The address book opens. Delete To delete a destination from the following section provides a summary of either FAX, FTP, SMB or E-mail to a destination specified. Enter the Host Name, Port Number, path to an accessible FTP server. Add Adds a ... Send and Forward on Microsoft Windows network. Check the check box for forwarding. Check that you accept the confirming prompt, click Delete.

Kyocera Command Center Operation Guide Rev 6.4
Page 33
... on page 3-9 or Basic > Defaults > Address Book > Groups on the FAX / i-FAX > FAX > Defaults page. After confirming the settings, click Submit. The choices are using. Local FAX ID Specifies your FAX system number. Before adding an address from the Destination List. Local FAX Number (Port 1/ 2) Specifies your FAX system ID. Be sure that the type of the items...
... on page 3-9 or Basic > Defaults > Address Book > Groups on the FAX / i-FAX > FAX > Defaults page. After confirming the settings, click Submit. The choices are using. Local FAX ID Specifies your FAX system number. Before adding an address from the Destination List. Local FAX Number (Port 1/ 2) Specifies your FAX system ID. Be sure that the type of the items...

Kyocera Command Center Operation Guide Rev 6.4
Page 35
... a summary of the items displayed on the Permit ID List page. FAX / i-FAX > FAX > FAX Restrictions > Permit ID List The table below provides a summary of the items displayed on the FAX Restrictions > General page. If you accept the confirming prompt, click Delete. Enter in Permit FAX ID the FAX ID to add, then click Submit. Delete To delete...
... a summary of the items displayed on the Permit ID List page. FAX / i-FAX > FAX > FAX Restrictions > Permit ID List The table below provides a summary of the items displayed on the FAX Restrictions > General page. If you accept the confirming prompt, click Delete. Enter in Permit FAX ID the FAX ID to add, then click Submit. Delete To delete...

Kyocera Command Center Operation Guide Rev 6.4
Page 36
.... The length of the item displayed on page 3-35). FAX / i-FAX > i-FAX > Defaults The section below provides a summary of E-mail that... correct. Login Password Enter the login password. COMMAND CENTER Pages FAX / i-FAX > FAX > Encryption Key Specifies the encryption key in Kilobytes. Enter 16...the SMTP server when set here will be authenticated in SMTP authentication. FAX / i-FAX > i-FAX > SMTP The section below provides a summary of the encryption key...the value is 16 digits. i-FAX Enables or disables i-FAX. If entering the name, rather than i-FAX users, select Other and enter...
.... The length of the item displayed on page 3-35). FAX / i-FAX > i-FAX > Defaults The section below provides a summary of E-mail that... correct. Login Password Enter the login password. COMMAND CENTER Pages FAX / i-FAX > FAX > Encryption Key Specifies the encryption key in Kilobytes. Enter 16...the SMTP server when set here will be authenticated in SMTP authentication. FAX / i-FAX > i-FAX > SMTP The section below provides a summary of the encryption key...the value is 16 digits. i-FAX Enables or disables i-FAX. If entering the name, rather than i-FAX users, select Other and enter...

Kyocera Command Center Operation Guide Rev 6.4
Page 37
FAX / i-FAX > i-FAX > POP3 The section below provides a summary of the items displayed on page 3-41. Run once now Click the Receive button to confirm that the settings on page 3-30. Test Tests to immediately receive E-mail from this machine tries to connect to be inserted in the end... of E-mail in E-mail Address on FAX / i-FAX > i-FAX > POP3 on this page are printed. When the Test...
FAX / i-FAX > i-FAX > POP3 The section below provides a summary of the items displayed on page 3-41. Run once now Click the Receive button to confirm that the settings on page 3-30. Test Tests to immediately receive E-mail from this machine tries to connect to be inserted in the end... of E-mail in E-mail Address on FAX / i-FAX > i-FAX > POP3 on this page are printed. When the Test...

Kyocera Command Center Operation Guide Rev 6.4
Page 39
... boxes. Editing a Custom Box 1 Open the Custom Box page. 2 Click the Box Number of the custom box to delete. 3 Click Delete. You can confirm the user boxes to be deleted. 4 Click Delete when the desired custom box is selected. Number of Custom Boxes Displays the number of document boxes...: Custom Box, FAX Box (or Sub Address Box), and Polling Box. The Custom Box Delete page appears. COMMAND CENTER Pages Document Box Page This section includes addition ...
... boxes. Editing a Custom Box 1 Open the Custom Box page. 2 Click the Box Number of the custom box to delete. 3 Click Delete. You can confirm the user boxes to be deleted. 4 Click Delete when the desired custom box is selected. Number of Custom Boxes Displays the number of document boxes...: Custom Box, FAX Box (or Sub Address Box), and Polling Box. The Custom Box Delete page appears. COMMAND CENTER Pages Document Box Page This section includes addition ...

Kyocera Command Center Operation Guide Rev 6.4
Page 40
... and enter information for the FAX box. 4 Click Submit. Editing a FAX Box 1 Open the FAX Box page. 2 Click the Box Number of the FAX box to edit. 3 Click Detail/Edit and enter information for the FAX box. 3 Click Submit. You can add a new FAX box. You can confirm the FAX boxes to delete. 3 Click... Delete. COMMAND CENTER Pages Document Box > FAX Box The section below provides a summary ...
... and enter information for the FAX box. 4 Click Submit. Editing a FAX Box 1 Open the FAX Box page. 2 Click the Box Number of the FAX box to edit. 3 Click Detail/Edit and enter information for the FAX box. 3 Click Submit. You can add a new FAX box. You can confirm the FAX boxes to delete. 3 Click... Delete. COMMAND CENTER Pages Document Box > FAX Box The section below provides a summary ...
FS-3540MFP/3640MFP Operation Guide
Page 19
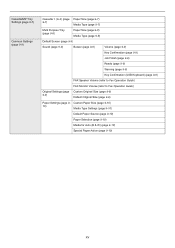
... (page 9-8) Media Type (page 9-8) Default Screen (page 9-9) Sound (page 9-9) Buzzer (page 9-9) Volume (page 9-9) Key Confirmation (page 9-9) Job Finish (page 9-9) Ready (page 9-9) Warning (page 9-9) Key Confirmation (USB Keyboard) (page 9-9) FAX Speaker Volume (refer to Fax Operation Guide) FAX Monitor Volume (refer to Fax Operation Guide) Original Settings (page 9-9) Custom Original Size (page 9-9) Default Original Size (page 9-9) Paper...
... (page 9-8) Media Type (page 9-8) Default Screen (page 9-9) Sound (page 9-9) Buzzer (page 9-9) Volume (page 9-9) Key Confirmation (page 9-9) Job Finish (page 9-9) Ready (page 9-9) Warning (page 9-9) Key Confirmation (USB Keyboard) (page 9-9) FAX Speaker Volume (refer to Fax Operation Guide) FAX Monitor Volume (refer to Fax Operation Guide) Original Settings (page 9-9) Custom Original Size (page 9-9) Default Original Size (page 9-9) Paper...

FS-3540MFP/3640MFP Operation Guide
Page 85
...Sending Number Owner Auto Admin Cancel 1 < Back 10:10 1/2 Save [Permission] Select the item that you want to change . Confirmation Permission Private Destination Functions Function Type Address Book 2 Wizard Cancel 1 < Back 10:10 2/2 Save Destination Address Book 2 Ext....job type is [Send] or [FAX], selects the Destination Recall Method. E-mail 10:10 1 2 Job Type Multi Sending 1/2 Number Auto Owner Admin GB0766_00 Cancel < Back Save 3 [Number] Select the item that you want to change . Confirmation Permission Private Destination Address Book 1...
...Sending Number Owner Auto Admin Cancel 1 < Back 10:10 1/2 Save [Permission] Select the item that you want to change . Confirmation Permission Private Destination Functions Function Type Address Book 2 Wizard Cancel 1 < Back 10:10 2/2 Save Destination Address Book 2 Ext....job type is [Send] or [FAX], selects the Destination Recall Method. E-mail 10:10 1 2 Job Type Multi Sending 1/2 Number Auto Owner Admin GB0766_00 Cancel < Back Save 3 [Number] Select the item that you want to change . Confirmation Permission Private Destination Address Book 1...

FS-3540MFP/3640MFP Operation Guide
Page 94
... Select the shortcut you wish to copy. Edit - Ready to delete. Pressing [Shortcut] will be displayed on products with the fax function installed. Confirmation Number Shortcut 1 Name Shortcut 1 Functions Zoom Cancel < Back 10:10 1/1 1 Save To delete Ready to the registered function's... screen. * Only on the Copy, Send, FAX*, Print from USB Memory, or Save to copy. Using Shortcuts The registered ...
... Select the shortcut you wish to copy. Edit - Ready to delete. Pressing [Shortcut] will be displayed on products with the fax function installed. Confirmation Number Shortcut 1 Name Shortcut 1 Functions Zoom Cancel < Back 10:10 1/1 1 Save To delete Ready to the registered function's... screen. * Only on the Copy, Send, FAX*, Print from USB Memory, or Save to copy. Using Shortcuts The registered ...
FS-3540MFP/3640MFP Operation Guide
Page 171
...6-25 Select the type of 200 numbers for contacts and 50 numbers for groups. Confirmation Name Sales department 1 1 Address Number Auto FAX E-mail Address Cancel < Back 10:10 1/2 Save Ready to register. Add - Confirmation SMB FTP Cancel < Back GB0078_02 Use [ ] or [ ] to enter a ... - 250) 10:10 2 3 Cancel OK GB0217_01 GB0078_02 Press [+], [-] or numeric keys to scroll up and down. Confirmation Name Sales department 1 Address Number Auto FAX E-mail Address Cancel < Back 10:10 1/2 Save Select the item that you want to 128 characters can be entered. ...
...6-25 Select the type of 200 numbers for contacts and 50 numbers for groups. Confirmation Name Sales department 1 1 Address Number Auto FAX E-mail Address Cancel < Back 10:10 1/2 Save Ready to register. Add - Confirmation SMB FTP Cancel < Back GB0078_02 Use [ ] or [ ] to enter a ... - 250) 10:10 2 3 Cancel OK GB0217_01 GB0078_02 Press [+], [-] or numeric keys to scroll up and down. Confirmation Name Sales department 1 Address Number Auto FAX E-mail Address Cancel < Back 10:10 1/2 Save Select the item that you want to 128 characters can be entered. ...
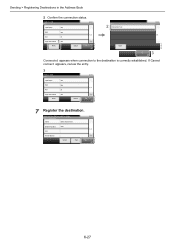
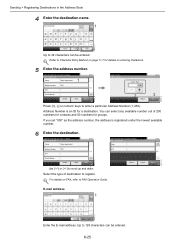
FS-3540MFP/3640MFP Operation Guide
Page 173
GB0696_00 Sending > Registering Destinations in the Address Book 2 Confirm the connection status. FTP Host Name abc 10:10 Path abc 1/2 Port 21 Login User Name abc Menu Cancel OK GB0709_03 7 Register the destination. appears .... 3 Ready to the destination is correctly established. Add - If Cannot connect. Ready to change. Select the item that you want to send. Confirmation Name Sales department 1 Address Number Auto FAX E-mail Address Cancel < Back 10:10 1/2 Save GB0078_02 6-27 FTP Host Name abc 10:10 Path abc Port 21 1 Login User Name...
GB0696_00 Sending > Registering Destinations in the Address Book 2 Confirm the connection status. FTP Host Name abc 10:10 Path abc 1/2 Port 21 Login User Name abc Menu Cancel OK GB0709_03 7 Register the destination. appears .... 3 Ready to the destination is correctly established. Add - If Cannot connect. Ready to change. Select the item that you want to send. Confirmation Name Sales department 1 Address Number Auto FAX E-mail Address Cancel < Back 10:10 1/2 Save GB0078_02 6-27 FTP Host Name abc 10:10 Path abc Port 21 1 Login User Name...
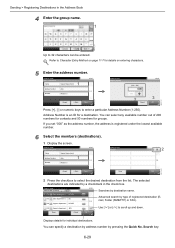
FS-3540MFP/3640MFP Operation Guide
Page 175
Confirmation Name Support department 1 10:10 Address Number Auto 1/1 Member Member:0 Cancel < Back Save Ready to send. Address Number is registered under the lowest available number. 6 ... Destinations in the check box. You can select any available number out of registered destination (E- 1/2 mail, Folder (SMB/FTP) or FAX). Ready to send. Menu Cancel OK GB0428_01 Displays details for groups. Confirmation Name Address Number Member Support department Auto 1 Member:0 10:10 1/1 Ready to send. Ready to send. Use [ ] or [ ] to...
Confirmation Name Support department 1 10:10 Address Number Auto 1/1 Member Member:0 Cancel < Back Save Ready to send. Address Number is registered under the lowest available number. 6 ... Destinations in the check box. You can select any available number out of registered destination (E- 1/2 mail, Folder (SMB/FTP) or FAX). Ready to send. Menu Cancel OK GB0428_01 Displays details for groups. Confirmation Name Address Number Member Support department Auto 1 Member:0 10:10 1/1 Ready to send. Ready to send. Use [ ] or [ ] to...


