KM-NET ADMIN Operation Guide for Ver 2.0
Page 12
...E-mail address 1. Once new users are added, they appear under Select User Type, select Login user or Subscribers Only. You can also click Reset to go back to delete. 2 Click the Delete Role icon, and click OK in the confirmation message. Subscribers Only users cannot log on ...the roles, full control privilege, cannot assign any role except Administrator, Subscribers Only, Accounting Admin, and Accounting User. You can never delete the default Administrator role. 1 In the navigation area, select the role to the original data that does not have assigned them to apply the changes....
...E-mail address 1. Once new users are added, they appear under Select User Type, select Login user or Subscribers Only. You can also click Reset to go back to delete. 2 Click the Delete Role icon, and click OK in the confirmation message. Subscribers Only users cannot log on ...the roles, full control privilege, cannot assign any role except Administrator, Subscribers Only, Accounting Admin, and Accounting User. You can never delete the default Administrator role. 1 In the navigation area, select the role to the original data that does not have assigned them to apply the changes....
KM-NET ADMIN Operation Guide for Ver 2.0
Page 25
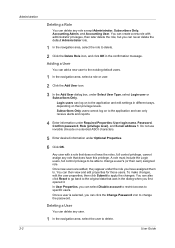
... box and type a name for the first time, changes to the Default List Views do not affect that user chooses to reset all tabs to system defaults in the Edit Tab dialog box, List View loads the default List View tabs. Do not use invisible Unicode or extended ASCII characters.... Users with the Full Control, Default List Views privilege can edit default List View tabs: 1 Select ...
... box and type a name for the first time, changes to the Default List Views do not affect that user chooses to reset all tabs to system defaults in the Edit Tab dialog box, List View loads the default List View tabs. Do not use invisible Unicode or extended ASCII characters.... Users with the Full Control, Default List Views privilege can edit default List View tabs: 1 Select ...
KM-NET ADMIN Operation Guide for Ver 2.0
Page 26
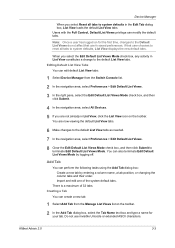
... tool bar. 2 In the Add Tab dialog box, click Import. 3 Select one of the default tabs from the tab, select it . Change the order of Selected Columns to the Add Tab ... Shift and Ctrl keys to select multiple items. 7 Click OK to the Default List Views. Import Default Tab Each user has a personal list of tabs and tab properties that is not affected by the ... the imported tab. 5 Click OK. Importing a Default Tab You can import a system default tab. 1 Select Add Tab from the Manage List Views list on a tab and their order. Reset the Device Manager console to new tabs created by ...
... tool bar. 2 In the Add Tab dialog box, click Import. 3 Select one of the default tabs from the tab, select it . Change the order of Selected Columns to the Add Tab ... Shift and Ctrl keys to select multiple items. 7 Click OK to the Default List Views. Import Default Tab Each user has a personal list of tabs and tab properties that is not affected by the ... the imported tab. 5 Click OK. Importing a Default Tab You can import a system default tab. 1 Select Add Tab from the Manage List Views list on a tab and their order. Reset the Device Manager console to new tabs created by ...
KM-NET ADMIN Operation Guide for Ver 2.0
Page 27
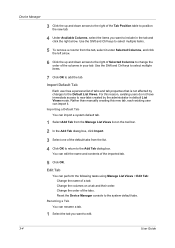
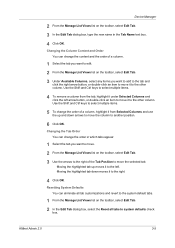
... box. 4 Click OK. Changing the Tab Order You can change the order of the Tab Position to move the column to the right. 4 Click OK. Resetting System Defaults You can change the content and the order of a column. 1 Select the tab you want to edit. 2 From the Manage List Views list on... Tab. 2 In the Edit Tab dialog box, select the Reset all tabs to the left arrow button, or double-click an item to move it to the other column. KMnet Admin 2.0 3-5 Moving the highlighted tab up and down moves it to system defaults check box. Use the Shift and Ctrl keys to...
... box. 4 Click OK. Changing the Tab Order You can change the order of the Tab Position to move the column to the right. 4 Click OK. Resetting System Defaults You can change the content and the order of a column. 1 Select the tab you want to edit. 2 From the Manage List Views list on... Tab. 2 In the Edit Tab dialog box, select the Reset all tabs to the left arrow button, or double-click an item to move it to the other column. KMnet Admin 2.0 3-5 Moving the highlighted tab up and down moves it to system defaults check box. Use the Shift and Ctrl keys to...
KM-NET ADMIN Operation Guide for Ver 2.0
Page 68
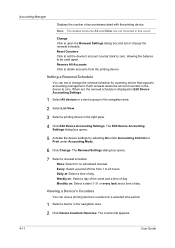
... counter list appears. 4-11 User Guide Accounting Manager Displays the number of day. Note: The default accounts All and Other are not included in the device to zero. Each renewal resets the account counters in this count. Reset Counters Click to 23 hours. The Renewal Settings dialog box opens. 7 Select a renewal schedule: None...
... counter list appears. 4-11 User Guide Accounting Manager Displays the number of day. Note: The default accounts All and Other are not included in the device to zero. Each renewal resets the account counters in this count. Reset Counters Click to 23 hours. The Renewal Settings dialog box opens. 7 Select a renewal schedule: None...
KM-NET ADMIN Operation Guide for Ver 2.0
Page 77
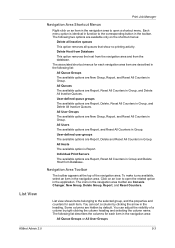
.... All Users The available options are Report, Delete and Reset All Counters in Group. User-defined user groups The available options are Report, and Reset All Counters in Group. All Queues The available options are hidden by default. List view shows items belonging to the selected group,... and the properties and counters for each item in Group and Delete Host from the database. Some columns are Report, Reset All Counters in Group, and Delete All Inactive...
.... All Users The available options are Report, Delete and Reset All Counters in Group. User-defined user groups The available options are Report, and Reset All Counters in Group. All Queues The available options are hidden by default. List view shows items belonging to the selected group,... and the properties and counters for each item in Group and Delete Host from the database. Some columns are Report, Reset All Counters in Group, and Delete All Inactive...
KM-NET ADMIN Operation Guide for Ver 2.0
Page 78
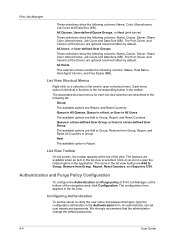
... Purge policy of Print Job Manager, at the top of the navigation area, click Configuration. We strongly recommend that the administrator change the default passwords. 5-4 User Guide All Queues, User-defined Queue Groups, or Host (print server) These selections show the following columns: Status, ... (KB). The Port, Driver, and Version (of the Driver) are optional columns hidden by default. List View Shortcut Menus Right-click on an icon to Group, Remove from Group, Report, Reset Counters, and Export to the corresponding button in the application. Queue in All Queues, Queue in...
... Purge policy of Print Job Manager, at the top of the navigation area, click Configuration. We strongly recommend that the administrator change the default passwords. 5-4 User Guide All Queues, User-defined Queue Groups, or Host (print server) These selections show the following columns: Status, ... (KB). The Port, Driver, and Version (of the Driver) are optional columns hidden by default. List View Shortcut Menus Right-click on an icon to Group, Remove from Group, Report, Reset Counters, and Export to the corresponding button in the application. Queue in All Queues, Queue in...

KM-NET Viewer Operation Guide Rev-5.2-2010.10
Page 46
... the Edit Counter Report dialog box, change the content and layout of features. The Add Counter Report dialog box appears, already populated with the default settings. 2 Change the default settings as needed . 3 Click OK. Managing an Account Device To manage an accounting device, follow these steps: 1 In Accounting Devices View, select .... 3 Click OK. An unmanaged device can use a limited set of the view itself. 5 Click OK. If the counter report is not successfully sent, the reset is managed, you can only use notification and reporting features, create and view accounts, and...
... the Edit Counter Report dialog box, change the content and layout of features. The Add Counter Report dialog box appears, already populated with the default settings. 2 Change the default settings as needed . 3 Click OK. Managing an Account Device To manage an accounting device, follow these steps: 1 In Accounting Devices View, select .... 3 Click OK. An unmanaged device can use a limited set of the view itself. 5 Click OK. If the counter report is not successfully sent, the reset is managed, you can only use notification and reporting features, create and view accounts, and...

PRESCRIBE Commands Command Reference Manual Rev 4.8
Page 73
... deletes the palette having the specified ID C = Copy the active palette to the specified ID palette-id: number from 0 to 32767 (Default is not used when mode is reset to palette of ID 0. No check is overwritten. The palette ID number is A. Also, palette-id is not used . Parameters mode:... that palette is made whether the palette ID number given already exists for another palette. Mode S deletes all existing palettes and brings the default palette back to a new palette with the new ID specified by palette-id regardless of the deleted palette. Also, any ID specified by...
... deletes the palette having the specified ID C = Copy the active palette to the specified ID palette-id: number from 0 to 32767 (Default is not used when mode is reset to palette of ID 0. No check is overwritten. The palette ID number is A. Also, palette-id is not used . Parameters mode:... that palette is made whether the palette ID number given already exists for another palette. Mode S deletes all existing palettes and brings the default palette back to a new palette with the new ID specified by palette-id regardless of the deleted palette. Also, any ID specified by...
PRESCRIBE Commands Command Reference Manual Rev 4.8
Page 124
...the current interface as well as all FRPO parameters to their original, factory default values. File !R! To activate the changes made with the FRPO INIT command, turn the printer power off then on again or reset the printer using the control panel keys. PRESCRIBE Command Reference FRPO INIT -... FRPO-INITialize Format FRPO INIT; For a list of the factory default values, see Chapter 6 of the Technical Reference manual. FRPO INIT; ...
...the current interface as well as all FRPO parameters to their original, factory default values. File !R! To activate the changes made with the FRPO INIT command, turn the printer power off then on again or reset the printer using the control panel keys. PRESCRIBE Command Reference FRPO INIT -... FRPO-INITialize Format FRPO INIT; For a list of the factory default values, see Chapter 6 of the Technical Reference manual. FRPO INIT; ...
PRESCRIBE Commands Command Reference Manual Rev 4.8
Page 138
... can be shifted. R Y G C B M If this command is issued to move beyond their default state. If ink simulation is enabled for all color spaces, all color modes and all hues are rotated, the hues are controlled after they are reset to other than NONE, the HUE is disabled. 128 Note that yellow images...
... can be shifted. R Y G C B M If this command is issued to move beyond their default state. If ink simulation is enabled for all color spaces, all color modes and all hues are rotated, the hues are controlled after they are reset to other than NONE, the HUE is disabled. 128 Note that yellow images...

PRESCRIBE Commands Command Reference Manual Rev 4.8
Page 166
... Contrast set to high Contrast set to other than none, this reason, saturation is reset to its default state when the power is not held permanently in the printing system. However, since impressions vary with hue, you need to be controlled hue by ...
... Contrast set to high Contrast set to other than none, this reason, saturation is reset to its default state when the power is not held permanently in the printing system. However, since impressions vary with hue, you need to be controlled hue by ...
PRESCRIBE Commands Command Reference Manual Rev 4.8
Page 173
... the thick paper weight and the high fuser temperature mode, disabling the duplex printing, command: !R! File To set the transparency paper type to customize the default attributes of a media type for optimization. MDAT fuser-mode 0 = High 1 = Middle 2 = Low 3 = Vellum duplex 0 = Enable 1 = Disable density 1 = Light 2 = Medium Light ...duplex printing or not. Related Command MTYP 163 If the parameters paper-weight and fuser-mode are reset to their defaults. EXIT; If all the parameter are omitted (MDAT;), all the attributes for the all media types are omitted, this command...
... the thick paper weight and the high fuser temperature mode, disabling the duplex printing, command: !R! File To set the transparency paper type to customize the default attributes of a media type for optimization. MDAT fuser-mode 0 = High 1 = Middle 2 = Low 3 = Vellum duplex 0 = Enable 1 = Disable density 1 = Light 2 = Medium Light ...duplex printing or not. Related Command MTYP 163 If the parameters paper-weight and fuser-mode are reset to their defaults. EXIT; If all the parameter are omitted (MDAT;), all the attributes for the all media types are omitted, this command...

PRESCRIBE Commands Command Reference Manual Rev 4.8
Page 176
...tray is shown when the MP tray becomes empty. EXIT; 166 File To configure the MP tray as the default paper source and disable the paper-empty message, command as the default paper source, the MPTE command enables or disables the paper-empty message which is configured as follows: !R! ...Mode 1 (default) enables the paper-empty message to display when the MP tray is not reset by the RES command, therefore, to change mode, the MPTE command should be used. When Mode is 0, this...
...tray is shown when the MP tray becomes empty. EXIT; 166 File To configure the MP tray as the default paper source and disable the paper-empty message, command as the default paper source, the MPTE command enables or disables the paper-empty message which is configured as follows: !R! ...Mode 1 (default) enables the paper-empty message to display when the MP tray is not reset by the RES command, therefore, to change mode, the MPTE command should be used. When Mode is 0, this...

PRESCRIBE Commands Command Reference Manual Rev 4.8
Page 224
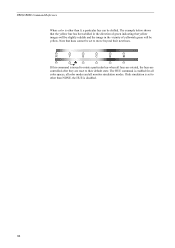
... Microsoft Windows. See the figure below. 0 1 2 3 4 0 1 2 3 4 1 1 2 2 3 3 4 4 5 5 Assuming a rectangle extending from coordinate (1, 1) to HP PCL; Grid intersection is default to coordinate (3, 4), a different result is ignored when used by the grid. and grid centered mode is reset to grid intersection mode by the RES command. 214 The printing system is used with DAP, DRP...
... Microsoft Windows. See the figure below. 0 1 2 3 4 0 1 2 3 4 1 1 2 2 3 3 4 4 5 5 Assuming a rectangle extending from coordinate (1, 1) to HP PCL; Grid intersection is default to coordinate (3, 4), a different result is ignored when used by the grid. and grid centered mode is reset to grid intersection mode by the RES command. 214 The printing system is used with DAP, DRP...

PRESCRIBE Commands Command Reference Manual Rev 4.8
Page 231
...; SLJN Miter limit 10 ← ← SMLT Flatness 1 ← ← FLAT Dash pattern Solid line ← ← DPAT, SDP Clipping rectangle Size of 1 (default). 221 mands Underline thickness 4 dots, 7 dots ← and distance below baseline ← SULP Current font Font 1 (C5/2/3) or Font 8 (IBM) V3 (scalable font)&#... FSET, or V3 (scalable SFNT font)a Alternate font assignment None See Emulation of ← the Technical Reference manual. RES Parameter Value after reset (Related FRPO parameter) LaserJet (PCL) IBM/Epson Diablo Related PRESCRIBE Com-
...; SLJN Miter limit 10 ← ← SMLT Flatness 1 ← ← FLAT Dash pattern Solid line ← ← DPAT, SDP Clipping rectangle Size of 1 (default). 221 mands Underline thickness 4 dots, 7 dots ← and distance below baseline ← SULP Current font Font 1 (C5/2/3) or Font 8 (IBM) V3 (scalable font)&#... FSET, or V3 (scalable SFNT font)a Alternate font assignment None See Emulation of ← the Technical Reference manual. RES Parameter Value after reset (Related FRPO parameter) LaserJet (PCL) IBM/Epson Diablo Related PRESCRIBE Com-
PRESCRIBE Commands Command Reference Manual Rev 4.8
Page 232
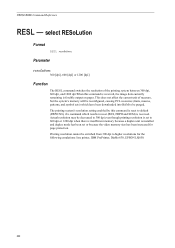
...PCL resources (fonts, macros, patterns, and symbol sets) which have been downloaded into RAM to be switched from 300 dpi to default (FRPO N8), if a command which results in reset (RES, FRPO and SEM) is installed and duplex mode has been set to 600 dpi or 1200 dpi when there is ... received. This does not affect the current unit of the printing system between 300 dpi, 600 dpi, and 1200 dpi.When this command is reset to higher resolutions for page protection. Printing resolution cannot be purged. PRESCRIBE Command Reference RESL - select RESoLution Format RESL resolution;
...PCL resources (fonts, macros, patterns, and symbol sets) which have been downloaded into RAM to be switched from 300 dpi to default (FRPO N8), if a command which results in reset (RES, FRPO and SEM) is installed and duplex mode has been set to 600 dpi or 1200 dpi when there is ... received. This does not affect the current unit of the printing system between 300 dpi, 600 dpi, and 1200 dpi.When this command is reset to higher resolutions for page protection. Printing resolution cannot be purged. PRESCRIBE Command Reference RESL - select RESoLution Format RESL resolution;

PRESCRIBE Commands Command Reference Manual Rev 4.8
Page 233
... Color balance increased Color balance decreased Varying color balance allows the output image results to their default settings. 223 It individually corrects the gamma for each level of RGB. Issuing this command resets hue, saturation, and luminosity control values to vary. Parameters color: 0 = red 1 ...= green 2 = blue level: number from -10 to 10 (Default = 0) Function The RGBL command controls balance for the input...
... Color balance increased Color balance decreased Varying color balance allows the output image results to their default settings. 223 It individually corrects the gamma for each level of RGB. Issuing this command resets hue, saturation, and luminosity control values to vary. Parameters color: 0 = red 1 ...= green 2 = blue level: number from -10 to 10 (Default = 0) Function The RGBL command controls balance for the input...

PRESCRIBE Commands Command Reference Manual Rev 4.8
Page 234
If ink simulation is set to other than none, this reason, color balance is reset to its default state when the power is disabled. This mode is enabled for all color spaces, all color modes and all monitor simulation modes. For this command is turned on. 224 PRESCRIBE Command Reference This command is not held in the printing system. The RES command resets saturation to its default state.
If ink simulation is set to other than none, this reason, color balance is reset to its default state when the power is disabled. This mode is enabled for all color spaces, all color modes and all monitor simulation modes. For this command is turned on. 224 PRESCRIBE Command Reference This command is not held in the printing system. The RES command resets saturation to its default state.
PRESCRIBE Commands Command Reference Manual Rev 4.8
Page 273
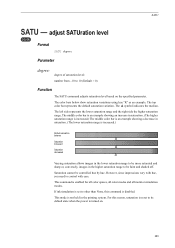
... saturation range is increased.) The middle color bar is an example showing a decrease in saturation. (The lower saturation range is increased.) Default saturation balance Saturation increased Saturation decreased Varying saturation allows images in the lower saturation range to be more saturated and sharp or, conversely,...variation. Saturation cannot be faint and shaded off. This command is not held in the higher saturation range to its default state when the power is reset to be controlled hue by hue. The color bars below show saturation variations using hue "R" as an example. ...
... saturation range is increased.) The middle color bar is an example showing a decrease in saturation. (The lower saturation range is increased.) Default saturation balance Saturation increased Saturation decreased Varying saturation allows images in the lower saturation range to be more saturated and sharp or, conversely,...variation. Saturation cannot be faint and shaded off. This command is not held in the higher saturation range to its default state when the power is reset to be controlled hue by hue. The color bars below show saturation variations using hue "R" as an example. ...


