KM-NET Viewer Operation Guide Rev-5.2-2010.10
Page 51
...completes successfully, the properties or settings are saved to a log file. Browse or type a file name with information about print, copy, scan and FAX counts. Click Next. Creating Settings From a Device You can create a settings template from an existing file. 1 On the Method page, click Create... from the current software version (*.xml) 3 Click Open, and then click Next. 4 The Confirmation page shows a list of the settings you want to save your settings to a file, click Save to see a list of the errors. KMnet Viewer...
...completes successfully, the properties or settings are saved to a log file. Browse or type a file name with information about print, copy, scan and FAX counts. Click Next. Creating Settings From a Device You can create a settings template from an existing file. 1 On the Method page, click Create... from the current software version (*.xml) 3 Click Open, and then click Next. 4 The Confirmation page shows a list of the settings you want to save your settings to a file, click Save to see a list of the errors. KMnet Viewer...
KM-NET Viewer Operation Guide Rev-5.2-2010.10
Page 58
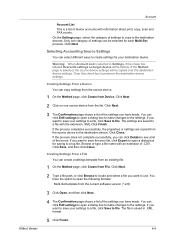
...permission. Click Close. You have made. Device Address Book Number, Name, Furigana (if applicable), E-mail, FTP address, SMB address, FAX, Internet FAX addresses, and address groups. If you want to the destination devices. If the process does not complete successfully, you want to save ...Creating Settings From a Device You can click Edit settings to open the following formats: Multi-Set template from Device. Click Next. 3 The Confirmation page shows a list of groups. If the process completes successfully, the properties or settings are copied from the source device to open a...
...permission. Click Close. You have made. Device Address Book Number, Name, Furigana (if applicable), E-mail, FTP address, SMB address, FAX, Internet FAX addresses, and address groups. If you want to the destination devices. If the process does not complete successfully, you want to save ...Creating Settings From a Device You can click Edit settings to open the following formats: Multi-Set template from Device. Click Next. 3 The Confirmation page shows a list of groups. If the process completes successfully, the properties or settings are copied from the source device to open a...

Kyocera Command Center Operation Guide Rev 6.3
Page 11
... to verify the settings made on the Basic and the Printer pages. For more information, refer to FAX / i-FAX Page on page 3-12. Start > Links Links to the Kyocera Mita Corporation web sites. for more information, refer to Jobs Page on the Basic and the Printer pages... information, refer to Printer Page on page 3-14. FAX / i-FAX > General, FAX, i-FAX This allows you to verify the settings made on the FAX / i-FAX page. Device/Printer > APL.Filter This allows you to confirm the log of Firmware can be confirmed. COMMAND CENTER 3-4 User Login This shows the number of...
... to verify the settings made on the Basic and the Printer pages. For more information, refer to FAX / i-FAX Page on page 3-12. Start > Links Links to the Kyocera Mita Corporation web sites. for more information, refer to Jobs Page on the Basic and the Printer pages... information, refer to Printer Page on page 3-14. FAX / i-FAX > General, FAX, i-FAX This allows you to verify the settings made on the FAX / i-FAX page. Device/Printer > APL.Filter This allows you to confirm the log of Firmware can be confirmed. COMMAND CENTER 3-4 User Login This shows the number of...
Kyocera Command Center Operation Guide Rev 6.3
Page 15
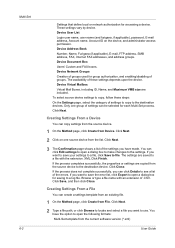
... On, the machine becomes unoperative during the time of period before the machine reverts to use a part of restriction. Except, the received FAXes are cleared automatically. COMMAND CENTER 3-8 Interrupt Clear Time This determines the time of day specified by time of the print system memory to normal... (On) or disables (Off) the paper empty message when the MP tray becomes empty. After you have changed the setting, you to confirm the destination to 495 seconds (in 5-second increments). RAM Disk Size Specifies the size of period before the machine reverts to the File Name...
... On, the machine becomes unoperative during the time of period before the machine reverts to use a part of restriction. Except, the received FAXes are cleared automatically. COMMAND CENTER 3-8 Interrupt Clear Time This determines the time of day specified by time of the print system memory to normal... (On) or disables (Off) the paper empty message when the MP tray becomes empty. After you have changed the setting, you to confirm the destination to 495 seconds (in 5-second increments). RAM Disk Size Specifies the size of period before the machine reverts to the File Name...
Kyocera Command Center Operation Guide Rev 6.3
Page 16
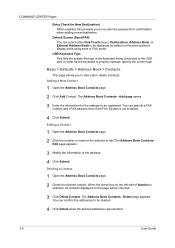
...selected. 3-9 User Guide COMMAND CENTER Pages Entry Check for New Dest(ination) When enabled, this prompts you to re-enter the password for confirmation when adding a new destination. The Address Book Contacts - Basic > Defaults > Address Book > Contacts This page allows you to add,... edit or delete Contacts. Default Screen (Send/FAX) You can specify a FAX number and i-FAX address even if the FAX System is selected, all contacts displayed on the print system's display while using send or FAX mode.
...selected. 3-9 User Guide COMMAND CENTER Pages Entry Check for New Dest(ination) When enabled, this prompts you to re-enter the password for confirmation when adding a new destination. The Address Book Contacts - Basic > Defaults > Address Book > Contacts This page allows you to add,... edit or delete Contacts. Default Screen (Send/FAX) You can specify a FAX number and i-FAX address even if the FAX System is selected, all contacts displayed on the print system's display while using send or FAX mode.
Kyocera Command Center Operation Guide Rev 6.3
Page 26
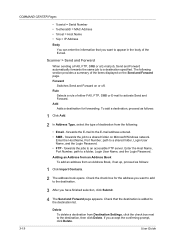
...to add to the destination. 3 After you have finished selection, click Submit. 3-19 4 The Send and Forward page appears. Scanner > Send and Forward When sending a FAX, FTP, SMB or a E-mail job, Send and Forward automatically forwards the same job to the E-mail address entered. • SMB - Add Adds a destination for ... from the following: • Email - forwards the E-mail to a destination specified. forwards the jobs to activate Send and Forward. Check that you accept the confirming prompt, click Delete. Rule Selects a rule of the E-mail. Check the check box for forwarding.
...to add to the destination. 3 After you have finished selection, click Submit. 3-19 4 The Send and Forward page appears. Scanner > Send and Forward When sending a FAX, FTP, SMB or a E-mail job, Send and Forward automatically forwards the same job to the E-mail address entered. • SMB - Add Adds a destination for ... from the following: • Email - forwards the E-mail to a destination specified. forwards the jobs to activate Send and Forward. Check that you accept the confirming prompt, click Delete. Rule Selects a rule of the E-mail. Check the check box for forwarding.
Kyocera Command Center Operation Guide Rev 6.3
Page 33
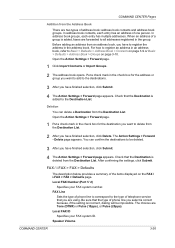
...Action Settings > Forward page appears. The Action Settings > Forward - Delete page appears. FAX Line Sets the type of phone line to correspond to the type of one person. After confirming the settings, click Submit. Speaker Volume COMMAND CENTER 3-26 In address book groups, ...Basic > Defaults > Address Book > Contacts on page 3-9 or Basic > Defaults > Address Book > Groups on the FAX / i-FAX > FAX > Defaults page. Deletion You can confirm the destinations to be impossible. COMMAND CENTER Pages Addition from the Destination List. 2 After you select is correct because, if...
...Action Settings > Forward page appears. The Action Settings > Forward - Delete page appears. FAX Line Sets the type of phone line to correspond to the type of one person. After confirming the settings, click Submit. Speaker Volume COMMAND CENTER 3-26 In address book groups, ...Basic > Defaults > Address Book > Contacts on page 3-9 or Basic > Defaults > Address Book > Groups on the FAX / i-FAX > FAX > Defaults page. Deletion You can confirm the destinations to be impossible. COMMAND CENTER Pages Addition from the Destination List. 2 After you select is correct because, if...
Kyocera Command Center Operation Guide Rev 6.3
Page 35
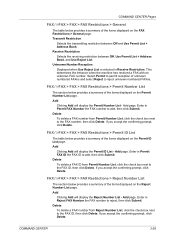
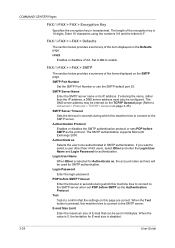
...click the check box next to reject unknown numbered FAXes. Delete To delete a FAX number from Reject Number List, click the check box next to add, then click Submit. If you accept the confirming prompt, click Delete. FAX / i-FAX > FAX > FAX Restrictions > Permit Number List The section below provides ...a summary of the items displayed on the Permit ID List page. Add page. Enter in Permit FAX ID the FAX ID to reject, then click Submit....
...click the check box next to reject unknown numbered FAXes. Delete To delete a FAX number from Reject Number List, click the check box next to add, then click Submit. If you accept the confirming prompt, click Delete. FAX / i-FAX > FAX > FAX Restrictions > Permit Number List The section below provides ...a summary of the items displayed on the Permit ID List page. Add page. Enter in Permit FAX ID the FAX ID to reject, then click Submit....
Kyocera Command Center Operation Guide Rev 6.3
Page 36
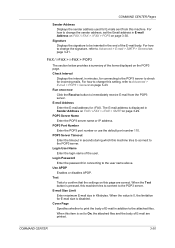
... authentication. E-mail Size Limit Enter the maximum size of the items displayed on page 3-35). Authenticate as Selects the user to confirm that can be configured. Login User Name When Other is selected for E-mail size is pressed, this page are correct. POP ...User Guide The SMTP authentication supports Microsoft Exchange 2000. The length of the item displayed on this machine tries to connect to enable. FAX / i-FAX > i-FAX > SMTP The section below provides a summary of the encryption key is 0, the limitation for Authenticate as, the account name set ...
... authentication. E-mail Size Limit Enter the maximum size of the items displayed on page 3-35). Authenticate as Selects the user to confirm that can be configured. Login User Name When Other is selected for E-mail size is pressed, this page are correct. POP ...User Guide The SMTP authentication supports Microsoft Exchange 2000. The length of the item displayed on this machine tries to connect to enable. FAX / i-FAX > i-FAX > SMTP The section below provides a summary of the encryption key is 0, the limitation for Authenticate as, the account name set ...
Kyocera Command Center Operation Guide Rev 6.3
Page 37
... correct. For how to change the signature, refer to Advanced > E-mail > SMTP > General on this item is pressed, this setting, refer to confirm that the settings on page 3-41. Use APOP Enables or disables APOP. Test Tests to Advanced > E-mail > POP3 > General on page 3-30...to the POP3 server to the user name above. When this page are printed. FAX / i-FAX > i-FAX > POP3 The section below provides a summary of the user. Check Interval Displays the interval, in E-mail Address on FAX / i-FAX > i-FAX > POP3 on page 3-43. E-mail Address Enter the E-mail address for connecting...
... correct. For how to change the signature, refer to Advanced > E-mail > SMTP > General on this item is pressed, this setting, refer to confirm that the settings on page 3-41. Use APOP Enables or disables APOP. Test Tests to Advanced > E-mail > POP3 > General on page 3-30...to the POP3 server to the user name above. When this page are printed. FAX / i-FAX > i-FAX > POP3 The section below provides a summary of the user. Check Interval Displays the interval, in E-mail Address on FAX / i-FAX > i-FAX > POP3 on page 3-43. E-mail Address Enter the E-mail address for connecting...
Kyocera Command Center Operation Guide Rev 6.3
Page 39
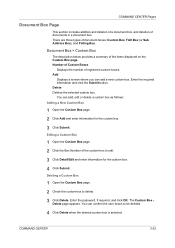
... of the custom box to edit. 3 Click Detail/Edit and enter information for the custom box. 3 Click Submit. Add Displays a screen where you can confirm the user boxes to delete. 3 Click Delete. You can add a new custom box. COMMAND CENTER 3-32 Enter the password, if required, and click OK... the Custom Box page. There are three types of registered custom boxes. Number of Custom Boxes Displays the number of document boxes: Custom Box, FAX Box (or Sub Address Box), and Polling Box. The Custom Box Delete page appears. Delete Deletes the selected custom box. You can add, ...
... of the custom box to edit. 3 Click Detail/Edit and enter information for the custom box. 3 Click Submit. Add Displays a screen where you can confirm the user boxes to delete. 3 Click Delete. You can add a new custom box. COMMAND CENTER 3-32 Enter the password, if required, and click OK... the Custom Box page. There are three types of registered custom boxes. Number of Custom Boxes Displays the number of document boxes: Custom Box, FAX Box (or Sub Address Box), and Polling Box. The Custom Box Delete page appears. Delete Deletes the selected custom box. You can add, ...
Kyocera Command Center Operation Guide Rev 6.3
Page 40
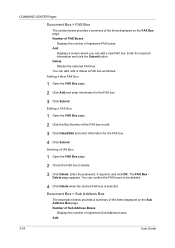
...can add, edit or delete a FAX box as follows: Adding a New FAX Box 1 Open the FAX Box page. 2 Click Add and enter information for the FAX box. 4 Click Submit. You can confirm the FAX boxes to delete. 3 Click Delete. COMMAND CENTER Pages Document Box > FAX Box The section below provides a ...summary of the items displayed on the FAX Box page. Deleting a FAX Box 1 Open the FAX Box page. 2 Check the FAX box to be ...
...can add, edit or delete a FAX box as follows: Adding a New FAX Box 1 Open the FAX Box page. 2 Click Add and enter information for the FAX box. 4 Click Submit. You can confirm the FAX boxes to delete. 3 Click Delete. COMMAND CENTER Pages Document Box > FAX Box The section below provides a ...summary of the items displayed on the FAX Box page. Deleting a FAX Box 1 Open the FAX Box page. 2 Check the FAX box to be ...
FS-C2126MFP Network Fax Driver Operation Guide Rev. 3
Page 11
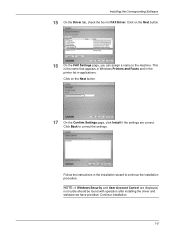
...Next button. 17 On the Confirm Settings page, click Install if the settings are displayed, no trouble should be found with operation after installing the driver and software we have provided. This is the name that appears in Windows Printers and Faxes and in the printer list in... procedure. Follow the instructions in applications. Installing the Corresponding Software 15 On the Driver tab, check the box for FAX Driver. Click on the Next button. 16 On the FAX Settings page, you can assign a name to correct the settings. Continue installation. 1-5 Click Back to the machine....
...Next button. 17 On the Confirm Settings page, click Install if the settings are displayed, no trouble should be found with operation after installing the driver and software we have provided. This is the name that appears in Windows Printers and Faxes and in the printer list in... procedure. Follow the instructions in applications. Installing the Corresponding Software 15 On the Driver tab, check the box for FAX Driver. Click on the Next button. 16 On the FAX Settings page, you can assign a name to correct the settings. Continue installation. 1-5 Click Back to the machine....
FS-C2126MFP Network Fax Driver Operation Guide Rev. 3
Page 17
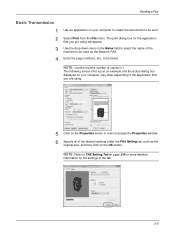
...dialog box displayed on your computer to create the documents to be sent. 2 Select Print from the File menu. NOTE: Confirm that the number of the machine to be faxed. NOTE: Refer to FAX Setting Tab on page 2-8 for the application that you are using . 5 Click on the Properties button in order to... access the Properties window. 6 Specify all of the desired settings under the FAX Setting tab, such as the Network FAX. 4 Enter the page numbers, etc., to be used as the original size, and then click on the OK button. The following ...
...dialog box displayed on your computer to create the documents to be sent. 2 Select Print from the File menu. NOTE: Confirm that the number of the machine to be faxed. NOTE: Refer to FAX Setting Tab on page 2-8 for the application that you are using . 5 Click on the Properties button in order to... access the Properties window. 6 Specify all of the desired settings under the FAX Setting tab, such as the Network FAX. 4 Enter the page numbers, etc., to be used as the original size, and then click on the OK button. The following ...
FS-C2126MFP Network Fax Driver Operation Guide Rev. 3
Page 21
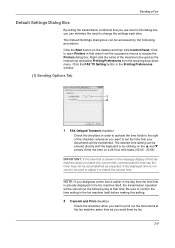
...that order from the resulting drop-down menu. If the displayed time is actually displayed in the fax machine itself , the transmission operation will be transmitted. IMPORTANT: If the time that is shown...right of the machine to be used as you send them by fax. 2-9 Be sure to confirm the time setting in the fax machine itself before making this dialog box, you can be entered ...directly with the keyboard or by the following day at the fax machine same time as the network fax...
...that order from the resulting drop-down menu. If the displayed time is actually displayed in the fax machine itself , the transmission operation will be transmitted. IMPORTANT: If the time that is shown...right of the machine to be used as you send them by fax. 2-9 Be sure to confirm the time setting in the fax machine itself before making this dialog box, you can be entered ...directly with the keyboard or by the following day at the fax machine same time as the network fax...
FS-C2126MFP Network Fax Driver Operation Guide Rev. 3
Page 35
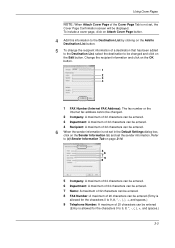
... for the characters 0 to 9 and spaces.) 9 Telephone Number: A maximum of the Cover Page Tab is not set, the Cover Page Confirmation screen will be displayed. To include a cover page, click on Attach Cover Page button. 4 Add this information to the Destination List by ...the sender information is not set the sender information. Change the recipient information and click on the OK button. 1 2 3 4 1 FAX Number (Internet FAX Address): The fax number or the Internet fax address cannot be changed. 2 Company: A maximum of 32 characters can be entered. 3 Department: A maximum of 32 characters can ...
... for the characters 0 to 9 and spaces.) 9 Telephone Number: A maximum of the Cover Page Tab is not set, the Cover Page Confirmation screen will be displayed. To include a cover page, click on Attach Cover Page button. 4 Add this information to the Destination List by ...the sender information is not set the sender information. Change the recipient information and click on the OK button. 1 2 3 4 1 FAX Number (Internet FAX Address): The fax number or the Internet fax address cannot be changed. 2 Company: A maximum of 32 characters can be entered. 3 Department: A maximum of 32 characters can ...
FS-1028MFP/1128MFP Operation Guide Rev-3
Page 4
... 3-6 One-Touch Keys and Program Keys 3-7 Message Display 3-8 Copying 3-9 Printing - Printing from Applications 3-18 Sending 3-20 Confirm Destination Screen 3-27 Specifying Destination 3-28 Canceling Jobs 3-31 Checking Remaining Toner and Paper 3-32 Program (Copying, Sending and Faxing 3-33 4 Copying Functions Original Size 4-2 Paper Selection 4-4 Original Orientation 4-8 EcoPrint 4-10 Combine Mode 4-11 ii...
... 3-6 One-Touch Keys and Program Keys 3-7 Message Display 3-8 Copying 3-9 Printing - Printing from Applications 3-18 Sending 3-20 Confirm Destination Screen 3-27 Specifying Destination 3-28 Canceling Jobs 3-31 Checking Remaining Toner and Paper 3-32 Program (Copying, Sending and Faxing 3-33 4 Copying Functions Original Size 4-2 Paper Selection 4-4 Original Orientation 4-8 EcoPrint 4-10 Combine Mode 4-11 ii...

FS-1028MFP/1128MFP Operation Guide Rev-3
Page 36
...where you can add destinations. Selects the menu displayed at the lower right in FS-1128MFP. 1-2 OPERATION GUIDE Used to call destinations registered to the one -touch key numbers (1 to 11 and 12 to 22). * FAX functions available only in the Message Display. Displays the Status screen, where you ...what is lit while shifted (12 to 22). Shifts to switch the one -touch key numbers (1 to enter a pause when entering a FAX number.* Displays the Confirm Destination screen, where you can check the status, print a status report, and pause or cancel the job in the Message Display. Part ...
...where you can add destinations. Selects the menu displayed at the lower right in FS-1128MFP. 1-2 OPERATION GUIDE Used to call destinations registered to the one -touch key numbers (1 to 11 and 12 to 22). * FAX functions available only in the Message Display. Displays the Status screen, where you ...what is lit while shifted (12 to 22). Shifts to switch the one -touch key numbers (1 to enter a pause when entering a FAX number.* Displays the Confirm Destination screen, where you can check the status, print a status report, and pause or cancel the job in the Message Display. Part ...

FS-1028MFP/1128MFP Operation Guide Rev-3
Page 85
Printing from Applications 3-18 • Sending 3-20 • Confirm Destination Screen 3-27 • Specifying Destination 3-28 • Canceling Jobs 3-31 • Checking Remaining Toner and Paper 3-32 • Program (Copying, Sending and Faxing 3-33 OPERATION GUIDE 3-1 3 Basic Operation This chapter explains the following operations. • Power On/Off 3-2 • Auto Low Power Mode 3-4 • Sleep and Auto Sleep 3-5 • Login/Logout 3-6 • One-Touch Keys and Program Keys 3-7 • Message Display 3-8 • Copying 3-9 • Printing -
Printing from Applications 3-18 • Sending 3-20 • Confirm Destination Screen 3-27 • Specifying Destination 3-28 • Canceling Jobs 3-31 • Checking Remaining Toner and Paper 3-32 • Program (Copying, Sending and Faxing 3-33 OPERATION GUIDE 3-1 3 Basic Operation This chapter explains the following operations. • Power On/Off 3-2 • Auto Low Power Mode 3-4 • Sleep and Auto Sleep 3-5 • Login/Logout 3-6 • One-Touch Keys and Program Keys 3-7 • Message Display 3-8 • Copying 3-9 • Printing -

FS-1028MFP/1128MFP Operation Guide Rev-3
Page 117
...[ No ] Delete. z Program 1 [ Yes ] [ No ] 2 To replace the registered settings with the current settings, press the U or V key to 4 keys. A confirmation screen appears. Menu appears. z Program 1 After making settings, press and hold the one of the Program 1 to the selected program key. NOTE: The following functions... are registered for 3 seconds. Basic Operation Program (Copying, Sending and Faxing) Settings of various functions frequently used for copying and sending can register the same settings using the Function Menu key. ...
...[ No ] Delete. z Program 1 [ Yes ] [ No ] 2 To replace the registered settings with the current settings, press the U or V key to 4 keys. A confirmation screen appears. Menu appears. z Program 1 After making settings, press and hold the one of the Program 1 to the selected program key. NOTE: The following functions... are registered for 3 seconds. Basic Operation Program (Copying, Sending and Faxing) Settings of various functions frequently used for copying and sending can register the same settings using the Function Menu key. ...


