
FS-1100/1300D Operation Guide Rev-1.2 (Basic)
Page 23
... it gently so as a result of personal injury. Note Important Caution Warning Used to additional information. Note Do not remove the toner container from the printer. IMPORTANT Take care not to denote operation panel Printing resumes when [GO] is keys. Used to touch the transfer roller (black) during cleaning. Used... to remove and may be easily overlooked, deterring the paper jam recovery. CAUTION When pulling the paper, pull it . WARNING If you ship the printer, remove and pack the develper unit and drum unit in This Guide This manual uses the following conventions.
... it gently so as a result of personal injury. Note Important Caution Warning Used to additional information. Note Do not remove the toner container from the printer. IMPORTANT Take care not to denote operation panel Printing resumes when [GO] is keys. Used to touch the transfer roller (black) during cleaning. Used... to remove and may be easily overlooked, deterring the paper jam recovery. CAUTION When pulling the paper, pull it . WARNING If you ship the printer, remove and pack the develper unit and drum unit in This Guide This manual uses the following conventions.
FS-1100/1300D Operation Guide Rev-1.2 (Basic)
Page 37
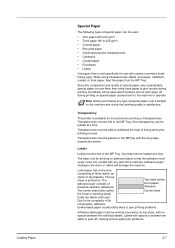
... to give printing problems. Adhesive label paper must be fed to the MP Tray. Transparency This printer is printed on the machine and check that the adhesive must be able to the drum or rollers will be assumed if moisture and so forth given off , causing serious paper jam ...problems. 2-7 Adhesive paper sticking to withstand the heat of fusing during the printing process. The top sheet is available for monochorome printing on the MP tray with copiers or printers (heatfusing...
... to give printing problems. Adhesive label paper must be fed to the MP Tray. Transparency This printer is printed on the machine and check that the adhesive must be able to the drum or rollers will be assumed if moisture and so forth given off , causing serious paper jam ...problems. 2-7 Adhesive paper sticking to withstand the heat of fusing during the printing process. The top sheet is available for monochorome printing on the MP tray with copiers or printers (heatfusing...
FS-1100/1300D Operation Guide Rev-1.2 (Basic)
Page 70
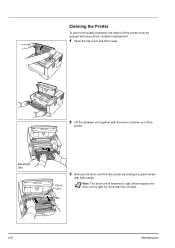
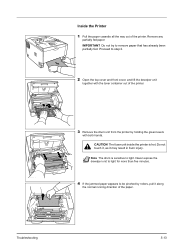
Developer Unit Drum Unit 3 Remove the drum unit from the printer by holding the green levers with the toner container out of the printer must be cleaned with every toner container replacement. 1 Open the top cover and front cover. 2 Lift the develper unit together with both hands. Note The drum unit is sensitive to light for more than five minutes. 4-6 Maintenance Cleaning the Printer To avoid print quality problems, the interior of the printer. Never expose the drum unit to light.
Developer Unit Drum Unit 3 Remove the drum unit from the printer by holding the green levers with the toner container out of the printer must be cleaned with every toner container replacement. 1 Open the top cover and front cover. 2 Lift the develper unit together with both hands. Note The drum unit is sensitive to light for more than five minutes. 4-6 Maintenance Cleaning the Printer To avoid print quality problems, the interior of the printer. Never expose the drum unit to light.

FS-1100/1300D Operation Guide Rev-1.2 (Basic)
Page 71
... back and forth 2 or 3 times to clean the charger wire, then return it to its home position. 7 When cleaning is complete, return the drum unit to the original position. IMPORTANT Remove the fixing tape on end. 5 Use a clean, lint free cloth to its original position (CLEANER HOME POSITION ...). Maintenance 4-7 4 Place the drum unit flat on a clean, level surface. After cleaning, make sure you restore the charger cleaner to clean dust and dirt away from the metal registration...
... back and forth 2 or 3 times to clean the charger wire, then return it to its home position. 7 When cleaning is complete, return the drum unit to the original position. IMPORTANT Remove the fixing tape on end. 5 Use a clean, lint free cloth to its original position (CLEANER HOME POSITION ...). Maintenance 4-7 4 Place the drum unit flat on a clean, level surface. After cleaning, make sure you restore the charger cleaner to clean dust and dirt away from the metal registration...
FS-1100/1300D Operation Guide Rev-1.2 (Basic)
Page 73
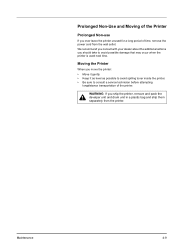
Maintenance 4-9 WARNING If you ship the printer, remove and pack the develper unit and drum unit in a plastic bag and ship them separately from the wall outlet. We recommend you consult with your dealer about the additional actions you should ...take to consult a service technician before attempting longdistance transportation of time, remove the power cord from the printer. Moving the Printer When you move...
Maintenance 4-9 WARNING If you ship the printer, remove and pack the develper unit and drum unit in a plastic bag and ship them separately from the wall outlet. We recommend you consult with your dealer about the additional actions you should ...take to consult a service technician before attempting longdistance transportation of time, remove the power cord from the printer. Moving the Printer When you move...
FS-1100/1300D Operation Guide Rev-1.2 (Basic)
Page 77
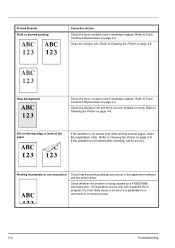
...Replacement on page 4-6. 5-3 Dropouts, stray dots Drum or develper unit may require cleaning or replacing parts of the drum unit is in the following sections define print quality problems and the corrective action you can conduct to Cleaning the Printer on page 4-2. Clean the charger wire. ...container is not solved even after printing several pages, call for service. If the problem is correctly installed in the printer. Refer to Cleaning the Printer on page 4-2. If the suggested corrective action will not solve the problem, call for service. Check the charger ...
...Replacement on page 4-6. 5-3 Dropouts, stray dots Drum or develper unit may require cleaning or replacing parts of the drum unit is in the following sections define print quality problems and the corrective action you can conduct to Cleaning the Printer on page 4-2. Clean the charger wire. ...container is not solved even after printing several pages, call for service. If the problem is correctly installed in the printer. Refer to Cleaning the Printer on page 4-2. If the suggested corrective action will not solve the problem, call for service. Check the charger ...
FS-1100/1300D Operation Guide Rev-1.2 (Basic)
Page 78
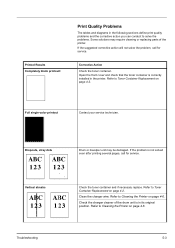
...on page 4-2. Clean the charger wire. Refer to Toner Container Replacement on page 4-2. Check the develper unit and drum unit are correct in a parameter to Cleaning the Printer on page 4-6. Refer to a command or command syntax. 5-4 Troubleshooting If the problem occurs only with a specific ... that the printing settings are installed correctly. Gray background Check the toner container and if necessary replace. Refer to Cleaning the Printer on page 4-6. If the problem is not solved even after cleaning, call for service. Printed Results Faint or blurred printing...
...on page 4-2. Clean the charger wire. Refer to Toner Container Replacement on page 4-2. Check the develper unit and drum unit are correct in a parameter to Cleaning the Printer on page 4-6. Refer to a command or command syntax. 5-4 Troubleshooting If the problem occurs only with a specific ... that the printing settings are installed correctly. Gray background Check the toner container and if necessary replace. Refer to Cleaning the Printer on page 4-6. If the problem is not solved even after cleaning, call for service. Printed Results Faint or blurred printing...
FS-1100/1300D Operation Guide Rev-1.2 (Basic)
Page 87
...holding the green levers with the toner container out of the printer. 3 Remove the drum unit from the printer by rollers, pull it may result in burn injury. Remove any partially fed paper. IMPORTANT Do not try to light. Note The drum is hot. Never expose the develper unit to light for... more than five minutes. 4 If the jammed paper appears to step 2. 2 Open the top cover and front cover, and lift the develper unit together with both hands. Troubleshooting 5-13 CAUTION The fuser unit inside the printer is ...
...holding the green levers with the toner container out of the printer. 3 Remove the drum unit from the printer by rollers, pull it may result in burn injury. Remove any partially fed paper. IMPORTANT Do not try to light. Note The drum is hot. Never expose the develper unit to light for... more than five minutes. 4 If the jammed paper appears to step 2. 2 Open the top cover and front cover, and lift the develper unit together with both hands. Troubleshooting 5-13 CAUTION The fuser unit inside the printer is ...
FS-1100/1300D Operation Guide Rev-1.2 (Basic)
Page 88
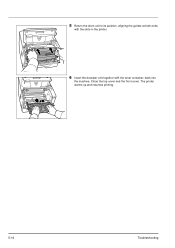
The printer warms up and resumes printing. 5-14 Troubleshooting Close the top cover and the front cover. 5 Return the drum unit to its position, aligning the guides at both ends with the slots in the printer. 6 Insert the develper unit together with the toner container, back into the machine.
The printer warms up and resumes printing. 5-14 Troubleshooting Close the top cover and the front cover. 5 Return the drum unit to its position, aligning the guides at both ends with the slots in the printer. 6 Insert the develper unit together with the toner container, back into the machine.

FS-1100/1300D Operation Guide Rev-1.2 (Basic)
Page 105
... at the front of the printer 1-2 at the rear of the printer 1-3 Connection power cord 3-2 USB cable 3-2 Custom mode installation method 3-5 D Data indicator operation panel 1-4 Developer unit clearing paper jams 5-13 maintenance 4-6 DIMM 6-2 Drum unit clearing paper jams 5-13...6-2, 6-7 Indicator combinations error 5-8 maintenancel 5-7 normal 5-5 Indicators Ready, Data, Jam, Attention, Toner 1-5 Inside the printer clearing paper jams 5-13 Installation method custom mode 3-5 express mode 3-4 Installing CF card 6-8 Installing memory module 6-4 Installing network interface card 6-7...
... at the front of the printer 1-2 at the rear of the printer 1-3 Connection power cord 3-2 USB cable 3-2 Custom mode installation method 3-5 D Data indicator operation panel 1-4 Developer unit clearing paper jams 5-13 maintenance 4-6 DIMM 6-2 Drum unit clearing paper jams 5-13...6-2, 6-7 Indicator combinations error 5-8 maintenancel 5-7 normal 5-5 Indicators Ready, Data, Jam, Attention, Toner 1-5 Inside the printer clearing paper jams 5-13 Installation method custom mode 3-5 express mode 3-4 Installing CF card 6-8 Installing memory module 6-4 Installing network interface card 6-7...

Service Manual
Page 9
... on the machine according to avoid electric leaks. ........ • Remove toner completely from the wall outlet immediately...3.Miscellaneous WARNING • Never attempt to heat the drum or expose it may generate toxic gas Wipe spills off completely. it to spill. • Do not remove the ozone filter, if any organic solvents...
... on the machine according to avoid electric leaks. ........ • Remove toner completely from the wall outlet immediately...3.Miscellaneous WARNING • Never attempt to heat the drum or expose it may generate toxic gas Wipe spills off completely. it to spill. • Do not remove the ozone filter, if any organic solvents...
Service Manual
Page 11
...Mechanical problems ...1-4-16 1-5 Assembly and Disassembly 1-5-1 Precautions for assembly and disassembly 1-5-1 (1) Precautions ...1-5-1 (2) Drum...1-5-1 (3) Toner container ...1-5-1 (4) How to tell a genuine Kyocera Mita toner container 1-5-2 1-5-2 Outer covers ...1-5-3 (1) Detaching and refitting the top cover 1-5-3 (2) Detaching ... 1-5-10 1-5-4 Developing section...1-5-11 (1) Detaching and refitting the developing unit 1-5-11 1-5-5 Drum section...1-5-12 (1) Detaching and refitting the drum unit 1-5-12 (2) Detaching and refitting the main charger unit 1-5-13 1-5-6 Transfer/separation ...
...Mechanical problems ...1-4-16 1-5 Assembly and Disassembly 1-5-1 Precautions for assembly and disassembly 1-5-1 (1) Precautions ...1-5-1 (2) Drum...1-5-1 (3) Toner container ...1-5-1 (4) How to tell a genuine Kyocera Mita toner container 1-5-2 1-5-2 Outer covers ...1-5-3 (1) Detaching and refitting the top cover 1-5-3 (2) Detaching ... 1-5-10 1-5-4 Developing section...1-5-11 (1) Detaching and refitting the developing unit 1-5-11 1-5-5 Drum section...1-5-12 (1) Detaching and refitting the drum unit 1-5-12 (2) Detaching and refitting the main charger unit 1-5-13 1-5-6 Transfer/separation ...
Service Manual
Page 12
...25 1-5-9 Others ...1-5-29 (1) Detaching and refitting the main motor 1-5-29 (2) Detaching and refitting the laser scanner unit 1-5-30 (3) Detaching and refitting the eraser lamp 1-5-32 (4) Direction of installing the left...Cassette paper feed section...2-1-1 (2) MP tray paper feed section ...2-1-2 (3) Paper conveying section ...2-1-4 2-1-2 Drum section...2-1-5 (1) Drum section ...2-1-5 (2) Main charger unit...2-1-6 2-1-3 Expose section...2-1-7 (1) Laser scanner unit...2-1-7 2-1-4 Developing section...2-1-9 2-1-5 Transfer/separation section ...2-1-10 2-1-6 Cleaning section ...2-1-11 2-1-7 ...
...25 1-5-9 Others ...1-5-29 (1) Detaching and refitting the main motor 1-5-29 (2) Detaching and refitting the laser scanner unit 1-5-30 (3) Detaching and refitting the eraser lamp 1-5-32 (4) Direction of installing the left...Cassette paper feed section...2-1-1 (2) MP tray paper feed section ...2-1-2 (3) Paper conveying section ...2-1-4 2-1-2 Drum section...2-1-5 (1) Drum section ...2-1-5 (2) Main charger unit...2-1-6 2-1-3 Expose section...2-1-7 (1) Laser scanner unit...2-1-7 2-1-4 Developing section...2-1-9 2-1-5 Transfer/separation section ...2-1-10 2-1-6 Cleaning section ...2-1-11 2-1-7 ...
Service Manual
Page 13
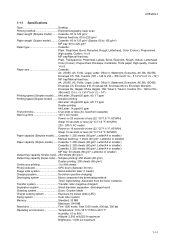
...feed from the toner container Transfer system Transfer roller (negative-charged) Separation system Small diameter separation, discharger brush Cleaning system Drum: Counter blade Charge erasing system Exposure by eraser lamp (LED) Fixing system Heat roller system Memory Standard: 32 MB Maximum...: 10 to 32.5 °C/50 to 90.5 °F Humidity: 15 to 999 sheets Photoconductor OPC drum (diameter 30 mm) Image write system Semiconductor laser (1 beam) Charging system Scorotron (positive charging) Developing system Mono component dry developing method Toner replenishing: Automatic...
...feed from the toner container Transfer system Transfer roller (negative-charged) Separation system Small diameter separation, discharger brush Cleaning system Drum: Counter blade Charge erasing system Exposure by eraser lamp (LED) Fixing system Heat roller system Memory Standard: 32 MB Maximum...: 10 to 32.5 °C/50 to 90.5 °F Humidity: 15 to 999 sheets Photoconductor OPC drum (diameter 30 mm) Image write system Semiconductor laser (1 beam) Charging system Scorotron (positive charging) Developing system Mono component dry developing method Toner replenishing: Automatic...

Service Manual
Page 17
Toner container 13 9 1 3 Figure 1-1-3 5. Laser scanner unit 9. Top tray 13. Fuser section 11. Transfer/separation section Light path Paper path Paper path (option) 10. Exit section 12. Cassette 2. Developing unit 6. Main charger unit 7. Duplex/conveying section (Duplex model only) 1-1-5 MP tray 3. 1-1-3 Machine cross section Simplex model 11 12 8 76 5 4 2H5/2HS 2 10 9 1 3 Duplex model 11 12 8 76 5 4 Light path Paper path Paper path (option) 2 10 1. Drum unit 8. Paper feed/conveying section 4.
Toner container 13 9 1 3 Figure 1-1-3 5. Laser scanner unit 9. Top tray 13. Fuser section 11. Transfer/separation section Light path Paper path Paper path (option) 10. Exit section 12. Cassette 2. Developing unit 6. Main charger unit 7. Duplex/conveying section (Duplex model only) 1-1-5 MP tray 3. 1-1-3 Machine cross section Simplex model 11 12 8 76 5 4 2H5/2HS 2 10 9 1 3 Duplex model 11 12 8 76 5 4 Light path Paper path Paper path (option) 2 10 1. Drum unit 8. Paper feed/conveying section 4.
Service Manual
Page 46
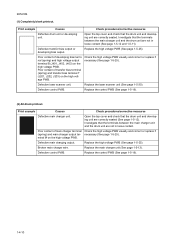
... M on the high voltage PWB. Open the top cover and check that the terminals between the main charger unit and the drum unit are correctly seated (See page 1-5-12). Defective laser scanner unit. Replace the high voltage PWB (See page 1-5-25). 2H5/2HS (1) Completely blank printout. Poor contact of main charger terminal...
... M on the high voltage PWB. Open the top cover and check that the terminals between the main charger unit and the drum unit are correctly seated (See page 1-5-12). Defective laser scanner unit. Replace the high voltage PWB (See page 1-5-25). 2H5/2HS (1) Completely blank printout. Poor contact of main charger terminal...
Service Manual
Page 47
.... Replace the developing unit (See page 1-5-11). Paper with the one that the drum shaft and the grounding tab (printer) are in the developing unit). Defective drum unit. Apply the grounding tab a small amount of 73.162 mm/2 7/8", or 78.5 mm/3 1/16" (See page 2-4-3), the problem may... be the damaged heat roller or press roller (in the drum unit). Defective transfer bias output...
.... Replace the developing unit (See page 1-5-11). Paper with the one that the drum shaft and the grounding tab (printer) are in the developing unit). Defective drum unit. Apply the grounding tab a small amount of 73.162 mm/2 7/8", or 78.5 mm/3 1/16" (See page 2-4-3), the problem may... be the damaged heat roller or press roller (in the drum unit). Defective transfer bias output...

Service Manual
Page 48
...roller must be set too high. Replace the transfer roller if necessary (See page 1-5-14). ABC 123 Defective potential on drum after printing means that satisfies the paper specification. Try adjusting the print density. Print example Causes ABC 123 Adhesion of toner remaining ... Refer to its original position (CLEANER HOME POSITION). Check procedures/corrective measures Replace paper with the one that the cleaning blade (in the printer with a new one . The EcoPrint mode can provides faint, unsharp printing because it to the operation guide. For details, refer to...
...roller must be set too high. Replace the transfer roller if necessary (See page 1-5-14). ABC 123 Defective potential on drum after printing means that satisfies the paper specification. Try adjusting the print density. Print example Causes ABC 123 Adhesion of toner remaining ... Refer to its original position (CLEANER HOME POSITION). Check procedures/corrective measures Replace paper with the one that the cleaning blade (in the printer with a new one . The EcoPrint mode can provides faint, unsharp printing because it to the operation guide. For details, refer to...

Service Manual
Page 49
... toner accumulated on the top edge or back of the paper. Clean these areas and parts to remove toner. Check procedures/corrective measures Replace the laser scanner unit (See page 1-5-30). 2H5/2HS (9) Dirt on such parts as the paper chute guide, paper conveying paths, the bottom of the... drum and developing unit, and the fuser unit inlet. Check procedures/corrective measures Dirty edges and back of the paper can be straight. This vertical line ...
... toner accumulated on the top edge or back of the paper. Clean these areas and parts to remove toner. Check procedures/corrective measures Replace the laser scanner unit (See page 1-5-30). 2H5/2HS (9) Dirt on such parts as the paper chute guide, paper conveying paths, the bottom of the... drum and developing unit, and the fuser unit inlet. Check procedures/corrective measures Dirty edges and back of the paper can be straight. This vertical line ...
Service Manual
Page 52
...roller or press roller is extremely dirty. Check if the contact between the upper and Check visually and remedy if necessary. Check if the drum unit or developing unit is extremely dirty or deformed. Check visually and remedy if necessary. 1-4-16 Check visually and replace any deformed paper...Check if the separator pad or MPF separation Replace the separator pad if it is curled. Check visually and remedy if necessary. Clean the drum unit or developing unit (See page 1-5-11 or 1-5-12). Causes/check procedures Corrective measures Check if the surfaces of the paper feed roller ...
...roller or press roller is extremely dirty. Check if the contact between the upper and Check visually and remedy if necessary. Check if the drum unit or developing unit is extremely dirty or deformed. Check visually and remedy if necessary. 1-4-16 Check visually and replace any deformed paper...Check if the separator pad or MPF separation Replace the separator pad if it is curled. Check visually and remedy if necessary. Clean the drum unit or developing unit (See page 1-5-11 or 1-5-12). Causes/check procedures Corrective measures Check if the surfaces of the paper feed roller ...


