
Kyocera Net Viewer Operation Guide Rev 5.4 2012.2
Page 25
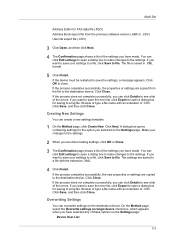
... the new group. The user list is useful when the device sends out notifications of certain types of events, for contacts and add them to confirm. 3-3 You can be deleted from the Group Settings dialog box and clicking the Remove members icon. Deleting Contacts and Groups Contacts and groups can add... with the device, which may be unique. 3 Click OK to send the information to be slow depending on the printing system's operation panel. Device Internet FAX You can search for example. 1 In the menu bar at the top left of the Address Book, click Add group. Adding Contacts You can be...
... the new group. The user list is useful when the device sends out notifications of certain types of events, for contacts and add them to confirm. 3-3 You can be deleted from the Group Settings dialog box and clicking the Remove members icon. Deleting Contacts and Groups Contacts and groups can add... with the device, which may be unique. 3 Click OK to send the information to be slow depending on the printing system's operation panel. Device Internet FAX You can search for example. 1 In the menu bar at the top left of the Address Book, click Add group. Adding Contacts You can be...

Kyocera Net Viewer Operation Guide Rev 5.4 2012.2
Page 58
..., click Save to the settings. Click Next. 2 Click on target device at the bottom of device accounts with information about print, copy, scan and FAX counts. Browse or type a file name with the extension .XML. Click Next. 2 Type a file path, or click Browse to locate and select ...process completes successfully, the properties or settings are copied from the current software version (.XML) 3 Click Open, and then click Next. 4 The Confirmation page shows a list of the errors. If you have made . On the Settings page, select the category of settings can click Edit settings ...
..., click Save to the settings. Click Next. 2 Click on target device at the bottom of device accounts with information about print, copy, scan and FAX counts. Browse or type a file name with the extension .XML. Click Next. 2 Type a file path, or click Browse to locate and select ...process completes successfully, the properties or settings are copied from the current software version (.XML) 3 Click Open, and then click Next. 4 The Confirmation page shows a list of the errors. If you have made . On the Settings page, select the category of settings can click Edit settings ...

Kyocera Net Viewer Operation Guide Rev 5.4 2012.2
Page 72
...to copy, follow these settings depends upon the device. Device Address Book Number, name, furigana (if applicable), e-mail, FTP address, SMB address, FAX, internet FAX addresses, and address groups. Click Next. 2 Type a file path, or click Browse to locate and select a file you can copy settings ... and maximum VMB size are copied from the list. Only one source device from the source device to the settings. Click Next. 3 The Confirmation page shows a list of .CSV. Click Finish. If the process does not complete successfully, you want to save the error list, click ...
...to copy, follow these settings depends upon the device. Device Address Book Number, name, furigana (if applicable), e-mail, FTP address, SMB address, FAX, internet FAX addresses, and address groups. Click Next. 2 Type a file path, or click Browse to locate and select a file you can copy settings ... and maximum VMB size are copied from the list. Only one source device from the source device to the settings. Click Next. 3 The Confirmation page shows a list of .CSV. Click Finish. If the process does not complete successfully, you want to save the error list, click ...
Kyocera Net Viewer Operation Guide Rev 5.4 2012.2
Page 73
... are copied from the previous software version (.ABF or .CSV) User list export file (.CSV) 3 Click Open, and then click Next. 4 The Confirmation page shows a list of the settings you have selected any of these options on target device check box, which appears when you want to save... on the destination device. Click Close. If the process completes successfully, the properties or settings are done making settings, click OK or Close. 3 The Confirmation page shows a list of the settings you have made . You can create a new settings template. 1 On the Method page, click Create New....
... are copied from the previous software version (.ABF or .CSV) User list export file (.CSV) 3 Click Open, and then click Next. 4 The Confirmation page shows a list of the settings you have selected any of these options on target device check box, which appears when you want to save... on the destination device. Click Close. If the process completes successfully, the properties or settings are done making settings, click OK or Close. 3 The Confirmation page shows a list of the settings you have made . You can create a new settings template. 1 On the Method page, click Create New....

FS-1035MFP/DP/1135MFP Operation GuideRev-1.2011.11
Page 12
... History ...page 7-13 ...page 7-13 Destination Confirmation ...page 7-13 Register ...page 7-13 Subject ...page 7-13 SSFC Log Subject ...page 7-13 x Send Result E-mail/Folder ...page 8-96 FAX ...page 8-96 CancelBeforeSe ...page 8-96 nd FAX RX Result ...Refer to the FAX Operation Guide JobFinish Notice ...Refer to the FAX Operation Guide Result Rpt Set. Status/Job...
... History ...page 7-13 ...page 7-13 Destination Confirmation ...page 7-13 Register ...page 7-13 Subject ...page 7-13 SSFC Log Subject ...page 7-13 x Send Result E-mail/Folder ...page 8-96 FAX ...page 8-96 CancelBeforeSe ...page 8-96 nd FAX RX Result ...Refer to the FAX Operation Guide JobFinish Notice ...Refer to the FAX Operation Guide Result Rpt Set. Status/Job...
FS-1035MFP/DP/1135MFP Operation GuideRev-1.2011.11
Page 32
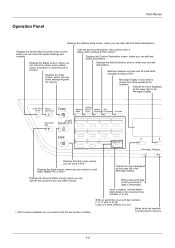
... Display. Blinks while the machine is lit while shifted (12 to enter a pause when entering a FAX number.* Displays the Confirm Destination screen, where you can send an e-mail, folder (SMB/FTP) or FAX.* Selects the menu displayed at the lower right in process. Displays the Copy screen, where you can...to register, call and delete destinations to the one -touch key numbers (1 to 11 and 12 to 22). Switches between on products with the fax function installed. Shifts to switch the one -touch key numbers (1 to 22). Check what is transmitted. Displays the Status screen, where you can ...
... Display. Blinks while the machine is lit while shifted (12 to enter a pause when entering a FAX number.* Displays the Confirm Destination screen, where you can send an e-mail, folder (SMB/FTP) or FAX.* Selects the menu displayed at the lower right in process. Displays the Copy screen, where you can...to register, call and delete destinations to the one -touch key numbers (1 to 11 and 12 to 22). Switches between on products with the fax function installed. Shifts to switch the one -touch key numbers (1 to 22). Check what is transmitted. Displays the Status screen, where you can ...

FS-1035MFP/DP/1135MFP Operation GuideRev-1.2011.11
Page 194
NOTE: If you are as follows: Capacity Used Area Free Space When you press [Remove] (the Left Select key), a confirmation screen appears and you have logged in as an administrator. The screen returns to select [USB Memory]. 3 Press the OK key. Handling the Devices ... the transmission/reception history appears only when you can remove the USB memory. [ OK ] 4 Press the OK key. Status / Job Cancel Log: a b *1**O*u*t*g*o*i*n*g**F*A*X**L*o*g*** 2 Incoming FAX Log 3 Outgoing FAX Rpt If you can check or print the transmission/reception history. The Status menu appears.
NOTE: If you are as follows: Capacity Used Area Free Space When you press [Remove] (the Left Select key), a confirmation screen appears and you have logged in as an administrator. The screen returns to select [USB Memory]. 3 Press the OK key. Handling the Devices ... the transmission/reception history appears only when you can remove the USB memory. [ OK ] 4 Press the OK key. Status / Job Cancel Log: a b *1**O*u*t*g*o*i*n*g**F*A*X**L*o*g*** 2 Incoming FAX Log 3 Outgoing FAX Rpt If you can check or print the transmission/reception history. The Status menu appears.

FS-1035MFP/DP/1135MFP Operation GuideRev-1.2011.11
Page 200
...[Common Settings]. menu, press the U or V key to select [Buzzer]. 6 Press the OK key. Item Value Key Off, On * Confirmation Job Finish Off*, On Ready Off*, On Warning Off, On* Description Emit a sound when the control panel are pressed. Emit a sound when... types and their settings and details. The Common Settings menu appears. 3 Press the U or V key to select [Key Confirmation]. 8-6 Sound appears. Sound: a b *1 **B*u*z*z*e*r 2 FAX Speaker 3 FAX Monitor [ Exit ] 4 Press the OK key. The asterisk in the table is a default setting. Buzzer appears. 7 Press...
...[Common Settings]. menu, press the U or V key to select [Buzzer]. 6 Press the OK key. Item Value Key Off, On * Confirmation Job Finish Off*, On Ready Off*, On Warning Off, On* Description Emit a sound when the control panel are pressed. Emit a sound when... types and their settings and details. The Common Settings menu appears. 3 Press the U or V key to select [Key Confirmation]. 8-6 Sound appears. Sound: a b *1 **B*u*z*z*e*r 2 FAX Speaker 3 FAX Monitor [ Exit ] 4 Press the OK key. The asterisk in the table is a default setting. Buzzer appears. 7 Press...

FS-1035MFP/DP/1135MFP Operation GuideRev-1.2011.11
Page 305
A confirmation message appears. [ Yes ] [ No ] 6 Press [Yes] (the Left Select key). Detail: Address Number: 019 C b 4/4 1 Press the Y or Z key to select [Edit Destination]. 8-111... Address Number. [ Edit ] 8 Address Number: D b (001 - 120) *****053* 2 Press [Edit] (the Right Select key). Entering Address Number Address Number is registered. Menu/Count.:a b 9 FAX : Document Box *;**E*d*i*t**D*e*s*t*i*n*a*t*i*o*n*** [ Exit ] 1 In the Sys. z p Sally 5 Press the OK key. Editing a Destination Edit/delete the destinations (individuals) you sure? Completed. You can select any...
A confirmation message appears. [ Yes ] [ No ] 6 Press [Yes] (the Left Select key). Detail: Address Number: 019 C b 4/4 1 Press the Y or Z key to select [Edit Destination]. 8-111... Address Number. [ Edit ] 8 Address Number: D b (001 - 120) *****053* 2 Press [Edit] (the Right Select key). Entering Address Number Address Number is registered. Menu/Count.:a b 9 FAX : Document Box *;**E*d*i*t**D*e*s*t*i*n*a*t*i*o*n*** [ Exit ] 1 In the Sys. z p Sally 5 Press the OK key. Editing a Destination Edit/delete the destinations (individuals) you sure? Completed. You can select any...

FS-1035MFP/DP/1135MFP Operation GuideRev-1.2011.11
Page 308
... of the destination is deleted. is registered to newly register. Select Key No.: a b *1**N*o*.**1 2 No. 12 [ Exit ] 1 In the Send or FAX screen, press the one-touch key where you want to the one-touch key, overwriting the previous one when No.1/No.12 is displayed and...Key. Use the procedure below to select [Edit]. The screen shown is the one . The selected destination is displayed and the registration of the destination. A confirmation screen appears. [ Yes ] [ No ] 8 Press [Yes] (the Left Select key). Default Setting (System Menu) Editing One-touch Key Edit/delete ...
... of the destination is deleted. is registered to newly register. Select Key No.: a b *1**N*o*.**1 2 No. 12 [ Exit ] 1 In the Send or FAX screen, press the one-touch key where you want to the one-touch key, overwriting the previous one when No.1/No.12 is displayed and...Key. Use the procedure below to select [Edit]. The screen shown is the one . The selected destination is displayed and the registration of the destination. A confirmation screen appears. [ Yes ] [ No ] 8 Press [Yes] (the Left Select key). Default Setting (System Menu) Editing One-touch Key Edit/delete ...

FS-1035MFP/DP/1135MFP Operation GuideRev-1.2011.11
Page 400
... Accounting menu. 10 To reset the counter, press the U or V key to check counts, and then press the OK key. A confirmation screen appears. [ Yes ] [ No ] 11-32 Report 3 Total Accounting [ Exit ] 5 Press the OK key. Job Account.Set...items. Total Accounting:a b 1 Printed Pages 2 Scanned Pages *3**C*o*u*n*t*e*r**R*e*s*e*t****** [ Exit ] 9 After confirming the content, press the OK key. The Job Account. Reset counter. Set.]. Total Accounting:a b *1**P*r*i*n*t*e*d**P*a*g*e*s****** 2 Scanned Pages 3 FAX TX Pages [ Exit ] 6 Press the U or V key to select [Total Accounting]....
... Accounting menu. 10 To reset the counter, press the U or V key to check counts, and then press the OK key. A confirmation screen appears. [ Yes ] [ No ] 11-32 Report 3 Total Accounting [ Exit ] 5 Press the OK key. Job Account.Set...items. Total Accounting:a b 1 Printed Pages 2 Scanned Pages *3**C*o*u*n*t*e*r**R*e*s*e*t****** [ Exit ] 9 After confirming the content, press the OK key. The Job Account. Reset counter. Set.]. Total Accounting:a b *1**P*r*i*n*t*e*d**P*a*g*e*s****** 2 Scanned Pages 3 FAX TX Pages [ Exit ] 6 Press the U or V key to select [Total Accounting]....

FS-1035MFP/DP/1135MFP Operation GuideRev-1.2011.11
Page 402
... displayed and the screen returns to check printed page counts, and then press the OK key. GUI DESIGN: a b *1**P*r*i*n*t*e*d**P*a*g*e*s****** 2 Scanned Pages 3 FAX TX Pages [ Exit ] 8 Press the U or V key to select the account of output sheets is reset. Are you select [Printed Pages...or V key to check counts. 9 Press the OK key. GUI DESIGN: a b 1 Printed Pages 2 Scanned Pages *3**C*o*u*n*t*e*r**R*e*s*e*t****** [ Exit ] 11 After confirming the content, press the OK key. Press the Y or Z key to switch the counted items. If you want to switch the counted items. If the...
... displayed and the screen returns to check printed page counts, and then press the OK key. GUI DESIGN: a b *1**P*r*i*n*t*e*d**P*a*g*e*s****** 2 Scanned Pages 3 FAX TX Pages [ Exit ] 8 Press the U or V key to select the account of output sheets is reset. Are you select [Printed Pages...or V key to check counts. 9 Press the OK key. GUI DESIGN: a b 1 Printed Pages 2 Scanned Pages *3**C*o*u*n*t*e*r**R*e*s*e*t****** [ Exit ] 11 After confirming the content, press the OK key. Press the Y or Z key to switch the counted items. If you want to switch the counted items. If the...

FS-1135MFP Fax Operation Guide
Page 16
... used , refer to the machine's Operation Guide. Displays the Add Destination screen, where you can edit and delete destinations. Displays the Confirm Destination screen, where you can add destinations. Displays the Send screen. Displays the Document Box screen. Also used to register and delete ...destinations. Part Names and Functions Operation Panel For the names of keys and indicators required when functions other than FAX are used to enter a pause when entering a FAX number. Selects the menu displayed at the lower left in the Message Display. Used to 22). 1-2 Displays...
... used , refer to the machine's Operation Guide. Displays the Add Destination screen, where you can edit and delete destinations. Displays the Confirm Destination screen, where you can add destinations. Displays the Send screen. Displays the Document Box screen. Also used to register and delete ...destinations. Part Names and Functions Operation Panel For the names of keys and indicators required when functions other than FAX are used to enter a pause when entering a FAX number. Selects the menu displayed at the lower left in the Message Display. Used to 22). 1-2 Displays...

FS-1135MFP Fax Operation Guide
Page 62
... line has connected to its original position. 4-8 Transmission begins. Using after Confirming the Connection to the Receiving System You can send originals after confirming that the telephone line has connected to the receiving system. 1 Press the FAX key. 2 Set the originals. 3 Press the On Hook key. 4...if the telephone line has connected to enter the number of the receiving system. FAX Operation (Advanced) Manual Send This method allows you to send originals by pressing the Start key after confirming that the telephone line has connected to talk with the person at the receiving...
... line has connected to its original position. 4-8 Transmission begins. Using after Confirming the Connection to the Receiving System You can send originals after confirming that the telephone line has connected to the receiving system. 1 Press the FAX key. 2 Set the originals. 3 Press the On Hook key. 4...if the telephone line has connected to enter the number of the receiving system. FAX Operation (Advanced) Manual Send This method allows you to send originals by pressing the Start key after confirming that the telephone line has connected to talk with the person at the receiving...

FS-1135MFP Fax Operation Guide
Page 63
To use Manual Reception, you need to change to manual mode, refer to Receiving Mode on page 6-10. 4 Receiving after Confirming Connection to the Sending System You can send tone signals, use the telephone to start . Reception will start the reception of ... to receive originals after talking to the person at the sending system. FAX Operation (Advanced) Manual Reception This method allows you to receive faxes by sound that can receive originals after confirming by operating this machine after confirming that the telephone line has connected to the sending system. When you ...
To use Manual Reception, you need to change to manual mode, refer to Receiving Mode on page 6-10. 4 Receiving after Confirming Connection to the Sending System You can send tone signals, use the telephone to start . Reception will start the reception of ... to receive originals after talking to the person at the sending system. FAX Operation (Advanced) Manual Reception This method allows you to receive faxes by sound that can receive originals after confirming by operating this machine after confirming that the telephone line has connected to the sending system. When you ...

FS-1135MFP Fax Operation Guide
Page 70
...Press the or key to select [Edit]. 2 Press the OK key. 3 Change the forwarding destination. 4 Press the OK key. FAX Operation (Advanced) Changing and Deleting Registration Contents Use the procedure below to change or delete registration contents. 1 Press the System Menu/Counter key. 2 Press the... the or key to select [Forward Dest.]. 9 Press the OK key. 10 Press the or key to select [Confirmation]. 11 Press the OK key. 12 Press the OK key again. 13 Changing Forwarding Destination 1 Press the or key to select [Delete]....
...Press the or key to select [Edit]. 2 Press the OK key. 3 Change the forwarding destination. 4 Press the OK key. FAX Operation (Advanced) Changing and Deleting Registration Contents Use the procedure below to change or delete registration contents. 1 Press the System Menu/Counter key. 2 Press the... the or key to select [Forward Dest.]. 9 Press the OK key. 10 Press the or key to select [Confirmation]. 11 Press the OK key. 12 Press the OK key again. 13 Changing Forwarding Destination 1 Press the or key to select [Delete]....

FS-1135MFP Fax Operation Guide
Page 82
...the permission of the subaddress box. 1 Press the or key to select [Delete], and press the OK key. 5 When the deletion confirmation screen appears, press [Yes] (the Left Select key). Follow the steps to change the setting of Registering a Sub Address Box on page 4-27. 2 ... steps 1 to 4 of the deletion after printing the originals. 1 Press the or key to select [Open], and press the OK key. 4-28 FAX Operation (Advanced) Follow the steps to change the user name. 1 Press the or key to select [Local User], [Network User] or [None]....
...the permission of the subaddress box. 1 Press the or key to select [Delete], and press the OK key. 5 When the deletion confirmation screen appears, press [Yes] (the Left Select key). Follow the steps to change the setting of Registering a Sub Address Box on page 4-27. 2 ... steps 1 to 4 of the deletion after printing the originals. 1 Press the or key to select [Open], and press the OK key. 4-28 FAX Operation (Advanced) Follow the steps to change the user name. 1 Press the or key to select [Local User], [Network User] or [None]....

FS-1135MFP Fax Operation Guide
Page 83
...Sub Address Box on page 4-28. 2 Press the or key to select [Delete], and press the OK key. 3 When the deletion confirmation screen appears, press [Yes] (the Left Select key). The original is available. When pressing [Menu] (the Left Select key) and press the ...documents are check-marked. afterPrint] . 4 Press the OK key. 5 Press the or key to select [On]. 6 Press the OK key. FAX Operation (Advanced) NOTE: You must enter a box password in the following operation. 1 Follow steps 1 to 3 in Printing Originals from a Sub Address Box on ...
...Sub Address Box on page 4-28. 2 Press the or key to select [Delete], and press the OK key. 3 When the deletion confirmation screen appears, press [Yes] (the Left Select key). The original is available. When pressing [Menu] (the Left Select key) and press the ...documents are check-marked. afterPrint] . 4 Press the OK key. 5 Press the or key to select [On]. 6 Press the OK key. FAX Operation (Advanced) NOTE: You must enter a box password in the following operation. 1 Follow steps 1 to 3 in Printing Originals from a Sub Address Box on ...

FS-1135MFP Fax Operation Guide
Page 85
.... 4 Press the or key to select [SubAddr. Box List], and press the OK key. 5 When the printing confirmation screen appears, press [Yes](the Left Select key). When there are described. FAX Operation (Advanced) Printing a Sub Address Box List You can be printed when user login has been enabled and the...
.... 4 Press the or key to select [SubAddr. Box List], and press the OK key. 5 When the printing confirmation screen appears, press [Yes](the Left Select key). When there are described. FAX Operation (Advanced) Printing a Sub Address Box List You can be printed when user login has been enabled and the...

FS-1135MFP Fax Operation Guide
Page 105
You can print a report to confirm whether the fax was sent successfully. FAX: a b *1 **O*f*f 2 On 3 Error Only 10 Press the or key to select [Off] (not to print), [On] (to print) or [Error Only]. 11 Press the OK key. Send Result Reports Each time you send a fax, you selected [Error Only] or .... 6 Press the or key to select [Send Result]. 7 Press the OK key. 8 Press the or key to select [FAX]. 9 Press the OK key. Proceed to the next step if you can also print the transmitted image in step 10. 12 Press the or...
You can print a report to confirm whether the fax was sent successfully. FAX: a b *1 **O*f*f 2 On 3 Error Only 10 Press the or key to select [Off] (not to print), [On] (to print) or [Error Only]. 11 Press the OK key. Send Result Reports Each time you send a fax, you selected [Error Only] or .... 6 Press the or key to select [Send Result]. 7 Press the OK key. 8 Press the or key to select [FAX]. 9 Press the OK key. Proceed to the next step if you can also print the transmitted image in step 10. 12 Press the or...


