
Operation Guide
Page 3
Contents 1 Machine Parts 1-1 Components at the Front of the Printer 1-2 Components at the Left of the Printer 1-2 Components at the Right of the Printer 1-3 Internal Components ...1-4 2 Printing Operation 2-1 Loading Printer Driver ...2-2 Printing from Application Software 2-3 3 Maintenance 3-1 General Information ...3-2 Loading Paper ...3-3 Toner Container Replacement 3-8 Cleaning the Printer ...3-13 4 Troubleshooting 4-1 General Guidelines ...4-2 Print Quality Problems ...4-3 Error Messages ...4-6 Clearing Paper Jams ...4-11 5 Specifications 5-1 i
Contents 1 Machine Parts 1-1 Components at the Front of the Printer 1-2 Components at the Left of the Printer 1-2 Components at the Right of the Printer 1-3 Internal Components ...1-4 2 Printing Operation 2-1 Loading Printer Driver ...2-2 Printing from Application Software 2-3 3 Maintenance 3-1 General Information ...3-2 Loading Paper ...3-3 Toner Container Replacement 3-8 Cleaning the Printer ...3-13 4 Troubleshooting 4-1 General Guidelines ...4-2 Print Quality Problems ...4-3 Error Messages ...4-6 Clearing Paper Jams ...4-11 5 Specifications 5-1 i

Operation Guide
Page 20
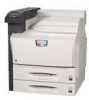
xviii About the Operation Guide This Operation Guide has the following chapters: 1 Machine Parts This chapter explains the names of parts. 2 Printing Operation This chapter explains how to print from your PC. 3 Maintenance This chapter explains how to replace the toner container and how to care for your printer. 4 Troubleshooting This chapter explains how to handle printer problems that may occur, such as paper jams. 5 Specifications This chapter lists the printer's specifications.
xviii About the Operation Guide This Operation Guide has the following chapters: 1 Machine Parts This chapter explains the names of parts. 2 Printing Operation This chapter explains how to print from your PC. 3 Maintenance This chapter explains how to replace the toner container and how to care for your printer. 4 Troubleshooting This chapter explains how to handle printer problems that may occur, such as paper jams. 5 Specifications This chapter lists the printer's specifications.

Operation Guide
Page 45
4 Troubleshooting This chapter contains explanations on the following topics: • General Guidelines...4-2 • Print Quality Problems...4-3 • Error Messages...4-6 • Clearing Paper Jams...4-11 If a problem cannot be corrected, contact your service technician. 4-1
4 Troubleshooting This chapter contains explanations on the following topics: • General Guidelines...4-2 • Print Quality Problems...4-3 • Error Messages...4-6 • Clearing Paper Jams...4-11 If a problem cannot be corrected, contact your service technician. 4-1
Operation Guide
Page 46
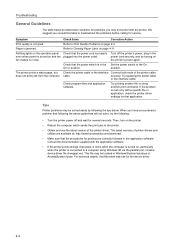
... outlet. Consult the documentation supplied with a specific file or application, check the printer driver settings for service. Symptom Check Items Corrective Action Print quality is connected to troubleshoot the problems before calling for that the power switch is turned on , particularly... when the printer is not good. Turn off the printer's power, plug in the application software. When you consult ...
... outlet. Consult the documentation supplied with a specific file or application, check the printer driver settings for service. Symptom Check Items Corrective Action Print quality is connected to troubleshoot the problems before calling for that the power switch is turned on , particularly... when the printer is not good. Turn off the printer's power, plug in the application software. When you consult ...

Operation Guide
Page 47
...corrective action will be conducted for service. Open the printer left cover 1 and clean the separator with a cleaning brush. Troubleshooting Print Quality Problems The tables and diagrams in cleaning...the following procedures on the operation panel and try cleaning the laser scanner unit using the printer's built-in the following procedures on page 3-13. Refer ...Some solutions may require cleaning or replacing parts of the printer. Refer to Ready. The printer reverts to display >>Drum. Perform color registration using the printer's built-in cleaning system. 1 Press [Menu], and ...
...corrective action will be conducted for service. Open the printer left cover 1 and clean the separator with a cleaning brush. Troubleshooting Print Quality Problems The tables and diagrams in cleaning...the following procedures on the operation panel and try cleaning the laser scanner unit using the printer's built-in the following procedures on page 3-13. Refer ...Some solutions may require cleaning or replacing parts of the printer. Refer to Ready. The printer reverts to display >>Drum. Perform color registration using the printer's built-in cleaning system. 1 Press [Menu], and ...

Operation Guide
Page 48
...Troubleshooting Printed Results Faint or blurred printing Gray background Corrective Action Check the operation panel. • If the Toner low (C/M/Y/K) message is displayed and the [Attention] indicator is flashing, install a new toner kit. Clean the developing unit. The printer reverts to Ready when cleaning is correct. Perform color calibration either by switching the printer... off then on or using the printer's built-in cleaning system....
...Troubleshooting Printed Results Faint or blurred printing Gray background Corrective Action Check the operation panel. • If the Toner low (C/M/Y/K) message is displayed and the [Attention] indicator is flashing, install a new toner kit. Clean the developing unit. The printer reverts to Ready when cleaning is correct. Perform color calibration either by switching the printer... off then on or using the printer's built-in cleaning system....

Operation Guide
Page 49
.... Check whether the problem is being caused by switching the printer off then on the data and actual printout are different. Perform color calibration either by a PRESCRIBE command error. Color on or using the printer operation panel. 4-5 Printing incomplete or out of the printer. Troubleshooting Printed Results Dirt on the top edge or back of the...
.... Check whether the problem is being caused by switching the printer off then on the data and actual printout are different. Perform color calibration either by a PRESCRIBE command error. Color on or using the printer operation panel. 4-5 Printing incomplete or out of the printer. Troubleshooting Printed Results Dirt on the top edge or back of the...
Operation Guide
Page 50
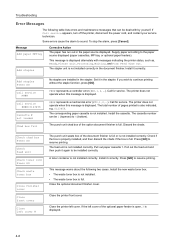
Troubleshooting Error Messages The following two cases. Some errors cause the alarm to...finisher. Supply paper according to sound. The stapler unit is not installed correctly in the paper source displayed. The printer does not operate when this message is also indicated, e.g. 0123456. The corresponding paper cassette is not installed correctly...unit waste box of the option document finisher is not installed correctly. Press [GO] to resume printing. The printer does not operate when this message is displayed. 4-6 If the left cover. Call for service. The total ...
Troubleshooting Error Messages The following two cases. Some errors cause the alarm to...finisher. Supply paper according to sound. The stapler unit is not installed correctly in the paper source displayed. The printer does not operate when this message is also indicated, e.g. 0123456. The corresponding paper cassette is not installed correctly...unit waste box of the option document finisher is not installed correctly. Press [GO] to resume printing. The printer does not operate when this message is displayed. 4-6 If the left cover. Call for service. The total ...
Operation Guide
Page 51
... the Maintenance Kit A or B which data are presently being received. Close the top cover. Turn the power switch off the printer and reinstall the hard disk or the network interface card in the specified virtual mailbox, or the specified virtual mailbox is displayed when... be used for a private job, or a stored job is empty again, it correctly. Contact your service representative or authorized service center. Troubleshooting Message Close mailbox cover Close top cover Duplex disabled Press GO e-MPS not stored Press GO Error power off , and contact your service technician...
... the Maintenance Kit A or B which data are presently being received. Close the top cover. Turn the power switch off the printer and reinstall the hard disk or the network interface card in the specified virtual mailbox, or the specified virtual mailbox is displayed when... be used for a private job, or a stored job is empty again, it correctly. Contact your service representative or authorized service center. Troubleshooting Message Close mailbox cover Close top cover Duplex disabled Press GO e-MPS not stored Press GO Error power off , and contact your service technician...

Operation Guide
Page 52
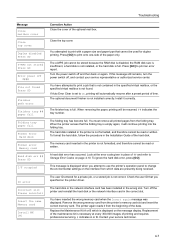
... If you can change the source for paper feeding. Install it from the beginning of the document finisher is categorized by the printer exceeds the printer's internal memory. Press [GO] to resume printing. Press [GO] to print an error report. After setting the correct paper... Paper Handling > appears. After setting the correct paper type, press [OK] and printing starts. If Auto Error Clear is full. Troubleshooting Message Corrective Action KPDL error ## Press GO Current print processing cannot continue because a KPDL error which does not match the current paper size...
... If you can change the source for paper feeding. Install it from the beginning of the document finisher is categorized by the printer exceeds the printer's internal memory. Press [GO] to resume printing. Press [GO] to print an error report. After setting the correct paper... Paper Handling > appears. After setting the correct paper type, press [OK] and printing starts. If Auto Error Clear is full. Troubleshooting Message Corrective Action KPDL error ## Press GO Current print processing cannot continue because a KPDL error which does not match the current paper size...

Operation Guide
Page 53
... or Replace toner is displayed. If a toner container which does not match the current paper size from the top tray. You can be an original Kyocera Mita toner container by C (Cyan), M (Magenta), Y (Yellow), and K (Black). Look at the error code given in this case, this...container(s). To ignore the RAM disk error, press [GO]. The color of the same model, this message may be turned on a page. Troubleshooting Message Corrective Action Print overrun Press GO ** The print job transferred to the printer was too complex to print on automatically. This message is displayed...
... or Replace toner is displayed. If a toner container which does not match the current paper size from the top tray. You can be an original Kyocera Mita toner container by C (Cyan), M (Magenta), Y (Yellow), and K (Black). Look at the error code given in this case, this...container(s). To ignore the RAM disk error, press [GO]. The color of the same model, this message may be turned on a page. Troubleshooting Message Corrective Action Print overrun Press GO ** The print job transferred to the printer was too complex to print on automatically. This message is displayed...
Operation Guide
Page 54
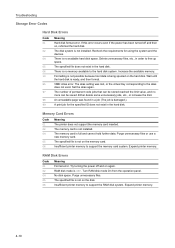
...The memory card is not on the disk. The specified file is not installed. Turn RAM disk mode On from the operation panel. Troubleshooting Storage Error Codes Hard Disk Errors Code 01 02 04 05 06 10 85 97 98 99 Meaning Hard disk format error. There is ...job is Off. VMB: Alias error. The alias setting was found in order to the alias does not exist. Insufficient printer memory to support the memory card system. Insufficient printer memory to support the RAM disk system. Purge unnecessary files. Increase the available memory. Either delete some unnecessary jobs, ...
...The memory card is not on the disk. The specified file is not installed. Turn RAM disk mode On from the operation panel. Troubleshooting Storage Error Codes Hard Disk Errors Code 01 02 04 05 06 10 85 97 98 99 Meaning Hard disk format error. There is ...job is Off. VMB: Alias error. The alias setting was found in order to the alias does not exist. Insufficient printer memory to support the memory card system. Insufficient printer memory to support the RAM disk system. Purge unnecessary files. Increase the available memory. Either delete some unnecessary jobs, ...

Operation Guide
Page 55
...Cassette 4 Paper jam MP Tray Paper jam Feed Unit Paper jam Left Cover 1 Paper jam location A Description Reference page Paper is also indicated. Troubleshooting Clearing Paper Jams If the paper jams in the paper transport system, or no paper sheets were fed at all, the Paper jam message appears... the paper jam (the component where the paper jam has occurred) is jammed at the lower cassette or 4-14 inside the printer. After removing the jammed paper, the printer will re-start printing. Possible Paper Jam Locations The figure below . Paper jams can occur in the feed unit. 4-16...
...Cassette 4 Paper jam MP Tray Paper jam Feed Unit Paper jam Left Cover 1 Paper jam location A Description Reference page Paper is also indicated. Troubleshooting Clearing Paper Jams If the paper jams in the paper transport system, or no paper sheets were fed at all, the Paper jam message appears... the paper jam (the component where the paper jam has occurred) is jammed at the lower cassette or 4-14 inside the printer. After removing the jammed paper, the printer will re-start printing. Possible Paper Jam Locations The figure below . Paper jams can occur in the feed unit. 4-16...

Operation Guide
Page 56
...Guide General considerations for clearing jams. Press ( ) when the paper jam message has appeared. Then a help messages are available in the printer's message display to provide simple instructions for clearing jams Bear in mind the following considerations when attempting jam removal: CAUTION: When pulling the ...after the paper was replaced. • Whether or not the jammed pages are difficult to facilitate jam clearing in the booklet folder. Troubleshooting Paper jam message Paper jam Left Cover 2 Paper jam Left Cover 3 Paper jam Top Cover Paper jam Finisher Paper jam Folding Unit...
...Guide General considerations for clearing jams. Press ( ) when the paper jam message has appeared. Then a help messages are available in the printer's message display to provide simple instructions for clearing jams Bear in mind the following considerations when attempting jam removal: CAUTION: When pulling the ...after the paper was replaced. • Whether or not the jammed pages are difficult to facilitate jam clearing in the booklet folder. Troubleshooting Paper jam message Paper jam Left Cover 2 Paper jam Left Cover 3 Paper jam Top Cover Paper jam Finisher Paper jam Folding Unit...

Operation Guide
Page 57
Troubleshooting Paper Cassette Paper Cassette 1 Remove the paper if a paper jam occurred in the paper cassette 1. Follow the instructions below. 1 Open the left cover 1. 2 Remove the jammed paper. 3 Open the duplex unit A1. 4 Remove the jammed paper. 4-13
Troubleshooting Paper Cassette Paper Cassette 1 Remove the paper if a paper jam occurred in the paper cassette 1. Follow the instructions below. 1 Open the left cover 1. 2 Remove the jammed paper. 3 Open the duplex unit A1. 4 Remove the jammed paper. 4-13

Operation Guide
Page 58
Troubleshooting 5 Pull out paper cassette 1. 6 Remove the jammed paper. 7 Slowly close left cover 1 securely. Follow the instructions below. 1 Open the left cover 1. IMPORTANT: Push the indicated position to close paper cassette 1. 8 Close the duplex unit A1 and the left cover 2. 2 Remove the jammed paper. 4-14 Paper Cassette 2 Remove the paper if a paper jam occurred in paper cassette 2.
Troubleshooting 5 Pull out paper cassette 1. 6 Remove the jammed paper. 7 Slowly close left cover 1 securely. Follow the instructions below. 1 Open the left cover 1. IMPORTANT: Push the indicated position to close paper cassette 1. 8 Close the duplex unit A1 and the left cover 2. 2 Remove the jammed paper. 4-14 Paper Cassette 2 Remove the paper if a paper jam occurred in paper cassette 2.

Operation Guide
Page 59
Troubleshooting 4 Remove the jammed paper. 5 Slowly close paper cassette 2. 6 Close the left cover 3. 2 Remove the jammed paper. 4-15 Follow the instructions below. 1 Open the left cover 2. 3 Pull out paper cassette 2. Paper Cassette 3 or 4 (option) Remove the paper if a paper jam occurred in the optional paper feeder (PF-710/PF-750).
Troubleshooting 4 Remove the jammed paper. 5 Slowly close paper cassette 2. 6 Close the left cover 3. 2 Remove the jammed paper. 4-15 Follow the instructions below. 1 Open the left cover 2. 3 Pull out paper cassette 2. Paper Cassette 3 or 4 (option) Remove the paper if a paper jam occurred in the optional paper feeder (PF-710/PF-750).

Operation Guide
Page 60
Follow the instructions below. 1 Open the left cover 3. Troubleshooting 3 Pull out the paper cassette being used. 4 Remove the jammed paper. MP Tray 5 Slowly close the paper cassette. 6 Close the left cover 1. 2 Remove the jammed paper. 4-16 Remove the paper if a paper jam occurred in the MP tray or feed unit.
Follow the instructions below. 1 Open the left cover 3. Troubleshooting 3 Pull out the paper cassette being used. 4 Remove the jammed paper. MP Tray 5 Slowly close the paper cassette. 6 Close the left cover 1. 2 Remove the jammed paper. 4-16 Remove the paper if a paper jam occurred in the MP tray or feed unit.

Operation Guide
Page 61
Troubleshooting B1 4-17 3 Open the duplex unit A1. 4 Remove the jammed paper. 5 Open the feed guide B1. 6 Remove the jammed paper. 7 Remove all the paper set in the MP tray.
Troubleshooting B1 4-17 3 Open the duplex unit A1. 4 Remove the jammed paper. 5 Open the feed guide B1. 6 Remove the jammed paper. 7 Remove all the paper set in the MP tray.

Operation Guide
Page 62
If paper cannot be moved to the inside of the left cover. 10 Remove the jammed paper. The jammed paper will be removed, perform the steps described below. 11 Pull out the feed unit B3. 12 Open the cover B4 and remove the jammed paper. 4-18 Troubleshooting 8 Pull out paper cassette 1. 9 Turn the handle B2 counterclockwise 10 times or more.
If paper cannot be moved to the inside of the left cover. 10 Remove the jammed paper. The jammed paper will be removed, perform the steps described below. 11 Pull out the feed unit B3. 12 Open the cover B4 and remove the jammed paper. 4-18 Troubleshooting 8 Pull out paper cassette 1. 9 Turn the handle B2 counterclockwise 10 times or more.