bizhub 215 Copy Operations User Guide
Page 3
... Printing reports ...4-24 5 Making Copies in Advanced Manner 5.1 5.1.1 5.1.2 5.2 5.3 5.4 5.5 5.6 5.6.1 Finishing setting (sorting, grouping 5-2 Finishing type...5-2 Setting finishing ...5-4 Making 1-sided or 2-sided copy ...5-5 Configuring 2in1 or 4in1 copy settings 5-7 Using the ID Copy ...5-9 Making copies by entering the ID (Account) number 5-10 Setting book separation copy...5-11 Frame/Center erase type ...5-12 bizhub 215 Contents-2
... Printing reports ...4-24 5 Making Copies in Advanced Manner 5.1 5.1.1 5.1.2 5.2 5.3 5.4 5.5 5.6 5.6.1 Finishing setting (sorting, grouping 5-2 Finishing type...5-2 Setting finishing ...5-4 Making 1-sided or 2-sided copy ...5-5 Configuring 2in1 or 4in1 copy settings 5-7 Using the ID Copy ...5-9 Making copies by entering the ID (Account) number 5-10 Setting book separation copy...5-11 Frame/Center erase type ...5-12 bizhub 215 Contents-2
bizhub 215 Copy Operations User Guide
Page 4
... size...6-12 Registering a custom size...6-12 Drum Dray (Dew condensation removal 6-14 Administrator Settings...6-15 Selecting the administrator setting 6-16 Changing the administrator number 6-16 Configuring setting so that sleep mode is not used 6-16 Specifying ACCOUNT TRACK MODE 6-17 Registering ID (account)...6-17 Changing or deleting the ID (account 6-18... margin position 6-24 Setting the book binding position...6-24 Adjusting the page margin width ...6-25 Setting the erase width ...6-25 Setting a small size original...6-26 bizhub 215 Contents-3
... size...6-12 Registering a custom size...6-12 Drum Dray (Dew condensation removal 6-14 Administrator Settings...6-15 Selecting the administrator setting 6-16 Changing the administrator number 6-16 Configuring setting so that sleep mode is not used 6-16 Specifying ACCOUNT TRACK MODE 6-17 Registering ID (account)...6-17 Changing or deleting the ID (account 6-18... margin position 6-24 Setting the book binding position...6-24 Adjusting the page margin width ...6-25 Setting the erase width ...6-25 Setting a small size original...6-26 bizhub 215 Contents-3

bizhub 215 Copy Operations User Guide
Page 5
... setting 6-30 Configuring BOOK SEPARATION setting 6-30 Setting stamp printing...6-31 Setting the page number print format 6-31 Setting the date/time print format...6-32 7 If you suspect a failure then do the following 7.1 If this copy is output ...7-2 7.2 Major messages and troubleshooting 7-4 7.3 The copier does not function...7-6 8 Others 8.1 8.1.1 8.1.2 8.1.3 8.1.4 8.1.5 8.2 8.2.1 8.2.2 8.2.3 8.2.4 8.2.5 Major specifications ...8-2 bizhub 215 ...8-2 Reverse...
... setting 6-30 Configuring BOOK SEPARATION setting 6-30 Setting stamp printing...6-31 Setting the page number print format 6-31 Setting the date/time print format...6-32 7 If you suspect a failure then do the following 7.1 If this copy is output ...7-2 7.2 Major messages and troubleshooting 7-4 7.3 The copier does not function...7-6 8 Others 8.1 8.1.1 8.1.2 8.1.3 8.1.4 8.1.5 8.2 8.2.1 8.2.2 8.2.3 8.2.4 8.2.5 Major specifications ...8-2 bizhub 215 ...8-2 Reverse...
bizhub 215 Copy Operations User Guide
Page 18
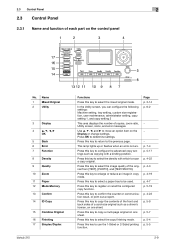
... 8 Density 9 Quality 10 Zoom 11 Paper 12 Mode Memory 13 Confirm 14 ID Copy 15 Combine Original 16 Finishing 17 Simplex/Duplex bizhub 215 Functions Press this key to select the mixed original mode. Press this key to the previous page. Press this key to return to ...quality of the original from [TEXT], [PHOTO], and [TEXT/PHOTO]. Press this key to be used. In the Utility screen, you can configure the following settings: Machine setting, tray setting, custom size registration, user maintenance, administrator setting, copy setting 1, and copy setting 2 This area...
... 8 Density 9 Quality 10 Zoom 11 Paper 12 Mode Memory 13 Confirm 14 ID Copy 15 Combine Original 16 Finishing 17 Simplex/Duplex bizhub 215 Functions Press this key to select the mixed original mode. Press this key to the previous page. Press this key to return to ...quality of the original from [TEXT], [PHOTO], and [TEXT/PHOTO]. Press this key to be used. In the Utility screen, you can configure the following settings: Machine setting, tray setting, custom size registration, user maintenance, administrator setting, copy setting 1, and copy setting 2 This area...

bizhub 215 Copy Operations User Guide
Page 19
... p. 2-19 − − p. 4-6 p. 4-2 p. 2-18 − bizhub 215 2-10 Press this key to switch between numerals and letters you enter from the Keypad. • Press this key to reset all settings you entered on the Control Panel. (Excluding the registered settings ) • Erases the jobs you are currently configuring. • Press this key to...
... p. 2-19 − − p. 4-6 p. 4-2 p. 2-18 − bizhub 215 2-10 Press this key to switch between numerals and letters you enter from the Keypad. • Press this key to reset all settings you entered on the Control Panel. (Excluding the registered settings ) • Erases the jobs you are currently configuring. • Press this key to...

bizhub 215 Copy Operations User Guide
Page 20
... keys 17 to configure a memory transmission. Press this key to switch to the fax mode. tings. Name 1 Fax 2 Scan 3 Copy 4 Auto RX Indicator 5 Memory TX 6 On Hook 7 Redial/Pause 8 Speed Dial 9 AddressBook 10 Switching Plate 11 One-Touch Dial Key bizhub 215 Functions Press this key... to dial a pre-registered destination. • Use keys 01 to 32 to configure one-touch dial key and group dial settings. • Use keys 29 to 32 to ...
... keys 17 to configure a memory transmission. Press this key to switch to the fax mode. tings. Name 1 Fax 2 Scan 3 Copy 4 Auto RX Indicator 5 Memory TX 6 On Hook 7 Redial/Pause 8 Speed Dial 9 AddressBook 10 Switching Plate 11 One-Touch Dial Key bizhub 215 Functions Press this key... to dial a pre-registered destination. • Use keys 01 to 32 to configure one-touch dial key and group dial settings. • Use keys 29 to 32 to ...

bizhub 215 Copy Operations User Guide
Page 28
To correct the value, press Clear/Stop. Tips - bizhub 215 2-19 2.5 Saving electricity 2 2.5 Saving electricity When you want to save electricity for power saving, it is enabled using the Keypad, then press OK. Timer setting can be configured between one and 240 minutes. - The machine setting screen appears. 3 Use +,, to select [SLEEP MODE], then press OK. 4 Enter time until the function is convenient to select [MACHINE SETTING], then press OK. The Utility screen appears. 2 Use +, to use the sleep mode. 2.5.1 Setting sleep mode 1 Press the Utility key.
To correct the value, press Clear/Stop. Tips - bizhub 215 2-19 2.5 Saving electricity 2 2.5 Saving electricity When you want to save electricity for power saving, it is enabled using the Keypad, then press OK. Timer setting can be configured between one and 240 minutes. - The machine setting screen appears. 3 Use +,, to select [SLEEP MODE], then press OK. 4 Enter time until the function is convenient to select [MACHINE SETTING], then press OK. The Utility screen appears. 2 Use +, to use the sleep mode. 2.5.1 Setting sleep mode 1 Press the Utility key.
bizhub 215 Copy Operations User Guide
Page 45
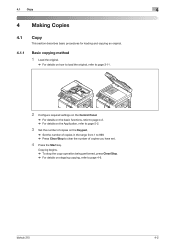
... page 3-11. 2 Configure required settings on the Control Panel. % For details on the basic functions, refer to page 4-2. % For details on the Application, refer to page 5-2. 3 Set the number of copies on stopping copying, refer to clear the number of copies you have set. 4 Press the Start key. bizhub 215 4-2 Copying begins. % To...
... page 3-11. 2 Configure required settings on the Control Panel. % For details on the basic functions, refer to page 4-2. % For details on the Application, refer to page 5-2. 3 Set the number of copies on stopping copying, refer to clear the number of copies you have set. 4 Press the Start key. bizhub 215 4-2 Copying begins. % To...

bizhub 215 Copy Operations User Guide
Page 46
... be copied, you can copy the original with clarity. 1 Load the original. % For details on the Application, refer to page 5-2. 5 Press the Start key. bizhub 215 4-3 The screen returns to the basic screen. 5 Confirm the size of paper for making copies by enlarging a LTR size original to fit 11e 17 size...Paper to select the tray in which sheets of 11 e 17 size are loaded. % For details on how to select the tray, refer to page 4-7. 6 Configure other desired settings. % For details on the basic functions, refer to page 4-2. % For details on how to load the original, refer to page 3-11. 2...
... be copied, you can copy the original with clarity. 1 Load the original. % For details on the Application, refer to page 5-2. 5 Press the Start key. bizhub 215 4-3 The screen returns to the basic screen. 5 Confirm the size of paper for making copies by enlarging a LTR size original to fit 11e 17 size...Paper to select the tray in which sheets of 11 e 17 size are loaded. % For details on how to select the tray, refer to page 4-7. 6 Configure other desired settings. % For details on the basic functions, refer to page 4-2. % For details on how to load the original, refer to page 3-11. 2...

bizhub 215 Copy Operations User Guide
Page 47
... and the [PHOTO] image quality setting at the same time. bizhub 215 4-4 Tips - 4.1 Copy 4 4.1.4 Specifying the density 1 Load the original. % For details on the Application, refer to select a density from nine levels, then press OK. The screen returns to the basic screen. 4 Configure other desired settings. % For details on the basic functions, refer...
... and the [PHOTO] image quality setting at the same time. bizhub 215 4-4 Tips - 4.1 Copy 4 4.1.4 Specifying the density 1 Load the original. % For details on the Application, refer to select a density from nine levels, then press OK. The screen returns to the basic screen. 4 Configure other desired settings. % For details on the basic functions, refer...
bizhub 215 Copy Operations User Guide
Page 48
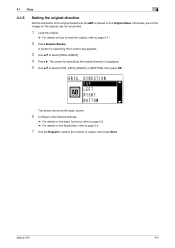
... specifying the 2-sided copy appears. 3 Use +, to select [ORIG. The screen returns to the basic screen. 6 Configure other desired settings. % For details on the basic functions, refer to page 4-2. % For details on the Original Glass. bizhub 215 4-5 DIRECT]. 4 Press ). 4.1 Copy 4 4.1.5 Setting the original direction Set the orientation of the original loaded into the...
... specifying the 2-sided copy appears. 3 Use +, to select [ORIG. The screen returns to the basic screen. 6 Configure other desired settings. % For details on the basic functions, refer to page 4-2. % For details on the Original Glass. bizhub 215 4-5 DIRECT]. 4 Press ). 4.1 Copy 4 4.1.5 Setting the original direction Set the orientation of the original loaded into the...
bizhub 215 Copy Operations User Guide
Page 49
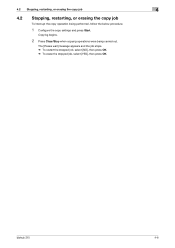
bizhub 215 4-6 The [Please wait] message appears and the job stops. % To restart the stopped job, select [NO], then press OK. % To erase the stopped job, select [YES], then press OK. Copying begins. 2 Press Clear/Stop when copying operations were being performed, follow the below procedure. 1 Configure the copy settings and press Start. 4.2 Stopping, restarting, or erasing the copy job 4 4.2 Stopping, restarting, or erasing the copy job To interrupt the copy operation being carried out.
bizhub 215 4-6 The [Please wait] message appears and the job stops. % To restart the stopped job, select [NO], then press OK. % To erase the stopped job, select [YES], then press OK. Copying begins. 2 Press Clear/Stop when copying operations were being performed, follow the below procedure. 1 Configure the copy settings and press Start. 4.2 Stopping, restarting, or erasing the copy job 4 4.2 Stopping, restarting, or erasing the copy job To interrupt the copy operation being carried out.

bizhub 215 Copy Operations User Guide
Page 50
... screen returns to the basic screen. % By selecting [TRAY1] and pressing ), you can specify the unit of the paper size and paper type. 4 Configure other desired settings. % For details on the basic functions, refer to page 4-2. % For details on the Application, refer to select [AUTO] or one...Paper. 3 Use +, to page 5-2. 5 Press the Start key. Load paper of the appropriate size or select one of the trays, then press Start again. - bizhub 215 4-7 If [NO SUITABLE PAPER] appears on the Display after you can specify the size, unit, and type of paper. % By selecting one of the trays...
... screen returns to the basic screen. % By selecting [TRAY1] and pressing ), you can specify the unit of the paper size and paper type. 4 Configure other desired settings. % For details on the basic functions, refer to page 4-2. % For details on the Application, refer to select [AUTO] or one...Paper. 3 Use +, to page 5-2. 5 Press the Start key. Load paper of the appropriate size or select one of the trays, then press Start again. - bizhub 215 4-7 If [NO SUITABLE PAPER] appears on the Display after you can specify the size, unit, and type of paper. % By selecting one of the trays...
bizhub 215 Copy Operations User Guide
Page 57
bizhub 215 4-14 The screen returns to the one for paper setup. 6 Use +, to select [TYPE], then press ). 7 Use +, to page 5-2. 10 Press the Start key. The .... A screen for paper setup. 8 Press Back. % When you want to change the size or type settings, take out the set paper and repeat Step 2 to 8. 9 Configure other desired settings. % For details on the basic functions, refer to page 4-2. % For details on how to load the original, refer to page 3-11. 2 Load...
bizhub 215 4-14 The screen returns to the one for paper setup. 6 Use +, to select [TYPE], then press ). 7 Use +, to page 5-2. 10 Press the Start key. The .... A screen for paper setup. 8 Press Back. % When you want to change the size or type settings, take out the set paper and repeat Step 2 to 8. 9 Configure other desired settings. % For details on the basic functions, refer to page 4-2. % For details on how to load the original, refer to page 3-11. 2 Load...

bizhub 215 Copy Operations User Guide
Page 59
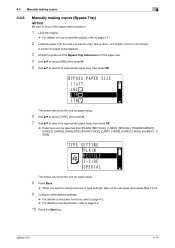
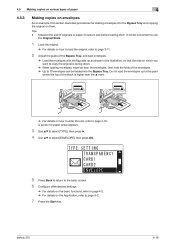
... is higher than the + mark. Length (X) 2. Tips - Width (Y) bizhub 215 4-16 Measure the size of originals or paper of 150 mm e 200 mm into the Bypass Tray. 4.5 Making copies on various types of paper 4 11 Press Back to return to the basic screen. 12 Configure other desired settings. % For details on the basic...
... is higher than the + mark. Length (X) 2. Tips - Width (Y) bizhub 215 4-16 Measure the size of originals or paper of 150 mm e 200 mm into the Bypass Tray. 4.5 Making copies on various types of paper 4 11 Press Back to return to the basic screen. 12 Configure other desired settings. % For details on the basic...
bizhub 215 Copy Operations User Guide
Page 60
... correct the entered value, press Clear/Stop. bizhub 215 4-17 The screen returns to the one for paper setup. 7 Confirm that [TYPE:PLAIN] is displayed. % If paper type other than plain paper is set, select [TYPE], then [PLAIN]. 8 Press Back to return to the basic screen. 9 Configure other desired settings. % For details on...
... correct the entered value, press Clear/Stop. bizhub 215 4-17 The screen returns to the one for paper setup. 7 Confirm that [TYPE:PLAIN] is displayed. % If paper type other than plain paper is set, select [TYPE], then [PLAIN]. 8 Press Back to return to the basic screen. 9 Configure other desired settings. % For details on...
bizhub 215 Copy Operations User Guide
Page 61
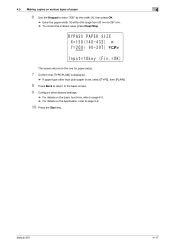
... for paper setup appears. 3 Use +, to select [TYPE], then press ). 4 Use +, to select [ENVELOPE], then press OK. 5 Press Back to return to the basic screen. 6 Configure other desired settings. % For details on the basic functions, refer to page 4-2. % For details on the Application, refer to page 5-2. 7 Press the Start key. Do... than the + mark. % For details on how to enter the size, refer to page 3-11. 2 Adjust the guide of custom size before loading them . Tips - bizhub 215 4-18
... for paper setup appears. 3 Use +, to select [TYPE], then press ). 4 Use +, to select [ENVELOPE], then press OK. 5 Press Back to return to the basic screen. 6 Configure other desired settings. % For details on the basic functions, refer to page 4-2. % For details on the Application, refer to page 5-2. 7 Press the Start key. Do... than the + mark. % For details on how to enter the size, refer to page 3-11. 2 Adjust the guide of custom size before loading them . Tips - bizhub 215 4-18

bizhub 215 Copy Operations User Guide
Page 62
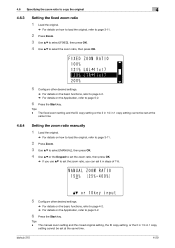
... original. % For details on how to load the original, refer to page 3-11. 2 Press Zoom. 3 Use +, to select [AUTO], then press OK. 4 Configure other desired settings. % For details on the basic functions, refer to page 4-2. % For details on the Application, refer to copy the original By specifying the...loaded original and the selected paper. Tips - Directly enter the zoom ratio on the size of a different standard size is set at the same time. bizhub 215 4-19 4.6 Specifying the zoom ratio to copy the original 4 4.6 Specifying the zoom ratio to page 5-2. 5 Press the Start key. The auto ...
... original. % For details on how to load the original, refer to page 3-11. 2 Press Zoom. 3 Use +, to select [AUTO], then press OK. 4 Configure other desired settings. % For details on the basic functions, refer to page 4-2. % For details on the Application, refer to copy the original By specifying the...loaded original and the selected paper. Tips - Directly enter the zoom ratio on the size of a different standard size is set at the same time. bizhub 215 4-19 4.6 Specifying the zoom ratio to copy the original 4 4.6 Specifying the zoom ratio to page 5-2. 5 Press the Start key. The auto ...
bizhub 215 Copy Operations User Guide
Page 63
... +, to set the zoom ratio, you can set at the same time. Tips - bizhub 215 4-20 Tips - The manual zoom setting and the mixed original setting, the ID copy setting, or the 2 in 1/4 in steps of 1%. 5 Configure other desired settings. % For details on the basic functions, refer to page 4-2. %... to page 3-11. 2 Press Zoom. 3 Use +, to select [FIXED], then press OK. 4 Use +, to select the zoom ratio, then press OK. 5 Configure other desired settings. % For details on the basic functions, refer to page 4-2. % For details on the Application, refer to page 5-2. 6 Press the Start key.
... +, to set the zoom ratio, you can set at the same time. Tips - bizhub 215 4-20 Tips - The manual zoom setting and the mixed original setting, the ID copy setting, or the 2 in 1/4 in steps of 1%. 5 Configure other desired settings. % For details on the basic functions, refer to page 4-2. %... to page 3-11. 2 Press Zoom. 3 Use +, to select [FIXED], then press OK. 4 Use +, to select the zoom ratio, then press OK. 5 Configure other desired settings. % For details on the basic functions, refer to page 4-2. % For details on the Application, refer to page 5-2. 6 Press the Start key.

bizhub 215 Copy Operations User Guide
Page 64
To correct the entered zoom ratio, press Clear/Stop, and configure the setting again. 6 Use the Keypad to page 3-11. 2 Press Function. Tips - bizhub 215 4-21 The X/Y variable zoom ratio setting and the auto paper setting, the mixed original setting, the ID copy setting, or the 2 in... the Keypad to page 5-2. 9 Press the Start key. To correct the entered zoom ratio, press Clear/Stop, and configure the setting again. 7 Press Back to return to the basic screen. 8 Configure other desired settings. % For details on the basic functions, refer to page 3-2. % For details on how to load...
To correct the entered zoom ratio, press Clear/Stop, and configure the setting again. 6 Use the Keypad to page 3-11. 2 Press Function. Tips - bizhub 215 4-21 The X/Y variable zoom ratio setting and the auto paper setting, the mixed original setting, the ID copy setting, or the 2 in... the Keypad to page 5-2. 9 Press the Start key. To correct the entered zoom ratio, press Clear/Stop, and configure the setting again. 7 Press Back to return to the basic screen. 8 Configure other desired settings. % For details on the basic functions, refer to page 3-2. % For details on how to load...


