
Cube3 User Guide
Page 2
... 6 Dimensions 7 6 UNPACKING AND SETTING UP YOUR CUBE 8 Contents 8 Unpacking and Installing your Cube 8 Initial Setup of the Cube 12 Menu Overview 23 Touchscreen Display 23 Print / Setup 23 Navigation 23 Materials 23 Print Plate Calibration 23 Network 24 System 1 24 System 2 24 System 3 24 Installing A Material Cartridge 25
... 6 Dimensions 7 6 UNPACKING AND SETTING UP YOUR CUBE 8 Contents 8 Unpacking and Installing your Cube 8 Initial Setup of the Cube 12 Menu Overview 23 Touchscreen Display 23 Print / Setup 23 Navigation 23 Materials 23 Print Plate Calibration 23 Network 24 System 1 24 System 2 24 System 3 24 Installing A Material Cartridge 25

Cube3 User Guide
Page 3
... Wi-Fi Connection 74 Connect To An Ad Hoc Network 76 11 CUBE MAINTENANCE 78 General Cleaning 78 Removing Waste from the Print Pad 31 Removing Rafts 31 Removing Supports 31 9 CUBIFY SOFTWARE 32 Cubify Software Installation 32 Installing Cubify Software for Windows 32 ...Account Settings 39 Design Feed Tab 40 Shop Tab 41 My Shelf Tab 44 Print Tab 46 Settings 47 Print Settings 48 Print Settings - Custom 49 Print Settings - Standard 50 Print Settings - 7 PRINTING YOUR CREATION 27 Printing Procedure 27 8 FINISHING YOUR CREATION 31 Removing your Creation from the Jet Wiper...
... Wi-Fi Connection 74 Connect To An Ad Hoc Network 76 11 CUBE MAINTENANCE 78 General Cleaning 78 Removing Waste from the Print Pad 31 Removing Rafts 31 Removing Supports 31 9 CUBIFY SOFTWARE 32 Cubify Software Installation 32 Installing Cubify Software for Windows 32 ...Account Settings 39 Design Feed Tab 40 Shop Tab 41 My Shelf Tab 44 Print Tab 46 Settings 47 Print Settings 48 Print Settings - Custom 49 Print Settings - Standard 50 Print Settings - 7 PRINTING YOUR CREATION 27 Printing Procedure 27 8 FINISHING YOUR CREATION 31 Removing your Creation from the Jet Wiper...

Cube3 User Guide
Page 4
Print Pad Calibration 81 Auto Level 81 Gap Verification 84 Manual Gap Adjustment 85 Print Pad Maintenance 86 Clean The Print Pad 86 Test Print 87 Cube Name 88 Updating the Cube Firmware 89 Updating Firmware Using Wi-F.i 89 Updating Firmware Using USB 92 Repacking the Printer 94 Contacting Support 96 12 CUBIFY SUSTAINABILITY PROGRAM 97
Print Pad Calibration 81 Auto Level 81 Gap Verification 84 Manual Gap Adjustment 85 Print Pad Maintenance 86 Clean The Print Pad 86 Test Print 87 Cube Name 88 Updating the Cube Firmware 89 Updating Firmware Using Wi-F.i 89 Updating Firmware Using USB 92 Repacking the Printer 94 Contacting Support 96 12 CUBIFY SUSTAINABILITY PROGRAM 97
Cube3 User Guide
Page 5
...harmful interference to radio or television reception, which the receiver is portable with the limits for a Class B digital device, pursuant to print in a residential installation. However, there is based on a circuit different from and two types of materials, enjoy the freedom to part... with the instructions, may cause harmful interference to you • Engage with other creative partners • Buy the Cube 3D Printer, print cartridges, and supplies COPYRIGHT INFORMATION ©2014 by 3D Systems may cause undesired operation of the FCC Rules. The 3D Systems logo, ...
...harmful interference to radio or television reception, which the receiver is portable with the limits for a Class B digital device, pursuant to print in a residential installation. However, there is based on a circuit different from and two types of materials, enjoy the freedom to part... with the instructions, may cause harmful interference to you • Engage with other creative partners • Buy the Cube 3D Printer, print cartridges, and supplies COPYRIGHT INFORMATION ©2014 by 3D Systems may cause undesired operation of the FCC Rules. The 3D Systems logo, ...
Cube3 User Guide
Page 6
... 499 (DE) weekdays during normal business hours or by email at cubifysupport@cubify. This warranty excludes (i) normal consumable or expendable parts (such as Material Cartridges, Print Pads, and Cube Glue), (ii) repairs required during the warranty period because of abnormal use of non-integrated, non-approved or non-licensed materials with...
... 499 (DE) weekdays during normal business hours or by email at cubifysupport@cubify. This warranty excludes (i) normal consumable or expendable parts (such as Material Cartridges, Print Pads, and Cube Glue), (ii) repairs required during the warranty period because of abnormal use of non-integrated, non-approved or non-licensed materials with...
Cube3 User Guide
Page 7
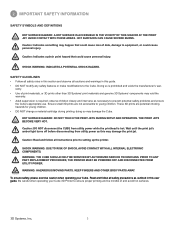
...2 IMPORTANT SAFETY INFORMATION SAFETY SYMBOLS AND DEFINITIONS HOT SURFACE HAZARD: A HOT SURFACE IS ACCESSIBLE IN THE VICINITY OF THIS SIGN OR AT THE PRINT JET. HOT SURFACES CAN CAUSE SEVERE BURNS. doing so may void the warranty. • Adult supervision is prohibited and voids the manufacturer's ...utility power while the printhead is hot. Caution: Read and follow all instructions prior to ensure proper printing and be mindful of print materials, or 3D prints other than 3D Systems' print materials and genuine 3D Systems' components may damage the Cube. SHOCK WARNING: DUE TO RISK OF ...
...2 IMPORTANT SAFETY INFORMATION SAFETY SYMBOLS AND DEFINITIONS HOT SURFACE HAZARD: A HOT SURFACE IS ACCESSIBLE IN THE VICINITY OF THIS SIGN OR AT THE PRINT JET. HOT SURFACES CAN CAUSE SEVERE BURNS. doing so may void the warranty. • Adult supervision is prohibited and voids the manufacturer's ...utility power while the printhead is hot. Caution: Read and follow all instructions prior to ensure proper printing and be mindful of print materials, or 3D prints other than 3D Systems' print materials and genuine 3D Systems' components may damage the Cube. SHOCK WARNING: DUE TO RISK OF ...
Cube3 User Guide
Page 8
... • USB inlet port and Wi-Fi connectivity CUBE 3D PRINTER PROPERTIES Technology: Plastic Jet Printing (PJP) Print Jets: Up to -14 mid-size creations. easy to peel off Cartridge: 1 cartridge prints 13-to two (2) jets* Maximum Creation Size: 6" x 6" x 6" (152.40 mm x 152.40 mm x 152.40...plastic Layer Thickness: .070 mm (70 microns) | .200 mm (200 microns) Supports: Fully automated; 3 CUBE 3D PRINTER FEATURES The print jets heat print materials and produce thin, flowing streams of melted plastic creating layers that a new layer can be drawn on top of the creation has ...
... • USB inlet port and Wi-Fi connectivity CUBE 3D PRINTER PROPERTIES Technology: Plastic Jet Printing (PJP) Print Jets: Up to -14 mid-size creations. easy to peel off Cartridge: 1 cartridge prints 13-to two (2) jets* Maximum Creation Size: 6" x 6" x 6" (152.40 mm x 152.40 mm x 152.40...plastic Layer Thickness: .070 mm (70 microns) | .200 mm (200 microns) Supports: Fully automated; 3 CUBE 3D PRINTER FEATURES The print jets heat print materials and produce thin, flowing streams of melted plastic creating layers that a new layer can be drawn on top of the creation has ...

Cube3 User Guide
Page 9
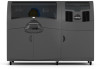
4 AT A GLANCE B C F A G B C J D H H E KI A Print Jets B Print Jet Tubes C Material Cartridges D Print Pad E Print Platform F Touchscreen Display I K G On / Off Button H USB Inlet Port (Mass Storage Device) I Power Inlet J Refuse Bins K USB B Port (for future use) 3D Systems, Inc. 5
4 AT A GLANCE B C F A G B C J D H H E KI A Print Jets B Print Jet Tubes C Material Cartridges D Print Pad E Print Platform F Touchscreen Display I K G On / Off Button H USB Inlet Port (Mass Storage Device) I Power Inlet J Refuse Bins K USB B Port (for future use) 3D Systems, Inc. 5
Cube3 User Guide
Page 10
... VERSION • OpenGLES 2.0+ on mobile platforms • Open GL 3.0+ on your printer. These applications generate .cube3 file for Ad Hoc Wi-Fi print job submission. and 64-bit operating systems • Windows 7, 8 and 8.1 • Minimum screen resolution: 1024 x 768 • Windows is ...conditions ensure the material remains high quality: • Do not unpack cartridges from the foil until the material is required for printing on Windows and Mac (using the USB inlet port. 5 SPECIFICATIONS AND REQUIREMENTS WEIGHT Maximum Cube Weight (with time. MATERIAL STORAGE...
... VERSION • OpenGLES 2.0+ on mobile platforms • Open GL 3.0+ on your printer. These applications generate .cube3 file for Ad Hoc Wi-Fi print job submission. and 64-bit operating systems • Windows 7, 8 and 8.1 • Minimum screen resolution: 1024 x 768 • Windows is ...conditions ensure the material remains high quality: • Do not unpack cartridges from the foil until the material is required for printing on Windows and Mac (using the USB inlet port. 5 SPECIFICATIONS AND REQUIREMENTS WEIGHT Maximum Cube Weight (with time. MATERIAL STORAGE...
Cube3 User Guide
Page 12
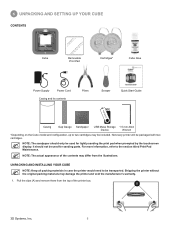
... sanding parts. UNPACKING AND INSTALLING YOUR CUBE NOTE: Keep all packing materials in case the printer would need to the section titled Print Pad Maintenance. It should only be included. Pull the clips (A) and remove them from the illustrations. NOTE: The actual appearance ...Systems, Inc. 8 NOTE: The sandpaper should not be packaged with two cartridges. 6 UNPACKING AND SETTING UP YOUR CUBE CONTENTS Cube Removable Print Pad Cartridges* Cube Glue Power Supply Power Cord Casing and its contents Pliers Scraper Quick Start Guide cubify.com Casing Gap Gauge Sandpaper USB...
... sanding parts. UNPACKING AND INSTALLING YOUR CUBE NOTE: Keep all packing materials in case the printer would need to the section titled Print Pad Maintenance. It should only be included. Pull the clips (A) and remove them from the illustrations. NOTE: The actual appearance ...Systems, Inc. 8 NOTE: The sandpaper should not be packaged with two cartridges. 6 UNPACKING AND SETTING UP YOUR CUBE CONTENTS Cube Removable Print Pad Cartridges* Cube Glue Power Supply Power Cord Casing and its contents Pliers Scraper Quick Start Guide cubify.com Casing Gap Gauge Sandpaper USB...
Cube3 User Guide
Page 14
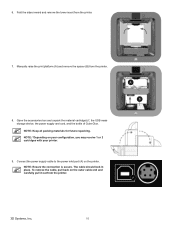
... (A) on the outer cable end and carefully pull it out from the printer. To remove the cable, pull back on the printer. Manually raise the print platform (A) and remove the spacer (B) from the printer. 7. A B A 3D Systems, Inc. 10 NOTE: Keep all packing materials for future repacking. The cable should lock in...
... (A) on the outer cable end and carefully pull it out from the printer. To remove the cable, pull back on the printer. Manually raise the print platform (A) and remove the spacer (B) from the printer. 7. A B A 3D Systems, Inc. 10 NOTE: Keep all packing materials for future repacking. The cable should lock in...
Cube3 User Guide
Page 19
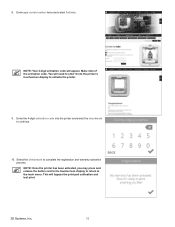
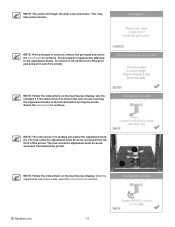
... activation code. Select the checkmark to the main menu. Enter your serial number twice and select Activate. NOTE: Your 4-digit activation code will bypass the print pad calibration and test print. 3D Systems, Inc. 15 8.
... activation code. Select the checkmark to the main menu. Enter your serial number twice and select Activate. NOTE: Your 4-digit activation code will bypass the print pad calibration and test print. 3D Systems, Inc. 15 8.
Cube3 User Guide
Page 20
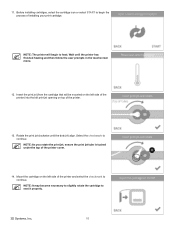
... the printer has finished heating and then follow the user prompts in the touchscreen menu. 12. A 14. Mount the cartridge on the left print jet opening on the left side of the printer) into the left side of the printer and select the checkmark to continue NOTE: As you... printer. 13. Wait until the dots (A) align. Select the checkmark to continue. NOTE: The printer will be mounted on top of installing your print cartridge. NOTE: It may become necessary to slightly rotate the cartridge to heat. Before installing cartridges, select the cartridge icon or select START to begin...
... the printer has finished heating and then follow the user prompts in the touchscreen menu. 12. A 14. Mount the cartridge on the left print jet opening on the left side of the printer) into the left side of the printer and select the checkmark to continue NOTE: As you... printer. 13. Wait until the dots (A) align. Select the checkmark to continue. NOTE: The printer will be mounted on top of installing your print cartridge. NOTE: It may become necessary to slightly rotate the cartridge to heat. Before installing cartridges, select the cartridge icon or select START to begin...
Cube3 User Guide
Page 21
...The printer will begin to continue. Select the checkmark to heat. Once the print jet has reached the proper temperature, the printer will be mounted on top of the printer. 17. A 3D Systems, Inc. 17 Rotate the print jet clockwise until the printer has finished heating and then follow the user prompts... in the touchscreen menu. 16. Insert the print jet (from the cartridge that will prime melted material into the right print jet opening on the right side of the printer cover. NOTE: As you rotate the print jet, ensure the print jet tube is tucked under the top of the ...
...The printer will begin to continue. Select the checkmark to heat. Once the print jet has reached the proper temperature, the printer will be mounted on top of the printer. 17. A 3D Systems, Inc. 17 Rotate the print jet clockwise until the printer has finished heating and then follow the user prompts... in the touchscreen menu. 16. Insert the print jet (from the cartridge that will prime melted material into the right print jet opening on the right side of the printer cover. NOTE: As you rotate the print jet, ensure the print jet tube is tucked under the top of the ...
Cube3 User Guide
Page 22
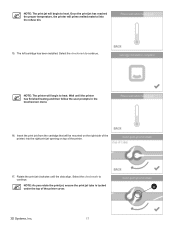
...the proper temperature, the printer will begin to Auto Level. Select the checkmark to seat it properly. NOTE: When installed properly, the print pad magnetically attaches to continue. The right cartridge has been installed. It is recommended that Auto Level is clean and installed properly and ...then select the checkmark to continue to heat. Select PRINT. 21. Mount the cartridge on the right side of the printer and select the checkmark to the adjustment knobs. 3D Systems, Inc. ...
...the proper temperature, the printer will begin to Auto Level. Select the checkmark to seat it properly. NOTE: When installed properly, the print pad magnetically attaches to continue. The right cartridge has been installed. It is recommended that Auto Level is clean and installed properly and ...then select the checkmark to continue to heat. Select PRINT. 21. Mount the cartridge on the right side of the printer and select the checkmark to the adjustment knobs. 3D Systems, Inc. ...
Cube3 User Guide
Page 23
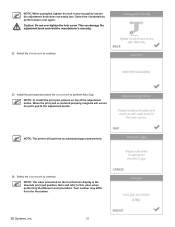
...loosen the lock screws securing the adjustment knobs to continue. The lock screw for adjustment knob B can be accessed from behind the printer. The print pad is located just below the adjustment knob (2). NOTE: Follow the instructions on the touchscreen display. NOTE: The lock screw (1) is magnetically ... can be accessed from the front of the printer. Select the checkmark to the bracket before turning the knobs. NOTE: If the print pad is not level, remove the print pad and select the checkmark to continue. 2 1 3D Systems, Inc. 19 This may take a few minutes. NOTE: The ...
...loosen the lock screws securing the adjustment knobs to continue. The lock screw for adjustment knob B can be accessed from behind the printer. The print pad is located just below the adjustment knob (2). NOTE: Follow the instructions on the touchscreen display. NOTE: The lock screw (1) is magnetically ... can be accessed from the front of the printer. Select the checkmark to the bracket before turning the knobs. NOTE: If the print pad is not level, remove the print pad and select the checkmark to continue. 2 1 3D Systems, Inc. 19 This may take a few minutes. NOTE: The ...
Cube3 User Guide
Page 24
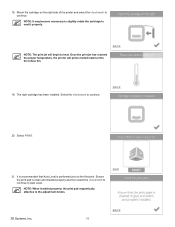
NOTE: When prompted, tighten the lock screw enough to continue. NOTE: To install the print pad, place it on the touchscreen display is centered properly, magnets will perform an automated gap measurement. 24. Select the checkmark to ensure the adjustment ... to perform Auto Gap. This can damage the adjustment knob and void the manufacturer's warranty. 22. Install the print pad and select the checkmark to continue. 23. When the print pad is the absolute print pad position. Select the checkmark to this value when performing the Manual Level procedure. Caution: Do not over...
NOTE: When prompted, tighten the lock screw enough to continue. NOTE: To install the print pad, place it on the touchscreen display is centered properly, magnets will perform an automated gap measurement. 24. Select the checkmark to ensure the adjustment ... to perform Auto Gap. This can damage the adjustment knob and void the manufacturer's warranty. 22. Install the print pad and select the checkmark to continue. 23. When the print pad is the absolute print pad position. Select the checkmark to this value when performing the Manual Level procedure. Caution: Do not over...

Cube3 User Guide
Page 25
...and Auto Gap. Follow the prompts in the touchscreen display. NOTE: If the color built into the test print does not match a color of one of Cube Glue to the test print. NOTE: If Auto Gap is still not successful, select MANUAL GAP ADJUSTMENT. Once the Manual Gap Adjustment ...procedure has been performed, note the final reading for more information about applying glue to the print pad, refer to cover a square area of printing the welcome message test print. NOTE: Apply enough glue to the section titled Applying Cube Glue. NOTE: For best results, allow the ...
...and Auto Gap. Follow the prompts in the touchscreen display. NOTE: If the color built into the test print does not match a color of one of Cube Glue to the test print. NOTE: If Auto Gap is still not successful, select MANUAL GAP ADJUSTMENT. Once the Manual Gap Adjustment ...procedure has been performed, note the final reading for more information about applying glue to the print pad, refer to cover a square area of printing the welcome message test print. NOTE: Apply enough glue to the section titled Applying Cube Glue. NOTE: For best results, allow the ...

Cube3 User Guide
Page 27
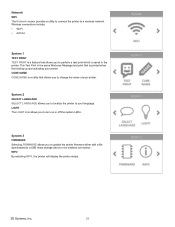
.... Using anything sharp will damage the touchscreen display and will prompt the user to use only light finger pressure to level the print pad. Materials CARTRIDGE STATUS CARTRIDGE STATUS allows you to view the type and color of specification, the user can invent your own... by pressing the right or left in empty bays or replace installed cartridges. AUTO GAP Following AUTO LEVEL, AUTO GAP is installed. Print / Setup PRINT PRINT allows the user to a Bluetooth device, install cartridges, and view the printer status. CHANGE CARTRIDGE Selecting CHANGE CARTRIDGE allows you to ...
.... Using anything sharp will damage the touchscreen display and will prompt the user to use only light finger pressure to level the print pad. Materials CARTRIDGE STATUS CARTRIDGE STATUS allows you to view the type and color of specification, the user can invent your own... by pressing the right or left in empty bays or replace installed cartridges. AUTO GAP Following AUTO LEVEL, AUTO GAP is installed. Print / Setup PRINT PRINT allows the user to a Bluetooth device, install cartridges, and view the printer status. CHANGE CARTRIDGE Selecting CHANGE CARTRIDGE allows you to ...
Cube3 User Guide
Page 28
...allows you to your printer. INFO By selecting INFO, the printer will display the printer status. 3D Systems, Inc. 24 This Test Print is printed when first setting up and activating your language. LIGHT The LIGHT icon allows you to localize the printer to turn on or off the... system LEDs. Wireless connections include: • Wi-Fi • Ad Hoc System 1 TEST PRINT TEST PRINT is saved in the printer. System 3 FIRMWARE Selecting FIRMWARE allows you to perform a test print which is a feature that allows you to update the printer firmware either with a file downloaded to a...
...allows you to your printer. INFO By selecting INFO, the printer will display the printer status. 3D Systems, Inc. 24 This Test Print is printed when first setting up and activating your language. LIGHT The LIGHT icon allows you to localize the printer to turn on or off the... system LEDs. Wireless connections include: • Wi-Fi • Ad Hoc System 1 TEST PRINT TEST PRINT is saved in the printer. System 3 FIRMWARE Selecting FIRMWARE allows you to perform a test print which is a feature that allows you to update the printer firmware either with a file downloaded to a...


