
Cube3 User Guide
Page 2
... 1 COPYRIGHT INFORMATION 1 FCC NOTICE 1 KCC 1 COMPLIANCE 1 WARRANTY 2 LIMITATION OF LIABILITY 2 EXTENDED WARRANTY 2 2 IMPORTANT SAFETY INFORMATION 3 Safety Symbols and Definitions 3 Safety Guidelines 3 3 CUBE 3D PRINTER FEATURES 4 Cube 3D Printer Features 4 Cube 3D Printer Properties 4 4 AT A GLANCE 5 5 SPECIFICATIONS AND REQUIREMENTS 6 Weight 6 Software 6 OpenGL Version 6 Windows Requirements 6 MAC OS X Requirements 6 Android 6 iOS 6 Wireless Options 6 USB Mass...
... 1 COPYRIGHT INFORMATION 1 FCC NOTICE 1 KCC 1 COMPLIANCE 1 WARRANTY 2 LIMITATION OF LIABILITY 2 EXTENDED WARRANTY 2 2 IMPORTANT SAFETY INFORMATION 3 Safety Symbols and Definitions 3 Safety Guidelines 3 3 CUBE 3D PRINTER FEATURES 4 Cube 3D Printer Features 4 Cube 3D Printer Properties 4 4 AT A GLANCE 5 5 SPECIFICATIONS AND REQUIREMENTS 6 Weight 6 Software 6 OpenGL Version 6 Windows Requirements 6 MAC OS X Requirements 6 Android 6 iOS 6 Wireless Options 6 USB Mass...
Cube3 User Guide
Page 5
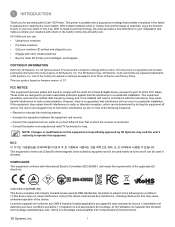
...device must accept any interference, including interference that may cause undesired operation of materials, enjoy the freedom to correct the interference by 3D Systems may void the user's authority to provide reasonable protection against harmful interference in the Cubify community at home and it up...can be used mainly at Cubify.com. CAN ICES-3 (B)/NMB-3(B) This device complies with other creative partners • Buy the Cube 3D Printer, print cartridges, and supplies COPYRIGHT INFORMATION ©2014 by turning the equipment off and on a circuit different from and two ...
...device must accept any interference, including interference that may cause undesired operation of materials, enjoy the freedom to correct the interference by 3D Systems may void the user's authority to provide reasonable protection against harmful interference in the Cubify community at home and it up...can be used mainly at Cubify.com. CAN ICES-3 (B)/NMB-3(B) This device complies with other creative partners • Buy the Cube 3D Printer, print cartridges, and supplies COPYRIGHT INFORMATION ©2014 by turning the equipment off and on a circuit different from and two ...
Cube3 User Guide
Page 6
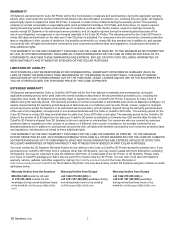
... during the warranty period because of abnormal use or conditions (such as riots, floods, misuse, neglect or improper service by anyone except 3D Systems or its authorized service provider), and (iii) repairs required during the warranty period because of the use of non-integrated, non-approved...WARRANTIES ARE EXPRESS, IMPLIED OR STATUTORY, INCLUDING WARRANTIES OF MERCHANTABILITY AND FITNESS FOR INTENDED OR PARTICULAR PURPOSES. You may also directly contact 3D Systems using the numbers or email addresses below: Warranty Hotline from the Americas 888-598-1440 inside the US and +1 678-338-...
... during the warranty period because of abnormal use or conditions (such as riots, floods, misuse, neglect or improper service by anyone except 3D Systems or its authorized service provider), and (iii) repairs required during the warranty period because of the use of non-integrated, non-approved...WARRANTIES ARE EXPRESS, IMPLIED OR STATUTORY, INCLUDING WARRANTIES OF MERCHANTABILITY AND FITNESS FOR INTENDED OR PARTICULAR PURPOSES. You may also directly contact 3D Systems using the numbers or email addresses below: Warranty Hotline from the Americas 888-598-1440 inside the US and +1 678-338-...
Cube3 User Guide
Page 7
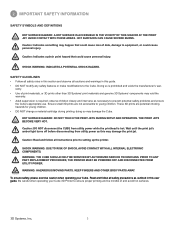
... DO NOT disconnect the CUBE from utility power as this user guide. To ensure safety, please exercise caution when operating your Cube 3D Printer to prevent potential safety problems and ensure the Cube's appropriate use. AVOID CONTACT WITH THESE AREAS. Caution: Indicates something may damage...PRIOR TO ANY PART REPLACEMENT PROCEDURE, THE PRINTER MUST BE POWERED OFF AND DISCONNECTED FROM UTILITY POWER. Doing so is hot. Ensure small 3D prints are potential choking hazards for young children. • DO NOT change a material cartridge during printing; HOT SURFACES CAN CAUSE SEVERE BURNS...
... DO NOT disconnect the CUBE from utility power as this user guide. To ensure safety, please exercise caution when operating your Cube 3D Printer to prevent potential safety problems and ensure the Cube's appropriate use. AVOID CONTACT WITH THESE AREAS. Caution: Indicates something may damage...PRIOR TO ANY PART REPLACEMENT PROCEDURE, THE PRINTER MUST BE POWERED OFF AND DISCONNECTED FROM UTILITY POWER. Doing so is hot. Ensure small 3D prints are potential choking hazards for young children. • DO NOT change a material cartridge during printing; HOT SURFACES CAN CAUSE SEVERE BURNS...
Cube3 User Guide
Page 8
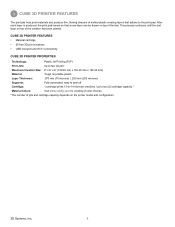
....com for a listing of color choices. *The number of jets and cartridge capacity depends on the printer model and configuration. 3D Systems, Inc. 4 3 CUBE 3D PRINTER FEATURES The print jets heat print materials and produce thin, flowing streams of melted plastic creating layers that a new layer ...can be drawn on top of the creation has been printed. CUBE 3D PRINTER FEATURES • Material cartridge • 25 free 3D print creations • USB inlet port and Wi-Fi connectivity CUBE 3D PRINTER PROPERTIES Technology: Plastic Jet Printing (PJP) Print Jets: Up to the print...
....com for a listing of color choices. *The number of jets and cartridge capacity depends on the printer model and configuration. 3D Systems, Inc. 4 3 CUBE 3D PRINTER FEATURES The print jets heat print materials and produce thin, flowing streams of melted plastic creating layers that a new layer ...can be drawn on top of the creation has been printed. CUBE 3D PRINTER FEATURES • Material cartridge • 25 free 3D print creations • USB inlet port and Wi-Fi connectivity CUBE 3D PRINTER PROPERTIES Technology: Plastic Jet Printing (PJP) Print Jets: Up to the print...

Cube3 User Guide
Page 9
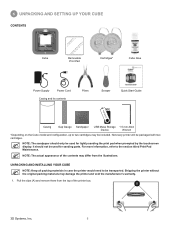
4 AT A GLANCE B C F A G B C J D H H E KI A Print Jets B Print Jet Tubes C Material Cartridges D Print Pad E Print Platform F Touchscreen Display I K G On / Off Button H USB Inlet Port (Mass Storage Device) I Power Inlet J Refuse Bins K USB B Port (for future use) 3D Systems, Inc. 5
4 AT A GLANCE B C F A G B C J D H H E KI A Print Jets B Print Jet Tubes C Material Cartridges D Print Pad E Print Platform F Touchscreen Display I K G On / Off Button H USB Inlet Port (Mass Storage Device) I Power Inlet J Refuse Bins K USB B Port (for future use) 3D Systems, Inc. 5
Cube3 User Guide
Page 10
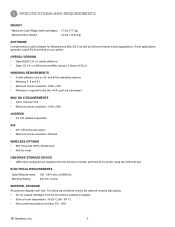
..., 5 amp. ELECTRICAL REQUIREMENTS Outlet Requirements Electrical Rating: 100 - 240 Volts, at room temperature: 16-29° C (60 - 85° F) • Non-condensing relative humidity: 5% - 25% 3D Systems, Inc. 6 The following conditions ensure the material remains high quality: • Do not unpack cartridges from the foil until the material is required for...
..., 5 amp. ELECTRICAL REQUIREMENTS Outlet Requirements Electrical Rating: 100 - 240 Volts, at room temperature: 16-29° C (60 - 85° F) • Non-condensing relative humidity: 5% - 25% 3D Systems, Inc. 6 The following conditions ensure the material remains high quality: • Do not unpack cartridges from the foil until the material is required for...
Cube3 User Guide
Page 12
...: Keep all packing materials in case the printer would need to be used for lightly sanding the print pad when prompted by the touchscreen display. A 3D Systems, Inc. 8 For more information, refer to the section titled Print Pad Maintenance. NOTE: The sandpaper should not be packaged with two cartridges. 6 UNPACKING AND...
...: Keep all packing materials in case the printer would need to be used for lightly sanding the print pad when prompted by the touchscreen display. A 3D Systems, Inc. 8 For more information, refer to the section titled Print Pad Maintenance. NOTE: The sandpaper should not be packaged with two cartridges. 6 UNPACKING AND...
Cube3 User Guide
Page 13
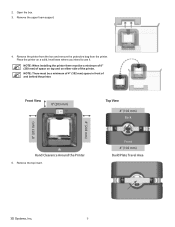
... intend to use it. Remove the printer from the box and remove the protective bag from the printer. Front 4" (102 mm) Build Plate Travel Area 3D Systems, Inc. 9 2.
... intend to use it. Remove the printer from the box and remove the protective bag from the printer. Front 4" (102 mm) Build Plate Travel Area 3D Systems, Inc. 9 2.
Cube3 User Guide
Page 14
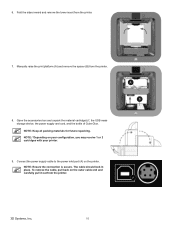
.... To remove the cable, pull back on your configuration, you may receive 1 or 2 cartridges with your printer. 9. NOTE: Keep all packing materials for future repacking. A B A 3D Systems, Inc. 10 Open the accessories box and unpack the material cartridge(s)*, the USB mass storage device, the power supply and cord, and the bottle...
.... To remove the cable, pull back on your configuration, you may receive 1 or 2 cartridges with your printer. 9. NOTE: Keep all packing materials for future repacking. A B A 3D Systems, Inc. 10 Open the accessories box and unpack the material cartridge(s)*, the USB mass storage device, the power supply and cord, and the bottle...
Cube3 User Guide
Page 15
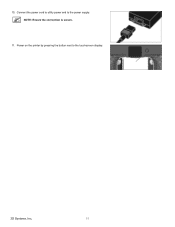
Power on the printer by pressing the button next to the power supply. Connect the power cord to utility power and to the touchscreen display. 3D Systems, Inc. 11 10. NOTE: Ensure the connection is secure. 11.
Power on the printer by pressing the button next to the power supply. Connect the power cord to utility power and to the touchscreen display. 3D Systems, Inc. 11 10. NOTE: Ensure the connection is secure. 11.
Cube3 User Guide
Page 16
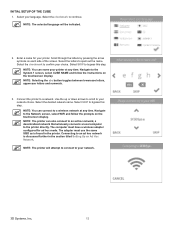
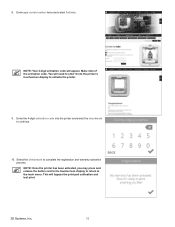
... follow the instructions on each side of the screen. Use the up or down arrows to scroll to continue. Select the checkmark to your network. 3D Systems, Inc. 12
... follow the instructions on each side of the screen. Use the up or down arrows to scroll to continue. Select the checkmark to your network. 3D Systems, Inc. 12
Cube3 User Guide
Page 17
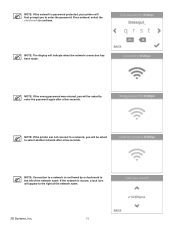
... will first prompt you will indicate when the network connection has been made. Once entered, select the checkmark to the left of the network name. 3D Systems, Inc. 13 If the network is confirmed by a checkmark to continue.
... will first prompt you will indicate when the network connection has been made. Once entered, select the checkmark to the left of the network name. 3D Systems, Inc. 13 If the network is confirmed by a checkmark to continue.
Cube3 User Guide
Page 18
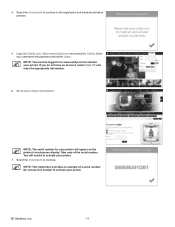
..., select SIGN UP and enter the appropriate information. 6. Go to continue. Select the checkmark to www.cubify.com and select My Cubify. Enter your printer. 3D Systems, Inc. 14 NOTE: This illustration provides an example of the serial number. Go to activate your username and password and select Login. NOTE: The...
..., select SIGN UP and enter the appropriate information. 6. Go to continue. Select the checkmark to www.cubify.com and select My Cubify. Enter your printer. 3D Systems, Inc. 14 NOTE: This illustration provides an example of the serial number. Go to activate your username and password and select Login. NOTE: The...
Cube3 User Guide
Page 19
NOTE: Your 4-digit activation code will bypass the print pad calibration and test print. 3D Systems, Inc. 15 Select the checkmark to the main menu. NOTE: Once the printer has been activated, you may press and release the button next ...
NOTE: Your 4-digit activation code will bypass the print pad calibration and test print. 3D Systems, Inc. 15 Select the checkmark to the main menu. NOTE: Once the printer has been activated, you may press and release the button next ...
Cube3 User Guide
Page 20
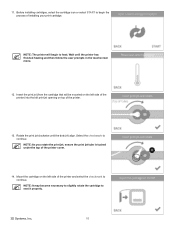
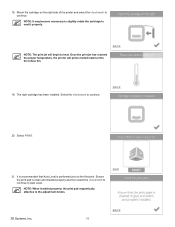
... rotate the print jet, ensure the print jet tube is tucked under the top of the printer and select the checkmark to seat it properly. 3D Systems, Inc. 16 A 14. Select the checkmark to begin to heat. NOTE: The printer will be mounted on top of installing your print cartridge...
... rotate the print jet, ensure the print jet tube is tucked under the top of the printer and select the checkmark to seat it properly. 3D Systems, Inc. 16 A 14. Select the checkmark to begin to heat. NOTE: The printer will be mounted on top of installing your print cartridge...
Cube3 User Guide
Page 21
... (from the cartridge that will prime melted material into the right print jet opening on top of the printer cover. Select the checkmark to continue. A 3D Systems, Inc. 17 Rotate the print jet clockwise until the printer has finished heating and then follow the user prompts in the touchscreen menu. 16...
... (from the cartridge that will prime melted material into the right print jet opening on top of the printer cover. Select the checkmark to continue. A 3D Systems, Inc. 17 Rotate the print jet clockwise until the printer has finished heating and then follow the user prompts in the touchscreen menu. 16...
Cube3 User Guide
Page 22
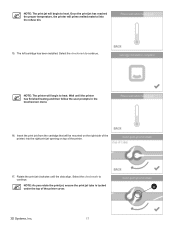
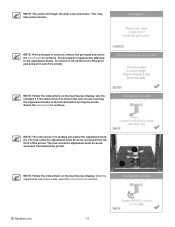
... select the checkmark to seat it properly. 18. Once the print jet has reached the proper temperature, the printer will begin to the adjustment knobs. 3D Systems, Inc. 18 NOTE: It may become necessary to slightly rotate the cartridge to continue. It is recommended that Auto Level is clean and installed...
... select the checkmark to seat it properly. 18. Once the print jet has reached the proper temperature, the printer will begin to the adjustment knobs. 3D Systems, Inc. 18 NOTE: It may become necessary to slightly rotate the cartridge to continue. It is recommended that Auto Level is clean and installed...
Cube3 User Guide
Page 23
... printer will begin the Auto Level procedure. NOTE: If the print pad is not level, remove the print pad and select the checkmark to continue. 2 1 3D Systems, Inc. 19
... printer will begin the Auto Level procedure. NOTE: If the print pad is not level, remove the print pad and select the checkmark to continue. 2 1 3D Systems, Inc. 19
Cube3 User Guide
Page 24
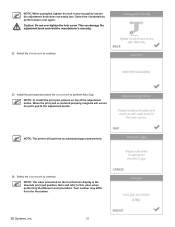
... not over-tighten the lock screw. NOTE: The printer will secure the print pad to the adjustment knobs. Your number may differ from the illustration. 3D Systems, Inc. 20 This can damage the adjustment knob and void the manufacturer's warranty. 22. Select the checkmark to continue. 23. NOTE: To install the...
... not over-tighten the lock screw. NOTE: The printer will secure the print pad to the adjustment knobs. Your number may differ from the illustration. 3D Systems, Inc. 20 This can damage the adjustment knob and void the manufacturer's warranty. 22. Select the checkmark to continue. 23. NOTE: To install the...