
KIP 7100 User Guide
Page 2
... The targeted products are necessary to take whatever steps are office equipment such as computers, monitors, printers, facsimiles, copiers, scanners, and multifunction devices. The symbol shown indicates that this Hardware Operation Guide carefully before using the printer. Operation of this product... ENERGY STAR ® guidelines for future reference. 1. has determined that this equipment in North America. Thank you for the KIP 7100. The symbol shown indicates that this product is subject to countries outside of the FCC Rules. This Hardware Operation Guide contains ...
... The targeted products are necessary to take whatever steps are office equipment such as computers, monitors, printers, facsimiles, copiers, scanners, and multifunction devices. The symbol shown indicates that this Hardware Operation Guide carefully before using the printer. Operation of this product... ENERGY STAR ® guidelines for future reference. 1. has determined that this equipment in North America. Thank you for the KIP 7100. The symbol shown indicates that this product is subject to countries outside of the FCC Rules. This Hardware Operation Guide contains ...
KIP 7100 User Guide
Page 7
Chapter 1 Before Use 1. 1 Installation Requirements 1. 2 Originals Prohibited from Duplication 1. 3 Features 1. 4 Specifications 1. 4. 1 General 1. 4. 2 Printer part 1. 4. 3 Scanner part 1. 5 Appearance 1. 5. 1 Front view 1. 5. 2 Rear view 1. 6 Specifications for the Scan Original 1. 7 Specifications for the Printing Paper 1. 7. 1 Papers not available to use 1. 7. 2 Keeping the paper in the custody 1. 7. 3 Treatment against environmental condition 1-1 page 1- 2 1- 3 1- 4 1- 5 1- 5 1- 6 1- 8 1- 9 1- 9 1-10 1-11 1-14 1-14 1-15 1-16 Chapter 1 Before Use
Chapter 1 Before Use 1. 1 Installation Requirements 1. 2 Originals Prohibited from Duplication 1. 3 Features 1. 4 Specifications 1. 4. 1 General 1. 4. 2 Printer part 1. 4. 3 Scanner part 1. 5 Appearance 1. 5. 1 Front view 1. 5. 2 Rear view 1. 6 Specifications for the Scan Original 1. 7 Specifications for the Printing Paper 1. 7. 1 Papers not available to use 1. 7. 2 Keeping the paper in the custody 1. 7. 3 Treatment against environmental condition 1-1 page 1- 2 1- 3 1- 4 1- 5 1- 5 1- 6 1- 8 1- 9 1- 9 1-10 1-11 1-14 1-14 1-15 1-16 Chapter 1 Before Use

KIP 7100 User Guide
Page 11
... consumption (Maximum) Power consumption (Low power mode) Acoustic noise Ozone Dimensions Weight Environmental condition for usage Interface Rating Input Power Specification KIP 7100 Console 1,440W (US model) 1,680W (EU / Asia model) (scanner / controller included) 30W or less Idling Max. 60db Printing Max. 65db (impulse sound excluded) EN ISO 7779 Max. 0.05ppm (Measurement method...
... consumption (Maximum) Power consumption (Low power mode) Acoustic noise Ozone Dimensions Weight Environmental condition for usage Interface Rating Input Power Specification KIP 7100 Console 1,440W (US model) 1,680W (EU / Asia model) (scanner / controller included) 30W or less Idling Max. 60db Printing Max. 65db (impulse sound excluded) EN ISO 7779 Max. 0.05ppm (Measurement method...
KIP 7100 User Guide
Page 14
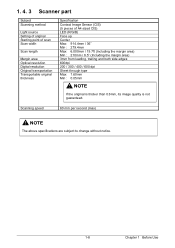
1. 4. 3 Scanner part Subject Scanning method Light source Setting of original Starting point of scan Scan width Scan length Margin area Optical resolution Digital resolution Original transportation ...
1. 4. 3 Scanner part Subject Scanning method Light source Setting of original Starting point of scan Scan width Scan length Margin area Optical resolution Digital resolution Original transportation ...

KIP 7100 User Guide
Page 15
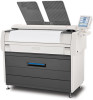
... 1. 5 Appearance 1. 5. 1 Front view 10 5 6 2 7 8 9 4 3 2 11 12 7 1 No. Also put the original here and then feed it into the Scanner Unit when you make scan or copy. 6 Toner Hatch (Original Table) Open the Toner Hatch when you open the Engine Unit. 8 Bypass Feeder Feed a cut...Before Use Press this button when you would like to stop copying or scanning emergently. 5 Scanner Unit Read the original with this to tap on /off the KIP 7100. 2 Original Guides Feed the original under the Scanner Unit along the Original Guides. 3 User Interface 4 Emergent Stop Button This is a Touch...
... 1. 5 Appearance 1. 5. 1 Front view 10 5 6 2 7 8 9 4 3 2 11 12 7 1 No. Also put the original here and then feed it into the Scanner Unit when you make scan or copy. 6 Toner Hatch (Original Table) Open the Toner Hatch when you open the Engine Unit. 8 Bypass Feeder Feed a cut...Before Use Press this button when you would like to stop copying or scanning emergently. 5 Scanner Unit Read the original with this to tap on /off the KIP 7100. 2 Original Guides Feed the original under the Scanner Unit along the Original Guides. 3 User Interface 4 Emergent Stop Button This is a Touch...
KIP 7100 User Guide
Page 17
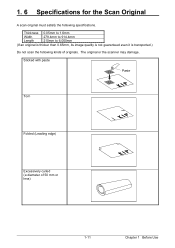
Sticked with paste Paste Torn Folded (Leading edge) Excessively curled (a diameter of originals. The original or the scanner may damage. Thickness 0.05mm to 1.6mm Width 279.4mm to 914.4mm Length 210mm to 6,000mm (If an original is thicker than 0.65mm, its image quality is not guaranteed even it is transported.) Do not scan the following specifications. 1. 6 Specifications for the Scan Original A scan original must satisfy the following kinds of 50 mm or less) 1-11 Chapter 1 Before Use
Sticked with paste Paste Torn Folded (Leading edge) Excessively curled (a diameter of originals. The original or the scanner may damage. Thickness 0.05mm to 1.6mm Width 279.4mm to 914.4mm Length 210mm to 6,000mm (If an original is thicker than 0.65mm, its image quality is not guaranteed even it is transported.) Do not scan the following specifications. 1. 6 Specifications for the Scan Original A scan original must satisfy the following kinds of 50 mm or less) 1-11 Chapter 1 Before Use

KIP 7100 User Guide
Page 38
Place the original on the Original Table with Original Guides (1). Then insert it under the Scanner Unit along with face up Original Guides (1) with the proper markings according to the original width. 1 1 2. When the leading edge touches the original feeding... roller, the machine automatically carries and sets the original at the proper position. 1 3. NOTE The scanner unit does not accept originals automatically during Sleep Mode. Line up . The KIP 7100 will start the copy process. There are several size markings on the UI screen and then insert an original...
Place the original on the Original Table with Original Guides (1). Then insert it under the Scanner Unit along with face up Original Guides (1) with the proper markings according to the original width. 1 1 2. When the leading edge touches the original feeding... roller, the machine automatically carries and sets the original at the proper position. 1 3. NOTE The scanner unit does not accept originals automatically during Sleep Mode. Line up . The KIP 7100 will start the copy process. There are several size markings on the UI screen and then insert an original...
KIP 7100 User Guide
Page 40
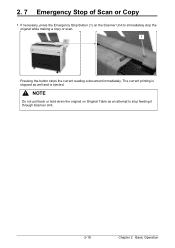
The current printing is ejected. If necessary, press the Emergency Stop Button (1) on Original Table as well and is stopped as an attempt to immediately stop feeding it through Scanner Unit. 2-18 Chapter 2 Basic Operation 2. 7 Emergency Stop of Scan or Copy 1. NOTE Do not pull back or hold down the original on the Scanner Unit to stop the original while making a copy or scan. 1 Pressing the button stops the current reading a document immediately.
The current printing is ejected. If necessary, press the Emergency Stop Button (1) on Original Table as well and is stopped as an attempt to immediately stop feeding it through Scanner Unit. 2-18 Chapter 2 Basic Operation 2. 7 Emergency Stop of Scan or Copy 1. NOTE Do not pull back or hold down the original on the Scanner Unit to stop the original while making a copy or scan. 1 Pressing the button stops the current reading a document immediately.

KIP 7100 User Guide
Page 41
... for the machine to get ready. (2) Tapping on the UI screen can cancel the screensaver but the KIP 7100 needs to stop the power supply for Fuser Unit and some other components. The KIP 7100 will start after a certain period of inactivity to recover temperature on the UI screen then an original is...the machine gets ready when; • the machine receives a print job through the network. • you tap on Fuser Unit. Sleep Mode is inserted the scanner unit. 2. 8 Canceling Sleep Mode The KIP 7100 has two Sleep Modes to start warming up for printing. 2-19 Chapter 2 Basic Operation
... for the machine to get ready. (2) Tapping on the UI screen can cancel the screensaver but the KIP 7100 needs to stop the power supply for Fuser Unit and some other components. The KIP 7100 will start after a certain period of inactivity to recover temperature on the UI screen then an original is...the machine gets ready when; • the machine receives a print job through the network. • you tap on Fuser Unit. Sleep Mode is inserted the scanner unit. 2. 8 Canceling Sleep Mode The KIP 7100 has two Sleep Modes to start warming up for printing. 2-19 Chapter 2 Basic Operation

KIP 7100 User Guide
Page 43
Jam / Internal Jam 3. 1. 4 Fuser Jam 3. 1. 5 Stack Jam 3. 1. 6 Original Jam 3. 1. 7 Accessory Jam 3. 2 Other Operator Call Error 3. 2. 1 Roll Replacement 3. 2. 2 Toner Empty 3. 2. 3 Cutter Set NG 3. 2. 4 Scanner Unit Open 3. 2. 5 Printer Not Available 3. 3 Service Call Error page 3- 2 3- 2 3- 5 3- 6 3- 7 3-10 3-11 3-11 3-12 3-12 3-12 3-12 3-12 3-12 3-13 3-1 Chapter 3 Error Correction Chapter 3 Error Correction 3. 1 Mis-feed Error 3. 1. 1 Deck Jam / Feeding Jam 3. 1. 2 Manual Jam 3. 1. 3 Reg.
Jam / Internal Jam 3. 1. 4 Fuser Jam 3. 1. 5 Stack Jam 3. 1. 6 Original Jam 3. 1. 7 Accessory Jam 3. 2 Other Operator Call Error 3. 2. 1 Roll Replacement 3. 2. 2 Toner Empty 3. 2. 3 Cutter Set NG 3. 2. 4 Scanner Unit Open 3. 2. 5 Printer Not Available 3. 3 Service Call Error page 3- 2 3- 2 3- 5 3- 6 3- 7 3-10 3-11 3-11 3-12 3-12 3-12 3-12 3-12 3-12 3-13 3-1 Chapter 3 Error Correction Chapter 3 Error Correction 3. 1 Mis-feed Error 3. 1. 1 Deck Jam / Feeding Jam 3. 1. 2 Manual Jam 3. 1. 3 Reg.
KIP 7100 User Guide
Page 53
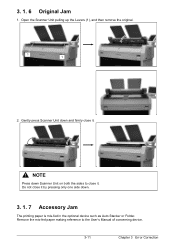
Gently press Scanner Unit down and firmly close it by pressing only one side down Scanner Unit on both the sides to the User's Manual of concerning device. 3-11 Chapter 3 Error Correction Remove the mis-fed paper making reference to close it . Open the Scanner Unit pulling up the Levers (1), and then remove the original. 1 1 2. Do not close it. NOTE Press down . 3. 1. 7 Accessory Jam The printing paper is mis-fed in the optional device such as Auto Stacker or Folder. 3. 1. 6 Original Jam 1.
Gently press Scanner Unit down and firmly close it by pressing only one side down Scanner Unit on both the sides to the User's Manual of concerning device. 3-11 Chapter 3 Error Correction Remove the mis-fed paper making reference to close it . Open the Scanner Unit pulling up the Levers (1), and then remove the original. 1 1 2. Do not close it. NOTE Press down . 3. 1. 7 Accessory Jam The printing paper is mis-fed in the optional device such as Auto Stacker or Folder. 3. 1. 6 Original Jam 1.

KIP 7100 User Guide
Page 54
... running out of toner, the UI Screen will display "Toner Empty" sign. Cutter Knob Cutter Knob 3. 2. 4 Scanner Unit Open The UI screen shows "Scanner Unit Open" if the Scanner Unit is open. (not closed properly) For closing the Scanner Unit, see [3.1.6 Original Jam]. 3. 2. 5 Printer Not Available If the Exit Cover or the Engine Unit...
... running out of toner, the UI Screen will display "Toner Empty" sign. Cutter Knob Cutter Knob 3. 2. 4 Scanner Unit Open The UI screen shows "Scanner Unit Open" if the Scanner Unit is open. (not closed properly) For closing the Scanner Unit, see [3.1.6 Original Jam]. 3. 2. 5 Printer Not Available If the Exit Cover or the Engine Unit...

KIP 7100 User Guide
Page 57
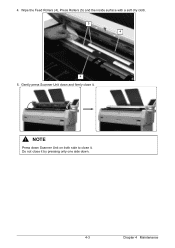
4. 1 Cleaning 4. 1. 1 Scanner Unit It is recommended to unlock the Scanner Unit. Wipe each Scan Glass, Feeding Rollers and Guide Plates as the scan/copy image may become defective if these parts are dirty. 1. Use equal volume mixture of water and a neutral detergent. 3 2 2 3 NOTE Do not use organic solvent, glass cleaner and anti-static spray for the cleaning. 4-2 Chapter 4 Maintenance Open the Scanner Unit. 1 1 3. Press the levers (1) up to clean each Scan Glass (2), Press Rollers (3) and the inside surface with a soft cloth. Turn off KIP 7100. 2.
4. 1 Cleaning 4. 1. 1 Scanner Unit It is recommended to unlock the Scanner Unit. Wipe each Scan Glass, Feeding Rollers and Guide Plates as the scan/copy image may become defective if these parts are dirty. 1. Use equal volume mixture of water and a neutral detergent. 3 2 2 3 NOTE Do not use organic solvent, glass cleaner and anti-static spray for the cleaning. 4-2 Chapter 4 Maintenance Open the Scanner Unit. 1 1 3. Press the levers (1) up to clean each Scan Glass (2), Press Rollers (3) and the inside surface with a soft cloth. Turn off KIP 7100. 2.
KIP 7100 User Guide
Page 58
NOTE Press down Scanner Unit on both side to close it . Wipe the Feed Rollers (4), Press Rollers (5) and the inside surface with a soft dry cloth. 5 4 4 5. Gently press Scanner Unit down . 4-3 Chapter 4 Maintenance Do not close it by pressing only one side down and firmly close it . 4.
NOTE Press down Scanner Unit on both side to close it . Wipe the Feed Rollers (4), Press Rollers (5) and the inside surface with a soft dry cloth. 5 4 4 5. Gently press Scanner Unit down . 4-3 Chapter 4 Maintenance Do not close it by pressing only one side down and firmly close it . 4.


