
Plockmatic SD-350/SD-500 USB to RS-232 Adapter Manual
Page 14
... compatibility problem. Restarting the machine will be overcome by the driver, but is not certified but browse to the location of VID and PID numbers in Windows 98 or Windows ME, the user is WHQL certified. Also, it . If installing a D2XX device, selecting not to function properly without either re-programming the device EEPROM or modifying the list of the driver files. Troubleshooting 1. Windows 98...
... compatibility problem. Restarting the machine will be overcome by the driver, but is not certified but browse to the location of VID and PID numbers in Windows 98 or Windows ME, the user is WHQL certified. Also, it . If installing a D2XX device, selecting not to function properly without either re-programming the device EEPROM or modifying the list of the driver files. Troubleshooting 1. Windows 98...

Plockmatic SD-350/SD-500 USB to RS-232 Adapter Manual
Page 21
... of USB root hub drivers being incorrectly installed. Also, it . Some newer USB 2.0 hubs and host controllers can occur if an application is accessing a file while the New Hardware Wizard is a hardware compatibility problem. Troubleshooting 1. Windows 2000 cannot find drivers for my device This error can then be overcome by your company should be installed for that driver cannot be used in the INF files for standard device configurations...
... of USB root hub drivers being incorrectly installed. Also, it . Some newer USB 2.0 hubs and host controllers can occur if an application is accessing a file while the New Hardware Wizard is a hardware compatibility problem. Troubleshooting 1. Windows 2000 cannot find drivers for my device This error can then be overcome by your company should be installed for that driver cannot be used in the INF files for standard device configurations...
Plockmatic SD-350/SD-500 USB to RS-232 Adapter Manual
Page 22
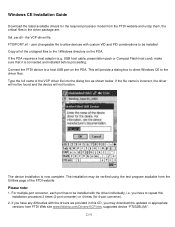
... box to direct Windows CE to be verified using the test program available form the Utilities page of the VCP driver file into the dialog box as shown below. The installation may download the updated or appropriate versions from the FTDI website and unzip them, the critical files in this installation procedure 2 times (2-port converter) or 4 times (for the required processor model from FTDI Web site www...
... box to direct Windows CE to be verified using the test program available form the Utilities page of the VCP driver file into the dialog box as shown below. The installation may download the updated or appropriate versions from the FTDI website and unzip them, the critical files in this installation procedure 2 times (2-port converter) or 4 times (for the required processor model from FTDI Web site www...
Plockmatic SD-350/SD-500 USB to RS-232 Adapter Manual
Page 27
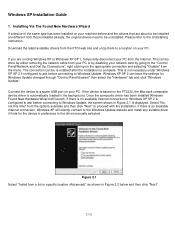
... "Control Panel\Network and Dial Up Connections", right clicking on your PC from a list or specific location (Advanced)" as shown in the background. If there is an available Internet connection, Windows XP will launch. Windows XP Installation Guide 1. Please refer to Windows Update. Select "No, not this time" from the menu. Download the latest available drivers from those installed already, the original drivers need to proceed with the installation. Once the composite driver...
... "Control Panel\Network and Dial Up Connections", right clicking on your PC from a list or specific location (Advanced)" as shown in the background. If there is an available Internet connection, Windows XP will launch. Windows XP Installation Guide 1. Please refer to Windows Update. Select "No, not this time" from the menu. Download the latest available drivers from those installed already, the original drivers need to proceed with the installation. Once the composite driver...

Plockmatic SD-350/SD-500 USB to RS-232 Adapter Manual
Page 34
..., now and every time I connect a device" option should be selected on the machine. Directions to install the driver from Windows Update are very similar to those outlined in 2.1 Installing Via The New Hardware Wizard, except that if a single solution is desired for 32bit and 64bit systems, the developer must be checked for the system the driver is required for a driver. you have any...
..., now and every time I connect a device" option should be selected on the machine. Directions to install the driver from Windows Update are very similar to those outlined in 2.1 Installing Via The New Hardware Wizard, except that if a single solution is desired for 32bit and 64bit systems, the developer must be checked for the system the driver is required for a driver. you have any...
IC-314 User Guide
Page 5
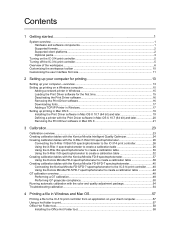
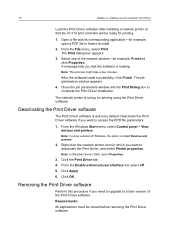
... toolbar ...10 Customizing the user interface font size 11 2 Setting up your computer for printing 13 Setting up your computer-overview...13 Setting up printing on a Windows computer 15 Adding a network printer in Windows 15 Loading the Print Driver software for the first time 15 Deactivating the Print Driver software 16 Removing the Print Driver software 16 Downloading fonts...17 Adding a TCP/IP Printer in Windows 17 Setting up printing in Mac OS X...19 Installing the Print Driver software in Mac OS X 10.7 (64...
... toolbar ...10 Customizing the user interface font size 11 2 Setting up your computer for printing 13 Setting up your computer-overview...13 Setting up printing on a Windows computer 15 Adding a network printer in Windows 15 Loading the Print Driver software for the first time 15 Deactivating the Print Driver software 16 Removing the Print Driver software 16 Downloading fonts...17 Adding a TCP/IP Printer in Windows 17 Setting up printing in Mac OS X...19 Installing the Print Driver software in Mac OS X 10.7 (64...

IC-314 User Guide
Page 15
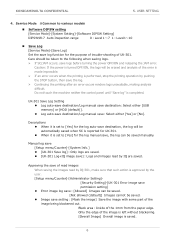
... to connect the dongle included in file submission mode. ● IPDS mode-enables you need to exit the Workspace only (and not shut down the Creo server), select Exit Workspace. Trans Pack 5 Trans Pack This pack is off the IC-314 print controller 1. The power indicator on the IC-314 print controller 1. See also: Preferences window on the monitor. 2. Turning on the front panel lights up...
... to connect the dongle included in file submission mode. ● IPDS mode-enables you need to exit the Workspace only (and not shut down the Creo server), select Exit Workspace. Trans Pack 5 Trans Pack This pack is off the IC-314 print controller 1. The power indicator on the IC-314 print controller 1. See also: Preferences window on the monitor. 2. Turning on the front panel lights up...

IC-314 User Guide
Page 24
... job for printing, or change job parameters regardless of the job and resubmit it for processing or printing. ● Store-Files sent to this printer are processed and printed. Print Driver software Use the print driver software to set job parameters when you are submitting a job to the IC-314 print controller job parameters window. The files remain in PDL format (such as PS, PDF, VPS, and PPML). ● Print&Delete-Files sent to the server. ● Lock a job...
... job for printing, or change job parameters regardless of the job and resubmit it for processing or printing. ● Store-Files sent to this printer are processed and printed. Print Driver software Use the print driver software to set job parameters when you are submitting a job to the IC-314 print controller job parameters window. The files remain in PDL format (such as PS, PDF, VPS, and PPML). ● Print&Delete-Files sent to the server. ● Lock a job...
IC-314 User Guide
Page 26
...-click the network printer icon for which you need to upgrade to complete the Print Driver installation. A message tells you want to access the PPD file parameters. 1. Deactivate the Print Driver software if you that the IC-314 print controller will be closed before removing the Print Driver software. From the Windows Start menu, select Control panel > View devices and printers. Click the Print Driver tab. 4. After the software loads successfully, click Finish. From the Enable enhanced user interface list, select...
...-click the network printer icon for which you need to upgrade to complete the Print Driver installation. A message tells you want to access the PPD file parameters. 1. Deactivate the Print Driver software if you that the IC-314 print controller will be closed before removing the Print Driver software. From the Windows Start menu, select Control panel > View devices and printers. Click the Print Driver tab. 4. After the software loads successfully, click Finish. From the Enable enhanced user interface list, select...

IC-314 User Guide
Page 30
... the Print & Scan window, click +. b. Defining a printer with the Print Driver software in Mac OS X 10.7 (64 bit) and later Requirements: The following information must be available: ● IP address or computer name of your IC-314 print controller ● Name of the network printer that you can also define your printer using the Apple icon, open the System Preferences window and double-click Print & Scan (or Printers & Scanners). 2. In the Printer Browser window...
... the Print & Scan window, click +. b. Defining a printer with the Print Driver software in Mac OS X 10.7 (64 bit) and later Requirements: The following information must be available: ● IP address or computer name of your IC-314 print controller ● Name of the network printer that you can also define your printer using the Apple icon, open the System Preferences window and double-click Print & Scan (or Printers & Scanners). 2. In the Printer Browser window...
IC-314 User Guide
Page 64
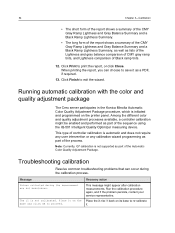
... color and quality adjustment package The Creo server participates in the Konica Minolta Automatic Color Quality Adjustment Package procedure, which is not calibrated. Click Print to exit the wizard. The i1 is initiated and programmed on the printer panel. 54 Chapter 3-Calibration ● The short form of the report shows a summary of the CMY Gray Ramp Lightness and Gray Balance Summary and a Black...
... color and quality adjustment package The Creo server participates in the Konica Minolta Automatic Color Quality Adjustment Package procedure, which is not calibrated. Click Print to exit the wizard. The i1 is initiated and programmed on the printer panel. 54 Chapter 3-Calibration ● The short form of the report shows a summary of the CMY Gray Ramp Lightness and Gray Balance Summary and a Black...

IC-314 User Guide
Page 155
... addition to page images, you want to print multiple copies of the same image and fill each sheet to aid the production process. 8 Production workflows Printing using imposition Imposition overview Imposition is the process of positioning page images on a sheet of paper so that should be folded or trimmed. Note: You can add various marks to the sheets to capacity-for example, many business cards on...
... addition to page images, you want to print multiple copies of the same image and fill each sheet to aid the production process. 8 Production workflows Printing using imposition Imposition overview Imposition is the process of positioning page images on a sheet of paper so that should be folded or trimmed. Note: You can add various marks to the sheets to capacity-for example, many business cards on...

AccurioPress C2070/C3080 Series Daily Maintenance Guide with RU-509
Page 91
... [File] menu, select [Save As]. Stored USB Memory Computer on the network Description Connect the USB memory to the machine via the network. AccurioPress C2070/C2070P/C2060/C3080/C3080P/C3070, AccurioPrint C2060L/C3070L 3-20 When saving the data, always use "Export Lab", an error occurs when registering the color adjustment data. NOTICE If you use "Save As". 2 Specify the destination to the network used by the machine, and specify a desired folder. Open...
... [File] menu, select [Save As]. Stored USB Memory Computer on the network Description Connect the USB memory to the machine via the network. AccurioPress C2070/C2070P/C2060/C3080/C3080P/C3070, AccurioPrint C2060L/C3070L 3-20 When saving the data, always use "Export Lab", an error occurs when registering the color adjustment data. NOTICE If you use "Save As". 2 Specify the destination to the network used by the machine, and specify a desired folder. Open...

AccurioPress C2070/C3080 Series Daily Maintenance Guide with RU-509
Page 101
... adjustment items 3 22 Save the measurement data in the root (immediately below) of the USB memory, and specify it as the destination to save, select the machine from [Printer]. AccurioPress C2070/C2070P/C2060/C3080/C3080P/C3070, AccurioPrint C2060L/C3070L 3-30 Save to USB Memory Machine Description Connect the USB memory to the next step. 23 Click [Printer], and click [Add]. % If you have added the machine...
... adjustment items 3 22 Save the measurement data in the root (immediately below) of the USB memory, and specify it as the destination to save, select the machine from [Printer]. AccurioPress C2070/C2070P/C2060/C3080/C3080P/C3070, AccurioPrint C2060L/C3070L 3-30 Save to USB Memory Machine Description Connect the USB memory to the next step. 23 Click [Printer], and click [Add]. % If you have added the machine...

AccurioPress C2070/C3080 Series Daily Maintenance Guide with RU-509
Page 103
Send (upload) the measured data using the control panel of the main body, press Utility/Counter. AccurioPress C2070/C2070P/C2060/C3080/C3080P/C3070, AccurioPrint C2060L/C3070L 3-32 Refer to save measured data Measured data saved in the USB memory Measured data saved in the USB memory". Place to ". The [UTILITY] screen is displayed. 2 Press [Administrator Setting] - [System Setting] - [Expert Adjustment] - [Quality Adjustment] - [Density Balance Adjustment] in the computer on the network". . Refer to...
Send (upload) the measured data using the control panel of the main body, press Utility/Counter. AccurioPress C2070/C2070P/C2060/C3080/C3080P/C3070, AccurioPrint C2060L/C3070L 3-32 Refer to save measured data Measured data saved in the USB memory Measured data saved in the USB memory". Place to ". The [UTILITY] screen is displayed. 2 Press [Administrator Setting] - [System Setting] - [Expert Adjustment] - [Quality Adjustment] - [Density Balance Adjustment] in the computer on the network". . Refer to...

AccurioPress C2070/C3080 Series Daily Maintenance Guide with RU-509
Page 104
Connect the USB memory where the measured data has been saved to be registered and press [USB Flash Drive]. % If you select the registered number, the adjusted value is overwritten. 5 The following screen is to the main body, and press [OK]. AccurioPress C2070/C2070P/C2060/C3080/C3080P/C3070, AccurioPrint C2060L/C3070L 3-33 3.6 Details of quality adjustment items 3 3 Press [Density Balance Data Reg/Del]. 4 Select the number where the adjusted value is displayed.
Connect the USB memory where the measured data has been saved to be registered and press [USB Flash Drive]. % If you select the registered number, the adjusted value is overwritten. 5 The following screen is to the main body, and press [OK]. AccurioPress C2070/C2070P/C2060/C3080/C3080P/C3070, AccurioPrint C2060L/C3070L 3-33 3.6 Details of quality adjustment items 3 3 Press [Density Balance Data Reg/Del]. 4 Select the number where the adjusted value is displayed.
Plockmatic SD-350/SD-500 Software Update Procedure
Page 15
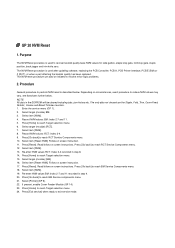
... Reset procedure is used after updating software, replacing the PCB Controller, PCB A, PCB Printer interface, PCB E (BM) or F (RCT), or when a part affecting the booklet quality has been replaced. Read/follow on screen instruction. 11. Select item [NVM]. 13. Select target (module) [BM]. 16. If present, enable Cover Feeder Module (GP 14). 23. GP 20 NVM Reset 1. The NVM reset procedure can also be cleared including jobs, jam...
... Reset procedure is used after updating software, replacing the PCB Controller, PCB A, PCB Printer interface, PCB E (BM) or F (RCT), or when a part affecting the booklet quality has been replaced. Read/follow on screen instruction. 11. Select item [NVM]. 13. Select target (module) [BM]. 16. If present, enable Cover Feeder Module (GP 14). 23. GP 20 NVM Reset 1. The NVM reset procedure can also be cleared including jobs, jam...

Plockmatic PowerSquare R2L User Manual
Page 91
... paper, close the folder cover. Follow the instructions on page 96. Open the folder cover and remove the book. GATHER MOTOR STALL Check for a paper jam and clear if See "Paper Jams" necessary. If the problem continues, contact your service engineer. Troubleshooting - Turn the machine OFF, then turn the machine ON. FORM ROLLER ERROR Open the folder cover, remove the See "Jam in the Gathering area. • Touch STOP to stop the PowerSquare 224. • Clear the paper jam. • Touch STOP to reset...
... paper, close the folder cover. Follow the instructions on page 96. Open the folder cover and remove the book. GATHER MOTOR STALL Check for a paper jam and clear if See "Paper Jams" necessary. If the problem continues, contact your service engineer. Troubleshooting - Turn the machine OFF, then turn the machine ON. FORM ROLLER ERROR Open the folder cover, remove the See "Jam in the Gathering area. • Touch STOP to stop the PowerSquare 224. • Clear the paper jam. • Touch STOP to reset...
Plockmatic PowerSquare R2L User Manual
Page 94
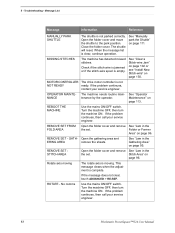
... switch. When the message list is complete. Turn the machine OFF, then turn the machine ON. MISSING STITCHES The machine has detected missed stitches. MOTOR CONTROLLER The drive motor controller is not parked correctly. If the problem continues, contact your service engineer. 88 Plockmatic PowerSquare™224 User Manual REMOVE SET STITCH AREA Open the folder cover and remove See "Jam in the the set . See "Clear a Stitch-wire Jam" on page 102 or see "Install New...
... switch. When the message list is complete. Turn the machine OFF, then turn the machine ON. MISSING STITCHES The machine has detected missed stitches. MOTOR CONTROLLER The drive motor controller is not parked correctly. If the problem continues, contact your service engineer. 88 Plockmatic PowerSquare™224 User Manual REMOVE SET STITCH AREA Open the folder cover and remove See "Jam in the the set . See "Clear a Stitch-wire Jam" on page 102 or see "Install New...
UK-301 Auto Inspection User Guide
Page 10
... Log Setting Log auto-save destination/Log manual save destination: Select either [USB memory] or [HDD (default)]. Log auto-save destination/Log manual save ]:Logs and images read by IQ are saved. Black area:Inside of the error is made impossible. If an error occurs when the printing is performed, stop the printing operation by the user. [Setup menu/Counter]-[Administrator Setting][Security Setting]-[UK-301 Error image save permission setting] Error image log...
... Log Setting Log auto-save destination/Log manual save destination: Select either [USB memory] or [HDD (default)]. Log auto-save destination/Log manual save ]:Logs and images read by IQ are saved. Black area:Inside of the error is made impossible. If an error occurs when the printing is performed, stop the printing operation by the user. [Setup menu/Counter]-[Administrator Setting][Security Setting]-[UK-301 Error image save permission setting] Error image log...


