
User Manual
Page 3
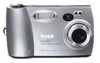
Product Overview Front View 1 2 56 7 3 ZDoXo3m9D0i0gital 3.1 Camera 8 M E G A P I X E L 4 1 Shutter button 2 Flash unit 3 Viewfinder lens 4 Lens (built-in cover not shown) Bottom View 1 2 3 OPEN EJECT OPEN 5 Light sensor 6 Self Timer light 7 On / Off switch 8 USB connector / Video out door 4 5 6 1 Connector door (open) 2 Camera Dock connector 3 USB / Video out connectors 4 Eject button (Picture Card) 5 Battery door 6 Tripod mount socket i
Product Overview Front View 1 2 56 7 3 ZDoXo3m9D0i0gital 3.1 Camera 8 M E G A P I X E L 4 1 Shutter button 2 Flash unit 3 Viewfinder lens 4 Lens (built-in cover not shown) Bottom View 1 2 3 OPEN EJECT OPEN 5 Light sensor 6 Self Timer light 7 On / Off switch 8 USB connector / Video out door 4 5 6 1 Connector door (open) 2 Camera Dock connector 3 USB / Video out connectors 4 Eject button (Picture Card) 5 Battery door 6 Tripod mount socket i

User Manual
Page 4
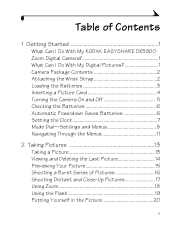
Top/Back View Product Overview 1 23 12 11 10 9 1 Viewfinder 8 2 Status display 3 Buttons: Flash Close-up/Distant Self Timer 4 Mode dial 5 Picture Card access light 4 5 6 7 6 Wrist strap post 7 Picture Card door 8 Menu button 9 Select button 10 Four-way arrow button / Zoom button (W and T) 11 LCD screen 12 Viewfinder light Mode Dial Capture-take pictures Review-display pictures on the LCD screen Setup-customize settings ii
Top/Back View Product Overview 1 23 12 11 10 9 1 Viewfinder 8 2 Status display 3 Buttons: Flash Close-up/Distant Self Timer 4 Mode dial 5 Picture Card access light 4 5 6 7 6 Wrist strap post 7 Picture Card door 8 Menu button 9 Select button 10 Four-way arrow button / Zoom button (W and T) 11 LCD screen 12 Viewfinder light Mode Dial Capture-take pictures Review-display pictures on the LCD screen Setup-customize settings ii

User Manual
Page 5
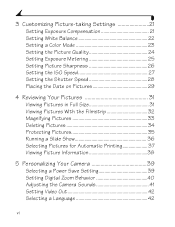
The icons displayed indicate the camera features and settings that are currently active. 1 2 3 456 13 1 ISO setting 2 Long-time exposure 3 Color mode 4 White balance 5 Red-eye flash 6 Flash setting 7 Close-up/Distant 7 8 12 11 10 9 8 Self Timer 9 Burst 10 Battery level 11 Exposure compensation 12 Pictures remaining 13 Quality setting iii Product Overview Status Display The Status Display is located on the top of the camera.
The icons displayed indicate the camera features and settings that are currently active. 1 2 3 456 13 1 ISO setting 2 Long-time exposure 3 Color mode 4 White balance 5 Red-eye flash 6 Flash setting 7 Close-up/Distant 7 8 12 11 10 9 8 Self Timer 9 Burst 10 Battery level 11 Exposure compensation 12 Pictures remaining 13 Quality setting iii Product Overview Status Display The Status Display is located on the top of the camera.
User Manual
Page 7
Table of Contents 1 Getting Started 1 What Can I Do With My KODAK EASYSHARE DX3900 Zoom Digital Camera 1 What Can I Do With My Digital Pictures 1 Camera Package Contents 2 Attaching the Wrist Strap 2 Loading the Batteries 3 Inserting a Picture Card 4 Turning the Camera On and Off 5 Checking the Batteries 6 Automatic Powerdown Saves Batteries 6 Setting the Clock 7 Mode Dial-Settings and Menus 8 Navigating Through the Menus...
Table of Contents 1 Getting Started 1 What Can I Do With My KODAK EASYSHARE DX3900 Zoom Digital Camera 1 What Can I Do With My Digital Pictures 1 Camera Package Contents 2 Attaching the Wrist Strap 2 Loading the Batteries 3 Inserting a Picture Card 4 Turning the Camera On and Off 5 Checking the Batteries 6 Automatic Powerdown Saves Batteries 6 Setting the Clock 7 Mode Dial-Settings and Menus 8 Navigating Through the Menus...
User Manual
Page 8
... Date on Pictures 29 4 Reviewing Your Pictures 31 Viewing Pictures in Full Size 31 Viewing Pictures With the Filmstrip 32 Magnifying Pictures 33 Deleting Pictures 34 Protecting Pictures 35 Running a Slide Show 36 Selecting Pictures for Automatic Printing 37 Viewing Picture Information 38 5 Personalizing Your Camera 39 Selecting a Power Save Setting 39 Setting Digital Zoom Behavior 40 Adjusting the Camera Sounds 41...
... Date on Pictures 29 4 Reviewing Your Pictures 31 Viewing Pictures in Full Size 31 Viewing Pictures With the Filmstrip 32 Magnifying Pictures 33 Deleting Pictures 34 Protecting Pictures 35 Running a Slide Show 36 Selecting Pictures for Automatic Printing 37 Viewing Picture Information 38 5 Personalizing Your Camera 39 Selecting a Power Save Setting 39 Setting Digital Zoom Behavior 40 Adjusting the Camera Sounds 41...

User Manual
Page 9
... Software 45 Software Included With Your Camera 47 Computer System Requirements 48 7 Using Pictures on Your Computer 49 Before You Transfer Your Pictures 49 Connecting to Your Computer 49 Transferring Your Pictures 50 Working With Your Pictures 51 Transferring Your Pictures Manually 52 Printing Your Pictures 53 8 Using the KODAK EASYSHARE Camera Dock ..... 55 Camera Dock Package Contents 55 Installing the...
... Software 45 Software Included With Your Camera 47 Computer System Requirements 48 7 Using Pictures on Your Computer 49 Before You Transfer Your Pictures 49 Connecting to Your Computer 49 Transferring Your Pictures 50 Working With Your Pictures 51 Transferring Your Pictures Manually 52 Printing Your Pictures 53 8 Using the KODAK EASYSHARE Camera Dock ..... 55 Camera Dock Package Contents 55 Installing the...

User Manual
Page 10
... Troubleshooting-EASYSHARE Camera Dock 68 EASYSHARE Camera Dock Status 69 10 Getting Help 71 Software Help 71 World Wide Web 71 Kodak Fax Support 71 Telephone Customer Support 72 11 Appendix 75 Camera Specifications 75 Camera Dock Specifications 77 Original Factory Settings-Camera 77 Power Save-Camera Performance 78 Using Your Batteries 79 Tips, Safety, Maintenance 80 Camera Accessories 81 Picture...
... Troubleshooting-EASYSHARE Camera Dock 68 EASYSHARE Camera Dock Status 69 10 Getting Help 71 Software Help 71 World Wide Web 71 Kodak Fax Support 71 Telephone Customer Support 72 11 Appendix 75 Camera Specifications 75 Camera Dock Specifications 77 Original Factory Settings-Camera 77 Power Save-Camera Performance 78 Using Your Batteries 79 Tips, Safety, Maintenance 80 Camera Accessories 81 Picture...
User Manual
Page 11
.... Set Up -in Review mode, display your pictures on the KODAK Picture Software CD*, then: Transfer-automatically transfer your home printer; What Can I Do With My KODAK EASYSHARE DX3900 Zoom Digital Camera? or take your Picture Card to your pictures to friends and family. Have fun!-add special ...effects to your computer. Share-e-mail your pictures to your pictures, fix red-eye, crop, rotate, and much more...
.... Set Up -in Review mode, display your pictures on the KODAK Picture Software CD*, then: Transfer-automatically transfer your home printer; What Can I Do With My KODAK EASYSHARE DX3900 Zoom Digital Camera? or take your Picture Card to your pictures to friends and family. Have fun!-add special ...effects to your computer. Share-e-mail your pictures to your pictures, fix red-eye, crop, rotate, and much more...
User Manual
Page 12
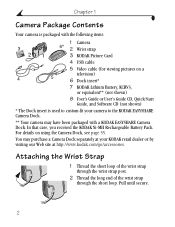
... CD (not shown) * The Dock insert is packaged with a KODAK EASYSHARE Camera Dock. You may purchase a Camera Dock separately at your camera to the KODAK EASYSHARE Camera Dock. ** Your camera may have been packaged with the following items: 3 2 4 1 Camera 6* 2 Wrist strap 1 3 KODAK Picture Card 4 USB cable 5 Video cable (for viewing pictures on using the Camera Dock, see page 55. In that case, you received...
... CD (not shown) * The Dock insert is packaged with a KODAK EASYSHARE Camera Dock. You may purchase a Camera Dock separately at your camera to the KODAK EASYSHARE Camera Dock. ** Your camera may have been packaged with the following items: 3 2 4 1 Camera 6* 2 Wrist strap 1 3 KODAK Picture Card 4 USB cable 5 Video cable (for viewing pictures on using the Camera Dock, see page 55. In that case, you received...

User Manual
Page 14
...the back of the arrow on the camera. 3 On the bottom of Picture Cards as illustrated and remove the card. Use only certified cards that carry the CompactFlash logo . See page 82 for Picture Card storage capacities. Additional KODAK Picture Cards can only be purchased separately ...on our Web site http://www.kodak.com/go/accessories. 4 Close the door. Eject button To remove a Picture Card: 1 Turn off the camera. 2 Slide the Picture Card door in the direction of the camera. Chapter 1 Inserting a Picture Card Think of the camera, slide the Eject button as removable ...
...the back of the arrow on the camera. 3 On the bottom of Picture Cards as illustrated and remove the card. Use only certified cards that carry the CompactFlash logo . See page 82 for Picture Card storage capacities. Additional KODAK Picture Cards can only be purchased separately ...on our Web site http://www.kodak.com/go/accessories. 4 Close the door. Eject button To remove a Picture Card: 1 Turn off the camera. 2 Slide the Picture Card door in the direction of the camera. Chapter 1 Inserting a Picture Card Think of the camera, slide the Eject button as removable ...

User Manual
Page 16
.... Low -batteries soon need to power the camera. off the camera when it has been inactive (no buttons pushed and no symbol appears, your battery is fully charged. Don't miss an important picture because the camera batteries are too weak to be replaced or ...recharged. For guidelines on the camera. 2 Check the battery symbol that appears in the Status Display before you begin taking pictures. Automatic Activated Camera Behavior Powerdown after To reactivate camera Power Save off 5 minutes All camera circuits turn off. Replace or recharge the batteries...
.... Low -batteries soon need to power the camera. off the camera when it has been inactive (no buttons pushed and no symbol appears, your battery is fully charged. Don't miss an important picture because the camera batteries are too weak to be replaced or ...recharged. For guidelines on the camera. 2 Check the battery symbol that appears in the Status Display before you begin taking pictures. Automatic Activated Camera Behavior Powerdown after To reactivate camera Power Save off 5 minutes All camera circuits turn off. Replace or recharge the batteries...

User Manual
Page 17
NOTE: It is exhausted, you want to imprint the date on your pictures (page 29). 1 With the camera turned on, turn the Mode dial to accept the changes. 7 Press the arrow buttons to adjust the date and time settings. 4 Press Select to Setup . 2 ...Highlight the Date & Time press Select. menu, then 3 Press the arrow buttons to reset the clock. If the battery is removed from the camera for an extended period of time, or is important to set the correct date and time if you may need to move through the fields...
NOTE: It is exhausted, you want to imprint the date on your pictures (page 29). 1 With the camera turned on, turn the Mode dial to accept the changes. 7 Press the arrow buttons to adjust the date and time settings. 4 Press Select to Setup . 2 ...Highlight the Date & Time press Select. menu, then 3 Press the arrow buttons to reset the clock. If the battery is removed from the camera for an extended period of time, or is important to set the correct date and time if you may need to move through the fields...

User Manual
Page 18
... Dial-Settings and Menus Use the Mode dial to access three ways to use your camera: Mode dial Capture -take pictures and change picture-taking options Review -view and work with your pictures on the LCD screen Setup -customize your camera functions Capture Menus To access the Capture mode menus: 1 Turn the Mode dial to...
... Dial-Settings and Menus Use the Mode dial to access three ways to use your camera: Mode dial Capture -take pictures and change picture-taking options Review -view and work with your pictures on the LCD screen Setup -customize your camera functions Capture Menus To access the Capture mode menus: 1 Turn the Mode dial to...

User Manual
Page 19
Chapter 1 Review Menus To access the Review mode menus: 1 Turn the Mode dial to Review . 2 Press the Menu button. 3 Use the arrow buttons to scroll through the menus and submenus. 4 Press the Select button. Menu Magnify (page 33) Delete (page 34) Protect (page 35) Menu Slide Show (page 36) Print Order from Picture Card only (page 37) Picture Info (page 38) 9
Chapter 1 Review Menus To access the Review mode menus: 1 Turn the Mode dial to Review . 2 Press the Menu button. 3 Use the arrow buttons to scroll through the menus and submenus. 4 Press the Select button. Menu Magnify (page 33) Delete (page 34) Protect (page 35) Menu Slide Show (page 36) Print Order from Picture Card only (page 37) Picture Info (page 38) 9

User Manual
Page 21
m In Setup mode, the menus are displayed W T on the screen with a picture. Select button 11 MENU The name of the selected menu is the same in all three camera modes. Chapter 1 Navigating Through the Menus The method of the screen. In Review mode, the menus are SELECT automatically displayed when you turn off...
m In Setup mode, the menus are displayed W T on the screen with a picture. Select button 11 MENU The name of the selected menu is the same in all three camera modes. Chapter 1 Navigating Through the Menus The method of the screen. In Review mode, the menus are SELECT automatically displayed when you turn off...

User Manual
Page 23
...3 Press the Shutter button completely down to lock in the camera, the Mode dial is turned to Capture , and the camera is a Picture Card in the auto-focus and exposure. The Automatic QuickView feature displays the picture in the viewfinder or use Shutter button Preview (page 15). ...In the Status Display, the frame counter blinks and displays the number of pictures remaining. Viewfinder 2 ...
...3 Press the Shutter button completely down to lock in the camera, the Mode dial is turned to Capture , and the camera is a Picture Card in the auto-focus and exposure. The Automatic QuickView feature displays the picture in the viewfinder or use Shutter button Preview (page 15). ...In the Status Display, the frame counter blinks and displays the number of pictures remaining. Viewfinder 2 ...

User Manual
Page 24
... delete it is displayed, you take a picture, Automatic QuickView displays the picture on the LCD screen for verifying picture information. 1 Take a picture. W T It immediately appears in the LCD screen with the Delete icon and the appropriate SELECT picture status icons. MENU 2 To delete the picture while it . While the picture is displayed, press the arrow button. Chapter...
... delete it is displayed, you take a picture, Automatic QuickView displays the picture on the LCD screen for verifying picture information. 1 Take a picture. W T It immediately appears in the LCD screen with the Delete icon and the appropriate SELECT picture status icons. MENU 2 To delete the picture while it . While the picture is displayed, press the arrow button. Chapter...

User Manual
Page 25
... auto-focus and exposure. IMPORTANT: Preview quickly consumes battery power. Chapter 2 Previewing Your Picture If you want to see what a picture looks like before it is required when you can preview a live image and icons digital zoom for the activated camera settings. 2 Center the subject on the LCD screen. NOTE: Preview is taken, you...
... auto-focus and exposure. IMPORTANT: Preview quickly consumes battery power. Chapter 2 Previewing Your Picture If you want to see what a picture looks like before it is required when you can preview a live image and icons digital zoom for the activated camera settings. 2 Center the subject on the LCD screen. NOTE: Preview is taken, you...

User Manual
Page 26
...-way to lock the auto-focus and exposure for all the pictures in quick succession. Chapter 2 Shooting a Burst Series of Pictures The Burst feature allows you to take the pictures. The camera takes 8 pictures in the Picture Quality menu (page 24). When you turn off the camera, the 0.8 MP (Burst) setting reverts to 0.8 MP; NOTE: Burst is...
...-way to lock the auto-focus and exposure for all the pictures in quick succession. Chapter 2 Shooting a Burst Series of Pictures The Burst feature allows you to take the pictures. The camera takes 8 pictures in the Picture Quality menu (page 24). When you turn off the camera, the 0.8 MP (Burst) setting reverts to 0.8 MP; NOTE: Burst is...

User Manual
Page 27
...Close-Up/Distant button repeatedly until the appropriate icon appears in pictures at close or very far away. When the Close-Up setting is selected, Preview is turned on and the camera automatically sets the focus distance depending on top of the camera. 3 Press the Shutter button half-way to lock the ...auto-focus and exposure. 4 Press the Shutter button all the way down to gain maximum sharpness of scenes that are either very close range. Close-Up Pictures Use the Close-Up setting to gain...
...Close-Up/Distant button repeatedly until the appropriate icon appears in pictures at close or very far away. When the Close-Up setting is selected, Preview is turned on and the camera automatically sets the focus distance depending on top of the camera. 3 Press the Shutter button half-way to lock the ...auto-focus and exposure. 4 Press the Shutter button all the way down to gain maximum sharpness of scenes that are either very close range. Close-Up Pictures Use the Close-Up setting to gain...


