User Manual
Page 7
... Started 1 What Can I Do With My KODAK EASYSHARE DX3900 Zoom Digital Camera 1 What Can I Do With My Digital Pictures 1 Camera Package Contents 2 Attaching the Wrist Strap 2 Loading the Batteries 3 Inserting a Picture Card 4 Turning the Camera On and Off 5 Checking the Batteries 6 Automatic Powerdown Saves Batteries 6 Setting the Clock 7 Mode Dial-Settings and Menus 8 Navigating Through the Menus 11 2 Taking Pictures 13 Taking a Picture 13 Viewing and Deleting the Last Picture 14 Previewing Your Picture 15 Shooting a Burst Series of Pictures 16 Shooting...
... Started 1 What Can I Do With My KODAK EASYSHARE DX3900 Zoom Digital Camera 1 What Can I Do With My Digital Pictures 1 Camera Package Contents 2 Attaching the Wrist Strap 2 Loading the Batteries 3 Inserting a Picture Card 4 Turning the Camera On and Off 5 Checking the Batteries 6 Automatic Powerdown Saves Batteries 6 Setting the Clock 7 Mode Dial-Settings and Menus 8 Navigating Through the Menus 11 2 Taking Pictures 13 Taking a Picture 13 Viewing and Deleting the Last Picture 14 Previewing Your Picture 15 Shooting a Burst Series of Pictures 16 Shooting...
User Manual
Page 8
...22 Setting a Color Mode 23 Setting the Picture Quality 24 Setting Exposure Metering 25 Setting Picture Sharpness 26 Setting the ISO Speed 27 Setting the Shutter Speed 28 Placing the Date on Pictures 29 4 Reviewing Your Pictures 31 Viewing Pictures in Full Size 31 Viewing Pictures With the Filmstrip 32 Magnifying Pictures 33 Deleting Pictures 34 Protecting Pictures 35 Running a Slide Show 36 Selecting Pictures for Automatic Printing 37 Viewing Picture Information 38 5 Personalizing Your Camera 39 Selecting a Power Save Setting 39 Setting Digital Zoom Behavior 40 Adjusting the...
...22 Setting a Color Mode 23 Setting the Picture Quality 24 Setting Exposure Metering 25 Setting Picture Sharpness 26 Setting the ISO Speed 27 Setting the Shutter Speed 28 Placing the Date on Pictures 29 4 Reviewing Your Pictures 31 Viewing Pictures in Full Size 31 Viewing Pictures With the Filmstrip 32 Magnifying Pictures 33 Deleting Pictures 34 Protecting Pictures 35 Running a Slide Show 36 Selecting Pictures for Automatic Printing 37 Viewing Picture Information 38 5 Personalizing Your Camera 39 Selecting a Power Save Setting 39 Setting Digital Zoom Behavior 40 Adjusting the...

User Manual
Page 10
... Problems 61 Troubleshooting-Camera 61 Camera Status and Messages 66 Troubleshooting-EASYSHARE Camera Dock 68 EASYSHARE Camera Dock Status 69 10 Getting Help 71 Software Help 71 World Wide Web 71 Kodak Fax Support 71 Telephone Customer Support 72 11 Appendix 75 Camera Specifications 75 Camera Dock Specifications 77 Original Factory Settings-Camera 77 Power Save-Camera Performance 78 Using Your Batteries 79 Tips, Safety, Maintenance 80 Camera Accessories 81 Picture Storage Capacities 82 Locating Pictures on a Picture Card 82 Picture Card File Naming Conventions 83 Upgrading...
... Problems 61 Troubleshooting-Camera 61 Camera Status and Messages 66 Troubleshooting-EASYSHARE Camera Dock 68 EASYSHARE Camera Dock Status 69 10 Getting Help 71 Software Help 71 World Wide Web 71 Kodak Fax Support 71 Telephone Customer Support 72 11 Appendix 75 Camera Specifications 75 Camera Dock Specifications 77 Original Factory Settings-Camera 77 Power Save-Camera Performance 78 Using Your Batteries 79 Tips, Safety, Maintenance 80 Camera Accessories 81 Picture Storage Capacities 82 Locating Pictures on a Picture Card 82 Picture Card File Naming Conventions 83 Upgrading...
User Manual
Page 11
... images you want by adjusting the camera settings-ISO levels, white balance, and more . * MACINTOSH OS X users, see the note on the LCD screen. Have fun!-add special effects to your pictures, fix red-eye, crop, rotate, and much more . make prints yourself at any KODAK Picture Maker; or take your Picture Card to your camera settings. Take great pictures with 3.1 Megapixel resolution -in Review mode, display your camera. 1 Getting Started What Can I Do With My Digital Pictures? Review -in Capture mode, use the default settings for professional printing...
... images you want by adjusting the camera settings-ISO levels, white balance, and more . * MACINTOSH OS X users, see the note on the LCD screen. Have fun!-add special effects to your pictures, fix red-eye, crop, rotate, and much more . make prints yourself at any KODAK Picture Maker; or take your Picture Card to your camera settings. Take great pictures with 3.1 Megapixel resolution -in Review mode, display your camera. 1 Getting Started What Can I Do With My Digital Pictures? Review -in Capture mode, use the default settings for professional printing...

User Manual
Page 14
... memory. Use only certified cards that carry the CompactFlash logo . Chapter 1 Inserting a Picture Card Think of Picture Cards as illustrated and remove the card. Do not force the card. Eject button To remove a Picture Card: 1 Turn off the camera. 2 Slide the Picture Card door in the direction of the arrow on the door, then pivot open. 3 Hold the Picture Card so the connection end is blinking. Picture Cards, also called memory cards, provide easy picture storage and transfer. Picture Card To insert a Picture Card: access light 1 Turn...
... memory. Use only certified cards that carry the CompactFlash logo . Chapter 1 Inserting a Picture Card Think of Picture Cards as illustrated and remove the card. Do not force the card. Eject button To remove a Picture Card: 1 Turn off the camera. 2 Slide the Picture Card door in the direction of the arrow on the door, then pivot open. 3 Hold the Picture Card so the connection end is blinking. Picture Cards, also called memory cards, provide easy picture storage and transfer. Picture Card To insert a Picture Card: access light 1 Turn...

User Manual
Page 17
... changes. 7 NOTE: It is exhausted, you want to imprint the date on your pictures (page 29). 1 With the camera turned on, turn the Mode dial to reset the clock. If the battery is removed from the camera for an extended period of time, or is important to set the correct date and time if you may need to Setup . 2 Highlight the Date & Time press Select. Press the arrow buttons to adjust the date...
... changes. 7 NOTE: It is exhausted, you want to imprint the date on your pictures (page 29). 1 With the camera turned on, turn the Mode dial to reset the clock. If the battery is removed from the camera for an extended period of time, or is important to set the correct date and time if you may need to Setup . 2 Highlight the Date & Time press Select. Press the arrow buttons to adjust the date...

User Manual
Page 18
... Review -view and work with your pictures on the LCD screen Setup -customize your camera functions Capture Menus To access the Capture mode menus: 1 Turn the Mode dial to Capture . 2 Press the Menu button. 3 Use the arrow buttons to scroll through the menus and submenus. 4 Press the Select button. Menu Menu Exposure Compensation (page 21) Sharpness (page 26) White Balance (page 22) ISO Speed (page 27) Color Mode (page 23) Shutter Speed (page 28) Quality (page 24) Date and Time Stamp...
... Review -view and work with your pictures on the LCD screen Setup -customize your camera functions Capture Menus To access the Capture mode menus: 1 Turn the Mode dial to Capture . 2 Press the Menu button. 3 Use the arrow buttons to scroll through the menus and submenus. 4 Press the Select button. Menu Menu Exposure Compensation (page 21) Sharpness (page 26) White Balance (page 22) ISO Speed (page 27) Color Mode (page 23) Shutter Speed (page 28) Quality (page 24) Date and Time Stamp...

User Manual
Page 20
Menu Power Save (page 39) Digital Zoom (page 40) Camera Sounds (page 41) Menu Language (page 42) Format Card (page 43) Reset User Settings (page 44) Date/Time Set (page 7) About this Camera (page 44) Video Out (page 42) 10 Chapter 1 Setup Menus To access the Setup mode menus: 1 Turn the Mode dial to scroll through the menus and submenus. 3 Press the Select button. The Setup menu screen is displayed on the LCD. 2 Use the arrow buttons to Setup .
Menu Power Save (page 39) Digital Zoom (page 40) Camera Sounds (page 41) Menu Language (page 42) Format Card (page 43) Reset User Settings (page 44) Date/Time Set (page 7) About this Camera (page 44) Video Out (page 42) 10 Chapter 1 Setup Menus To access the Setup mode menus: 1 Turn the Mode dial to scroll through the menus and submenus. 3 Press the Select button. The Setup menu screen is displayed on the LCD. 2 Use the arrow buttons to Setup .

User Manual
Page 25
... is required when you are displayed . 4 Press the Shutter button completely down to take slightly longer to charge when you can preview a live image and icons digital zoom for the activated camera settings. 2 Center the subject on the LCD screen. aperture shutter speed The LCD displays a live image on the LCD. IMPORTANT: Preview quickly consumes battery power. The flash may also take the picture. NOTE: Preview is taken, you use the LCD instead of the viewfinder to lock the auto-focus and exposure.
... is required when you are displayed . 4 Press the Shutter button completely down to take slightly longer to charge when you can preview a live image and icons digital zoom for the activated camera settings. 2 Center the subject on the LCD screen. aperture shutter speed The LCD displays a live image on the LCD. IMPORTANT: Preview quickly consumes battery power. The flash may also take the picture. NOTE: Preview is taken, you use the LCD instead of the viewfinder to lock the auto-focus and exposure.

User Manual
Page 32
... White Balance menu , then press Select. 3 Highlight the White Balance setting you change and return to the Menu screen. 5 Press Menu to exit the Menu screen. DAYLIGHT-ideal for indoor pictures under other lighting conditions. AUTO (default)-automatically corrects the white balance. Ideal for pictures in daylight, but different under this type of color shifts that result from shooting pictures under this lighting without flash. 4 Press Select to accept the change it unless Reset User Settings is set to use...
... White Balance menu , then press Select. 3 Highlight the White Balance setting you change and return to the Menu screen. 5 Press Menu to exit the Menu screen. DAYLIGHT-ideal for indoor pictures under other lighting conditions. AUTO (default)-automatically corrects the white balance. Ideal for pictures in daylight, but different under this type of color shifts that result from shooting pictures under this lighting without flash. 4 Press Select to accept the change it unless Reset User Settings is set to use...

User Manual
Page 41
... first picture MENU last picture 31 The last picture taken is ideal for verifying your pictures before you can view each picture stored on the Picture Card in full LCD screen size, or you transfer or print them. Viewing Pictures in Full Size 1 Turn the Mode dial to review and work with friends, or for sharing pictures on the camera with the pictures that are stored on the Picture Card in your camera in your camera. 4 Reviewing Your Pictures Use the Review setting...
... first picture MENU last picture 31 The last picture taken is ideal for verifying your pictures before you can view each picture stored on the Picture Card in full LCD screen size, or you transfer or print them. Viewing Pictures in Full Size 1 Turn the Mode dial to review and work with friends, or for sharing pictures on the camera with the pictures that are stored on the Picture Card in your camera in your camera. 4 Reviewing Your Pictures Use the Review setting...

User Manual
Page 49
... camera perfomance. 1 Turn the Mode dial to use. Selecting a Power Save Setting The Power Save feature is not a primary concern. See page 78 for everyday shooting. 4 Press Select. This setting remains until you want to Setup . 2 Highlight the Power Save menu , then press Select. 3 Highlight the Power Save setting you change it. 39 ON-battery life has priority over battery consumption. Ideal when battery life is designed to your personal preferences. STANDARD (default)-battery...
... camera perfomance. 1 Turn the Mode dial to use. Selecting a Power Save Setting The Power Save feature is not a primary concern. See page 78 for everyday shooting. 4 Press Select. This setting remains until you want to Setup . 2 Highlight the Power Save menu , then press Select. 3 Highlight the Power Save setting you change it. 39 ON-battery life has priority over battery consumption. Ideal when battery life is designed to your personal preferences. STANDARD (default)-battery...

User Manual
Page 71
...back when a Picture Card error when the on the KODAK Picture Software CD. No Picture Card is inserted or removed. Card. 61 Caution: Formatting erases all pictures from the card. The Picture Card Reformat the Picture Card may not be corrupt. (page 43). For updates to Troubleshooting information, visit our Web site at http://www.kodak.com. Troubleshooting-Camera Picture Card (also called a memory card) Problem Cause Solution The camera does not The Picture Card Purchase a certified recognize your KODAK EASYSHARE DX3900 Zoom Digital Camera or KODAK EASYSHARE Camera Dock...
...back when a Picture Card error when the on the KODAK Picture Software CD. No Picture Card is inserted or removed. Card. 61 Caution: Formatting erases all pictures from the card. The Picture Card Reformat the Picture Card may not be corrupt. (page 43). For updates to Troubleshooting information, visit our Web site at http://www.kodak.com. Troubleshooting-Camera Picture Card (also called a memory card) Problem Cause Solution The camera does not The Picture Card Purchase a certified recognize your KODAK EASYSHARE DX3900 Zoom Digital Camera or KODAK EASYSHARE Camera Dock...

User Manual
Page 77
... Picture Card. or the batteries are exhausted. 67 Camera cannot read picture file Unrecognized file format The camera cannot Transfer the unreadable read (Format card or insert formatted for an extended time; Turn the camera off, then back on the camera; If the error message is no more space Delete pictures (page 34) on the Picture Card. appears automatically turned on . Date/Time entry screen This is the first time you Reset the clock (page 7). Chapter 9 LCD Messages Message Cause Solution Memory card requires The Picture Card...
... Picture Card. or the batteries are exhausted. 67 Camera cannot read picture file Unrecognized file format The camera cannot Transfer the unreadable read (Format card or insert formatted for an extended time; Turn the camera off, then back on the camera; If the error message is no more space Delete pictures (page 34) on the Picture Card. appears automatically turned on . Date/Time entry screen This is the first time you Reset the clock (page 7). Chapter 9 LCD Messages Message Cause Solution Memory card requires The Picture Card...

User Manual
Page 82
... concerning the operation of KODAK software or the camera, you received Version of installation CD Camera serial number Telephone Numbers m U.S.-call toll free, 1-800-465-6325, between the hours of 9:00 a.m. m Europe-call the Kodak Digital Imaging Support Centre toll free number associated with your computer, and have the following information available: Operating system Processor speed (MHz Computer model Amount of memory (MB Exact error message you may speak directly to your...
... concerning the operation of KODAK software or the camera, you received Version of installation CD Camera serial number Telephone Numbers m U.S.-call toll free, 1-800-465-6325, between the hours of 9:00 a.m. m Europe-call the Kodak Digital Imaging Support Centre toll free number associated with your computer, and have the following information available: Operating system Processor speed (MHz Computer model Amount of memory (MB Exact error message you may speak directly to your...
User Manual
Page 91
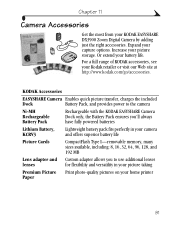
... KODAK EASYSHARE Camera Dock only, the Battery Pack ensures you'll always have fully powered batteries Lithium Battery, Lightweight battery pack fits perfectly in your camera KCRV3 and offers superior battery life Picture Cards CompactFlash Type I-removable memory, many sizes available, including: 8, 16, 32, 64, 96, 128, and 192 MB Lens adapter and Custom adapter allows you to use additional lenses lenses for flexibility and versatility in your picture taking Premium Picture Print photo...
... KODAK EASYSHARE Camera Dock only, the Battery Pack ensures you'll always have fully powered batteries Lithium Battery, Lightweight battery pack fits perfectly in your camera KCRV3 and offers superior battery life Picture Cards CompactFlash Type I-removable memory, many sizes available, including: 8, 16, 32, 64, 96, 128, and 192 MB Lens adapter and Custom adapter allows you to use additional lenses lenses for flexibility and versatility in your picture taking Premium Picture Print photo...
User Manual
Page 98
Index provided with Camera Dock 55 USB 2 video 2 camera accessories 81 cleaning 80 connecting problems 62 information, viewing 44 maintenance 80 original defaults, resetting 44 original factory defaults 77 package contents 2 problems 63 safety 80 specifications 75 turning on and off 5 Camera Connection Software about 47 online help 52 transferring pictures 52 Camera Dock charging Battery Pack 58 installing insert 56 loading camera 57 package contents 55 power connection 56 specifications 77 transferring pictures 59 USB connection 56 using 55 Canadian compliance 85 capture, mode dial...
Index provided with Camera Dock 55 USB 2 video 2 camera accessories 81 cleaning 80 connecting problems 62 information, viewing 44 maintenance 80 original defaults, resetting 44 original factory defaults 77 package contents 2 problems 63 safety 80 specifications 75 turning on and off 5 Camera Connection Software about 47 online help 52 transferring pictures 52 Camera Dock charging Battery Pack 58 installing insert 56 loading camera 57 package contents 55 power connection 56 specifications 77 transferring pictures 59 USB connection 56 using 55 Canadian compliance 85 capture, mode dial...

User Manual
Page 102
... Picture Software about 47 editing pictures 51 Picture Transfer Software about 47 online help 51 transferring pictures 50 pictures black & white 23 color 23 customizing settings 21 deleting 34 editing 51 file naming 83 information, viewing 38 locating on computer 50 locating on Picture Card 83 magnifying 33 printing 53 protecting 35 quality, adjusting 24 reviewing 31 selecting for printing 37 sepia 23 sharpness, setting 26 storage capacity 82 taking 13 transferring manually 52 transferring to computer 49, 50, 59 using...
... Picture Software about 47 editing pictures 51 Picture Transfer Software about 47 online help 51 transferring pictures 50 pictures black & white 23 color 23 customizing settings 21 deleting 34 editing 51 file naming 83 information, viewing 38 locating on computer 50 locating on Picture Card 83 magnifying 33 printing 53 protecting 35 quality, adjusting 24 reviewing 31 selecting for printing 37 sepia 23 sharpness, setting 26 storage capacity 82 taking 13 transferring manually 52 transferring to computer 49, 50, 59 using...

User Manual
Page 103
... of pictures 16 service and support fax numbers 71 Kodak web site 71 telephone numbers 72 setting clock 7 date and time on pictures 29 digital zoom 40 exposure metering 25 flash 19 ISO speed 27 language 42 mode dial menus 8 original camera defaults 44 picture quality 24 picture sharpness 26 power save 39 resolution, compression 24 shutter speed 28 video out signal 42 settings camera setup 39 picture taking 21 review 31 setup customizing settings 39 mode dial 10 sharpness, setting 26 shutoff, auto 6 shutter problems 63 self-timer delay 20 shutter speed, setting 28...
... of pictures 16 service and support fax numbers 71 Kodak web site 71 telephone numbers 72 setting clock 7 date and time on pictures 29 digital zoom 40 exposure metering 25 flash 19 ISO speed 27 language 42 mode dial menus 8 original camera defaults 44 picture quality 24 picture sharpness 26 power save 39 resolution, compression 24 shutter speed 28 video out signal 42 settings camera setup 39 picture taking 21 review 31 setup customizing settings 39 mode dial 10 sharpness, setting 26 shutoff, auto 6 shutter problems 63 self-timer delay 20 shutter speed, setting 28...

User Manual
Page 104
... 48 WINDOWS 48 T taking pictures burst 16 close-up 17 distant 17 general 13 menus 8 telephone support 72 telephoto zoom 18 television, slide show 36 time placing on pictures 29 setting 7 timer, shutter delay 20 tips battery guidelines 79 maintenance 80 ReadMe file 61 safety 80 transferring pictures to computer 49, 50, 52, 59 tripod 59 use with long time exposure 28 use with self-timer 20 troubleshooting problems camera 63 camera communications 62 Camera...
... 48 WINDOWS 48 T taking pictures burst 16 close-up 17 distant 17 general 13 menus 8 telephone support 72 telephoto zoom 18 television, slide show 36 time placing on pictures 29 setting 7 timer, shutter delay 20 tips battery guidelines 79 maintenance 80 ReadMe file 61 safety 80 transferring pictures to computer 49, 50, 52, 59 tripod 59 use with long time exposure 28 use with self-timer 20 troubleshooting problems camera 63 camera communications 62 Camera...


