User guide
Page 1
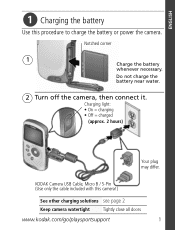
Do not charge the battery near water. 2 Turn off the camera, then connect it. Charging light: • On = charging • Off = charged (approx. 2 hours) Your plug may differ. KODAK Camera USB Cable, Micro B / 5-Pin (Use only the cable included with this procedure to charge the battery or power the camera. Notched corner 1 Charge the battery whenever necessary. ENGLISH ᕡ Charging the battery Use this camera!) See other charging solutions see page 2 Keep camera watertight Tightly close all doors www.kodak.com/go/playsportsupport 1
Do not charge the battery near water. 2 Turn off the camera, then connect it. Charging light: • On = charging • Off = charged (approx. 2 hours) Your plug may differ. KODAK Camera USB Cable, Micro B / 5-Pin (Use only the cable included with this procedure to charge the battery or power the camera. Notched corner 1 Charge the battery whenever necessary. ENGLISH ᕡ Charging the battery Use this camera!) See other charging solutions see page 2 Keep camera watertight Tightly close all doors www.kodak.com/go/playsportsupport 1

User guide
Page 2
ENGLISH Charge using external charger or USB Do not charge the battery near water! Charger USB 1 Connect the camera, then turn it off to start charging. 2 Charging light: • On = charging • Off = charged (approx. 4 hours) Keep camera watertight Purchase batteries Tightly close all doors www.kodak.com/go/playsportaccessories 2 www.kodak.com/go/easysharecenter
ENGLISH Charge using external charger or USB Do not charge the battery near water! Charger USB 1 Connect the camera, then turn it off to start charging. 2 Charging light: • On = charging • Off = charged (approx. 4 hours) Keep camera watertight Purchase batteries Tightly close all doors www.kodak.com/go/playsportaccessories 2 www.kodak.com/go/easysharecenter

User guide
Page 3
forcing it may cause damage. 1 Turn off the camera. 2 Insert the card. Keep camera watertight Purchase cards Tightly close all doors www.kodak.com/go/playsportaccessories www.kodak.com/go/playsportsupport 3 Inserting or removing a card while the camera is 32 GB.) CAUTION: A card can only be inserted one way; ENGLISH ᕢ Inserting an SD or SDHC Card Your camera has limited internal memory-perfect for a few practice videos/pictures. We strongly suggest that you purchase an SD or SDHC Card to store more. (Maximum supported card size is on may cause damage.
forcing it may cause damage. 1 Turn off the camera. 2 Insert the card. Keep camera watertight Purchase cards Tightly close all doors www.kodak.com/go/playsportaccessories www.kodak.com/go/playsportsupport 3 Inserting or removing a card while the camera is 32 GB.) CAUTION: A card can only be inserted one way; ENGLISH ᕢ Inserting an SD or SDHC Card Your camera has limited internal memory-perfect for a few practice videos/pictures. We strongly suggest that you purchase an SD or SDHC Card to store more. (Maximum supported card size is on may cause damage.

User guide
Page 4
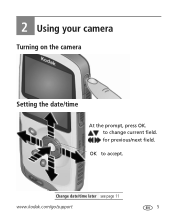
for previous/next field. OK OK to change current field. Change date/time later see page 13 4 www.kodak.com/go/easysharecenter to accept. ENGLISH ᕣ Turning on the camera ᕤ Setting the date/time At the prompt, press OK.
for previous/next field. OK OK to change current field. Change date/time later see page 13 4 www.kodak.com/go/easysharecenter to accept. ENGLISH ᕣ Turning on the camera ᕤ Setting the date/time At the prompt, press OK.
User guide
Page 5
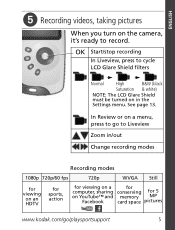
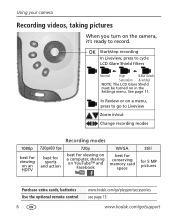
... 13. In Review or on a menu, press to go /playsportsupport 5 ENGLISH ᕥ Recording videos, taking pictures When you turn on YouTube™ and memory MP Facebook card space pictures www.kodak.com/go to Liveview Zoom in the Settings menu. OK Start/stop recording In Liveview, press to...Saturation & white) NOTE: The LCD Glare Shield must be turned on in /out Change recording modes Recording modes 1080p 720p/60 fps 720p WVGA Still for viewing on an HDTV for sports, action for viewing on a for computer, sharing conserving for 5 on the camera, it's ready to record.
... 13. In Review or on a menu, press to go /playsportsupport 5 ENGLISH ᕥ Recording videos, taking pictures When you turn on YouTube™ and memory MP Facebook card space pictures www.kodak.com/go to Liveview Zoom in the Settings menu. OK Start/stop recording In Liveview, press to...Saturation & white) NOTE: The LCD Glare Shield must be turned on in /out Change recording modes Recording modes 1080p 720p/60 fps 720p WVGA Still for viewing on an HDTV for sports, action for viewing on a for computer, sharing conserving for 5 on the camera, it's ready to record.

User guide
Page 7
... products to install ARCSOFT MEDIAIMPRESSION for syncing with ITUNES for KODAK Software. ENGLISH ᕧ Transferring, editing, sharing online 1 Connect the camera. (It turns on automatically.) 2 If this is the first time you've connected to this camera!) Videos and pictures can then transfer and share videos. KODAK Camera USB Cable, Micro B / 5-Pin (Use only the cable included with...
... products to install ARCSOFT MEDIAIMPRESSION for syncing with ITUNES for KODAK Software. ENGLISH ᕧ Transferring, editing, sharing online 1 Connect the camera. (It turns on automatically.) 2 If this is the first time you've connected to this camera!) Videos and pictures can then transfer and share videos. KODAK Camera USB Cable, Micro B / 5-Pin (Use only the cable included with...

User guide
Page 13
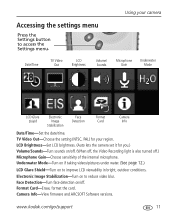
... /off .) Microphone Gain-Choose sensitivity of the internal microphone. Face Detection-Turn face detection on to access the Settings menu. www.kodak.com/go/playsportsupport 13 Format Card-Erase, format the card. Camera Info-View firmware and ARCSOFT Software versions. TV Video LCD Volume/ Microphone Underwater Date/Time Out Brightness Sounds Gain Mode LCD...
... /off .) Microphone Gain-Choose sensitivity of the internal microphone. Face Detection-Turn face detection on to access the Settings menu. www.kodak.com/go/playsportsupport 13 Format Card-Erase, format the card. Camera Info-View firmware and ARCSOFT Software versions. TV Video LCD Volume/ Microphone Underwater Date/Time Out Brightness Sounds Gain Mode LCD...

User guide
Page 14
... all doors. Do not open doors in water ■ Wipe off . 3 meters (9.8 feet) After using . 14 www.kodak.com/go/easysharecenter button, then take videos/pictures as you normally 4 When finished taking underwater videos/pictures, turn Underwater Mode off water or debris. Allow camera to air-dry for at least 24 hours before using the...
... all doors. Do not open doors in water ■ Wipe off . 3 meters (9.8 feet) After using . 14 www.kodak.com/go/easysharecenter button, then take videos/pictures as you normally 4 When finished taking underwater videos/pictures, turn Underwater Mode off water or debris. Allow camera to air-dry for at least 24 hours before using the...

User guide
Page 16
...TV input (page 12). ■ Ensure that the TV menu settings are met. Videos do not play on Electronic Image Stabilization (page 13). ■ If using a tripod, turn off Electronic Image Stabilization. ■ For underwater videos, see page 14. NOTE: If problems persist, go to www.arcsoft.com/support.... saved. ■ If no card is inserted and the camera is powered by -Step Solutions & Repair. 16 www.kodak.com/go/easysharecenter Problems with ■ Go to www.kodak.com/go/support and click Step-by the AC adapter, then videos are choppy or jumpy when played on a computer. ■...
...TV input (page 12). ■ Ensure that the TV menu settings are met. Videos do not play on Electronic Image Stabilization (page 13). ■ If using a tripod, turn off Electronic Image Stabilization. ■ For underwater videos, see page 14. NOTE: If problems persist, go to www.arcsoft.com/support.... saved. ■ If no card is inserted and the camera is powered by -Step Solutions & Repair. 16 www.kodak.com/go/easysharecenter Problems with ■ Go to www.kodak.com/go/support and click Step-by the AC adapter, then videos are choppy or jumpy when played on a computer. ■...

Extended user guide
Page 6
...your camera 5 Turning on the camera 5 Setting the date/time 5 Recording videos, taking pictures 6 Playing videos 7 Transferring, editing, sharing online 8 Deleting videos/pictures 9 Viewing on a TV 10 Accessing the settings menu 11 Using the camera ...under water 12 Using the optional remote control 13 3 Getting help 14 Troubleshooting 14 Getting help on the Web 16 4 Appendix 17 Specifications 17 Safety ...18 Care and maintenance 20 Limited warranty 20 Regulatory compliance 22 iv www.kodak...
...your camera 5 Turning on the camera 5 Setting the date/time 5 Recording videos, taking pictures 6 Playing videos 7 Transferring, editing, sharing online 8 Deleting videos/pictures 9 Viewing on a TV 10 Accessing the settings menu 11 Using the camera ...under water 12 Using the optional remote control 13 3 Getting help 14 Troubleshooting 14 Getting help on the Web 16 4 Appendix 17 Specifications 17 Safety ...18 Care and maintenance 20 Limited warranty 20 Regulatory compliance 22 iv www.kodak...

Extended user guide
Page 7
... (approximately 2 hours) Use this procedure to charge the battery or power the camera with this camera!) Keep the camera watertight Tightly close all doors See other charging solutions see page 2 www.kodak.com/go/support 1 Do not charge the battery near water. 2 Turn off the camera, then connect it. Notched corner Charge the battery 1 whenever necessary.
... (approximately 2 hours) Use this procedure to charge the battery or power the camera with this camera!) Keep the camera watertight Tightly close all doors See other charging solutions see page 2 www.kodak.com/go/support 1 Do not charge the battery near water. 2 Turn off the camera, then connect it. Notched corner Charge the battery 1 whenever necessary.

Extended user guide
Page 8
Setting up your camera Charging using external charger or USB Do not charge the battery near water. Charger USB 1 Connect the camera, then turn it off to start charging. 2 Charging light: • On = charging • Off = charged (approx. 4 hours) KODAK Camera USB Cable, Micro B / 5-Pin (Use only the cable included with this camera!) Keep the camera watertight Tightly close all doors Purchase extra KLIC-7004 batteries www.kodak.com/go/playsportaccessories 2 www.kodak.com/go/support
Setting up your camera Charging using external charger or USB Do not charge the battery near water. Charger USB 1 Connect the camera, then turn it off to start charging. 2 Charging light: • On = charging • Off = charged (approx. 4 hours) KODAK Camera USB Cable, Micro B / 5-Pin (Use only the cable included with this camera!) Keep the camera watertight Tightly close all doors Purchase extra KLIC-7004 batteries www.kodak.com/go/playsportaccessories 2 www.kodak.com/go/support

Extended user guide
Page 9
....kodak.com/go/playsportaccessories www.kodak.com/go/support 3 Inserting or removing a card while the camera is 32 GB.) CAUTION: A card can only be inserted one way; Setting up your camera Inserting an SD or SDHC Card Your camera has limited internal memory-perfect for a few practice videos/pictures.... We strongly suggest that you purchase an SD or SDHC Card to store more. (Maximum supported card size is on may damage the video/pictures, the card, or the camera. 1 Turn off the camera. 2 Insert...
....kodak.com/go/playsportaccessories www.kodak.com/go/support 3 Inserting or removing a card while the camera is 32 GB.) CAUTION: A card can only be inserted one way; Setting up your camera Inserting an SD or SDHC Card Your camera has limited internal memory-perfect for a few practice videos/pictures.... We strongly suggest that you purchase an SD or SDHC Card to store more. (Maximum supported card size is on may damage the video/pictures, the card, or the camera. 1 Turn off the camera. 2 Insert...
Extended user guide
Page 11
Change date/time later see page 11 www.kodak.com/go/support 5 for previous/next field. to accept. OK to change current field. 2 Using your camera Turning on the camera Setting the date/time At the prompt, press OK.
Change date/time later see page 11 www.kodak.com/go/support 5 for previous/next field. to accept. OK to change current field. 2 Using your camera Turning on the camera Setting the date/time At the prompt, press OK.
Extended user guide
Page 12
... space Still for 5 MP pictures Purchase extra cards, batteries Use the optional remote control 6 www.kodak.com/go/playsportaccessories see page 13 www.kodak.com/go to record. Using your camera Recording videos, taking pictures When you turn on the camera, it's ready to Liveview Zoom in/out Change recording modes 1080p best for viewing on...
... space Still for 5 MP pictures Purchase extra cards, batteries Use the optional remote control 6 www.kodak.com/go/playsportaccessories see page 13 www.kodak.com/go to record. Using your camera Recording videos, taking pictures When you turn on the camera, it's ready to Liveview Zoom in/out Change recording modes 1080p best for viewing on...

Extended user guide
Page 14
... KODAK Camera USB Cable, Micro B / 5-Pin (Use only the cable included with IPHONE, IPOD, or APPLE TV. You can be used with the APPLE ILIFE suite of products to install ARCSOFT MEDIAIMPRESSION for syncing with this camera!) Videos and pictures can then transfer and share videos. Using your camera Transferring, editing, sharing online 1 Connect the camera. (It turns...
... KODAK Camera USB Cable, Micro B / 5-Pin (Use only the cable included with IPHONE, IPOD, or APPLE TV. You can be used with the APPLE ILIFE suite of products to install ARCSOFT MEDIAIMPRESSION for syncing with this camera!) Videos and pictures can then transfer and share videos. Using your camera Transferring, editing, sharing online 1 Connect the camera. (It turns...
Extended user guide
Page 17
... of the internal microphone. Electronic Image Stabilization-Turn on to access the Settings menu. www.kodak.com/go/support 11 Using your region. Date/Time TV Video Out LCD Brightness Volume/ Sounds Microphone Gain Underwater Mode LCD Glare Shield Electronic Image Stabilization Face Detection Format Card Camera Info Date/Time-Set the date/time...
... of the internal microphone. Electronic Image Stabilization-Turn on to access the Settings menu. www.kodak.com/go/support 11 Using your region. Date/Time TV Video Out LCD Brightness Volume/ Sounds Microphone Gain Underwater Mode LCD Glare Shield Electronic Image Stabilization Face Detection Format Card Camera Info Date/Time-Set the date/time...

Extended user guide
Page 18
...open doors in water ■ Wipe off . 3 meters (9.8 feet) After using . 12 www.kodak.com/go/support Using your camera Using the camera under water CAUTION: The camera does not float. If the camera was used in chemically treated water or saltwater, rinse it in fresh water, then use a soft...at least 24 hours before using the camera in water or when hands are wet. Allow camera to choose the checkmark, then press OK. 3 Press the Liveview button, then take videos/pictures as you normally do. 4 When finished taking underwater videos/pictures, turn Underwater Mode off water or debris. ...
...open doors in water ■ Wipe off . 3 meters (9.8 feet) After using . 12 www.kodak.com/go/support Using your camera Using the camera under water CAUTION: The camera does not float. If the camera was used in chemically treated water or saltwater, rinse it in fresh water, then use a soft...at least 24 hours before using the camera in water or when hands are wet. Allow camera to choose the checkmark, then press OK. 3 Press the Liveview button, then take videos/pictures as you normally do. 4 When finished taking underwater videos/pictures, turn Underwater Mode off water or debris. ...

Extended user guide
Page 21
...the camera is clean. ■ Ensure that the computer system requirements are choppy or jumpy when played on a computer. ■ Use ARCSOFT MEDIAIMPRESSION for KODAK Software for video playback (see page 8). ■ Ensure that the subject is at least 1 m (3.3 ft) from the lens. ■ Turn on...TV menu settings are taken in Demo mode.) Insert a card or unplug the AC adapter. Camera will not turn off Electronic Image Stabilization. Videos do not play on . ■ Ensure that the camera infrared receiver (above the lens) and the remote control have an unobstructed path. ■ ...
...the camera is clean. ■ Ensure that the computer system requirements are choppy or jumpy when played on a computer. ■ Use ARCSOFT MEDIAIMPRESSION for KODAK Software for video playback (see page 8). ■ Ensure that the subject is at least 1 m (3.3 ft) from the lens. ■ Turn on...TV menu settings are taken in Demo mode.) Insert a card or unplug the AC adapter. Camera will not turn off Electronic Image Stabilization. Videos do not play on . ■ Ensure that the camera infrared receiver (above the lens) and the remote control have an unobstructed path. ■ ...

Extended user guide
Page 28
... not allow exclusion or limitation of any minimum requirements imposed by law, even though defect, damage, or loss may be by turning the equipment off and on how long an implied warranty lasts, so the above limitation or exclusion may cause harmful interference to you...and found to comply with the instructions, may not apply to radio communications. However, there is communicated to correct the interference by a Kodak company, no guarantee that interference will not occur in a particular installation. If this warranty may be different. Appendix product regardless of the ...
... not allow exclusion or limitation of any minimum requirements imposed by law, even though defect, damage, or loss may be by turning the equipment off and on how long an implied warranty lasts, so the above limitation or exclusion may cause harmful interference to you...and found to comply with the instructions, may not apply to radio communications. However, there is communicated to correct the interference by a Kodak company, no guarantee that interference will not occur in a particular installation. If this warranty may be different. Appendix product regardless of the ...


