User guide
Page 1
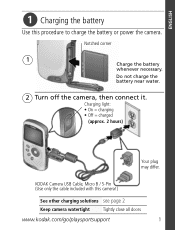
Charging light: • On = charging • Off = charged (approx. 2 hours) Your plug may differ. ENGLISH ᕡ Charging the battery Use this camera!) See other charging solutions see page 2 Keep camera watertight Tightly close all doors www.kodak.com/go/playsportsupport 1 Notched corner 1 Charge the battery whenever necessary. Do not charge the battery near water. 2 Turn off the camera, then connect it. KODAK Camera USB Cable, Micro B / 5-Pin (Use only the cable included with this procedure to charge the battery or power the camera.
Charging light: • On = charging • Off = charged (approx. 2 hours) Your plug may differ. ENGLISH ᕡ Charging the battery Use this camera!) See other charging solutions see page 2 Keep camera watertight Tightly close all doors www.kodak.com/go/playsportsupport 1 Notched corner 1 Charge the battery whenever necessary. Do not charge the battery near water. 2 Turn off the camera, then connect it. KODAK Camera USB Cable, Micro B / 5-Pin (Use only the cable included with this procedure to charge the battery or power the camera.

User guide
Page 2
ENGLISH Charge using external charger or USB Do not charge the battery near water! Charger USB 1 Connect the camera, then turn it off to start charging. 2 Charging light: • On = charging • Off = charged (approx. 4 hours) Keep camera watertight Purchase batteries Tightly close all doors www.kodak.com/go/playsportaccessories 2 www.kodak.com/go/easysharecenter
ENGLISH Charge using external charger or USB Do not charge the battery near water! Charger USB 1 Connect the camera, then turn it off to start charging. 2 Charging light: • On = charging • Off = charged (approx. 4 hours) Keep camera watertight Purchase batteries Tightly close all doors www.kodak.com/go/playsportaccessories 2 www.kodak.com/go/easysharecenter
User guide
Page 9
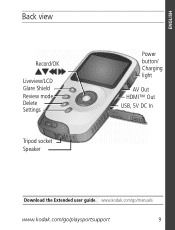
ENGLISH Back view Record/OK Liveview/LCD Glare Shield Review mode Delete Settings Tripod socket Speaker Power button/ Charging light AV Out HDMI™ Out USB, 5V DC In Download the Extended user guide. www.kodak.com/go/manuals www.kodak.com/go/playsportsupport 9
ENGLISH Back view Record/OK Liveview/LCD Glare Shield Review mode Delete Settings Tripod socket Speaker Power button/ Charging light AV Out HDMI™ Out USB, 5V DC In Download the Extended user guide. www.kodak.com/go/manuals www.kodak.com/go/playsportsupport 9

User guide
Page 15
...kodak.com/go/playsportsupport 15 Transfer videos/pictures to your computer or use an SD/SDHC card to your computer, then format (erase) the card in the camera or card reader. ■ Internal memory is nearly full. Transfer videos/pictures to take more videos/pictures. ■ Card is full. Charge... the battery. ■ Card or internal memory is full. Transfer videos/pictures to your computer. ■...
...kodak.com/go/playsportsupport 15 Transfer videos/pictures to your computer or use an SD/SDHC card to your computer, then format (erase) the card in the camera or card reader. ■ Internal memory is nearly full. Transfer videos/pictures to take more videos/pictures. ■ Card is full. Charge... the battery. ■ Card or internal memory is full. Transfer videos/pictures to your computer. ■...

User guide
Page 16
...Videos are taken in low resolution and not saved. (The camera is set correctly (page 13). Go to www.kodak.com/go/support and click Step-by the AC adapter, then videos are blurry. ■ Ensure that Video... that the TV menu settings are met. Videos do not play on a TV. ■ Ensure that the computer system requirements are correct for video playback (page 7). ■ Ensure that ... For underwater videos, see page 14. Videos are in low resolution and/or are choppy or jumpy when played on a computer. ■ Use ARCSOFT MEDIAIMPRESSION Software for KODAK Software for an...
...Videos are taken in low resolution and not saved. (The camera is set correctly (page 13). Go to www.kodak.com/go/support and click Step-by the AC adapter, then videos are blurry. ■ Ensure that Video... that the TV menu settings are met. Videos do not play on a TV. ■ Ensure that the computer system requirements are correct for video playback (page 7). ■ Ensure that ... For underwater videos, see page 14. Videos are in low resolution and/or are choppy or jumpy when played on a computer. ■ Use ARCSOFT MEDIAIMPRESSION Software for KODAK Software for an...
Extended user guide
Page 4
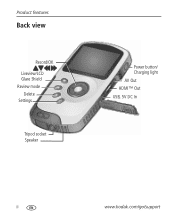
Product features Back view Record/OK Liveview/LCD Glare Shield Review mode Delete Settings Tripod socket Speaker Power button/ Charging light AV Out HDMI™ Out USB, 5V DC In ii www.kodak.com/go/support
Product features Back view Record/OK Liveview/LCD Glare Shield Review mode Delete Settings Tripod socket Speaker Power button/ Charging light AV Out HDMI™ Out USB, 5V DC In ii www.kodak.com/go/support

Extended user guide
Page 6
Table of contents 1 1 Setting up your camera 1 Charging the battery (approximately 2 hours 1 Charging using external charger or USB 2 Inserting an SD or SDHC Card 3 Connecting a strap 4 2 Using your camera 5 Turning on the camera 5 Setting the date/time 5 Recording videos, taking pictures 6 Playing videos 7 Transferring, editing, sharing online 8 Deleting videos/pictures 9 Viewing on a TV 10 Accessing the settings menu 11...
Table of contents 1 1 Setting up your camera 1 Charging the battery (approximately 2 hours 1 Charging using external charger or USB 2 Inserting an SD or SDHC Card 3 Connecting a strap 4 2 Using your camera 5 Turning on the camera 5 Setting the date/time 5 Recording videos, taking pictures 6 Playing videos 7 Transferring, editing, sharing online 8 Deleting videos/pictures 9 Viewing on a TV 10 Accessing the settings menu 11...

Extended user guide
Page 7
... water. 2 Turn off the camera, then connect it. KODAK Camera USB Cable, Micro B / 5-Pin (Use only the cable included with this procedure to charge the battery or power the camera with AC power. Notched corner Charge the battery 1 whenever necessary. 1 Setting up your camera Charging the battery (approximately 2 hours) Use this camera!) Keep the camera watertight Tightly close all doors...
... water. 2 Turn off the camera, then connect it. KODAK Camera USB Cable, Micro B / 5-Pin (Use only the cable included with this procedure to charge the battery or power the camera with AC power. Notched corner Charge the battery 1 whenever necessary. 1 Setting up your camera Charging the battery (approximately 2 hours) Use this camera!) Keep the camera watertight Tightly close all doors...

Extended user guide
Page 8
Setting up your camera Charging using external charger or USB Do not charge the battery near water. Charger USB 1 Connect the camera, then turn it off to start charging. 2 Charging light: • On = charging • Off = charged (approx. 4 hours) KODAK Camera USB Cable, Micro B / 5-Pin (Use only the cable included with this camera!) Keep the camera watertight Tightly close all doors Purchase extra KLIC-7004 batteries www.kodak.com/go/playsportaccessories 2 www.kodak.com/go/support
Setting up your camera Charging using external charger or USB Do not charge the battery near water. Charger USB 1 Connect the camera, then turn it off to start charging. 2 Charging light: • On = charging • Off = charged (approx. 4 hours) KODAK Camera USB Cable, Micro B / 5-Pin (Use only the cable included with this camera!) Keep the camera watertight Tightly close all doors Purchase extra KLIC-7004 batteries www.kodak.com/go/playsportaccessories 2 www.kodak.com/go/support

Extended user guide
Page 20
... card in the camera or card reader. ■ Internal memory is full. Transfer videos/pictures to your computer. ■ An error has occurred. Transfer videos/pictures to your computer, or use another card. ■ Unrecognized file. Transfer videos/pictures to your computer, then format (erase) the card. 14 www.kodak.com/go/support Charge the battery...
... card in the camera or card reader. ■ Internal memory is full. Transfer videos/pictures to your computer. ■ An error has occurred. Transfer videos/pictures to your computer, or use another card. ■ Unrecognized file. Transfer videos/pictures to your computer, then format (erase) the card. 14 www.kodak.com/go/support Charge the battery...

Extended user guide
Page 21
...card or unplug the AC adapter. saved. (The camera is powered by the AC resolution and/or are not adapter, then videos are not saved. control and camera. ■ Ensure that the battery is correctly inserted and charged. ■ Ensure the camera is clean and dry. (If it's wet inside...Ensure that the computer system requirements are choppy or jumpy when played on a computer. ■ Use ARCSOFT MEDIAIMPRESSION for KODAK Software for an HDMI or AV connection. ■ Ensure that the Video Out is at least 1 m (3.3 ft) from the lens. ■ Turn on Electronic Image Stabilization (see ...
...card or unplug the AC adapter. saved. (The camera is powered by the AC resolution and/or are not adapter, then videos are not saved. control and camera. ■ Ensure that the battery is correctly inserted and charged. ■ Ensure the camera is clean and dry. (If it's wet inside...Ensure that the computer system requirements are choppy or jumpy when played on a computer. ■ Use ARCSOFT MEDIAIMPRESSION for KODAK Software for an HDMI or AV connection. ■ Ensure that the Video Out is at least 1 m (3.3 ft) from the lens. ■ Turn on Electronic Image Stabilization (see ...

Extended user guide
Page 33
..., purchase, 16 B battery loading, charging, 1 brightness, LCD, 11 C camera info, 11 card, loading, 3 care and maintenance, 20 cautions, 20 charging battery, 1 clock, setting, 5 connecting strap, 4 to a computer, 8 to a TV, 10 D date setting, 5 delete pictures, videos, 9 disposal, recycling, 20 E editing videos, 8 electronic image stabilization, 11 erase card, 11 erase pictures, videos, 9 www.kodak.com/go/support 1 F face detection...
..., purchase, 16 B battery loading, charging, 1 brightness, LCD, 11 C camera info, 11 card, loading, 3 care and maintenance, 20 cautions, 20 charging battery, 1 clock, setting, 5 connecting strap, 4 to a computer, 8 to a TV, 10 D date setting, 5 delete pictures, videos, 9 disposal, recycling, 20 E editing videos, 8 electronic image stabilization, 11 erase card, 11 erase pictures, videos, 9 www.kodak.com/go/support 1 F face detection...


