User guide
Page 1
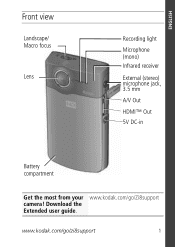
Download the Extended user guide. www.kodak.com/go /Zi8support camera! ENGLISH Front view Landscape/ Macro focus Lens Recording light Microphone (mono) Infrared receiver External (stereo) microphone jack, 3.5 mm A/V Out HDMI™ Out 5V DC-in Battery compartment Get the most from your www.kodak.com/go /zi8support 1
Download the Extended user guide. www.kodak.com/go /Zi8support camera! ENGLISH Front view Landscape/ Macro focus Lens Recording light Microphone (mono) Infrared receiver External (stereo) microphone jack, 3.5 mm A/V Out HDMI™ Out 5V DC-in Battery compartment Get the most from your www.kodak.com/go /zi8support 1
User guide
Page 2
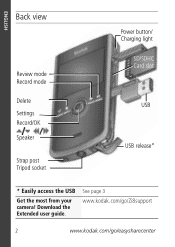
Download the Extended user guide. ENGLISH Back view Review mode Record mode Delete Settings Record/OK Speaker Strap post Tripod socket Power button/ Charging light SD/SDHC Card slot USB USB release* * Easily access the USB Get the most from your camera! See page 3 www.kodak.com/go/Zi8support 2 www.kodak.com/go/easysharecenter
Download the Extended user guide. ENGLISH Back view Review mode Record mode Delete Settings Record/OK Speaker Strap post Tripod socket Power button/ Charging light SD/SDHC Card slot USB USB release* * Easily access the USB Get the most from your camera! See page 3 www.kodak.com/go/Zi8support 2 www.kodak.com/go/easysharecenter
User guide
Page 4
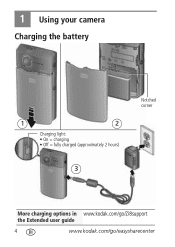
1 Using your camera Charging the battery 1 2 Charging light: • On = charging • Off = fully charged (approximately 2 hours) 3 Notched corner More charging options in www.kodak.com/go/Zi8support the Extended user guide 4 www.kodak.com/go/easysharecenter
1 Using your camera Charging the battery 1 2 Charging light: • On = charging • Off = fully charged (approximately 2 hours) 3 Notched corner More charging options in www.kodak.com/go/Zi8support the Extended user guide 4 www.kodak.com/go/easysharecenter
User guide
Page 6
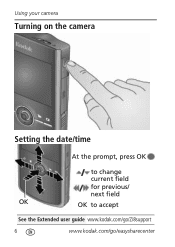
Using your camera Turning on the camera Setting the date/time At the prompt, press OK to change current field for previous/ next field OK OK to accept See the Extended user guide www.kodak.com/go/Zi8support 6 www.kodak.com/go/easysharecenter
Using your camera Turning on the camera Setting the date/time At the prompt, press OK to change current field for previous/ next field OK OK to accept See the Extended user guide www.kodak.com/go/Zi8support 6 www.kodak.com/go/easysharecenter
User guide
Page 7
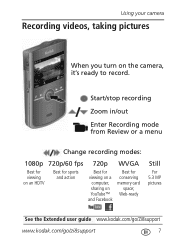
Web-ready Still For 5.3 MP pictures See the Extended user guide www.kodak.com/go/Zi8support www.kodak.com/go/zi8support 7 Start/stop recording Zoom in/out Enter Recording mode from Review or a menu Change recording modes: 1080p 720p/60 fps 720p WVGA Best for viewing on an HDTV Best for sports and action Best for conserving memory card space; Using your camera Recording videos, taking pictures When you turn on YouTube™ and Facebook Best for viewing on a computer, sharing on the camera, it's ready to record.
Web-ready Still For 5.3 MP pictures See the Extended user guide www.kodak.com/go/Zi8support www.kodak.com/go/zi8support 7 Start/stop recording Zoom in/out Enter Recording mode from Review or a menu Change recording modes: 1080p 720p/60 fps 720p WVGA Best for viewing on an HDTV Best for sports and action Best for conserving memory card space; Using your camera Recording videos, taking pictures When you turn on YouTube™ and Facebook Best for viewing on a computer, sharing on the camera, it's ready to record.

User guide
Page 12
For stereo playback, use the HDMI cable.* Purchase accessories www.kodak.com/go/Zi8accessories Set Video Out (NTSC/PAL) See page 13 * To record in stereo, use www.kodak.com/go/Zi8support an external stereo mic (see the Extended user guide) 12 www.kodak.com/go/easysharecenter 2 Doing more with your camera Playing back on a TV HDMI cable AV cable Set TV input to match your connection.
For stereo playback, use the HDMI cable.* Purchase accessories www.kodak.com/go/Zi8accessories Set Video Out (NTSC/PAL) See page 13 * To record in stereo, use www.kodak.com/go/Zi8support an external stereo mic (see the Extended user guide) 12 www.kodak.com/go/easysharecenter 2 Doing more with your camera Playing back on a TV HDMI cable AV cable Set TV input to match your connection.