
User Manual
Page 1
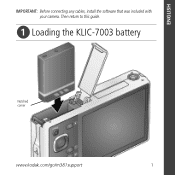
Then return to this guide. ᕡ Loading the KLIC-7003 battery Notched corner www.kodak.com/go/m381support 1 ENGLISH IMPORTANT: Before connecting any cables, install the software that was included with your camera.
Then return to this guide. ᕡ Loading the KLIC-7003 battery Notched corner www.kodak.com/go/m381support 1 ENGLISH IMPORTANT: Before connecting any cables, install the software that was included with your camera.
User Manual
Page 2
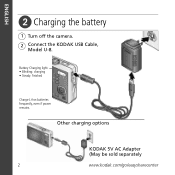
Battery Charging light: • Blinking: charging • Steady: finished Charge Li-Ion batteries frequently, even if power remains. ENGLISH ᕢ Charging the battery 1 Turn off the camera. 2 Connect the KODAK USB Cable, Model U-8. Other charging options KODAK 5V AC Adapter (May be sold separately 2 www.kodak.com/go/easysharecenter
Battery Charging light: • Blinking: charging • Steady: finished Charge Li-Ion batteries frequently, even if power remains. ENGLISH ᕢ Charging the battery 1 Turn off the camera. 2 Connect the KODAK USB Cable, Model U-8. Other charging options KODAK 5V AC Adapter (May be sold separately 2 www.kodak.com/go/easysharecenter

User Manual
Page 3
for previous/next field. ENGLISH ᕣ Turning on the camera ᕤ Setting the language and date/time OK (press) Language: to change current field. OK to accept. Date/Time: At the prompt, press OK. OK to accept. See the Extended user guide www.kodak.com/go/m381support www.kodak.com/go/m381support 3 to change .
for previous/next field. ENGLISH ᕣ Turning on the camera ᕤ Setting the language and date/time OK (press) Language: to change current field. OK to accept. Date/Time: At the prompt, press OK. OK to accept. See the Extended user guide www.kodak.com/go/m381support www.kodak.com/go/m381support 3 to change .
User Manual
Page 4
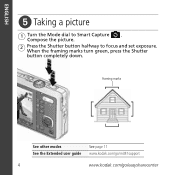
When the framing marks turn green, press the Shutter button completely down. Framing marks See other modes See the Extended user guide See page 11 www.kodak.com/go/m381support 4 www.kodak.com/go/easysharecenter ENGLISH ᕥ Taking a picture 1 Turn the Mode dial to focus and set exposure. Compose the picture. 2 Press the Shutter button halfway to Smart Capture .
When the framing marks turn green, press the Shutter button completely down. Framing marks See other modes See the Extended user guide See page 11 www.kodak.com/go/m381support 4 www.kodak.com/go/easysharecenter ENGLISH ᕥ Taking a picture 1 Turn the Mode dial to focus and set exposure. Compose the picture. 2 Press the Shutter button halfway to Smart Capture .

User Manual
Page 5
See the Extended user guide www.kodak.com/go/m381support www.kodak.com/go/m381support 5 View previous/next picture/video. OK Play a video. ENGLISH ᕦ Reviewing pictures/videos Press the Review button to enter/exit Review.
See the Extended user guide www.kodak.com/go/m381support www.kodak.com/go/m381support 5 View previous/next picture/video. OK Play a video. ENGLISH ᕦ Reviewing pictures/videos Press the Review button to enter/exit Review.

User Manual
Page 6
ENGLISH ᕧ Transferring pictures/videos 1 Turn off the camera. 2 Connect a KODAK USB Cable, Model U-8. 3 Turn on the camera. See the Extended user guide Purchase accessories www.kodak.com/go/m381support www.kodak.com/go/m381accessories 6 www.kodak.com/go/easysharecenter
ENGLISH ᕧ Transferring pictures/videos 1 Turn off the camera. 2 Connect a KODAK USB Cable, Model U-8. 3 Turn on the camera. See the Extended user guide Purchase accessories www.kodak.com/go/m381support www.kodak.com/go/m381accessories 6 www.kodak.com/go/easysharecenter

User Manual
Page 7
... to take the best possible pictures and videos Great news! Scroll through a Help topic See the Extended user guide www.kodak.com/go/m381support www.kodak.com/go/m381support 7 You want the most from your camera You want to understand: ■ What it can do for every menu choice. It describes every setting for you ■ And how to use on-camera Help. Because...
... to take the best possible pictures and videos Great news! Scroll through a Help topic See the Extended user guide www.kodak.com/go/m381support www.kodak.com/go/m381support 7 You want the most from your camera You want to understand: ■ What it can do for every menu choice. It describes every setting for you ■ And how to use on-camera Help. Because...

User Manual
Page 8
Congratulations! Finish reading this book, so you can take and share your camera! ENGLISH ᕩ Keep learning about your best pictures! Go to your computer Keep learning! You have: • set up your camera • taken pictures • transferred pictures to www.kodak.com/go/m381support: • the extended user guide • interactive troubleshooting and repairs • interactive tutorials • FAQs • downloads • accessories • printing information •...
Congratulations! Finish reading this book, so you can take and share your camera! ENGLISH ᕩ Keep learning about your best pictures! Go to your computer Keep learning! You have: • set up your camera • taken pictures • transferred pictures to www.kodak.com/go/m381support: • the extended user guide • interactive troubleshooting and repairs • interactive tutorials • FAQs • downloads • accessories • printing information •...

User Manual
Page 10
ENGLISH Back View LCD Delete, Menu, Battery Zoom Info buttons Charging (Telephoto/ light Wide Angle) button Tripod socket USB/AV Out DC-In (5V) Strap post SD/SDHC Card/ Battery compartment OK button Share button Review button 10 www.kodak.com/go/easysharecenter
ENGLISH Back View LCD Delete, Menu, Battery Zoom Info buttons Charging (Telephoto/ light Wide Angle) button Tripod socket USB/AV Out DC-In (5V) Strap post SD/SDHC Card/ Battery compartment OK button Share button Review button 10 www.kodak.com/go/easysharecenter
User Manual
Page 11
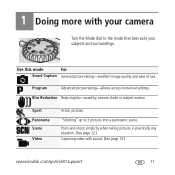
....) www.kodak.com/go/m381support 11 Program Advanced picture taking pictures in practically any situation. (See page 12.) Capturing video with your camera Turn the Mode dial to 3 pictures into a panoramic scene. "Stitching" up to the mode that best suits your subjects and surroundings. Point-and-shoot simplicity when taking -allows access to manual settings. Sport Panorama Scene Video Action pictures. Use this mode For Smart Capture General picture taking-excellent image quality...
....) www.kodak.com/go/m381support 11 Program Advanced picture taking pictures in practically any situation. (See page 12.) Capturing video with your camera Turn the Mode dial to 3 pictures into a panoramic scene. "Stitching" up to the mode that best suits your subjects and surroundings. Point-and-shoot simplicity when taking -allows access to manual settings. Sport Panorama Scene Video Action pictures. Use this mode For Smart Capture General picture taking-excellent image quality...

User Manual
Page 12
Using the optical zoom 1 Use the LCD to frame your camera Taking a video 1 Turn the Mode dial to Video . 2 Press the Shutter button completely down, then release it , press OK. 3 Press OK to view scene mode descriptions. To stop recording, press and release the Shutter button again. To review videos, see page 5. To zoom out, press Wide Angle (W). 3 Take the picture. 12 www.kodak.com/go/easysharecenter Using Scene (SCN) modes Choose a Scene mode-for great pictures in...
Using the optical zoom 1 Use the LCD to frame your camera Taking a video 1 Turn the Mode dial to Video . 2 Press the Shutter button completely down, then release it , press OK. 3 Press OK to view scene mode descriptions. To stop recording, press and release the Shutter button again. To review videos, see page 5. To zoom out, press Wide Angle (W). 3 Take the picture. 12 www.kodak.com/go/easysharecenter Using Scene (SCN) modes Choose a Scene mode-for great pictures in...

User Manual
Page 13
To choose a red eye setting, use a tripod. In low light, hold the camera steady or use the Setup tab. The current flash mode is taken. the camera corrects red eye. Off Never www.kodak.com/go/m381support 13 Flash modes Auto Flash fires When the lighting conditions require it. Fill (Flash On) Red Eye Preflash Your camera can correct red-eye using 2 methods. NOTE: (Not available in Smart Capture mode.) A preflash fires, shrinking the eye pupil, before the picture is...
To choose a red eye setting, use a tripod. In low light, hold the camera steady or use the Setup tab. The current flash mode is taken. the camera corrects red eye. Off Never www.kodak.com/go/m381support 13 Flash modes Auto Flash fires When the lighting conditions require it. Fill (Flash On) Red Eye Preflash Your camera can correct red-eye using 2 methods. NOTE: (Not available in Smart Capture mode.) A preflash fires, shrinking the eye pupil, before the picture is...

User Manual
Page 14
The shortcuts appear. 2 Press to access functions like Exposure Compensation, Self-timer/Burst, and Auto focus. (You'll see different functions in different modes.) 3 Press to the most popular functions: 1 Press the Info button. Shortcuts 14 www.kodak.com/go/easysharecenter Doing more with your camera Using shortcuts For quick access to choose a setting. 4 To hide the shortcuts again, press .
The shortcuts appear. 2 Press to access functions like Exposure Compensation, Self-timer/Burst, and Auto focus. (You'll see different functions in different modes.) 3 Press to the most popular functions: 1 Press the Info button. Shortcuts 14 www.kodak.com/go/easysharecenter Doing more with your camera Using shortcuts For quick access to choose a setting. 4 To hide the shortcuts again, press .

User Manual
Page 15
... OK. 4 Highlight an option, then press OK. To get the best results from your camera, see page 7. others, until you change settings to change them; Using the menu button to get the most common picture/video-taking settings ■ Setup for previous/next picture/video. 3 Press the Delete button. 4 Follow the screen prompts. www.kodak.com/go/m381support 15 Some settings remain until you change settings IMPORTANT: Your camera offers a built-in Help system.
... OK. 4 Highlight an option, then press OK. To get the best results from your camera, see page 7. others, until you change settings to change them; Using the menu button to get the most common picture/video-taking settings ■ Setup for previous/next picture/video. 3 Press the Delete button. 4 Follow the screen prompts. www.kodak.com/go/m381support 15 Some settings remain until you change settings IMPORTANT: Your camera offers a built-in Help system.

User Manual
Page 16
Doing more with your camera Understanding the picture-taking icons Focus mode Self timer/Burst Exposure compensation Flash mode Capture mode Pictures/time remaining Zoom slider Tag name Battery level 16 www.kodak.com/go/easysharecenter
Doing more with your camera Understanding the picture-taking icons Focus mode Self timer/Burst Exposure compensation Flash mode Capture mode Pictures/time remaining Zoom slider Tag name Battery level 16 www.kodak.com/go/easysharecenter
User Manual
Page 17
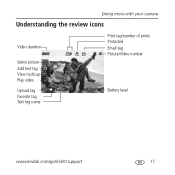
Doing more with your camera Understanding the review icons Video duration Select picture Add text tag View multi-up Play video Print tag/number of prints Protected Email tag Picture/Video number Upload tag Favorite tag Text tag name Battery level www.kodak.com/go/m381support 17
Doing more with your camera Understanding the review icons Video duration Select picture Add text tag View multi-up Play video Print tag/number of prints Protected Email tag Picture/Video number Upload tag Favorite tag Text tag name Battery level www.kodak.com/go/m381support 17

User Manual
Page 19
... or black screen is displayed instead of a picture ■ Transfer all modes. Camera buttons and controls do not function Flash does not fire ■ Check the flash setting, and change as needed (see page 6). NOTE: The flash does not fire in all pictures to the computer (see page 6). ■ Take another card. You cannot take a picture ■ Turn the camera off, then on or off ■ Make sure the battery is charged and installed correctly (see page 1). Memory card...
... or black screen is displayed instead of a picture ■ Transfer all modes. Camera buttons and controls do not function Flash does not fire ■ Check the flash setting, and change as needed (see page 6). NOTE: The flash does not fire in all pictures to the computer (see page 6). ■ Take another card. You cannot take a picture ■ Turn the camera off, then on or off ■ Make sure the battery is charged and installed correctly (see page 1). Memory card...

User Manual
Page 20
... use only. KODAK AC Adapters and Battery Chargers are no user-serviceable parts inside the product, contact Kodak customer support. ■ In the unlikely event that battery fluid leaks onto your local Kodak customer support. ■ See www.kodak.com/go/REACH for information about the presence of substances included on batteries, see www.kodak.com/go/batterytypes. 20 www.kodak.com/go /kes. ■ Do not charge...
... use only. KODAK AC Adapters and Battery Chargers are no user-serviceable parts inside the product, contact Kodak customer support. ■ In the unlikely event that battery fluid leaks onto your local Kodak customer support. ■ See www.kodak.com/go/REACH for information about the presence of substances included on batteries, see www.kodak.com/go/batterytypes. 20 www.kodak.com/go /kes. ■ Do not charge...
User Manual
Page 21
.... This warranty gives you specific rights, and you may contain remanufactured materials. The option of repair or replacement, whichever is expressly disclaimed. Kodak will include all labor as well as third party ink or ink tanks), failure to follow Kodak's operation, maintenance or repacking instructions, failure to be free from malfunctions and defects in making repairs, those parts may be remanufactured...
.... This warranty gives you specific rights, and you may contain remanufactured materials. The option of repair or replacement, whichever is expressly disclaimed. Kodak will include all labor as well as third party ink or ink tanks), failure to follow Kodak's operation, maintenance or repacking instructions, failure to be free from malfunctions and defects in making repairs, those parts may be remanufactured...

User Manual
Page 22
... to comply with the instructions, may cause harmful interference to radio communications. This equipment generates, uses, and can be determined by turning the equipment off and on, the user is connected; 4) consult the dealer or an experienced radio/TV technician for compliance could void the user's authority to the purchaser in writing by a Kodak company, no guarantee that...
... to comply with the instructions, may cause harmful interference to radio communications. This equipment generates, uses, and can be determined by turning the equipment off and on, the user is connected; 4) consult the dealer or an experienced radio/TV technician for compliance could void the user's authority to the purchaser in writing by a Kodak company, no guarantee that...


