

User Manual
Page 1
ENGLISH ᕡ Installing the software Before connecting any cables, install the software that was included with your camera. Follow the on-screen instructions. After installing the software, return to this user guide. ᕢ Loading the KLIC-7001 battery See the Extended user guide www.kodak.com/go/m320support www.kodak.com/go/m320support 1
ENGLISH ᕡ Installing the software Before connecting any cables, install the software that was included with your camera. Follow the on-screen instructions. After installing the software, return to this user guide. ᕢ Loading the KLIC-7001 battery See the Extended user guide www.kodak.com/go/m320support www.kodak.com/go/m320support 1
User Manual
Page 2
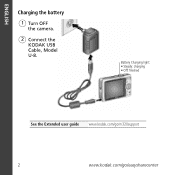
ENGLISH Charging the battery 1 Turn OFF the camera. 2 Connect the KODAK USB Cable, Model U-8. Battery Charging light: • Steady: charging • Off: finished See the Extended user guide www.kodak.com/go/m320support 2 www.kodak.com/go/easysharecenter
ENGLISH Charging the battery 1 Turn OFF the camera. 2 Connect the KODAK USB Cable, Model U-8. Battery Charging light: • Steady: charging • Off: finished See the Extended user guide www.kodak.com/go/m320support 2 www.kodak.com/go/easysharecenter
User Manual
Page 3
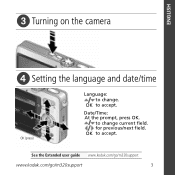
for previous/next field. OK to accept. See the Extended user guide www.kodak.com/go/m320support www.kodak.com/go/m320support 3 OK to accept. Date/Time: At the prompt, press OK. to change . ENGLISH ᕣ Turning on the camera ᕤ Setting the language and date/time OK (press) Language: to change current field.
for previous/next field. OK to accept. See the Extended user guide www.kodak.com/go/m320support www.kodak.com/go/m320support 3 OK to accept. Date/Time: At the prompt, press OK. to change . ENGLISH ᕣ Turning on the camera ᕤ Setting the language and date/time OK (press) Language: to change current field.
User Manual
Page 4
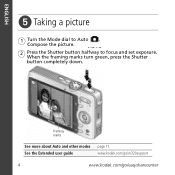
Compose the picture. 2 Press the Shutter button halfway to Auto . ENGLISH ᕥ Taking a picture 1 Turn the Mode dial to focus and set exposure. When the framing marks turn green, press the Shutter button completely down. Framing marks See more about Auto and other modes page 11 See the Extended user guide www.kodak.com/go/m320support 4 www.kodak.com/go/easysharecenter
Compose the picture. 2 Press the Shutter button halfway to Auto . ENGLISH ᕥ Taking a picture 1 Turn the Mode dial to focus and set exposure. When the framing marks turn green, press the Shutter button completely down. Framing marks See more about Auto and other modes page 11 See the Extended user guide www.kodak.com/go/m320support 4 www.kodak.com/go/easysharecenter
User Manual
Page 7
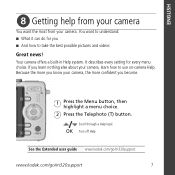
... a Help topic OK Turn off Help See the Extended user guide www.kodak.com/go/m320support www.kodak.com/go/m320support 7 You want the most from your camera, the more confident you become. 1 Press the Menu button, then highlight a menu choice. 2 Press the Telephoto (T) button. Because the more you learn nothing else about your camera, learn how to take the best possible pictures and videos Great...
... a Help topic OK Turn off Help See the Extended user guide www.kodak.com/go/m320support www.kodak.com/go/m320support 7 You want the most from your camera, the more confident you become. 1 Press the Menu button, then highlight a menu choice. 2 Press the Telephoto (T) button. Because the more you learn nothing else about your camera, learn how to take the best possible pictures and videos Great...
User Manual
Page 8
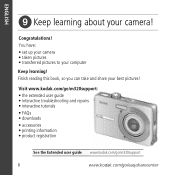
Congratulations! Finish reading this book, so you can take and share your camera! ENGLISH ᕩ Keep learning about your best pictures! Visit www.kodak.com/go/m320support: • the extended user guide • interactive troubleshooting and repairs • interactive tutorials • FAQs • downloads • accessories • printing information • product registration See the Extended user guide www.kodak.com/go/m320support 8 www.kodak.com/go/easysharecenter You...
Congratulations! Finish reading this book, so you can take and share your camera! ENGLISH ᕩ Keep learning about your best pictures! Visit www.kodak.com/go/m320support: • the extended user guide • interactive troubleshooting and repairs • interactive tutorials • FAQs • downloads • accessories • printing information • product registration See the Extended user guide www.kodak.com/go/m320support 8 www.kodak.com/go/easysharecenter You...
User Manual
Page 11
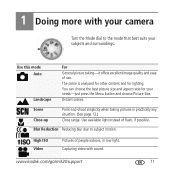
... excellent image quality and ease of flash, if possible. www.kodak.com/go/m320support 11 Blur Reduction Reducing blur due to the mode that best suits your subjects and surroundings. High ISO Video Pictures of people indoors, in practically any situation. (See page 12.) Close range. 1 Doing more with sound. Use available light instead of use. Capturing video with your camera Turn the Mode dial...
... excellent image quality and ease of flash, if possible. www.kodak.com/go/m320support 11 Blur Reduction Reducing blur due to the mode that best suits your subjects and surroundings. High ISO Video Pictures of people indoors, in practically any situation. (See page 12.) Close range. 1 Doing more with sound. Use available light instead of use. Capturing video with your camera Turn the Mode dial...
User Manual
Page 12
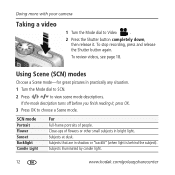
...light. Subjects illuminated by candle light. 12 www.kodak.com/go/easysharecenter Using Scene (SCN) modes Choose a Scene mode-for great pictures in practically any situation. 1 Turn the Mode dial to SCN. 2 Press to choose a Scene mode. SCN mode Portrait Flower Sunset Backlight Candle Light..." (when light is behind the subject). To review videos, see page 18. Subjects at dusk. To stop recording, press and release the Shutter button again. Close-ups of people. Doing more with your camera Taking a video 1 Turn the Mode dial to Video . 2 Press the Shutter button completely down,...
...light. Subjects illuminated by candle light. 12 www.kodak.com/go/easysharecenter Using Scene (SCN) modes Choose a Scene mode-for great pictures in practically any situation. 1 Turn the Mode dial to SCN. 2 Press to choose a Scene mode. SCN mode Portrait Flower Sunset Backlight Candle Light..." (when light is behind the subject). To review videos, see page 18. Subjects at dusk. To stop recording, press and release the Shutter button again. Close-ups of people. Doing more with your camera Taking a video 1 Turn the Mode dial to Video . 2 Press the Shutter button completely down,...
User Manual
Page 13
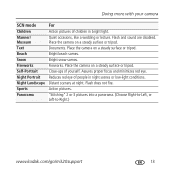
... or tripod. Close-ups of people in bright light. Flash does not fire. Doing more with your camera SCN mode Children Manner/ Museum Text Beach Snow Fireworks Self-Portrait Night Portrait Night Landscape Sports Panorama For Action pictures of children in night scenes or low-light conditions. Fireworks. Assures proper focus and minimizes red eye. Distant scenery at night. Place the...
... or tripod. Close-ups of people in bright light. Flash does not fire. Doing more with your camera SCN mode Children Manner/ Museum Text Beach Snow Fireworks Self-Portrait Night Portrait Night Landscape Sports Panorama For Action pictures of children in night scenes or low-light conditions. Fireworks. Assures proper focus and minimizes red eye. Distant scenery at night. Place the...
User Manual
Page 14
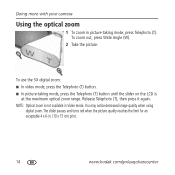
... (T) button. ■ In picture-taking mode, press Telephoto (T). The slider pauses and turns red when the picture quality reaches the limit for an acceptable 4 x 6-in Video mode. To zoom out, press Wide Angle (W). 2 Take the picture. Doing more with your camera Using the optical zoom 1 To zoom in picture-taking mode, press the Telephoto (T) button until the slider on the LCD is not available in . (10 x 15 cm) print. 14 www.kodak.com...
... (T) button. ■ In picture-taking mode, press Telephoto (T). The slider pauses and turns red when the picture quality reaches the limit for an acceptable 4 x 6-in Video mode. To zoom out, press Wide Angle (W). 2 Take the picture. Doing more with your camera Using the optical zoom 1 To zoom in picture-taking mode, press the Telephoto (T) button until the slider on the LCD is not available in . (10 x 15 cm) print. 14 www.kodak.com...
User Manual
Page 15
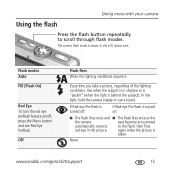
... Red-eye Pre-flash is turned off , press the Menu button and see Red Eye Preflash. again when the picture is behind the subject). Flash modes Auto Fill (Flash On) Red Eye To turn the red eye preflash feature on : ■ The flash fires once and ■ The flash fires once so the the camera eyes become accustomed automatically corrects to scroll through flash modes. In low light, hold the camera steady or use a tripod. Never www.kodak...
... Red-eye Pre-flash is turned off , press the Menu button and see Red Eye Preflash. again when the picture is behind the subject). Flash modes Auto Fill (Flash On) Red Eye To turn the red eye preflash feature on : ■ The flash fires once and ■ The flash fires once so the the camera eyes become accustomed automatically corrects to scroll through flash modes. In low light, hold the camera steady or use a tripod. Never www.kodak...
User Manual
Page 16
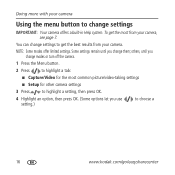
... settings. Some settings remain until you change settings to get the most common picture/video-taking settings ■ Setup for the most from your camera, see page 7. To get the best results from your camera. You can change modes or turn off the camera. 1 Press the Menu button. 2 Press to highlight a tab: ■ Capture/Video for other camera settings 3 Press to choose a 16 www.kodak.com/go/easysharecenter others, until you use setting...
... settings. Some settings remain until you change settings to get the most common picture/video-taking settings ■ Setup for the most from your camera, see page 7. To get the best results from your camera. You can change modes or turn off the camera. 1 Press the Menu button. 2 Press to highlight a tab: ■ Capture/Video for other camera settings 3 Press to choose a 16 www.kodak.com/go/easysharecenter others, until you use setting...
User Manual
Page 17
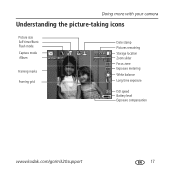
Doing more with your camera Understanding the picture-taking icons Picture size Self timer/Burst Flash mode Capture mode Album Framing marks Framing grid Date stamp Pictures remaining Storage location Zoom slider Focus zone Exposure metering White balance Long time exposure ISO speed Battery level Exposure compensation www.kodak.com/go/m320support 17
Doing more with your camera Understanding the picture-taking icons Picture size Self timer/Burst Flash mode Capture mode Album Framing marks Framing grid Date stamp Pictures remaining Storage location Zoom slider Focus zone Exposure metering White balance Long time exposure ISO speed Battery level Exposure compensation www.kodak.com/go/m320support 17
User Manual
Page 18
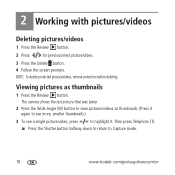
... a single picture/video, press to highlight it. The camera shows the last picture that was taken. 2 Press the Wide Angle (W) button to Capture mode. 18 www.kodak.com/go/easysharecenter Then press Telephoto (T). ■ Press the Shutter button halfway down to return to view pictures/videos as thumbnails 1 Press the Review button. NOTE: To delete protected pictures/videos, remove protection before deleting. 2 Working with pictures/videos Deleting pictures/videos 1 Press the Review button. 2 Press for previous/next picture/video. 3 Press the Delete button...
... a single picture/video, press to highlight it. The camera shows the last picture that was taken. 2 Press the Wide Angle (W) button to Capture mode. 18 www.kodak.com/go/easysharecenter Then press Telephoto (T). ■ Press the Shutter button halfway down to return to view pictures/videos as thumbnails 1 Press the Review button. NOTE: To delete protected pictures/videos, remove protection before deleting. 2 Working with pictures/videos Deleting pictures/videos 1 Press the Review button. 2 Press for previous/next picture/video. 3 Press the Delete button...

User Manual
Page 19
Review Selected picture Protected Print tag/number of prints Picture number Storage location Previous/next picture Videos Review www.kodak.com/go/m320support Battery level Video length Video number Image storage location Play time Volume control indicator Battery level 19 Working with pictures/videos Understanding the review icons Pictures Favorite tag Email tag PERFECT TOUCH tech.
Review Selected picture Protected Print tag/number of prints Picture number Storage location Previous/next picture Videos Review www.kodak.com/go/m320support Battery level Video length Video number Image storage location Play time Volume control indicator Battery level 19 Working with pictures/videos Understanding the review icons Pictures Favorite tag Email tag PERFECT TOUCH tech.
User Manual
Page 20
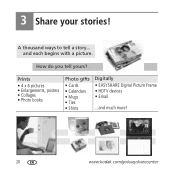
Prints • 4 x 6 pictures • Enlargements, posters • Collages • Photo books Photo gifts • Cards • Calendars • Mugs • Ties • Shirts Digitally • EASYSHARE Digital Picture Frame • HDTV devices • Email ...and much more! 20 www.kodak.com/go/easysharecenter 3 Share your stories! A thousand ways to tell a story... How do you tell yours? and each begins with a picture.
Prints • 4 x 6 pictures • Enlargements, posters • Collages • Photo books Photo gifts • Cards • Calendars • Mugs • Ties • Shirts Digitally • EASYSHARE Digital Picture Frame • HDTV devices • Email ...and much more! 20 www.kodak.com/go/easysharecenter 3 Share your stories! A thousand ways to tell a story... How do you tell yours? and each begins with a picture.
User Manual
Page 22
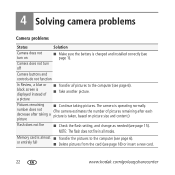
4 Solving camera problems Camera problems Status Solution Camera does not turn off Camera buttons and controls do not function In Review, a blue or black screen is displayed instead of pictures remaining after each decrease after taking pictures. Pictures remaining ■ Continue taking a picture is taken, based on ■ Make sure the battery is charged and installed correctly (see page 18) or insert a new card. 22 www.kodak.com/go/easysharecenter The camera is almost ■ Transfer the pictures to the computer (see...
4 Solving camera problems Camera problems Status Solution Camera does not turn off Camera buttons and controls do not function In Review, a blue or black screen is displayed instead of pictures remaining after each decrease after taking pictures. Pictures remaining ■ Continue taking a picture is taken, based on ■ Make sure the battery is charged and installed correctly (see page 18) or insert a new card. 22 www.kodak.com/go/easysharecenter The camera is almost ■ Transfer the pictures to the computer (see...

User Manual
Page 23
Refer servicing to cool; KODAK AC Adapters and Battery Chargers are no user-serviceable parts inside the product, contact Kodak customer support. ■ In the unlikely event that is stored for an extended period of time. For approved accessories, visit www.kodak.com/go /batterytypes. For more information on batteries, see www.kodak.com/go /accessories. ■ Use only a USB-certified computer equipped with water and contact...
Refer servicing to cool; KODAK AC Adapters and Battery Chargers are no user-serviceable parts inside the product, contact Kodak customer support. ■ In the unlikely event that is stored for an extended period of time. For approved accessories, visit www.kodak.com/go /batterytypes. For more information on batteries, see www.kodak.com/go /accessories. ■ Use only a USB-certified computer equipped with water and contact...
User Manual
Page 24
... ink tanks), failure to follow Kodak's operation, maintenance or repacking instructions, failure to use of the equipment, cost of substitute equipment, facilities or services, or claims of purchase. Appendix Limited Warranty Kodak warrants Kodak consumer electronic products and accessories ("products"), excluding batteries, to be free from malfunctions and defects in making repairs, those parts may contain remanufactured materials. Repair, replacement, or refund of the...
... ink tanks), failure to follow Kodak's operation, maintenance or repacking instructions, failure to use of the equipment, cost of substitute equipment, facilities or services, or claims of purchase. Appendix Limited Warranty Kodak warrants Kodak consumer electronic products and accessories ("products"), excluding batteries, to be free from malfunctions and defects in making repairs, those parts may contain remanufactured materials. Repair, replacement, or refund of the...
User Manual
Page 25
Unless a specific Kodak warranty is communicated to operate the equipment. FCC compliance and advisory KODAK EASYSHARE M320 Digital Camera This equipment has been tested and found to comply with the instructions, may be determined by turning the equipment off and on, the user is encouraged to try to correct the interference by the party responsible for compliance could void the user's authority to...
Unless a specific Kodak warranty is communicated to operate the equipment. FCC compliance and advisory KODAK EASYSHARE M320 Digital Camera This equipment has been tested and found to comply with the instructions, may be determined by turning the equipment off and on, the user is encouraged to try to correct the interference by the party responsible for compliance could void the user's authority to...


