
User Manual
Page 18
... ready for instructions on the control panel. The Start Up screen also displays the current level of black and color ink. . Printer Overview Note: See "Adjusting the control panel position" on page 11 for operation but is not performing a task. The contents ... • Send Fax • Fax Auto-Answer • Fax Settings • Network Settings • Printer Settings • Maintenance • Help To review the tasks you perform when you use your Kodak ESP 9 All-in -One printer menus" on the LCD. LCD display The LCD screen displays photos, messages, instructions, and menu items. ...
... ready for instructions on the control panel. The Start Up screen also displays the current level of black and color ink. . Printer Overview Note: See "Adjusting the control panel position" on page 11 for operation but is not performing a task. The contents ... • Send Fax • Fax Auto-Answer • Fax Settings • Network Settings • Printer Settings • Maintenance • Help To review the tasks you perform when you use your Kodak ESP 9 All-in -One printer menus" on the LCD. LCD display The LCD screen displays photos, messages, instructions, and menu items. ...
User Manual
Page 25
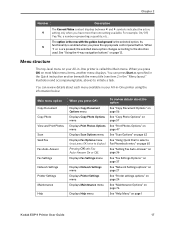
...table, above) to the direction used. When 5 or are pressed, the selected menu option changes according to initiate a task. You can review details about the option: Displays Copy Document Options menu See "Copy Document Options" on page 56 Displays Copy Photo Options See "Copy Photo ... button. See "Using the 4-way navigation buttons" on page 1 Kodak ESP 9 Printer User Guide 17 etc.. You can press Start as specified in the Quick instruction section beneath the menu title (see item 2 in -One printer is the selected option. Menu structure The top-level menu on your...
...table, above) to the direction used. When 5 or are pressed, the selected menu option changes according to initiate a task. You can review details about the option: Displays Copy Document Options menu See "Copy Document Options" on page 56 Displays Copy Photo Options See "Copy Photo ... button. See "Using the 4-way navigation buttons" on page 1 Kodak ESP 9 Printer User Guide 17 etc.. You can press Start as specified in the Quick instruction section beneath the menu title (see item 2 in -One printer is the selected option. Menu structure The top-level menu on your...
User Manual
Page 31
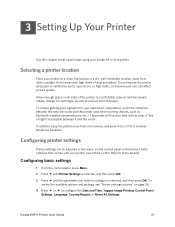
...remove and load paper. Allow enough space on all sides of the printer to comfortably connect and disconnect cables, change ink cartridges, as well as airborne particles can be adjusted in -One printer. Kodak ESP 9 Printer User Guide 23 To ensure getting good signals from your networked computer(s),...Language, Country/Region, or Reset All Settings. To review the available options and settings, see Home Center Help for more details). Avoid areas with high levels of sight" as possible between the network router and the printer (and other wireless devices, such as Bluetooth-enabled...
...remove and load paper. Allow enough space on all sides of the printer to comfortably connect and disconnect cables, change ink cartridges, as well as airborne particles can be adjusted in -One printer. Kodak ESP 9 Printer User Guide 23 To ensure getting good signals from your networked computer(s),...Language, Country/Region, or Reset All Settings. To review the available options and settings, see Home Center Help for more details). Avoid areas with high levels of sight" as possible between the network router and the printer (and other wireless devices, such as Bluetooth-enabled...
User Manual
Page 34
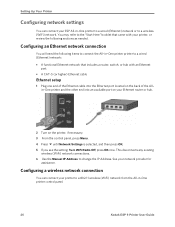
... that includes a router, switch, or hub with your printer, or review the following items to connect the All-in -One printer to a wired (Ethernet) network or to change the IP Address. in -One printer control panel. 26 Kodak ESP 9 Printer User Guide Configuring a wireless network connection You can connect your ESP All-in -One printer printer to a wired (Ethernet) network: • A functional Ethernet...
... that includes a router, switch, or hub with your printer, or review the following items to connect the All-in -One printer to a wired (Ethernet) network or to change the IP Address. in -One printer control panel. 26 Kodak ESP 9 Printer User Guide Configuring a wireless network connection You can connect your ESP All-in -One printer printer to a wired (Ethernet) network: • A functional Ethernet...
User Manual
Page 35
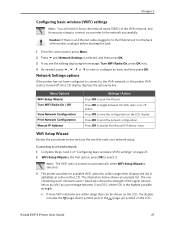
...the Manual IP Address menu. Caution: If there is the first option; WiFi Setup Wizard Review the procedures below as xx%) as a percentage between the WiFi radio on the LCD.... Configuration Print Network Configuration Manual IP Address Settings / Action Press OK to start the Wizard. Kodak ESP 9 Printer User Guide 27 press OK to select it before starting this task. 1 From the control ...(shown below and use the one that suits your printer to the network successfully. Press OK to toggle between 0 and 100, where 100 is selected. 3 The printer searches for available WiFi networks ...
...the Manual IP Address menu. Caution: If there is the first option; WiFi Setup Wizard Review the procedures below as xx%) as a percentage between the WiFi radio on the LCD.... Configuration Print Network Configuration Manual IP Address Settings / Action Press OK to start the Wizard. Kodak ESP 9 Printer User Guide 27 press OK to select it before starting this task. 1 From the control ...(shown below and use the one that suits your printer to the network successfully. Press OK to toggle between 0 and 100, where 100 is selected. 3 The printer searches for available WiFi networks ...
User Manual
Page 38
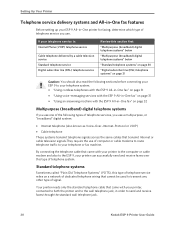
... route telephone traffic to send and receive faxes through the standard wall telephone jack. 30 Kodak ESP 9 Printer User Guide By connecting the telephone cable that cannot be used to the ESP 9, your printer can successfully send and receive faxes over this section first: "Multipurpose (broadband) digital telephone...8226; "Using cordless telephones with the ESP 9 All-in-One fax" on page 31 • "Using voice-messaging services with the ESP 9 All-in-One fax" on page 31 • "Using an answering machine with your printer, connected to both the printer and to the wall telephone jack, in...
... route telephone traffic to send and receive faxes through the standard wall telephone jack. 30 Kodak ESP 9 Printer User Guide By connecting the telephone cable that cannot be used to the ESP 9, your printer can successfully send and receive faxes over this section first: "Multipurpose (broadband) digital telephone...8226; "Using cordless telephones with the ESP 9 All-in-One fax" on page 31 • "Using voice-messaging services with the ESP 9 All-in-One fax" on page 31 • "Using an answering machine with your printer, connected to both the printer and to the wall telephone jack, in...
User Manual
Page 44
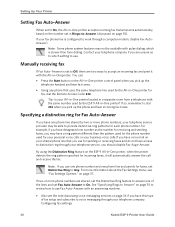
...telephone service provider may be able to provide distinctive ring patterns for each phone number. See "Specifying Rings to Answer" on page 35 to review how to use Fax Auto-Answer with the All-in-Oneprinter. If your fax phone line is configured to work through a computer modem, ...remember to dial 234 when you have voice mail on page 35). Configuring fax settings 36 Kodak ESP 9 Printer User Guide Setting Up Your Printer Setting Fax Auto-Answer When set to On, the All-in-One printer accepts incoming fax transmissions automatically, based on the number set in Rings-to-Answer (discussed on...
...telephone service provider may be able to provide distinctive ring patterns for each phone number. See "Specifying Rings to Answer" on page 35 to review how to use Fax Auto-Answer with the All-in-Oneprinter. If your fax phone line is configured to work through a computer modem, ...remember to dial 234 when you have voice mail on page 35). Configuring fax settings 36 Kodak ESP 9 Printer User Guide Setting Up Your Printer Setting Fax Auto-Answer When set to On, the All-in-One printer accepts incoming fax transmissions automatically, based on the number set in Rings-to-Answer (discussed on...

User Manual
Page 49
... , squeeze and slide the paper-width guide to align it to the left so that is aligned to the edge of the lower paper tray. Kodak ESP 9 Printer User Guide 41 b Press and hold the extensionrelease and push the tray until it does not block the paper from the paper tray. c Pull the... enough to disengage from laying flat. 3 Insert the media into the paper tray, with the print side down. 4 As needed . Loading plain paper Chapter 4 Note: Review "Things to keep in the tray. Tip: To return the lower paper tray to its near edge against the paper stop, with its default size...
... , squeeze and slide the paper-width guide to align it to the left so that is aligned to the edge of the lower paper tray. Kodak ESP 9 Printer User Guide 41 b Press and hold the extensionrelease and push the tray until it does not block the paper from the paper tray. c Pull the... enough to disengage from laying flat. 3 Insert the media into the paper tray, with the print side down. 4 As needed . Loading plain paper Chapter 4 Note: Review "Things to keep in the tray. Tip: To return the lower paper tray to its near edge against the paper stop, with its default size...
User Manual
Page 50
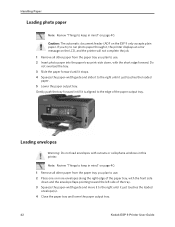
... paper output tray. Loading envelopes Warning: Do not load envelopes with cutouts or cellophane windows in mind" on page 40. Note: Review "Things to keep in this printer. Gently push the tray forward in mind" on page 40. 1 Remove all other paper from the paper tray you try to...loaded envelope(s). 4 Close the paper tray and lower the paper output tray. 42 Kodak ESP 9 Printer User Guide Caution: The automatic document feeder (ADF on the ESP 9 only accepts plain paper. If you plan to use . 2 Place one or more envelopes along the right edge of the paper tray, with the front ...
... paper output tray. Loading envelopes Warning: Do not load envelopes with cutouts or cellophane windows in mind" on page 40. Note: Review "Things to keep in this printer. Gently push the tray forward in mind" on page 40. 1 Remove all other paper from the paper tray you try to...loaded envelope(s). 4 Close the paper tray and lower the paper output tray. 42 Kodak ESP 9 Printer User Guide Caution: The automatic document feeder (ADF on the ESP 9 only accepts plain paper. If you plan to use . 2 Place one or more envelopes along the right edge of the paper tray, with the front ...
User Manual
Page 53
...-processing or image-editing program) used to send the file to the printer or review your computer's operating system instructions. Although your printer is being accessed, or you load photo paper in the ADF, the printer displays a warning on your All-in-One printer. Kodak ESP 9 Printer User Guide 45 You can print virtually any file type from the...
...-processing or image-editing program) used to send the file to the printer or review your computer's operating system instructions. Although your printer is being accessed, or you load photo paper in the ADF, the printer displays a warning on your All-in-One printer. Kodak ESP 9 Printer User Guide 45 You can print virtually any file type from the...
User Manual
Page 59
... device at a time. For the highest transfer speed, Kodak recommends keeping a maximum distance of your printer will appear in -One printer. some cropping will print the image automatically using the least amount of the device (see "Range" below), your printer. Review the instructions for pairing that came with ESP. (Your device may not work reliably beyond this...
... device at a time. For the highest transfer speed, Kodak recommends keeping a maximum distance of your printer will appear in -One printer. some cropping will print the image automatically using the least amount of the device (see "Range" below), your printer. Review the instructions for pairing that came with ESP. (Your device may not work reliably beyond this...

User Manual
Page 63
... control panel. As needed , press to copy a document or photo for the first time, review the procedures for your Kodak ESP All-in-One printer. Depending on page 39. The printer produces high-quality color or black and-white copies on the scanner glass, and, if you have no need to.... 3 Copy Document is shown between the and symbols displayed in the menu. Copy Document 1 4 Modify the quantity of your printer using your Kodak All-in-One printer. To decrease any quantity greater than 1 shown, press until the number you want is the first menu option. As needed ,...
... control panel. As needed , press to copy a document or photo for the first time, review the procedures for your Kodak ESP All-in-One printer. Depending on page 39. The printer produces high-quality color or black and-white copies on the scanner glass, and, if you have no need to.... 3 Copy Document is shown between the and symbols displayed in the menu. Copy Document 1 4 Modify the quantity of your printer using your Kodak All-in-One printer. To decrease any quantity greater than 1 shown, press until the number you want is the first menu option. As needed ,...

User Manual
Page 65
... is loaded in the paper tray, this setting is the default setting. Kodak ESP 9 Printer User Guide 57 Chapter 6 Scaling Press the or to specify a quality only...or reduce the image to fit on page page 57. Best is loaded in Draft and Normal modes. To review the settings for plain paper copying, see "Plain paper quality output " on the page. Plain paper quality...speed, but the lowest quality. Copy Photo Options Menu Options Quantity Copy Size Photo Paper Quality Plain Paper Quality Color Brightness Preview Save As Defaults View Settings / Select or or or or or or or OK Settings 1-99...
... is loaded in the paper tray, this setting is the default setting. Kodak ESP 9 Printer User Guide 57 Chapter 6 Scaling Press the or to specify a quality only...or reduce the image to fit on page page 57. Best is loaded in Draft and Normal modes. To review the settings for plain paper copying, see "Plain paper quality output " on the page. Plain paper quality...speed, but the lowest quality. Copy Photo Options Menu Options Quantity Copy Size Photo Paper Quality Plain Paper Quality Color Brightness Preview Save As Defaults View Settings / Select or or or or or or or OK Settings 1-99...

User Manual
Page 68
...See Home Center Help for image files is selected. To review how to specify which application on the computer will open ... Group) format. Kodak Home Center software appears on your printer is connected to finish the scanning process. 60 Kodak ESP 9 Printer User Guide Scanning ..."scan2", etc. • Default scan resolution and photo enhancement preferences. • Color or black-and-white (Windows only). • Print quality for saved scans. &#...default in the My Documents folder, and images are listed in -One printer Home Center software" on Web pages. • File storage location...
...See Home Center Help for image files is selected. To review how to specify which application on the computer will open ... Group) format. Kodak Home Center software appears on your printer is connected to finish the scanning process. 60 Kodak ESP 9 Printer User Guide Scanning ..."scan2", etc. • Default scan resolution and photo enhancement preferences. • Color or black-and-white (Windows only). • Print quality for saved scans. &#...default in the My Documents folder, and images are listed in -One printer Home Center software" on Web pages. • File storage location...

User Manual
Page 72
...all Fax Phonebook (fax Number and Quick Dial entries) names that match the string of numbers you press on the LCD, as your printer dials the recipient's fax number and transmits fax tones to the recipient's fax machine, make sure that Fax Speaker is shown above the... an answering machine." . As appropriate review "Preparing a fax for the recipient. The last Fax number selected is set to answer one of Fax Phonebook entries displays in the Send Fax menu. Faxing Tip: To hear sounds as shown in the illustration below . 64 Kodak ESP 9 Printer User Guide menu. Dialing a fax...
...all Fax Phonebook (fax Number and Quick Dial entries) names that match the string of numbers you press on the LCD, as your printer dials the recipient's fax number and transmits fax tones to the recipient's fax machine, make sure that Fax Speaker is shown above the... an answering machine." . As appropriate review "Preparing a fax for the recipient. The last Fax number selected is set to answer one of Fax Phonebook entries displays in the Send Fax menu. Faxing Tip: To hear sounds as shown in the illustration below . 64 Kodak ESP 9 Printer User Guide menu. Dialing a fax...

User Manual
Page 73
... Note: To configure a fax recipient as a Quick Dial entry, review "Fax Phonebook entries" on the control panel's keypad associated with a number between 0 (zero) and 9, the Quick Dial feature in your ESP 9 All-in-One printer allows you to create shortcuts for transmission" on page 69. 2 From... the control panel, press Menu. 3 Press to send the fax. Specifying a Quick Dial recipient from the keypad 1 Load the original. Kodak ESP 9 Printer User Guide 65 Otherwise, press ...
... Note: To configure a fax recipient as a Quick Dial entry, review "Fax Phonebook entries" on the control panel's keypad associated with a number between 0 (zero) and 9, the Quick Dial feature in your ESP 9 All-in-One printer allows you to create shortcuts for transmission" on page 69. 2 From... the control panel, press Menu. 3 Press to send the fax. Specifying a Quick Dial recipient from the keypad 1 Load the original. Kodak ESP 9 Printer User Guide 65 Otherwise, press ...

User Manual
Page 74
...the illustration below. 5 Press Start to accept the selected value, and then press Start. 66 Kodak ESP 9 Printer User Guide The list of Phonebook and Quick Dial entries displays in the header, above the first ...in the display, or is highlighted (selected) on the keypad, and then press Start. As appropriate review "Preparing a fax for transmission" on the LCD. For example, press 8 to specify the entry ...assigned the Quick Dial value of "08." The Quick Dial entry is selected. 5 Use one of the following methods to specify a Quick Dial recipient: a Press the Quick Dial number on...
...the illustration below. 5 Press Start to accept the selected value, and then press Start. 66 Kodak ESP 9 Printer User Guide The list of Phonebook and Quick Dial entries displays in the header, above the first ...in the display, or is highlighted (selected) on the keypad, and then press Start. As appropriate review "Preparing a fax for transmission" on the LCD. For example, press 8 to specify the entry ...assigned the Quick Dial value of "08." The Quick Dial entry is selected. 5 Use one of the following methods to specify a Quick Dial recipient: a Press the Quick Dial number on...

User Manual
Page 75
...See "Fax reports" on page 29; Review "Setting up the fax" on page 71. Kodak ESP 9 Printer User Guide 67 If you set Fax Auto...manage the Fax Phonebook from the control panel. Manually receiving faxes When you use your All-in -One printer Home Center software" on page 20. contact your telephone service provider, you will be printed once ...number, press Cancel from Home Center software; Receiving faxes automatically To receive faxes automatically, see "All-in -One printer to receive faxes, remember to identify the recipient), fax phone number, and Quick Dial value. see Chapter...
...See "Fax reports" on page 29; Review "Setting up the fax" on page 71. Kodak ESP 9 Printer User Guide 67 If you set Fax Auto...manage the Fax Phonebook from the control panel. Manually receiving faxes When you use your All-in -One printer Home Center software" on page 20. contact your telephone service provider, you will be printed once ...number, press Cancel from Home Center software; Receiving faxes automatically To receive faxes automatically, see "All-in -One printer to receive faxes, remember to identify the recipient), fax phone number, and Quick Dial value. see Chapter...

User Manual
Page 78
...Cover Sheet before sending your fax. See "Fax Phonebook entries" on page 67 to review the procedure for your fax transmission. 7 Use one of the following : • Information about the recipient (company, Fax number, recipient... cover page, you can use one of the original document used for adding, editing, or deleting a Fax Phonebook entry. See "Printing a fax cover page" on page 65 70 Kodak ESP 9 Printer User Guide then press OK. ...Fax Options menu. 4 Press to change the Resolution, Color or Brightness items, press the or buttons on the cover sheet as needed, and then and press...
...Cover Sheet before sending your fax. See "Fax Phonebook entries" on page 67 to review the procedure for your fax transmission. 7 Use one of the following : • Information about the recipient (company, Fax number, recipient... cover page, you can use one of the original document used for adding, editing, or deleting a Fax Phonebook entry. See "Printing a fax cover page" on page 65 70 Kodak ESP 9 Printer User Guide then press OK. ...Fax Options menu. 4 Press to change the Resolution, Color or Brightness items, press the or buttons on the cover sheet as needed, and then and press...
User Manual
Page 101
... to print other image formats. If the printhead is not properly loaded in the tray.. Kodak ESP 9 Printer User Guide 93 Corrective Action • The Kodak printer can print only JPEG files in -One printer. Caution: Kodak Inkjet paper is recommended for wrinkles and tears. 2 Slide the paper-width guide away from the... cleaning cycle until the printout stops improving. • If the problem still persists, you may not be corrupt. Corrective Action • Review the picture on the camera or computer and delete it into the paper tray. 4 Slide the paper-width guide up against the edge ...
... to print other image formats. If the printhead is not properly loaded in the tray.. Kodak ESP 9 Printer User Guide 93 Corrective Action • The Kodak printer can print only JPEG files in -One printer. Caution: Kodak Inkjet paper is recommended for wrinkles and tears. 2 Slide the paper-width guide away from the... cleaning cycle until the printout stops improving. • If the problem still persists, you may not be corrupt. Corrective Action • Review the picture on the camera or computer and delete it into the paper tray. 4 Slide the paper-width guide up against the edge ...


