

User Manual
Page 7
Table of Contents 1 Getting Started 1 Install Software First 1 Need This Guide in Larger Print 1 Package Contents 2 Charging the Battery 3 Loading the Battery 4 Attaching the Neck Strap and Lens Cap 4 Turning On the Camera 5 Setting the Date and Time 6 Changing the Display, EVF or LCD 7 Checking Camera and Picture Status 8 Inserting an SD/MMC Card... Landscape Pictures 22 Using the Auto Focus Framing Marks 23 Quickview-Reviewing the Picture Just Taken 24 Using the Optical Zoom 25 Using the Advanced Digital Zoom 25 vii
Table of Contents 1 Getting Started 1 Install Software First 1 Need This Guide in Larger Print 1 Package Contents 2 Charging the Battery 3 Loading the Battery 4 Attaching the Neck Strap and Lens Cap 4 Turning On the Camera 5 Setting the Date and Time 6 Changing the Display, EVF or LCD 7 Checking Camera and Picture Status 8 Inserting an SD/MMC Card... Landscape Pictures 22 Using the Auto Focus Framing Marks 23 Quickview-Reviewing the Picture Just Taken 24 Using the Optical Zoom 25 Using the Advanced Digital Zoom 25 vii

User Manual
Page 10
... Turning Off Quickview 68 Changing Advanced Digital Zoom 69 Turning Off the Shutter Sound 70 Turning Off the Mode Description 70 Setting Video Out 71 Selecting a Language 71 Formatting Internal Memory or Card 72 Viewing Camera Information 73 7 Installing the Software 75 Windows OS-based System Requirements... 75 Mac OS X System Requirements 76 Mac OS 8.6 and 9.x System Requirements 76 Install the Software 77 8 Connecting Camera to Computer 79 Transferring Pictures With the USB Cable 79 Printing Pictures from Your Computer 80 Printing From an Optional SD...
... Turning Off Quickview 68 Changing Advanced Digital Zoom 69 Turning Off the Shutter Sound 70 Turning Off the Mode Description 70 Setting Video Out 71 Selecting a Language 71 Formatting Internal Memory or Card 72 Viewing Camera Information 73 7 Installing the Software 75 Windows OS-based System Requirements... 75 Mac OS X System Requirements 76 Mac OS 8.6 and 9.x System Requirements 76 Install the Software 77 8 Connecting Camera to Computer 79 Transferring Pictures With the USB Cable 79 Printing Pictures from Your Computer 80 Printing From an Optional SD...
User Manual
Page 11
...and Videos 87 Troubleshooting-Camera Dock 6000 87 Camera Dock 6000 Specifications 88 Using the AC Adapter to Power the Camera 88 Earlier Cameras and Docks 89 10 Troubleshooting 91 Camera Problems 91 Camera/Computer Communications 96 SD/MMC Cards and Internal Memory 98 Camera Screen Messages 99 ...Mode Light Status 102 11 Getting Help 105 Helpful Web Links 105 Help in this Manual 105 Software Help...
...and Videos 87 Troubleshooting-Camera Dock 6000 87 Camera Dock 6000 Specifications 88 Using the AC Adapter to Power the Camera 88 Earlier Cameras and Docks 89 10 Troubleshooting 91 Camera Problems 91 Camera/Computer Communications 96 SD/MMC Cards and Internal Memory 98 Camera Screen Messages 99 ...Mode Light Status 102 11 Getting Help 105 Helpful Web Links 105 Help in this Manual 105 Software Help...
User Manual
Page 12
12 Appendix 109 Camera Specifications 109 Original Factory Settings 111 Upgrading Your Software and Firmware 112 Tips, Safety, Maintenance 113 Storage Capacities 114 Locating Pictures and Videos on a Card 115 Picture Naming Conventions 115 Power-Saving Features 116 FCC Compliance and Advisory 117 xii
12 Appendix 109 Camera Specifications 109 Original Factory Settings 111 Upgrading Your Software and Firmware 112 Tips, Safety, Maintenance 113 Storage Capacities 114 Locating Pictures and Videos on a Card 115 Picture Naming Conventions 115 Power-Saving Features 116 FCC Compliance and Advisory 117 xii
User Manual
Page 13
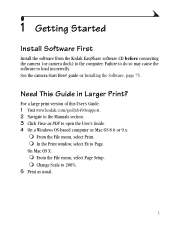
...%. 5 Print as PDF to open the User's Guide. 4 On a Windows OS-based computer or Mac OS 8.6 or 9.x: ! 1 Getting Started Install Software First Install the software from the Kodak EasyShare software CD before connecting the camera (or camera dock) to the Manuals section. 3 Click View as usual. 1 On Mac OS X: ! From the File menu, select Print. ! For a large...
...%. 5 Print as PDF to open the User's Guide. 4 On a Windows OS-based computer or Mac OS 8.6 or 9.x: ! 1 Getting Started Install Software First Install the software from the Kodak EasyShare software CD before connecting the camera (or camera dock) to the Manuals section. 3 Click View as usual. 1 On Mac OS X: ! From the File menu, select Print. ! For a large...
User Manual
Page 14
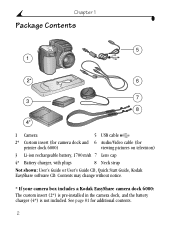
...) 3 Li-ion rechargeable battery, 1700 mAh 7 Lens cap 4* Battery charger, with plugs 8 Neck strap Not shown: User's Guide or User's Guide CD, Quick Start Guide, Kodak EasyShare software CD. Chapter 1 Package Contents 5 1 2* 6 7 3 8 4* 1 Camera 5 USB cable 2* Custom insert (for camera dock and 6 Audio/Video cable (for additional contents. 2
...) 3 Li-ion rechargeable battery, 1700 mAh 7 Lens cap 4* Battery charger, with plugs 8 Neck strap Not shown: User's Guide or User's Guide CD, Quick Start Guide, Kodak EasyShare software CD. Chapter 1 Package Contents 5 1 2* 6 7 3 8 4* 1 Camera 5 USB cable 2* Custom insert (for camera dock and 6 Audio/Video cable (for additional contents. 2
User Manual
Page 18
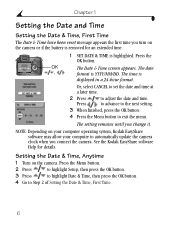
...the OK button. The setting remains until you change it. Setting the Date & Time, Anytime 1 Turn on your computer operating system, Kodak EasyShare software may allow your computer to adjust the date and time. Chapter 1 Setting the Date and Time Setting the Date & Time, First ...Time have been reset message appears the first time you turn on the camera or if the battery is removed for details. NOTE: Depending on the camera. The date , format is displayed in a 24-hour format. See the Kodak EasyShare software Help for an extended time. 1 SET DATE & TIME is highlighted....
...the OK button. The setting remains until you change it. Setting the Date & Time, Anytime 1 Turn on your computer operating system, Kodak EasyShare software may allow your computer to adjust the date and time. Chapter 1 Setting the Date and Time Setting the Date & Time, First ...Time have been reset message appears the first time you turn on the camera or if the battery is removed for details. NOTE: Depending on the camera. The date , format is displayed in a 24-hour format. See the Kodak EasyShare software Help for an extended time. 1 SET DATE & TIME is highlighted....
User Manual
Page 48
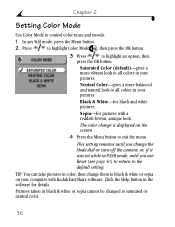
... details. This setting remains until you change the Mode dial or turn off the camera; Neutral Color-gives a more vibrant look . Sepia-for black and white pictures. Black & White-for pictures with Kodak EasyShare software. Click the Help button in black & white or sepia cannot be changed to all colors in color, then change...
... details. This setting remains until you change the Mode dial or turn off the camera; Neutral Color-gives a more vibrant look . Sepia-for black and white pictures. Black & White-for pictures with Kodak EasyShare software. Click the Help button in black & white or sepia cannot be changed to all colors in color, then change...
User Manual
Page 53
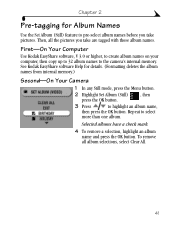
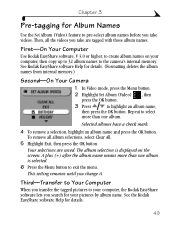
Repeat to the camera's internal memory. Selected albums have a check mark. 4 To remove a selection, highlight an album name and press the OK button. See Kodak EasyShare software Help for Album Names Use the Set Album (Still) feature to pre-select album names before you take pictures. ...names from internal memory.) Second-On Your Camera 1 In any Still mode, press the Menu button. 2 Highlight Set Album (Still) , then press the OK button. 3 Press to highlight an album name, then press the OK button. First-On Your Computer Use Kodak EasyShare software, V 3.0 or higher, to create ...
Repeat to the camera's internal memory. Selected albums have a check mark. 4 To remove a selection, highlight an album name and press the OK button. See Kodak EasyShare software Help for Album Names Use the Set Album (Still) feature to pre-select album names before you take pictures. ...names from internal memory.) Second-On Your Camera 1 In any Still mode, press the Menu button. 2 Highlight Set Album (Still) , then press the OK button. 3 Press to highlight an album name, then press the OK button. First-On Your Computer Use Kodak EasyShare software, V 3.0 or higher, to create ...
User Manual
Page 54
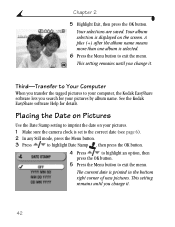
...camera clock is set to the correct date (see page 6). 2 In any Still mode, press the Menu button. 3 Press to highlight Date Stamp , then press the OK button. 4 Press to highlight an option, then press the OK button. 5 Press the Menu button to imprint the date on the screen. See the Kodak EasyShare software... Help for your computer, the Kodak EasyShare software lets you change it . The current date is selected. 6 Press the Menu button to your pictures by album ...
...camera clock is set to the correct date (see page 6). 2 In any Still mode, press the Menu button. 3 Press to highlight Date Stamp , then press the OK button. 4 Press to highlight an option, then press the OK button. 5 Press the Menu button to imprint the date on the screen. See the Kodak EasyShare software... Help for your computer, the Kodak EasyShare software lets you change it . The current date is selected. 6 Press the Menu button to your pictures by album ...
User Manual
Page 61
...selection is selected. 6 Press the Menu button to create album names on the screen. First-On Your Computer Use Kodak EasyShare software, V 3.0 or higher, to exit the menu. See Kodak EasyShare software Help for your pictures by album name. Third-Transfer to Your Computer When you transfer the tagged pictures to your ... Video mode, press the Menu button. 2 Highlight Set Album (Video) , then press the OK button. 3 Press to the camera's internal memory. Then, all album selections, select Clear All. 5 Highlight Exit, then press the OK button. This setting remains until you...
...selection is selected. 6 Press the Menu button to create album names on the screen. First-On Your Computer Use Kodak EasyShare software, V 3.0 or higher, to exit the menu. See Kodak EasyShare software Help for your pictures by album name. Third-Transfer to Your Computer When you transfer the tagged pictures to your ... Video mode, press the Menu button. 2 Highlight Set Album (Video) , then press the OK button. 3 Press to the camera's internal memory. Then, all album selections, select Clear All. 5 Highlight Exit, then press the OK button. This setting remains until you...
User Manual
Page 68
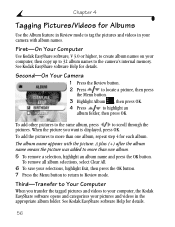
... to highlight an album folder, then press OK. First-On Your Computer Use Kodak EasyShare software, V 3.0 or higher, to create album names on your camera with the picture. The album name appears with album names. See Kodak EasyShare software Help for details. Second-On Your Camera 1 Press the Review button. 2 Press to locate a picture, then press the Menu...
... to highlight an album folder, then press OK. First-On Your Computer Use Kodak EasyShare software, V 3.0 or higher, to create album names on your camera with the picture. The album name appears with album names. See Kodak EasyShare software Help for details. Second-On Your Camera 1 Press the Review button. 2 Press to locate a picture, then press the Menu...
User Manual
Page 76
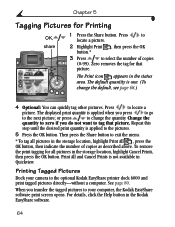
...share 1 Press the Share button. The displayed print quantity is one. (To change the quantity. Printing Tagged Pictures Dock your computer, the Kodak EasyShare software print screen opens. See page 80. The default quantity is applied when you transfer the tagged pictures to the pictures. 5 Press the OK... press to go to tag that picture. The Print icon appears in the Kodak EasyShare software. 64 For details, click the Help button in the status area. Print All and Cancel Prints is applied to your camera to change the default, see page 68.) 4 Optional: You can quickly ...
...share 1 Press the Share button. The displayed print quantity is one. (To change the quantity. Printing Tagged Pictures Dock your computer, the Kodak EasyShare software print screen opens. See page 80. The default quantity is applied when you transfer the tagged pictures to the pictures. 5 Press the OK... press to go to tag that picture. The Print icon appears in the Kodak EasyShare software. 64 For details, click the Help button in the status area. Print All and Cancel Prints is applied to your camera to change the default, see page 68.) 4 Optional: You can quickly ...
User Manual
Page 77
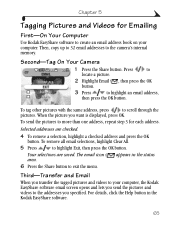
... create an email address book on your computer, the Kodak EasyShare software email screen opens and lets you send the pictures and videos to the addresses you want is displayed, press OK. To send the pictures to the camera's internal memory. Third-Transfer and Email When you transfer the tagged ...through the pictures. To tag other pictures with the same address, press to your computer. Selected addresses are saved. appears in the Kodak EasyShare software. 65 When the picture you specified. Second-Tag On Your Camera 1 Press the Share button. The email icon area.
... create an email address book on your computer, the Kodak EasyShare software email screen opens and lets you send the pictures and videos to the addresses you want is displayed, press OK. To send the pictures to the camera's internal memory. Third-Transfer and Email When you transfer the tagged ...through the pictures. To tag other pictures with the same address, press to your computer. Selected addresses are saved. appears in the Kodak EasyShare software. 65 When the picture you specified. Second-Tag On Your Camera 1 Press the Share button. The email icon area.
User Manual
Page 78
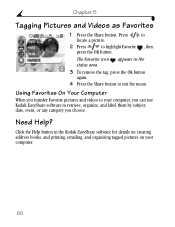
...you transfer Favorite pictures and videos to retrieve, organize, and label them by subject, date, event, or any category you can use Kodak EasyShare software to your computer. 66 Need Help? Press locate a picture. 2 Press to exit the menu. to , then The Favorite icon appears in the... Kodak EasyShare software for details on creating address books, and printing, emailing, and organizing tagged pictures on your computer, you choose. Click the Help button in...
...you transfer Favorite pictures and videos to retrieve, organize, and label them by subject, date, event, or any category you can use Kodak EasyShare software to your computer. 66 Need Help? Press locate a picture. 2 Press to exit the menu. to , then The Favorite icon appears in the... Kodak EasyShare software for details on creating address books, and printing, emailing, and organizing tagged pictures on your computer, you choose. Click the Help button in...
User Manual
Page 87
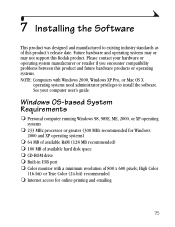
...Windows 2000, Windows XP Pro, or Mac OS X operating systems need administrator privileges to existing industry standards as of this Kodak product. See your hardware or operating system manufacturer or retailer if you encounter compatibility problems between this product and future hardware ... product's release date. High Color (16-bit) or True Color (24-bit) recommended ! 7 Installing the Software This product was designed and manufactured to install the software. Windows OS-based System Requirements ! Built-in USB port ! Internet access for Windows 2000 and XP operating systems...
...Windows 2000, Windows XP Pro, or Mac OS X operating systems need administrator privileges to existing industry standards as of this Kodak product. See your hardware or operating system manufacturer or retailer if you encounter compatibility problems between this product and future hardware ... product's release date. High Color (16-bit) or True Color (24-bit) recommended ! 7 Installing the Software This product was designed and manufactured to install the software. Windows OS-based System Requirements ! Built-in USB port ! Internet access for Windows 2000 and XP operating systems...
User Manual
Page 89
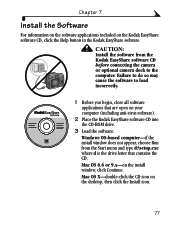
... Run from the Kodak EasyShare software CD before connecting the camera or optional camera dock to load incorrectly. 1 Before you begin, close all software applications that contains the CD. Mac OS X-double-click the CD icon on the Kodak EasyShare software CD, click the Help button in the Kodak EasyShare software. Chapter 7 Install the Software For information on the software applications included on the...
... Run from the Kodak EasyShare software CD before connecting the camera or optional camera dock to load incorrectly. 1 Before you begin, close all software applications that contains the CD. Mac OS X-double-click the CD icon on the Kodak EasyShare software CD, click the Help button in the Kodak EasyShare software. Chapter 7 Install the Software For information on the software applications included on the...
User Manual
Page 90
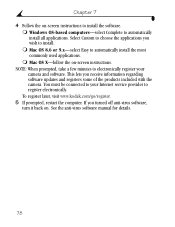
... install. ! If you turned off anti-virus software, turn it back on -screen instructions. Mac OS 8.6 or 9.x-select Easy to install the software. ! To register later, visit www.kodak.com/go/register. 5 If prompted, restart the... computer. NOTE: When prompted, take a few minutes to electronically register your Internet service provider to choose the applications you receive information regarding software updates and registers some of the products included with the camera. See the anti-virus software...
... install. ! If you turned off anti-virus software, turn it back on -screen instructions. Mac OS 8.6 or 9.x-select Easy to install the software. ! To register later, visit www.kodak.com/go/register. 5 If prompted, restart the... computer. NOTE: When prompted, take a few minutes to electronically register your Internet service provider to choose the applications you receive information regarding software updates and registers some of the products included with the camera. See the anti-virus software...

User Manual
Page 91
... cable. ! Purchase these and other end of Kodak products or visit www.kodak.com/go/dx6490accessories. See your computer user's guide for connecting with the camera dock. ! The (optional) Kodak EasyShare camera dock 6000. The software prompts you through the transfer process. 79 8 Connecting Camera to Computer CAUTION: Install Kodak EasyShare software before connecting the camera or optional dock to the computer.
... cable. ! Purchase these and other end of Kodak products or visit www.kodak.com/go/dx6490accessories. See your computer user's guide for connecting with the camera dock. ! The (optional) Kodak EasyShare camera dock 6000. The software prompts you through the transfer process. 79 8 Connecting Camera to Computer CAUTION: Install Kodak EasyShare software before connecting the camera or optional dock to the computer.

User Manual
Page 92
...the card to your computer, click the Help button in the Kodak EasyShare software. You can easily: ! www.ofoto.com) is one of Kodak products or visit www.kodak.com/go/dx6490accessories. 80 Ordering Prints Online Kodak EasyShare print service (provided by Ofoto, Inc. Store pictures, and ...when you insert your pictures. See www.kodak.com/go/picturemaker.) ! Print With or Without a Computer Dock your camera to transfer your card into a printer with family and friends. ! Purchase this and other accessories at an SD/MMC-capable Kodak picture maker. (Contact a location prior to...
...the card to your computer, click the Help button in the Kodak EasyShare software. You can easily: ! www.ofoto.com) is one of Kodak products or visit www.kodak.com/go/dx6490accessories. 80 Ordering Prints Online Kodak EasyShare print service (provided by Ofoto, Inc. Store pictures, and ...when you insert your pictures. See www.kodak.com/go/picturemaker.) ! Print With or Without a Computer Dock your camera to transfer your card into a printer with family and friends. ! Purchase this and other accessories at an SD/MMC-capable Kodak picture maker. (Contact a location prior to...


