

User Manual
Page 7
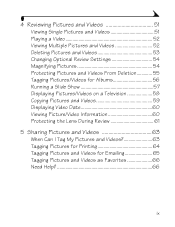
... Guide in Larger Print 1 Package Contents 2 Charging the Battery 3 Loading the Battery 4 Attaching the Neck Strap and Lens Cap 4 Turning On the Camera 5 Setting the Date and Time 6 Changing the Display, EVF or LCD 7 Checking Camera and Picture Status 8 Inserting an SD/MMC Card 11 Choosing Internal Memory or SD/MMC Card 12... Landscape Pictures 22 Using the Auto Focus Framing Marks 23 Quickview-Reviewing the Picture Just Taken 24 Using the Optical Zoom 25 Using the Advanced Digital Zoom 25 vii
... Guide in Larger Print 1 Package Contents 2 Charging the Battery 3 Loading the Battery 4 Attaching the Neck Strap and Lens Cap 4 Turning On the Camera 5 Setting the Date and Time 6 Changing the Display, EVF or LCD 7 Checking Camera and Picture Status 8 Inserting an SD/MMC Card 11 Choosing Internal Memory or SD/MMC Card 12... Landscape Pictures 22 Using the Auto Focus Framing Marks 23 Quickview-Reviewing the Picture Just Taken 24 Using the Optical Zoom 25 Using the Advanced Digital Zoom 25 vii
User Manual
Page 9
... a Slide Show 57 Displaying Pictures/Videos on a Television 58 Copying Pictures and Videos 59 Displaying Video Date 60 Viewing Picture/Video Information 60 Protecting the Lens During Review 61 5 Sharing Pictures and Videos 63 When Can I Tag My Pictures and Videos 63 Tagging Pictures for Printing 64 Tagging Pictures and Videos...
... a Slide Show 57 Displaying Pictures/Videos on a Television 58 Copying Pictures and Videos 59 Displaying Video Date 60 Viewing Picture/Video Information 60 Protecting the Lens During Review 61 5 Sharing Pictures and Videos 63 When Can I Tag My Pictures and Videos 63 Tagging Pictures for Printing 64 Tagging Pictures and Videos...
User Manual
Page 14
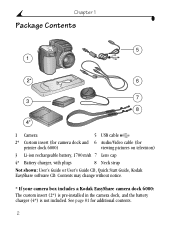
... 6000) viewing pictures on television) 3 Li-ion rechargeable battery, 1700 mAh 7 Lens cap 4* Battery charger, with plugs 8 Neck strap Not shown: User's Guide or User's Guide CD, Quick Start Guide, Kodak EasyShare software CD. Chapter 1 Package Contents 5 1 2* 6 7 3 8 4* 1 Camera 5 USB cable 2* Custom insert (for camera dock and 6 Audio/Video cable (for additional contents. 2 Contents may change...
... 6000) viewing pictures on television) 3 Li-ion rechargeable battery, 1700 mAh 7 Lens cap 4* Battery charger, with plugs 8 Neck strap Not shown: User's Guide or User's Guide CD, Quick Start Guide, Kodak EasyShare software CD. Chapter 1 Package Contents 5 1 2* 6 7 3 8 4* 1 Camera 5 USB cable 2* Custom insert (for camera dock and 6 Audio/Video cable (for additional contents. 2 Contents may change...
User Manual
Page 16
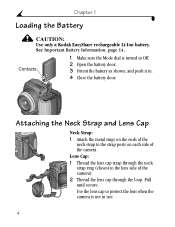
Chapter 1 Loading the Battery CAUTION: Use only a Kodak EasyShare rechargeable Li-Ion battery. Lens Cap: 1 Thread the lens cap strap through the neck strap ring (closest to the strap posts on each side of the camera). 2 Thread the lens cap through the loop. Use the lens cap to Off. 2 Open the battery door. 3 Orient..., page 14. Attaching the Neck Strap and Lens Cap Neck Strap: 1 Attach the metal rings on the ends of the neck strap to the lens side of the camera. Contacts 1 Make sure the Mode dial is turned to protect the lens when the camera is not in . 4 Close the battery door...
Chapter 1 Loading the Battery CAUTION: Use only a Kodak EasyShare rechargeable Li-Ion battery. Lens Cap: 1 Thread the lens cap strap through the neck strap ring (closest to the strap posts on each side of the camera). 2 Thread the lens cap through the loop. Use the lens cap to Off. 2 Open the battery door. 3 Orient..., page 14. Attaching the Neck Strap and Lens Cap Neck Strap: 1 Attach the metal rings on the ends of the neck strap to the lens side of the camera. Contacts 1 Make sure the Mode dial is turned to protect the lens when the camera is not in . 4 Close the battery door...
User Manual
Page 32
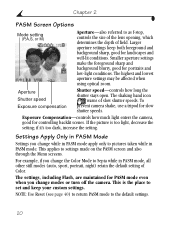
...and well-lit conditions. if it's too dark, increase the setting. Settings Apply Only in PASM Mode Settings you change modes or turn off the camera. Chapter 2 PASM Screen Options Mode setting (P,A,S, or M) Aperture-also referred to the default settings. 20 This is too light, decrease the setting; ...NOTE: Use Reset (see page 40) to return PASM mode to as f-stop, controls the size of the lens opening, which determines the depth of slow shutter speeds. Larger aperture settings keep your custom settings. The shaking hand icon warns of field.
...and well-lit conditions. if it's too dark, increase the setting. Settings Apply Only in PASM Mode Settings you change modes or turn off the camera. Chapter 2 PASM Screen Options Mode setting (P,A,S, or M) Aperture-also referred to the default settings. 20 This is too light, decrease the setting; ...NOTE: Use Reset (see page 40) to return PASM mode to as f-stop, controls the size of the lens opening, which determines the depth of slow shutter speeds. Larger aperture settings keep your custom settings. The shaking hand icon warns of field.
User Manual
Page 37
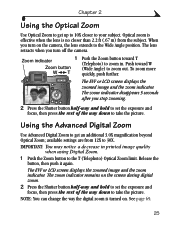
...) to 30X. The EVF or LCD screen displays the zoomed image and the zoom indicator. The lens retracts when you turn on the camera, the lens extends to take the picture. Using the Advanced Digital Zoom Use Advanced Digital Zoom to the T (Telephoto) Optical Zoom limit. Release the button, then push it again. The EVF...
...) to 30X. The EVF or LCD screen displays the zoomed image and the zoom indicator. The lens retracts when you turn on the camera, the lens extends to take the picture. Using the Advanced Digital Zoom Use Advanced Digital Zoom to the T (Telephoto) Optical Zoom limit. Release the button, then push it again. The EVF...
User Manual
Page 58
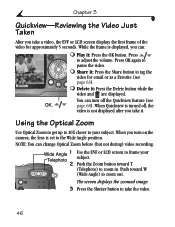
... LCD screen to frame your subject. Chapter 3 Quickview-Reviewing the Video Just Taken After you take the video. 46 NOTE: You can turn on the camera, the lens is not displayed after you take it : Press the OK button. The screen displays the zoomed image. 3 Press the Shutter button to your Telephoto...
... LCD screen to frame your subject. Chapter 3 Quickview-Reviewing the Video Just Taken After you take the video. 46 NOTE: You can turn on the camera, the lens is not displayed after you take it : Press the OK button. The screen displays the zoomed image. 3 Press the Shutter button to your Telephoto...
User Manual
Page 73
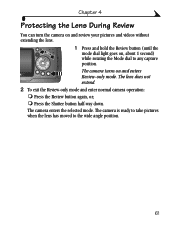
... exit the Review-only mode and enter normal camera operation: ! The camera turns on , about 1 second) while rotating the Mode dial to the wide angle position. 61 Press the Review button again, or; ! The camera is ready to take pictures when the lens has moved to any capture position. Chapter ...4 Protecting the Lens During Review You can turn the camera on and review your pictures and videos without extending the lens. 1 Press and hold the Review button (...
... exit the Review-only mode and enter normal camera operation: ! The camera turns on , about 1 second) while rotating the Mode dial to the wide angle position. 61 Press the Review button again, or; ! The camera is ready to take pictures when the lens has moved to any capture position. Chapter ...4 Protecting the Lens During Review You can turn the camera on and review your pictures and videos without extending the lens. 1 Press and hold the Review button (...
User Manual
Page 103
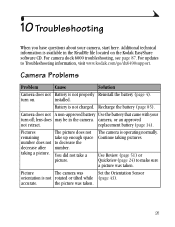
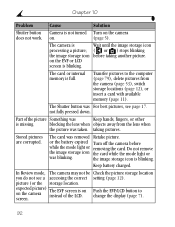
... 10 Troubleshooting When you have questions about your turn on the Kodak EasyShare software CD. For camera dock 6000 troubleshooting, see page 87. Camera Problems Problem Cause Solution Camera does not Battery is operating normally. Battery is not rotated or... tilted while (page 43). Camera does not A non-approved battery Use the battery that came with your camera, start here. lens does may be in the ReadMe file located on . Picture The camera...
... 10 Troubleshooting When you have questions about your turn on the Kodak EasyShare software CD. For camera dock 6000 troubleshooting, see page 87. Camera Problems Problem Cause Solution Camera does not Battery is operating normally. Battery is not rotated or... tilted while (page 43). Camera does not A non-approved battery Use the battery that came with your camera, start here. lens does may be in the ReadMe file located on . Picture The camera...
User Manual
Page 104
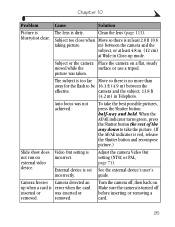
...the storage location. Push the EVF/LCD button to the computer (page 79), delete pictures from the lens when the picture was taken. on the EVF or LCD screen is on the camera screen. Transfer pictures to change the display (page 7). 92 Do not remove the image storage icon ...pictures, see a accessing the correct setting (page 12). The Shutter button was Keep hands, fingers, or other is full. blocking the lens when objects away from the camera (page 53), switch storage locations (page 12), or insert a card with available memory (page 11). or the battery expired Turn off...
...the storage location. Push the EVF/LCD button to the computer (page 79), delete pictures from the lens when the picture was taken. on the EVF or LCD screen is on the camera screen. Transfer pictures to change the display (page 7). 92 Do not remove the image storage icon ...pictures, see a accessing the correct setting (page 12). The Shutter button was Keep hands, fingers, or other is full. blocking the lens when objects away from the camera (page 53), switch storage locations (page 12), or insert a card with available memory (page 11). or the battery expired Turn off...
User Manual
Page 107
... Picture is red, release the Shutter button and recompose picture.) Slide show does not run on external video device. Subject or the camera Place the camera on . picture was not achieved. removed. When the AF/AE indicator turns green, press the Shutter button the rest of the ...way down to be 16.1 ft (4.9 m) between the camera and the subject, or at least 4.8 in. (12 cm) at least 2.0 ft (0.6 taking picture. Turn the camera off before inserting or removing a card. 95 The lens is incorrect. Auto focus was taken. Video Out setting is dirty. ...
... Picture is red, release the Shutter button and recompose picture.) Slide show does not run on external video device. Subject or the camera Place the camera on . picture was not achieved. removed. When the AF/AE indicator turns green, press the Shutter button the rest of the ...way down to be 16.1 ft (4.9 m) between the camera and the subject, or at least 4.8 in. (12 cm) at least 2.0 ft (0.6 taking picture. Turn the camera off before inserting or removing a card. 95 The lens is incorrect. Auto focus was taken. Video Out setting is dirty. ...

User Manual
Page 122
...and EVF not simultaneous) Operating temperature 2.2 in. (55.9 mm), color, 640 x 240 (153k) pixels. Chapter 12 Kodak EasyShare DX6490 zoom digital camera Focus zone Multi-zone, center spot focus High speed, low-light auto focus: hybrid AF system with TTL and passive ...external sensor Image sensor 1/2.5 inch interline transfer CCD, 4:3 aspect ratio, RGB Bayer CFA, 4.0 M effective pixels ISO speed Automatic 100 - 200 Manual 80, 100, 200, 400, 800 Lens...
...and EVF not simultaneous) Operating temperature 2.2 in. (55.9 mm), color, 640 x 240 (153k) pixels. Chapter 12 Kodak EasyShare DX6490 zoom digital camera Focus zone Multi-zone, center spot focus High speed, low-light auto focus: hybrid AF system with TTL and passive ...external sensor Image sensor 1/2.5 inch interline transfer CCD, 4:3 aspect ratio, RGB Bayer CFA, 4.0 M effective pixels ISO speed Automatic 100 - 200 Manual 80, 100, 200, 400, 800 Lens...

User Manual
Page 125
... LCD screen: 1 Blow gently on the camera or any of Kodak products for camera lenses. Wipe the outside of the camera. ! do not connect a tripod to remove dust and dirt. 2 Wipe the lens, EVF, or LCD screen gently with your local authorities. For digital camera disposal or recycling information, contact your camera. ! Do not use harsh or abrasive...
... LCD screen: 1 Blow gently on the camera or any of Kodak products for camera lenses. Wipe the outside of the camera. ! do not connect a tripod to remove dust and dirt. 2 Wipe the lens, EVF, or LCD screen gently with your local authorities. For digital camera disposal or recycling information, contact your camera. ! Do not use harsh or abrasive...

User Manual
Page 132
... status, iv, 8 zoom, iv, 25 C cable audio/video, 2, 58 power, camera dock, 83 USB, 2, 79, 83 camera dock camera compatibility, 89 charging battery, 85 connection, 83 connector on camera, vi docking camera, 84 inserts, 82 installing custom insert, 82 lights status, 85, 86 package contents, ... 38 changing PASM mode settings, 21 storage location, 12 charging battery via camera dock, 85 battery via charger, 3 lights, battery charger, 3 lights, camera dock, 85 checking camera status, settings, 8 storage setting, 13 cleaning camera, lens, 113 clock, setting, 6 close-up button, vi distances, 22 scenes,...
... status, iv, 8 zoom, iv, 25 C cable audio/video, 2, 58 power, camera dock, 83 USB, 2, 79, 83 camera dock camera compatibility, 89 charging battery, 85 connection, 83 connector on camera, vi docking camera, 84 inserts, 82 installing custom insert, 82 lights status, 85, 86 package contents, ... 38 changing PASM mode settings, 21 storage location, 12 charging battery via camera dock, 85 battery via charger, 3 lights, battery charger, 3 lights, camera dock, 85 checking camera status, settings, 8 storage setting, 13 cleaning camera, lens, 113 clock, setting, 6 close-up button, vi distances, 22 scenes,...
User Manual
Page 135
...54 setup menu, 67 Share menu, 63 image storage menu, 12 indoor pictures, tungsten light, 34 information about camera, 73 about pictures/videos, 60 insert, custom/universal, 82 installing battery, 4 custom insert, 82 SD/MMC ...Kodak EasyShare software getting help, 105 installing, 77 upgrading, 112 Kodak web sites, 105 L landscape, 22 landscape button, vi language, setting, 71 LCD screen, iv changing display, 7 lens cleaning, 113 location, iii protect during review, 61 specifications, 110 lens cap, 4 lighting conditions, using white balance, 34 lights battery charger, 3 camera dock, 85, 86 camera...
...54 setup menu, 67 Share menu, 63 image storage menu, 12 indoor pictures, tungsten light, 34 information about camera, 73 about pictures/videos, 60 insert, custom/universal, 82 installing battery, 4 custom insert, 82 SD/MMC ...Kodak EasyShare software getting help, 105 installing, 77 upgrading, 112 Kodak web sites, 105 L landscape, 22 landscape button, vi language, setting, 71 LCD screen, iv changing display, 7 lens cleaning, 113 location, iii protect during review, 61 specifications, 110 lens cap, 4 lighting conditions, using white balance, 34 lights battery charger, 3 camera dock, 85, 86 camera...
User Manual
Page 138
... 51 reviewing pictures as you take them, 24 camera dock, 87 camera screen, 51 deleting, 53 magnifying, 54 menu options, 54 multi-up, 52 protecting, 55 slide show, 57 without lens extend, 61 reviewing videos as you take them, 46 camera dock, 87 camera screen, 51 deleting, 53 menu options, 54 ...protecting, 55 slide show, 57 running slide show, 57 S safety battery, 15 camera, 113 saturated color mode, 36 screens, camera error messages, 99 LCD or ...
... 51 reviewing pictures as you take them, 24 camera dock, 87 camera screen, 51 deleting, 53 magnifying, 54 menu options, 54 multi-up, 52 protecting, 55 slide show, 57 without lens extend, 61 reviewing videos as you take them, 46 camera dock, 87 camera screen, 51 deleting, 53 menu options, 54 ...protecting, 55 slide show, 57 running slide show, 57 S safety battery, 15 camera, 113 saturated color mode, 36 screens, camera error messages, 99 LCD or ...


