
User Manual
Page 1
Kodak EasyShare CX7330 zoom digital camera User's guide www.kodak.com For interactive tutorials, www.kodak.com/go/howto For help with your camera, www.kodak.com/go/cx7330support
Kodak EasyShare CX7330 zoom digital camera User's guide www.kodak.com For interactive tutorials, www.kodak.com/go/howto For help with your camera, www.kodak.com/go/cx7330support

User Manual
Page 4
Product features Back View 89 10 11 7 12 6 13 14 5 43 2 1 1 Camera screen (LCD) 8 Ready light 2 Share button 9 Self Timer/Burst button 3 OK button (press) 10 Flash/status button 4 4-way controller 11 Zoom (Wide Angle/Telephoto) 5 DC-In (3V) ,for optional AC adapter 12 Grip 6 Delete button 13 Menu button 7 Viewfinder 14 Review button ii
Product features Back View 89 10 11 7 12 6 13 14 5 43 2 1 1 Camera screen (LCD) 8 Ready light 2 Share button 9 Self Timer/Burst button 3 OK button (press) 10 Flash/status button 4 4-way controller 11 Zoom (Wide Angle/Telephoto) 5 DC-In (3V) ,for optional AC adapter 12 Grip 6 Delete button 13 Menu button 7 Viewfinder 14 Review button ii

User Manual
Page 6
... SD/MMC card 7 2 Taking pictures and videos 8 Taking a picture 8 Taking a video 8 Camera modes 9 Using the camera screen as a viewfinder 10 Reviewing the picture or video just taken 12 Using optical zoom 13 Using digital zoom 13 Using the flash 14 Putting yourself in the picture 16 Putting yourself in... the video 16 Taking a burst series of pictures 17 Changing picture-taking settings 18 Customizing your camera 20 Pre-tagging for album names 22 ...
... SD/MMC card 7 2 Taking pictures and videos 8 Taking a picture 8 Taking a video 8 Camera modes 9 Using the camera screen as a viewfinder 10 Reviewing the picture or video just taken 12 Using optical zoom 13 Using digital zoom 13 Using the flash 14 Putting yourself in the picture 16 Putting yourself in... the video 16 Taking a burst series of pictures 17 Changing picture-taking settings 18 Customizing your camera 20 Pre-tagging for album names 22 ...

User Manual
Page 7
... 37 Printing from an optional SD/MMC card 37 Printing without a computer 37 7 Troubleshooting 38 Camera problems 38 Computer/connectivity problems 39 Picture quality problems 40 Camera ready light status 41 8 Getting help 42 Helpful links 42 Software help 42 Telephone customer support ...42 9 Appendix 44 Camera specifications 44 Tips, safety, maintenance 46 Storage capacities 47 Power-saving features ...
... 37 Printing from an optional SD/MMC card 37 Printing without a computer 37 7 Troubleshooting 38 Camera problems 38 Computer/connectivity problems 39 Picture quality problems 40 Camera ready light status 41 8 Getting help 42 Helpful links 42 Software help 42 Telephone customer support ...42 9 Appendix 44 Camera specifications 44 Tips, safety, maintenance 46 Storage capacities 47 Power-saving features ...
User Manual
Page 8
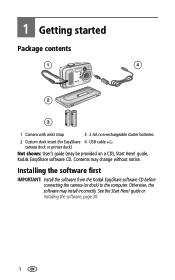
... the software, page 30. 1 Installing the software first IMPORTANT: Install the software from the Kodak EasyShare software CD before connecting the camera (or dock) to the computer. Otherwise, the software may be provided on a CD), Start Here! 1 Getting started Package contents 1 4 2 3 1 Camera with wrist strap 3 2 AA non-rechargeable starter batteries 2 Custom dock insert (for...
... the software, page 30. 1 Installing the software first IMPORTANT: Install the software from the Kodak EasyShare software CD before connecting the camera (or dock) to the computer. Otherwise, the software may be provided on a CD), Start Here! 1 Getting started Package contents 1 4 2 3 1 Camera with wrist strap 3 2 AA non-rechargeable starter batteries 2 Custom dock insert (for...
User Manual
Page 9
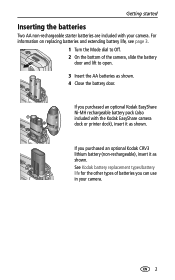
If you purchased an optional Kodak EasyShare Ni-MH rechargeable battery pack (also included with your camera. 2 See Kodak battery replacement types/battery life for the other types of the camera, slide the battery door and lift to Off. 2 On the bottom of batteries you purchased an optional Kodak CRV3 lithium battery (non-rechargeable), insert ... dial to open. 3 Insert the AA batteries as shown. Getting started Inserting the batteries Two AA non-rechargeable starter batteries are included with the Kodak EasyShare camera dock or printer dock), insert it as shown. If you can use in your...
If you purchased an optional Kodak EasyShare Ni-MH rechargeable battery pack (also included with your camera. 2 See Kodak battery replacement types/battery life for the other types of the camera, slide the battery door and lift to Off. 2 On the bottom of batteries you purchased an optional Kodak CRV3 lithium battery (non-rechargeable), insert ... dial to open. 3 Insert the AA batteries as shown. Getting started Inserting the batteries Two AA non-rechargeable starter batteries are included with the Kodak EasyShare camera dock or printer dock), insert it as shown. If you can use in your...
User Manual
Page 10
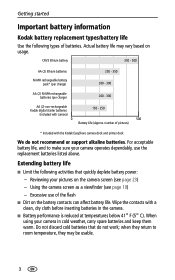
... charge) 200 - 300 AA (2) Ni-MH rechargeable batteries (per charge) 200 - 300 AA (2) non-rechargeable Kodak digital starter batteries 150 - 250 (included with camera) 0 500 Battery Life (Approx. number of batteries. Wipe the contacts with a clean, dry cloth before inserting ...started Important battery information Kodak battery replacement types/battery life Use the following activities that do not recommend or support alkaline batteries. Extending battery life ■ Limit the following types of pictures) * Included with the Kodak EasyShare camera dock and printer ...
... charge) 200 - 300 AA (2) Ni-MH rechargeable batteries (per charge) 200 - 300 AA (2) non-rechargeable Kodak digital starter batteries 150 - 250 (included with camera) 0 500 Battery Life (Approx. number of batteries. Wipe the contacts with a clean, dry cloth before inserting ...started Important battery information Kodak battery replacement types/battery life Use the following activities that do not recommend or support alkaline batteries. Extending battery life ■ Limit the following types of pictures) * Included with the Kodak EasyShare camera dock and printer ...
User Manual
Page 11
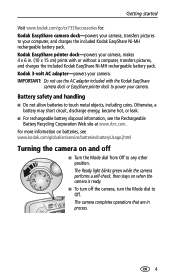
... hot, or leak. ■ For rechargeable battery disposal information, see www.kodak.com/global/en/service/batteries/batteryUsage.jhtml Turning the camera on when the camera is ready. ■ To turn off ■ Turn the Mode dial from Off to Off. Kodak EasyShare printer dock-powers your camera. Kodak 3-volt AC adapter-powers your camera, makes 4 x 6 in process. 4
... hot, or leak. ■ For rechargeable battery disposal information, see www.kodak.com/global/en/service/batteries/batteryUsage.jhtml Turning the camera on when the camera is ready. ■ To turn off ■ Turn the Mode dial from Off to Off. Kodak EasyShare printer dock-powers your camera. Kodak 3-volt AC adapter-powers your camera, makes 4 x 6 in process. 4
User Manual
Page 12
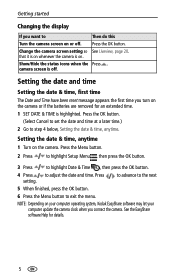
.... that it is on the camera or if the batteries are removed for details. 5 Setting the date & time, anytime 1 Turn on your computer operating system, Kodak EasyShare software may let your computer update the camera clock when you connect the camera. Getting started Changing the display If... you want to adjust the date and time. Press the OK button. camera screen is on or off . Press the Menu...
.... that it is on the camera or if the batteries are removed for details. 5 Setting the date & time, anytime 1 Turn on your computer operating system, Kodak EasyShare software may let your computer update the camera clock when you connect the camera. Getting started Changing the display If... you want to adjust the date and time. Press the OK button. camera screen is on or off . Press the Menu...

User Manual
Page 13
... picture status The icons that appear on the camera screen indicate the active camera and picture settings. Capture mode screen Only the active camera settings are displayed: Self Timer/Burst Date stamp Album name Mode description Flash Picture/video quality Pictures/time remaining Storage location Digital zoom Review screen Print tag/number of prints...
... picture status The icons that appear on the camera screen indicate the active camera and picture settings. Capture mode screen Only the active camera settings are displayed: Self Timer/Burst Date stamp Album name Mode description Flash Picture/video quality Pictures/time remaining Storage location Digital zoom Review screen Print tag/number of prints...
User Manual
Page 14
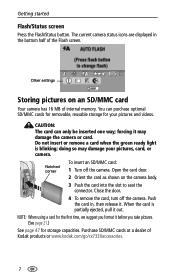
... only be inserted one way; Open the card door. 2 Orient the card as shown on an SD/MMC card Your camera has 16 MB of Kodak products or www.kodak.com/go/cx7330accessories. 7 Getting started Flash/Status screen Press the Flash/Status button. Other settings Storing pictures on the... camera body. 3 Push the card into the slot to seat the connector. NOTE: When using a card for storage capacities. Notched corner...
... only be inserted one way; Open the card door. 2 Orient the card as shown on an SD/MMC card Your camera has 16 MB of Kodak products or www.kodak.com/go/cx7330accessories. 7 Getting started Flash/Status screen Press the Flash/Status button. Other settings Storing pictures on the... camera body. 3 Push the card into the slot to seat the connector. NOTE: When using a card for storage capacities. Notched corner...

User Manual
Page 15
... mode name and description. 2 Taking pictures and videos Taking a picture 1 Turn the Mode dial to the mode you want to turn on the camera screen. When the ready light blinks green, the picture is red, wait until it for mode descriptions. To interrupt the description, press any button.... 2 Use the viewfinder or camera screen to frame your subject. 3 Press the Shutter button completely down and hold to set the exposure and focus. 4 When the ready light turns...
... mode name and description. 2 Taking pictures and videos Taking a picture 1 Turn the Mode dial to the mode you want to turn on the camera screen. When the ready light blinks green, the picture is red, wait until it for mode descriptions. To interrupt the description, press any button.... 2 Use the viewfinder or camera screen to frame your subject. 3 Press the Shutter button completely down and hold to set the exposure and focus. 4 When the ready light turns...
User Manual
Page 16
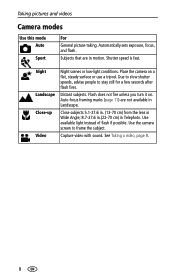
... are not available in motion. Flash does not fire unless you turn it on a flat, steady surface or use a tripod. Use the camera screen to stay still for a few seconds after flash fires. Auto-focus framing marks (page 11) are in Landscape. Capture video with sound.... Night Landscape Close-up Video Night scenes or low-light conditions. See Taking a video, page 8. 9 Taking pictures and videos Camera modes Use this mode Auto Sport For General picture-taking. Automatically sets exposure, focus, and flash. Use available light instead of flash if possible...
... are not available in motion. Flash does not fire unless you turn it on a flat, steady surface or use a tripod. Use the camera screen to stay still for a few seconds after flash fires. Auto-focus framing marks (page 11) are in Landscape. Capture video with sound.... Night Landscape Close-up Video Night scenes or low-light conditions. See Taking a video, page 8. 9 Taking pictures and videos Camera modes Use this mode Auto Sport For General picture-taking. Automatically sets exposure, focus, and flash. Use available light instead of flash if possible...
User Manual
Page 17
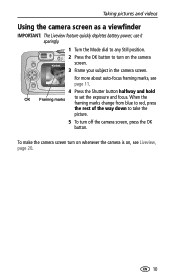
For more about auto-focus framing marks, see Liveview, page 20. 10 To make the camera screen turn off the camera screen, press the OK button. use it sparingly. 1 Turn the Mode dial to any Still position. 2 Press the OK button to turn on , see page ... Shutter button halfway and hold OK Framing marks to take the picture. 5 To turn on whenever the camera is on the camera screen. 3 Frame your subject in the camera screen. Taking pictures and videos Using the camera screen as a viewfinder IMPORTANT: The Liveview feature quickly depletes battery power; When the framing marks change from...
For more about auto-focus framing marks, see Liveview, page 20. 10 To make the camera screen turn off the camera screen, press the OK button. use it sparingly. 1 Turn the Mode dial to any Still position. 2 Press the OK button to turn on , see page ... Shutter button halfway and hold OK Framing marks to take the picture. 5 To turn on whenever the camera is on the camera screen. 3 Frame your subject in the camera screen. Taking pictures and videos Using the camera screen as a viewfinder IMPORTANT: The Liveview feature quickly depletes battery power; When the framing marks change from...
User Manual
Page 18
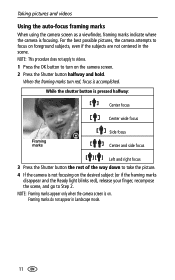
... button is on foreground subjects, even if the subjects are not centered in Landscape mode. 11 NOTE: Framing marks appear only when the camera screen is pressed halfway: Center focus Center wide focus Framing marks Side focus Center and side focus Left and right focus 3 Press the ...of the way down to focus on . Taking pictures and videos Using the auto-focus framing marks When using the camera screen as a viewfinder, framing marks indicate where the camera is not focusing on the camera screen. 2 Press the Shutter button halfway and hold. For the best possible pictures, the...
... button is on foreground subjects, even if the subjects are not centered in Landscape mode. 11 NOTE: Framing marks appear only when the camera screen is pressed halfway: Center focus Center wide focus Framing marks Side focus Center and side focus Left and right focus 3 Press the ...of the way down to focus on . Taking pictures and videos Using the auto-focus framing marks When using the camera screen as a viewfinder, framing marks indicate where the camera is not focusing on the camera screen. 2 Press the Shutter button halfway and hold. For the best possible pictures, the...
User Manual
Page 19
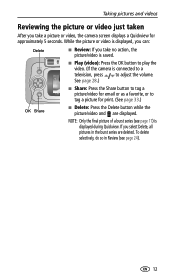
... just taken After you take no action, the picture/video is saved. ■ Play (video): Press the OK button to play the video. (If the camera is displayed during Quickview. While the picture or video is displayed, you can: Delete ■ Review: If you take a picture or video, the...
... just taken After you take no action, the picture/video is saved. ■ Play (video): Press the OK button to play the video. (If the camera is displayed during Quickview. While the picture or video is displayed, you can: Delete ■ Review: If you take a picture or video, the...
User Manual
Page 20
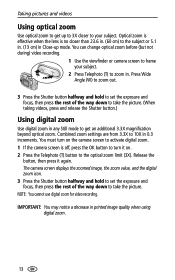
...lens is off, press the OK button to turn it again. You must turn on the camera screen to activate digital zoom. 1 If the camera screen is no closer than 23.6 in . NOTE: You cannot use digital zoom for video recording. Taking pictures and videos Using optical zoom Use optical zoom to get... beyond optical zoom. Combined zoom settings are from 3.3X to your subject. 2 Press Telephoto (T) to get up mode. The camera screen displays the zoomed image, the zoom value, and the digital zoom icon. 3 Press the Shutter button halfway and hold to set the exposure and focus, then press the rest of...
...lens is off, press the OK button to turn it again. You must turn on the camera screen to activate digital zoom. 1 If the camera screen is no closer than 23.6 in . NOTE: You cannot use digital zoom for video recording. Taking pictures and videos Using optical zoom Use optical zoom to get... beyond optical zoom. Combined zoom settings are from 3.3X to your subject. 2 Press Telephoto (T) to get up mode. The camera screen displays the zoomed image, the zoom value, and the digital zoom icon. 3 Press the Shutter button halfway and hold to set the exposure and focus, then press the rest of...
User Manual
Page 21
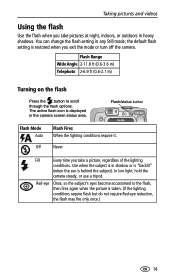
...is "backlit" (when the sun is behind the subject). Use when the subject is displayed in heavy shadows. In low light, hold the camera steady, or use a tripod. the default flash setting is taken. (If the lighting conditions require flash but do not require Red-eye reduction,... flash Use the flash when you take a picture, regardless of the lighting conditions. Never Fill Every time you exit the mode or turn off the camera. Red-eye Once, so the subject's eyes become accustomed to scroll through the flash options. Flash Range Wide Angle 2-11.8 ft (0.6-3.6 m) Telephoto 2-6.9 ...
...is "backlit" (when the sun is behind the subject). Use when the subject is displayed in heavy shadows. In low light, hold the camera steady, or use a tripod. the default flash setting is taken. (If the lighting conditions require flash but do not require Red-eye reduction,... flash Use the flash when you take a picture, regardless of the lighting conditions. Never Fill Every time you exit the mode or turn off the camera. Red-eye Once, so the subject's eyes become accustomed to scroll through the flash options. Flash Range Wide Angle 2-11.8 ft (0.6-3.6 m) Telephoto 2-6.9 ...

User Manual
Page 22
Night Auto* Landscape Off Close-up Off Video Off None Burst Off Flash cannot be turned on. * When you change to change it remains until you change ) Auto, Flash Off, Fill Exit the mode or turn off Flash, Red-eye the camera. Taking pictures and videos Flash settings in these modes, it . 15 Icon Capture mode Auto Sport Default flash setting Auto* Auto Available flash settings To return to the default flash setting: (press the Flash button to Red-eye in each mode For the best possible pictures, flash settings are preset for each capture mode.
Night Auto* Landscape Off Close-up Off Video Off None Burst Off Flash cannot be turned on. * When you change to change it remains until you change ) Auto, Flash Off, Fill Exit the mode or turn off Flash, Red-eye the camera. Taking pictures and videos Flash settings in these modes, it . 15 Icon Capture mode Auto Sport Default flash setting Auto* Auto Available flash settings To return to the default flash setting: (press the Flash button to Red-eye in each mode For the best possible pictures, flash settings are preset for each capture mode.
User Manual
Page 23
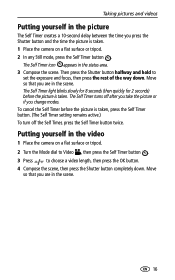
... picture The Self Timer creates a 10-second delay between the time you press the Shutter button and the time the picture is taken. 1 Place the camera on a flat surface or tripod. 2 Turn the Mode dial to Video , then press the Self Timer button . 3 Press to set the exposure and focus, then... scene. The Self Timer turns off the Self Timer, press the Self Timer button twice. Move so that you are in the video 1 Place the camera on a flat surface or tripod. 2 In any Still mode, press the Self Timer button . Move so that you are in the status area. 3 Compose the...
... picture The Self Timer creates a 10-second delay between the time you press the Shutter button and the time the picture is taken. 1 Place the camera on a flat surface or tripod. 2 Turn the Mode dial to Video , then press the Self Timer button . 3 Press to set the exposure and focus, then... scene. The Self Timer turns off the Self Timer, press the Self Timer button twice. Move so that you are in the video 1 Place the camera on a flat surface or tripod. 2 In any Still mode, press the Self Timer button . Move so that you are in the status area. 3 Compose the...


