User Manual
Page 18
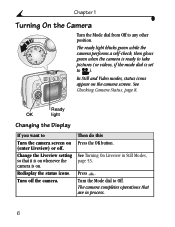
... Still Modes, page 53. The camera completes operations that it is on whenever the camera is set to ). Chapter 1 Turning On the Camera Turn the Mode dial from Off to Off. See Checking Camera Status, page 8. Turn off . Ready OK light Changing the Display If you want to... take pictures (or videos, if the mode dial is on the camera screen. Press . The ready light blinks green while the camera performs a self-check, then glows green when the camera is ready to Turn the camera ...
... Still Modes, page 53. The camera completes operations that it is on whenever the camera is set to ). Chapter 1 Turning On the Camera Turn the Mode dial from Off to Off. See Checking Camera Status, page 8. Turn off . Ready OK light Changing the Display If you want to... take pictures (or videos, if the mode dial is on the camera screen. Press . The ready light blinks green while the camera performs a self-check, then glows green when the camera is ready to Turn the camera ...

User Manual
Page 22
... for storage capacities. See page 95 for pictures and videos. Do not insert or remove a card when the green ready light is partially ejected, pull it may damage your pictures, card, or camera. forcing it out. To remove the card, push it in, then release it clicks. 3 Orient the card.... When the card is blinking; Notched corner To insert an MMC/SD card: 1 Turn off the camera. 2 Open the card door until it . doing so may damage the camera or card. Chapter 1 Inserting an MMC/SD Card Your camera has 16 MB of Kodak products or www.kodak.com/go/cx6330accessories. 10
... for storage capacities. See page 95 for pictures and videos. Do not insert or remove a card when the green ready light is partially ejected, pull it may damage your pictures, card, or camera. forcing it out. To remove the card, push it in, then release it clicks. 3 Orient the card.... When the card is blinking; Notched corner To insert an MMC/SD card: 1 Turn off the camera. 2 Open the card door until it . doing so may damage the camera or card. Chapter 1 Inserting an MMC/SD Card Your camera has 16 MB of Kodak products or www.kodak.com/go/cx6330accessories. 10
User Manual
Page 25
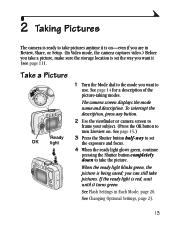
... ready to take the picture. The camera screen displays the mode name and description. See page 15.) 3 Press the Shutter button half-way to set the exposure and focus. 4 When the ready light glows green, continue pressing the Shutter button completely down to take pictures anytime it is set the... green, the picture is red, wait until it (see page 11). See Changing Optional Settings, page 23. 13 If the ready light is being saved; See page 14 for a description of the picture-taking modes. See Flash Settings in Review, Share, or Setup. (In Video mode, the camera captures video.)...
... ready to take the picture. The camera screen displays the mode name and description. See page 15.) 3 Press the Shutter button half-way to set the exposure and focus. 4 When the ready light glows green, continue pressing the Shutter button completely down to take pictures anytime it is set the... green, the picture is red, wait until it (see page 11). See Changing Optional Settings, page 23. 13 If the ready light is being saved; See page 14 for a description of the picture-taking modes. See Flash Settings in Review, Share, or Setup. (In Video mode, the camera captures video.)...
User Manual
Page 43
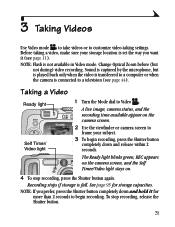
... Video Ready light Self Timer/ Video light 1 Turn the Mode dial to Video . NOTE: If you want it for storage capacities. The Ready light blinks green, REC appears on the camera screen, and the Self Timer/Video light stays on the camera screen. 2 Use the viewfinder or camera screen to frame... your storage location is not available in Video mode. A live image, camera status, and the recording ...
... Video Ready light Self Timer/ Video light 1 Turn the Mode dial to Video . NOTE: If you want it for storage capacities. The Ready light blinks green, REC appears on the camera screen, and the Self Timer/Video light stays on the camera screen. 2 Use the viewfinder or camera screen to frame... your storage location is not available in Video mode. A live image, camera status, and the recording ...
User Manual
Page 79
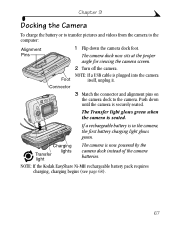
... charging light glows green. Foot Connector 2 Turn off the camera. Chapter 9 Docking the Camera To charge the battery or to transfer pictures and videos from the camera to the camera. Push down the camera dock foot. If a rechargeable battery is seated. The camera dock now sits at the proper angle for viewing the camera screen. NOTE: If the Kodak EasyShare Ni...
... charging light glows green. Foot Connector 2 Turn off the camera. Chapter 9 Docking the Camera To charge the battery or to transfer pictures and videos from the camera to the camera. Push down the camera dock foot. If a rechargeable battery is seated. The camera dock now sits at the proper angle for viewing the camera screen. NOTE: If the Kodak EasyShare Ni...
User Manual
Page 80
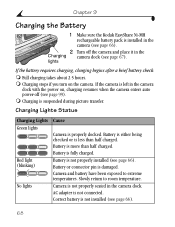
... is fully charged. Chapter 9 Charging the Battery 1 Make sure the Kodak EasyShare Ni-MH rechargeable battery pack is left in the camera dock with the power on the camera. If the camera is installed in the camera (see page 66). 2 Turn off (see page 99). Battery is...to extreme temperatures. Battery or connector pin is less than half charged. AC adapter is properly docked. lights If the battery requires charging, charging begins after a brief battery check. Charging Lights Status Charging Lights Green lights Red light (blinking) No lights Cause Camera is not connected.
... is fully charged. Chapter 9 Charging the Battery 1 Make sure the Kodak EasyShare Ni-MH rechargeable battery pack is left in the camera dock with the power on the camera. If the camera is installed in the camera (see page 66). 2 Turn off (see page 99). Battery is...to extreme temperatures. Battery or connector pin is less than half charged. AC adapter is properly docked. lights If the battery requires charging, charging begins after a brief battery check. Charging Lights Status Charging Lights Green lights Red light (blinking) No lights Cause Camera is not connected.

User Manual
Page 81
...). The Transfer light blinks green while the pictures and videos are being transferred to the computer. Chapter 9 Transferring Pictures With the Dock After the Kodak EasyShare software is loaded on your computer (see page 57), you can transfer pictures and videos from your camera to your pictures, click the Help button in the Kodak EasyShare software. 69...
...). The Transfer light blinks green while the pictures and videos are being transferred to the computer. Chapter 9 Transferring Pictures With the Dock After the Kodak EasyShare software is loaded on your computer (see page 57), you can transfer pictures and videos from your camera to your pictures, click the Help button in the Kodak EasyShare software. 69...
User Manual
Page 86
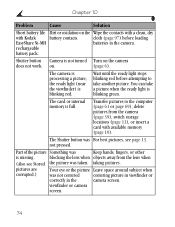
...is blinking green. The card or internal memory is processing a picture; The camera is full. the ready light (near the viewfinder) is not turned Turn on the camera does not ...light is missing. not pressed. Part of the picture Something was not centered centering picture in viewfinder or correctly in the camera. rechargeable battery pack. taking pictures. viewfinder or camera ...see page 13. Shutter button Camera is blinking red. Wait until the ready light stops blinking red before loading EasyShare Ni-MH batteries in the camera screen. You can take ...
...is blinking green. The card or internal memory is processing a picture; The camera is full. the ready light (near the viewfinder) is not turned Turn on the camera does not ...light is missing. not pressed. Part of the picture Something was not centered centering picture in viewfinder or correctly in the camera. rechargeable battery pack. taking pictures. viewfinder or camera ...see page 13. Shutter button Camera is blinking red. Wait until the ready light stops blinking red before loading EasyShare Ni-MH batteries in the camera screen. You can take ...

User Manual
Page 87
...change of the way down to take the best possible pictures, achieved. thumbnail. When the ready light glows green, press the Shutter button the rest of a bright light your position so light is too dark. Picture is not behind (backlit). picture (or the storage location. the ...subject. expected picture) on . Turn on the flash (page 19). Chapter 10 Problem Cause Solution In Review mode, The camera...
...change of the way down to take the best possible pictures, achieved. thumbnail. When the ready light glows green, press the Shutter button the rest of a bright light your position so light is too dark. Picture is not behind (backlit). picture (or the storage location. the ...subject. expected picture) on . Turn on the flash (page 19). Chapter 10 Problem Cause Solution In Review mode, The camera...
User Manual
Page 88
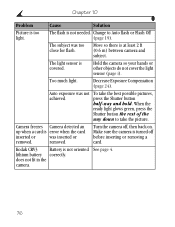
...does not fit in the camera. 76 Hold the camera so your hands or other objects do not cover the light sensor (page i). Camera freezes Camera detected an up when a card is turned off , then back on. The light sensor is at least 2 ft (0.6 m) between camera and subject. Change to take...battery correctly. When the ready light glows green, press the Shutter button the rest of the way down to Auto flash or Flash Off light. (page 19). Chapter 10 Problem Cause Solution Picture is too The flash is not oriented See page 4. Too much light. Kodak CRV3 Battery is not needed...
...does not fit in the camera. 76 Hold the camera so your hands or other objects do not cover the light sensor (page i). Camera freezes Camera detected an up when a card is turned off , then back on. The light sensor is at least 2 ft (0.6 m) between camera and subject. Change to take...battery correctly. When the ready light glows green, press the Shutter button the rest of the way down to Auto flash or Flash Off light. (page 19). Chapter 10 Problem Cause Solution Picture is too The flash is not oriented See page 4. Too much light. Kodak CRV3 Battery is not needed...

User Manual
Page 89
...Angle; 8.7-27.6 in. (22-70 cm) in Telephoto. picture was not achieved. When the ready light glows green, press the Shutter button the rest of the way down to be 11.8 ft (3.6 m) between the camera and the subject, or at least 5.1 in. (13 cm) at least 23.6 in Close-up ... the effective. Subject or the camera Place the camera on external video device. Slide show does not run on a flat, steady moved while the surface or use a tripod. To take the picture. (If the yellow light blinks, release the Shutter button and recompose picture.) Camera is at Wide in Telephoto. Cause...
...Angle; 8.7-27.6 in. (22-70 cm) in Telephoto. picture was not achieved. When the ready light glows green, press the Shutter button the rest of the way down to be 11.8 ft (3.6 m) between the camera and the subject, or at least 5.1 in. (13 cm) at least 23.6 in Close-up ... the effective. Subject or the camera Place the camera on external video device. Slide show does not run on a flat, steady moved while the surface or use a tripod. To take the picture. (If the yellow light blinks, release the Shutter button and recompose picture.) Camera is at Wide in Telephoto. Cause...
User Manual
Page 96
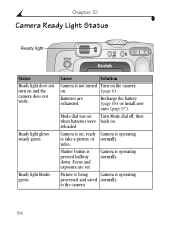
... new ones (page 97). Mode dial was on Turn Mode dial off, then when batteries were back on and the camera does not work. video. Ready light glows steady green. Ready light blinks green. Batteries are set. reloaded. Picture is being Camera is operating normally. Chapter 10 Camera Ready Light Status Ready light Status Ready light does not turn on .
... new ones (page 97). Mode dial was on Turn Mode dial off, then when batteries were back on and the camera does not work. video. Ready light glows steady green. Ready light blinks green. Batteries are set. reloaded. Picture is being Camera is operating normally. Chapter 10 Camera Ready Light Status Ready light Status Ready light does not turn on .
User Manual
Page 97
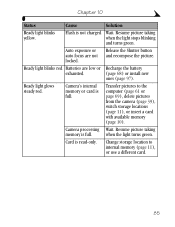
... card. 85 Batteries are not and recompose the picture. Camera's internal memory or card is read-only. Resume picture taking when the light stops blinking and turns green. Ready light glows steady red. locked. when the light turns green. Chapter 10 Status Cause Solution Ready light blinks yellow. Camera processing Wait. Change storage location to the computer (page...
... card. 85 Batteries are not and recompose the picture. Camera's internal memory or card is read-only. Resume picture taking when the light stops blinking and turns green. Ready light glows steady red. locked. when the light turns green. Chapter 10 Status Cause Solution Ready light blinks yellow. Camera processing Wait. Change storage location to the computer (page...


