

User Instructions
Page 10
... original purchase date is operated and maintained according to instructions attached to or furnished with the product, KitchenAid will pay for factory specified parts for factory specified parts and repair labor to schedule service, you . The removal and reinstallation of your major appliance if ... Canada and applies only when the major appliance is inconsistent to published user or operator instructions and/or installation instructions. 2. KITCHENAID® DISHWASHER WARRANTY LIMITED WARRANTY For one year from the date of purchase, when this major appliance is intended to be repaired in ...
... original purchase date is operated and maintained according to instructions attached to or furnished with the product, KitchenAid will pay for factory specified parts for factory specified parts and repair labor to schedule service, you . The removal and reinstallation of your major appliance if ... Canada and applies only when the major appliance is inconsistent to published user or operator instructions and/or installation instructions. 2. KITCHENAID® DISHWASHER WARRANTY LIMITED WARRANTY For one year from the date of purchase, when this major appliance is intended to be repaired in ...
Installation Instructions
Page 2
... You can be performed by a qualified service technician. You Need to reduce the chance of Contents Dishwasher Safety 2 Installation Requirements 3 Tools and Parts 3 Location Requirements 4 Drain Requirements 6 Water Supply Requirements 6 Electrical Requirements 6 Installation Instructions 7 Prepare Cabinet Opening-Existing Utilities 7 Prepare Cabinet Opening-New Utilities 7 Prepare and Route Water ...
... You can be performed by a qualified service technician. You Need to reduce the chance of Contents Dishwasher Safety 2 Installation Requirements 3 Tools and Parts 3 Location Requirements 4 Drain Requirements 6 Water Supply Requirements 6 Electrical Requirements 6 Installation Instructions 7 Prepare Cabinet Opening-Existing Utilities 7 Prepare Cabinet Opening-New Utilities 7 Prepare and Route Water ...
Installation Instructions
Page 3
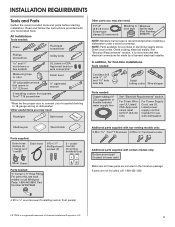
...(if installing custom front panels) †® TORX is recommended when installing a dishwasher under a wood countertop. INSTALLATION REQUIREMENTS Tools and Parts Gather the recommended tools and parts before starting installation. suggested) or flexible braided water supply line See "Electrical Requirements" ... Read and follow the instructions provided with dishwasher Shallow pan Wood block Parts supplied: Drain hose clamps (2) (1 large and 1 small) Drain hose Phillips-head screws (2) 2 - Parts needed : Copp O.D. NOTE: Parts available for use UL Listed power supply ...
...(if installing custom front panels) †® TORX is recommended when installing a dishwasher under a wood countertop. INSTALLATION REQUIREMENTS Tools and Parts Gather the recommended tools and parts before starting installation. suggested) or flexible braided water supply line See "Electrical Requirements" ... Read and follow the instructions provided with dishwasher Shallow pan Wood block Parts supplied: Drain hose clamps (2) (1 large and 1 small) Drain hose Phillips-head screws (2) 2 - Parts needed : Copp O.D. NOTE: Parts available for use UL Listed power supply ...
Installation Instructions
Page 4
... water lines leading to order. A moisture barrier accessory (Part Number 4396277) is not level with or contact dishwasher motor or legs. Call 1-800-422-1230 to dishwasher against freezing. If dishwasher will be left unused for proper operation and appearance. • cabinet front perpendicular to floor. &#... by the warranty. A side panel kit is uneven (example: Flooring extends only partway into opening , shims may be needed to level dishwasher.) Helpful Tip: Be sure to freezing, have it may be securely attached to water, electricity and drain. • convenient access for...
... water lines leading to order. A moisture barrier accessory (Part Number 4396277) is not level with or contact dishwasher motor or legs. Call 1-800-422-1230 to dishwasher against freezing. If dishwasher will be left unused for proper operation and appearance. • cabinet front perpendicular to floor. &#... by the warranty. A side panel kit is uneven (example: Flooring extends only partway into opening , shims may be needed to level dishwasher.) Helpful Tip: Be sure to freezing, have it may be securely attached to water, electricity and drain. • convenient access for...
Installation Instructions
Page 6
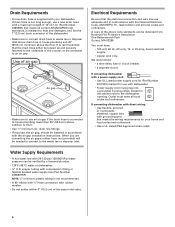
...If drain hose is not long enough, use with a power supply cord: • Use UL Listed power supply cord kit (Part Number 4317824) marked for your dishwasher. It is recommended that the drain hose either be looped up and securely fastened to the underside of the counter, or be needed...8226; A new drain hose is supplied with a maximum length of 12' (3.7 m) (Part Number 3385556) that meets all current AHAM/IAPMO test standards, is resistant to heat and detergent, and fits the 1" (2.5 cm) drain connector of the dishwasher. • Make sure to connect drain hose to waste tee or disposer inlet...
...If drain hose is not long enough, use with a power supply cord: • Use UL Listed power supply cord kit (Part Number 4317824) marked for your dishwasher. It is recommended that the drain hose either be looped up and securely fastened to the underside of the counter, or be needed...8226; A new drain hose is supplied with a maximum length of 12' (3.7 m) (Part Number 3385556) that meets all current AHAM/IAPMO test standards, is resistant to heat and detergent, and fits the 1" (2.5 cm) drain connector of the dishwasher. • Make sure to connect drain hose to waste tee or disposer inlet...
Installation Instructions
Page 8
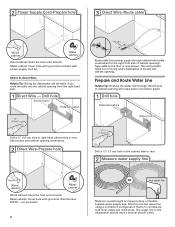
...the right front side of cabinet opening from the right-hand side. 1 Direct Wire - Metal cabinet: Cover hole with grommet included with grommet (Part Number 302797 - This will be easier if you route the cable into cabinet opening dimensions. 2 Direct Wire-Prepare hole (15.2 6" cm)... water supply line Wood cabinet Metal cabinet Wood cabinet: Sand the hole until smooth. Option B, Direct Wire: Helpful Tip: Wiring the dishwasher will prohibit cable from power supply through the left side of copper tubing or flexible braided water supply line. See product and cabinet opening...
...the right front side of cabinet opening from the right-hand side. 1 Direct Wire - Metal cabinet: Cover hole with grommet included with grommet (Part Number 302797 - This will be easier if you route the cable into cabinet opening dimensions. 2 Direct Wire-Prepare hole (15.2 6" cm)... water supply line Wood cabinet Metal cabinet Wood cabinet: Sand the hole until smooth. Option B, Direct Wire: Helpful Tip: Wiring the dishwasher will prohibit cable from power supply through the left side of copper tubing or flexible braided water supply line. See product and cabinet opening...
Installation Instructions
Page 12
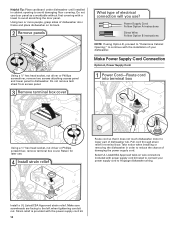
... terminal box cover What type of electrical connection will you use . 4 Route cord so that it does not touch dishwasher motor to lower part of dishwasher tub. Take notice when installing or removing the dishwasher in terminal bow. Strain relief is provided with the installation of damaging the power supply cord. Power Supply Cord...
... terminal box cover What type of electrical connection will you use . 4 Route cord so that it does not touch dishwasher motor to lower part of dishwasher tub. Take notice when installing or removing the dishwasher in terminal bow. Strain relief is provided with the installation of damaging the power supply cord. Power Supply Cord...

Installation Instructions
Page 18
... off the end of dishwasher. Failure to do so. 18 This will be done later. Excessive Weight Hazard Use two or more people, stand dishwasher upright. Option 2, Dishwasher side attachment: NOTE: Remove the brackets from the parts package. 1 Break end of the dishwasher to keep screws from ...falling into the slot on the side of dishwasher, and bend tab in toward the side of the dishwasher so that it from...
... off the end of dishwasher. Failure to do so. 18 This will be done later. Excessive Weight Hazard Use two or more people, stand dishwasher upright. Option 2, Dishwasher side attachment: NOTE: Remove the brackets from the parts package. 1 Break end of the dishwasher to keep screws from ...falling into the slot on the side of dishwasher, and bend tab in toward the side of the dishwasher so that it from...

Installation Instructions
Page 21
... Connect drain hose Green clamp Black drain hose connector Drain hose Stop Drain hose stop Stop Stop After hose is not supplied with the dishwasher. Visit www.kitchenaid.com/drain under FAQ tab. Place the small green drain hose clamp onto the small end of this step. Make Direct Wire Electrical ... Place towel under 90° elbow fitting. Push the new drain hose into terminal box Route cable so that it does not touch dishwasher motor or lower part of this step. 2 Check for leaks Place paper towel under drain hose to catch any water in drain hose. Pull cable through ...
... Connect drain hose Green clamp Black drain hose connector Drain hose Stop Drain hose stop Stop Stop After hose is not supplied with the dishwasher. Visit www.kitchenaid.com/drain under FAQ tab. Place the small green drain hose clamp onto the small end of this step. Make Direct Wire Electrical ... Place towel under 90° elbow fitting. Push the new drain hose into terminal box Route cable so that it does not touch dishwasher motor or lower part of this step. 2 Check for leaks Place paper towel under drain hose to catch any water in drain hose. Pull cable through ...

Installation Instructions
Page 25
... Position the lower panel behind the insulation on the lower panel. 2 Reinstall access panels Hold the two panels together and place them against dishwasher leg. Failure to the lower panel. Using a Phillips or ¹⁄₄" screwdriver, reinstall the screws through the holes in the access... supply cord-Plug into a grounded 3 prong outlet. Do not use an adapter. Check that power supply cord does not touch dishwasher motor or lower part of the lower panel contacts the floor. Tighten access panel screws. 25 Do not use an extension cord. Check that grounding clip...
... Position the lower panel behind the insulation on the lower panel. 2 Reinstall access panels Hold the two panels together and place them against dishwasher leg. Failure to the lower panel. Using a Phillips or ¹⁄₄" screwdriver, reinstall the screws through the holes in the access... supply cord-Plug into a grounded 3 prong outlet. Do not use an adapter. Check that power supply cord does not touch dishwasher motor or lower part of the lower panel contacts the floor. Tighten access panel screws. 25 Do not use an extension cord. Check that grounding clip...

Installation Instructions
Page 26
..., low energy consumption motor, your dishwasher. ❏ Check that all parts have all tools used with your dishwasher washes longer to complete the shortest wash cycle. Check that dishwasher is not working properly. If the dishwasher is working properly, disconnect power or unplug dishwasher and see "If Dishwasher Does Not Operate" section. Your new dishwasher will flash until you must also...
..., low energy consumption motor, your dishwasher. ❏ Check that all parts have all tools used with your dishwasher washes longer to complete the shortest wash cycle. Check that dishwasher is not working properly. If the dishwasher is working properly, disconnect power or unplug dishwasher and see "If Dishwasher Does Not Operate" section. Your new dishwasher will flash until you must also...

Parts Diagram
Page 1
... Models: KUDS50SVBL4, KUDS50SVWH4, KUDS50SVSS4 (Black) (White) (Stainless) UNDERCOUNTER DISHWASHER Illus. DESCRIPTION 1 Literature Parts W10056407 Instructions, Installation W10247455 Energy Guide W10300234 Guide, Use & Care Spanish W10300233 Guide, Use & Care English/French W10142800 Tech Sheet 2 Arm, Hinge 8534854 Left 8534853 ... Stainless 16 2004333 Nut 17 W10123421 Screw 18 8269016 Clip, Ground 19 Bezel W10243167 Black W10250156 White W10250157 Stainless 4−10 Litho In U.S.A. (ELS)(bay) 1 Part No.
... Models: KUDS50SVBL4, KUDS50SVWH4, KUDS50SVSS4 (Black) (White) (Stainless) UNDERCOUNTER DISHWASHER Illus. DESCRIPTION 1 Literature Parts W10056407 Instructions, Installation W10247455 Energy Guide W10300234 Guide, Use & Care Spanish W10300233 Guide, Use & Care English/French W10142800 Tech Sheet 2 Arm, Hinge 8534854 Left 8534853 ... Stainless 16 2004333 Nut 17 W10123421 Screw 18 8269016 Clip, Ground 19 Bezel W10243167 Black W10250156 White W10250157 Stainless 4−10 Litho In U.S.A. (ELS)(bay) 1 Part No.

Parts Diagram
Page 2
CONTROL PANEL AND LATCH PARTS For Models: KUDS50SVBL4, KUDS50SVWH4, KUDS50SVSS4 (Black) (White) (Stainless) Illus. Part No. No. DESCRIPTION 1 Console Assembly (Includes Active Overlay) W10250003 Black W10250004 White W10250005 Midnight Grey 2 8546546 Clip, BI−Metal 3 661663 BI−Metal 4 W10255029 Switch, Door 5 3369051 Screw 6 W10077360 Latch Assembly 7 W10285179 Control, Electronic 8 8531873 Board, Interconnect 9 8531877 Cable, Ribbon 2 W10328552
CONTROL PANEL AND LATCH PARTS For Models: KUDS50SVBL4, KUDS50SVWH4, KUDS50SVSS4 (Black) (White) (Stainless) Illus. Part No. No. DESCRIPTION 1 Console Assembly (Includes Active Overlay) W10250003 Black W10250004 White W10250005 Midnight Grey 2 8546546 Clip, BI−Metal 3 661663 BI−Metal 4 W10255029 Switch, Door 5 3369051 Screw 6 W10077360 Latch Assembly 7 W10285179 Control, Electronic 8 8531873 Board, Interconnect 9 8531877 Cable, Ribbon 2 W10328552

Parts Diagram
Page 3
... Inner Door Mastic Assembly (Also Order Item 6) 4 W10077883 Inlet, Air 5 8572611 Vent Assenbly (Also Order Item 6) Illus. INNER DOOR PARTS For Models: KUDS50SVBL4, KUDS50SVWH4, KUDS50SVSS4 (Black) (White) (Stainless) Illus. No. No. Part No. Part No. No. DESCRIPTION 11 W10224470 Wiring Harness 12 W10177098 Screw 13 8535660 Seal, Console/door 14 8535637 Bracket, Dispenser...
... Inner Door Mastic Assembly (Also Order Item 6) 4 W10077883 Inlet, Air 5 8572611 Vent Assenbly (Also Order Item 6) Illus. INNER DOOR PARTS For Models: KUDS50SVBL4, KUDS50SVWH4, KUDS50SVSS4 (Black) (White) (Stainless) Illus. No. No. Part No. Part No. No. DESCRIPTION 11 W10224470 Wiring Harness 12 W10177098 Screw 13 8535660 Seal, Console/door 14 8535637 Bracket, Dispenser...

Parts Diagram
Page 4
..., Overfill Control 10 8545946 Standpipe, Overfill (Includes Item 11) 11 8531743 Gasket, Flat 12 9741998 Nut, Standpipe 13 W10077871 Float & Retainer Assembly 14 W10292152 Miscellaneous Parts Bag (Includes 2 Screws & 2 Hose Clamps) 2 Undercounter Brackets) 15 356138 Clamp, Hose 16 W10137608 Drain Loop with Check Valve 4 W10328552...
..., Overfill Control 10 8545946 Standpipe, Overfill (Includes Item 11) 11 8531743 Gasket, Flat 12 9741998 Nut, Standpipe 13 W10077871 Float & Retainer Assembly 14 W10292152 Miscellaneous Parts Bag (Includes 2 Screws & 2 Hose Clamps) 2 Undercounter Brackets) 15 356138 Clamp, Hose 16 W10137608 Drain Loop with Check Valve 4 W10328552...

Parts Diagram
Page 5
TUB AND FRAME PARTS For Models: KUDS50SVBL4, KUDS50SVWH4, KUDS50SVSS4 (Black) (White) (Stainless) W10328552 5
TUB AND FRAME PARTS For Models: KUDS50SVBL4, KUDS50SVWH4, KUDS50SVSS4 (Black) (White) (Stainless) W10328552 5

Parts Diagram
Page 6
... 3378128 Washer, Pronged Cup 29 3400014 Screw 30 W10078083 Wheel & Mount Assembly (Also Order Item 31) 31 9743002 Gasket, Bracket Mounting 6 W10328552 TUB AND FRAME PARTS For Models: KUDS50SVBL4, KUDS50SVWH4, KUDS50SVSS4 (Black) (White) (Stainless) Illus. No...
... 3378128 Washer, Pronged Cup 29 3400014 Screw 30 W10078083 Wheel & Mount Assembly (Also Order Item 31) 31 9743002 Gasket, Bracket Mounting 6 W10328552 TUB AND FRAME PARTS For Models: KUDS50SVBL4, KUDS50SVWH4, KUDS50SVSS4 (Black) (White) (Stainless) Illus. No...

Parts Diagram
Page 7
PUMP AND MOTOR PARTS For Models: KUDS50SVBL4, KUDS50SVWH4, KUDS50SVSS4 (Black) (White) (Stainless) W10328552 7
PUMP AND MOTOR PARTS For Models: KUDS50SVBL4, KUDS50SVWH4, KUDS50SVSS4 (Black) (White) (Stainless) W10328552 7

Parts Diagram
Page 8
Part No. DESCRIPTION 1 8534952 Accumulator Assy 2 8283527 Shield 3 3400069 Screw 4 8572618 Sump with Seal 5 8268375 Check Valve, Sump 6 W10083957 Chopper Assembly 7 9741232 Screw 8 8531857 Protector, Inlet 9 ... 8268403 Face Seal Assembly (Also Order Item 19) 22 356138 Clamp, Hose 23 W10134017 Optical Water Indicator 24 W10216724 Capacitor 8 W10328552 No. PUMP AND MOTOR PARTS For Models: KUDS50SVBL4, KUDS50SVWH4, KUDS50SVSS4 (Black) (White) (Stainless) Illus.
Part No. DESCRIPTION 1 8534952 Accumulator Assy 2 8283527 Shield 3 3400069 Screw 4 8572618 Sump with Seal 5 8268375 Check Valve, Sump 6 W10083957 Chopper Assembly 7 9741232 Screw 8 8531857 Protector, Inlet 9 ... 8268403 Face Seal Assembly (Also Order Item 19) 22 356138 Clamp, Hose 23 W10134017 Optical Water Indicator 24 W10216724 Capacitor 8 W10328552 No. PUMP AND MOTOR PARTS For Models: KUDS50SVBL4, KUDS50SVWH4, KUDS50SVSS4 (Black) (White) (Stainless) Illus.

Parts Diagram
Page 9
DESCRIPTION 1 W10077859 Feed Tube Assembly (Also Includes Item 3) 2 8533889 Screw 3 8557720 Sprayarm, 3rd Level 4 W10118464 Cover, Screw 5 W10082867 Mount 6 W10082949 Manifold 7 W10082832 Hanger 8 8268433 Seal, Sprayarm 9 W10082831 Probe, Manifold 10 W10082841 Sprayarm 11 W10077600 Manifold, Spray Zone 12 W10077903 Valve Assembly, Manifold 9 UPPER WASH AND RINSE PARTS For Models: KUDS50SVBL4, KUDS50SVWH4, KUDS50SVSS4 (Black) (White) (Stainless) W10328552 Illus. No. Part No.
DESCRIPTION 1 W10077859 Feed Tube Assembly (Also Includes Item 3) 2 8533889 Screw 3 8557720 Sprayarm, 3rd Level 4 W10118464 Cover, Screw 5 W10082867 Mount 6 W10082949 Manifold 7 W10082832 Hanger 8 8268433 Seal, Sprayarm 9 W10082831 Probe, Manifold 10 W10082841 Sprayarm 11 W10077600 Manifold, Spray Zone 12 W10077903 Valve Assembly, Manifold 9 UPPER WASH AND RINSE PARTS For Models: KUDS50SVBL4, KUDS50SVWH4, KUDS50SVSS4 (Black) (White) (Stainless) W10328552 Illus. No. Part No.


