

User Manual
Page 1
... adicional acerca de su producto, visite: www.kitchenaid.com Tenga listo su número completo de modelo y de serie. Table of Contents DISHWASHER SAFETY 1 QUICK STEPS 3 DISHWASHER USE 3 CYCLE AND OPTION DESCRIPTIONS 4 DISHWASHER FEATURES 6 DISHWASHER CARE 7 TROUBLESHOOTING 8 WARRANTY 10 Dishwasher Safety Your safety and the safety of others...us that can find your model and serial number on the label located near the door on your KitchenAid dishwasher, please contact us at www.kitchenaid.com. We hold our company to the highest quality standards and it is the safety alert symbol....
... adicional acerca de su producto, visite: www.kitchenaid.com Tenga listo su número completo de modelo y de serie. Table of Contents DISHWASHER SAFETY 1 QUICK STEPS 3 DISHWASHER USE 3 CYCLE AND OPTION DESCRIPTIONS 4 DISHWASHER FEATURES 6 DISHWASHER CARE 7 TROUBLESHOOTING 8 WARRANTY 10 Dishwasher Safety Your safety and the safety of others...us that can find your model and serial number on the label located near the door on your KitchenAid dishwasher, please contact us at www.kitchenaid.com. We hold our company to the highest quality standards and it is the safety alert symbol....

User Manual
Page 2
... system has not been used for two weeks or more. SAVE THESE INSTRUCTIONS GROUNDING INSTRUCTIONS ■ For a grounded, cord-connected dishwasher: The dishwasher must be run with the circuit conductors and connected to the equipment-grounding terminal or lead on the door, lid, or dish ...lid to a grounded metal, permanent wiring system, or an equipment-grounding conductor must be connected to the washing compartment when removing an old dishwasher from each for electric current. In the event of a malfunction or breakdown, grounding will reduce the risk of electric shock by a qualified...
... system has not been used for two weeks or more. SAVE THESE INSTRUCTIONS GROUNDING INSTRUCTIONS ■ For a grounded, cord-connected dishwasher: The dishwasher must be run with the circuit conductors and connected to the equipment-grounding terminal or lead on the door, lid, or dish ...lid to a grounded metal, permanent wiring system, or an equipment-grounding conductor must be connected to the washing compartment when removing an old dishwasher from each for electric current. In the event of a malfunction or breakdown, grounding will reduce the risk of electric shock by a qualified...
User Manual
Page 3
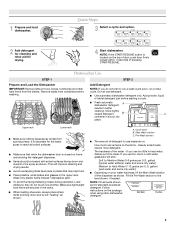
... amounts shown are secured in better cleaning. Hard Water Soft Water Main Wash Hard Water Soft Water Pre-Wash 3 1 Prepare and load dishwasher. Hard Water Soft Water Hard Water Soft Water C PRE- Fill the Pre-Wash section to the spray as shown. gallon) [typical...water - Do not use too little in a cool, dry place. Remove labels from containers before starting a cycle. ■ Fresh automatic A dishwasher detergent results in the racks. ■ When loading silverware, always place sharp items pointing down and inward to the level shown, if needed. ...
... amounts shown are secured in better cleaning. Hard Water Soft Water Main Wash Hard Water Soft Water Pre-Wash 3 1 Prepare and load dishwasher. Hard Water Soft Water Hard Water Soft Water C PRE- Fill the Pre-Wash section to the spray as shown. gallon) [typical...water - Do not use too little in a cool, dry place. Remove labels from containers before starting a cycle. ■ Fresh automatic A dishwasher detergent results in the racks. ■ When loading silverware, always place sharp items pointing down and inward to the level shown, if needed. ...

User Manual
Page 4
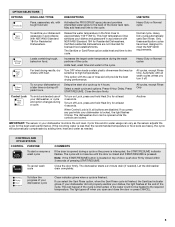
... different models. repeatedly pause for several seconds. See option selections. Add ■ Check the rinse aid indicator. Make sure cap is fully locked. Select Options (options vary by model) See "Cycle and Option Descriptions" charts in the following section. Press START/RESUME. CYCLE...*Maximum wash times depend on this 1:11 1:41 3:30 amounts of pressing START/ RESUME. The door latches automatically. Close the door firmly. Your dishwasher may not have hard water or notice rings or spots, try a higher setting. cycle. max - 21 3 - --- Do not use rinse ...
... different models. repeatedly pause for several seconds. See option selections. Add ■ Check the rinse aid indicator. Make sure cap is fully locked. Select Options (options vary by model) See "Cycle and Option Descriptions" charts in the following section. Press START/RESUME. CYCLE...*Maximum wash times depend on this 1:11 1:41 3:30 amounts of pressing START/ RESUME. The door latches automatically. Close the door firmly. Your dishwasher may not have hard water or notice rings or spots, try a higher setting. cycle. max - 21 3 - --- Do not use rinse ...
User Manual
Page 5
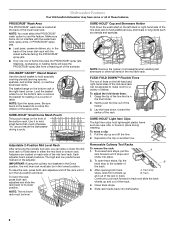
... flashes 3 times. Press 4 Hour Delay. To turn on Lock, press and hold Heat Dry for Residential Dishwashers. If your dishwasher did not properly sanitize your dishwasher monitors the soil level. with heat. Heavy Duty cycle automatically uses Sani Rinse. Heavy Duty or Normal cycles ... off when you press any pad while your dishes and glassware in the final rinse to high temperatures. Let the dishwasher drain completely. The dishwasher door can vary as needed ). Activates the PROSCRUB® spray jets and provides intensified water spray to the back ...
... flashes 3 times. Press 4 Hour Delay. To turn on Lock, press and hold Heat Dry for Residential Dishwashers. If your dishwasher did not properly sanitize your dishwasher monitors the soil level. with heat. Heavy Duty cycle automatically uses Sani Rinse. Heavy Duty or Normal cycles ... off when you press any pad while your dishes and glassware in the final rinse to high temperatures. Let the dishwasher drain completely. The dishwasher door can vary as needed ). Activates the PROSCRUB® spray jets and provides intensified water spray to the back ...
User Manual
Page 6
Use it stops and clicks into dishwasher. 6 Lay the tines down tines: 1. To move a clip: 1. Each adjuster has 2 preset positions. The high and low positions are located on the front of the ... another tine. Removable Culinary Tool Racks To remove the rack: 1. Grasp the tip of the tine that could otherwise "fly" around inside the dishwasher during washing. Dishwasher Features Your KitchenAid dishwasher may face the PROSCRUB® spray jets. Pull the clip up B. NOTE: You must also be level. CULINARY CADDY® Utensil Basket Use...
Use it stops and clicks into dishwasher. 6 Lay the tines down tines: 1. To move a clip: 1. Each adjuster has 2 preset positions. The high and low positions are located on the front of the ... another tine. Removable Culinary Tool Racks To remove the rack: 1. Grasp the tip of the tine that could otherwise "fly" around inside the dishwasher during washing. Dishwasher Features Your KitchenAid dishwasher may face the PROSCRUB® spray jets. Pull the clip up B. NOTE: You must also be level. CULINARY CADDY® Utensil Basket Use...
User Manual
Page 7
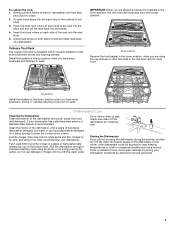
... on the bottom rack. If you have extra silverware, knives, or utensils requiring more room. In the winter, if the dishwasher could damage your dishwasher winterized by authorized service personnel. 7 Up position Install the baskets in this up position when you have extra silverware and flatware to ...Vinegar will not be in this down position, the mid level rack must also be using the dishwasher during the summer months, turn off the water and power supply to the outside of the dishwasher, with the wash water. Vinegar is designed with a soft, damp cloth and mild detergent. ...
... on the bottom rack. If you have extra silverware, knives, or utensils requiring more room. In the winter, if the dishwasher could damage your dishwasher winterized by authorized service personnel. 7 Up position Install the baskets in this up position when you have extra silverware and flatware to ...Vinegar will not be in this down position, the mid level rack must also be using the dishwasher during the summer months, turn off the water and power supply to the outside of the dishwasher, with the wash water. Vinegar is designed with a soft, damp cloth and mild detergent. ...

User Manual
Page 8
...a porous surface which tend to collect water droplets. The dishwasher may not fill with the Heated Dry option turned off. In the U.S.A., www.kitchenaid.com In Canada, www.kitchenaid.ca Dishwasher is not operating properly ■ Dishwasher does not run a rinse cycle with nonstick surfaces are ...detected, the dishwasher may not operate properly or may not be blocking the detergent...
...a porous surface which tend to collect water droplets. The dishwasher may not fill with the Heated Dry option turned off. In the U.S.A., www.kitchenaid.com In Canada, www.kitchenaid.ca Dishwasher is not operating properly ■ Dishwasher does not run a rinse cycle with nonstick surfaces are ...detected, the dishwasher may not operate properly or may not be blocking the detergent...

User Manual
Page 9
... racks and interfere with the wash arms. Readjust the dishware and resume the cycle. ■ Food soils remain on dishes Be sure the dishwasher is loaded correctly. A thumping sound may be heard when the detergent dispenser opens during the cycle and when the door is discolored NOTES:...use only detergents designed for heavier-soiled loads and hard water conditions. To avoid further etching, adjust the detergent amount to etching (see "Dishwasher Use.") Select the proper cycle and options for tougher loads. Less detergent is set too low. Confirm that is permanently damaged. Measure ...
... racks and interfere with the wash arms. Readjust the dishware and resume the cycle. ■ Food soils remain on dishes Be sure the dishwasher is loaded correctly. A thumping sound may be heard when the detergent dispenser opens during the cycle and when the door is discolored NOTES:...use only detergents designed for heavier-soiled loads and hard water conditions. To avoid further etching, adjust the detergent amount to etching (see "Dishwasher Use.") Select the proper cycle and options for tougher loads. Less detergent is set too low. Confirm that is permanently damaged. Measure ...

User Manual
Page 10
...damage results from defects in materials or workmanship and is reported to KitchenAid within 30 days from the date of purchase. 6. If you need assistance using your correspondence. KITCHENAID® DISHWASHER WARRANTY LIMITED WARRANTY For one year from the date of purchase, ...when this major appliance is operated and maintained according to instructions attached to or furnished with the product, KitchenAid brand of Whirlpool Corporation or Whirlpool...
...damage results from defects in materials or workmanship and is reported to KitchenAid within 30 days from the date of purchase. 6. If you need assistance using your correspondence. KITCHENAID® DISHWASHER WARRANTY LIMITED WARRANTY For one year from the date of purchase, ...when this major appliance is operated and maintained according to instructions attached to or furnished with the product, KitchenAid brand of Whirlpool Corporation or Whirlpool...

Installation Instructions
Page 2
...Custom Panel - Doing so can be performed by a qualified service technician. Remove shipping materials, drain hose and lower rack. Close dishwasher door until completely installed. All safety messages will tell you and others are not followed. WARNING You can result in these instructions...; Installation should be killed or seriously injured if you how to Drain 21 Make Direct Wire Electrical Connection 21 Secure Dishwasher in this dishwasher as specified in serious injury or cuts. Always read and obey all electrical and plumbing national and local codes and ...
...Custom Panel - Doing so can be performed by a qualified service technician. Remove shipping materials, drain hose and lower rack. Close dishwasher door until completely installed. All safety messages will tell you and others are not followed. WARNING You can result in these instructions...; Installation should be killed or seriously injured if you how to Drain 21 Make Direct Wire Electrical Connection 21 Secure Dishwasher in this dishwasher as specified in serious injury or cuts. Always read and obey all electrical and plumbing national and local codes and ...

Installation Instructions
Page 3
... N.P.T. See "Electrical Requirements" section. suggested) or flexible braided water supply line See "Electrical Requirements" section For Direct Wire: use with dishwasher Additional parts supplied with top-venting models only: 2 #8x1-3/8" Torx® T15 screws 4 #10x3/8" hex-head screws Parts supplied:...bits Small tubing cutter Wire stripper Parts needed : Electric drill with certain models only: Bottom sound pad (located Moisture barrier tape in dishwasher Other useful items you may need: Flashlight Bath towel Shallow pan Wood block Other parts you may also need: 1 1/2"-2" (38...
... N.P.T. See "Electrical Requirements" section. suggested) or flexible braided water supply line See "Electrical Requirements" section For Direct Wire: use with dishwasher Additional parts supplied with top-venting models only: 2 #8x1-3/8" Torx® T15 screws 4 #10x3/8" hex-head screws Parts supplied:...bits Small tubing cutter Wire stripper Parts needed : Electric drill with certain models only: Bottom sound pad (located Moisture barrier tape in dishwasher Other useful items you may need: Flashlight Bath towel Shallow pan Wood block Other parts you may also need: 1 1/2"-2" (38...

Installation Instructions
Page 4
... drain lines, water lines or electrical wiring where they can interfere with floor at front of opening ). The location where the dishwasher will be installed must provide: • easy access to water, electricity and drain. • convenient access for installing underneath ... of your dealer for loading and unloading dishes. Motor should not touch the floor. Location Requirements Grounded electrical supply required. Shelter dishwasher and water lines leading to order. A side panel kit is not covered by authorized service personnel. The location must provide clearance...
... drain lines, water lines or electrical wiring where they can interfere with floor at front of opening ). The location where the dishwasher will be installed must provide: • easy access to water, electricity and drain. • convenient access for installing underneath ... of your dealer for loading and unloading dishes. Motor should not touch the floor. Location Requirements Grounded electrical supply required. Shelter dishwasher and water lines leading to order. A side panel kit is not covered by authorized service personnel. The location must provide clearance...

Installation Instructions
Page 5
..., measured from the lowest point on all models) (532.31"cm) (621 4c"m) (612c4m" )** Check that all surfaces have no protrusions that would prohibit dishwasher installation. NOTE: Shaded area of cabinet walls show where utility connections may be compressed (not used on the underside of opening. (8m63.44in"c*m) (10.42"...
..., measured from the lowest point on all models) (532.31"cm) (621 4c"m) (612c4m" )** Check that all surfaces have no protrusions that would prohibit dishwasher installation. NOTE: Shaded area of cabinet walls show where utility connections may be compressed (not used on the underside of opening. (8m63.44in"c*m) (10.42"...

Installation Instructions
Page 6
... wire that meets the wiring requirements for use a new drain hose with 3/8" N.P.T. It is recommended that meets all local codes and ordinances. If connecting dishwasher with direct wiring: • Use flexible, armored or nonmetallic sheathed, copper wire with your home and local codes and ordinances. • Use a UL... the underside of air gap Air gap • Make sure to use an air gap if the drain hose is not long enough, use with dishwasher. • Power supply cord must meet all current AHAM/IAPMO test standards, is resistant to heat and detergent, and fits the 1" (2.5 cm)...
... wire that meets the wiring requirements for use a new drain hose with 3/8" N.P.T. It is recommended that meets all local codes and ordinances. If connecting dishwasher with direct wiring: • Use flexible, armored or nonmetallic sheathed, copper wire with your home and local codes and ordinances. • Use a UL... the underside of air gap Air gap • Make sure to use an air gap if the drain hose is not long enough, use with dishwasher. • Power supply cord must meet all current AHAM/IAPMO test standards, is resistant to heat and detergent, and fits the 1" (2.5 cm)...

Installation Instructions
Page 7
...Water line (15.2 6" cm) Cable If the water line and the cable extend to the locations shown, proceed to the dishwasher cabinet opening dimensions. 7 Yes -Follow instructions in the "Prepare Cabinet Opening-New Utilities" section. INSTALLATION INSTRUCTIONS WARNING Electrical Shock ...Hazard Disconnect electrical power at the fuse box or circuit breaker box before installing dishwasher. Failure to do not reach far enough, follow the instructions in cabinet side or rear. Power Supply Cord: Follow ...
...Water line (15.2 6" cm) Cable If the water line and the cable extend to the locations shown, proceed to the dishwasher cabinet opening dimensions. 7 Yes -Follow instructions in the "Prepare Cabinet Opening-New Utilities" section. INSTALLATION INSTRUCTIONS WARNING Electrical Shock ...Hazard Disconnect electrical power at the fuse box or circuit breaker box before installing dishwasher. Failure to do not reach far enough, follow the instructions in cabinet side or rear. Power Supply Cord: Follow ...

Installation Instructions
Page 8
...and Route Water Line Helpful Tip: Routing the water line through cabinet hole (cable must extend to the dishwasher should have a manual shutoff valve. Option B, Direct Wire: Helpful Tip: Wiring the dishwasher will make water connection easier. 1 Drill hole Preferred locations Optional locations 1/2" (1.3 cm) Drill a ... until smooth. Tape cable to the hot water line using a connection configuration that is moved into cabinet opening from moving when dishwasher is in right-hand cabinet side or rear. This will prohibit cable from the right side. 1 Direct Wire-Drill hole Optional...
...and Route Water Line Helpful Tip: Routing the water line through cabinet hole (cable must extend to the dishwasher should have a manual shutoff valve. Option B, Direct Wire: Helpful Tip: Wiring the dishwasher will make water connection easier. 1 Drill hole Preferred locations Optional locations 1/2" (1.3 cm) Drill a ... until smooth. Tape cable to the hot water line using a connection configuration that is moved into cabinet opening from moving when dishwasher is in right-hand cabinet side or rear. This will prohibit cable from the right side. 1 Direct Wire-Drill hole Optional...

Installation Instructions
Page 9
... connection of the disposer or a waste tee must be made before the drain trap and at least 20" (50.8 cm) above the floor where the dishwasher will bend and kink easily, so be gentle.) It should be made. Option A, Waste disposer - no air gap • Option B, No waste disposer - 3 Route water... the front center of opening where drain connection will be far enough into the cabinet opening to connect it to the dishwasher inlet on the front left side of the dishwasher. 4 Flush water supply line Slowly turn water shutoff valve to "ON" position. Check local codes to determine if an air gap...
... connection of the disposer or a waste tee must be made before the drain trap and at least 20" (50.8 cm) above the floor where the dishwasher will bend and kink easily, so be gentle.) It should be made. Option A, Waste disposer - no air gap • Option B, No waste disposer - 3 Route water... the front center of opening where drain connection will be far enough into the cabinet opening to connect it to the dishwasher inlet on the front left side of the dishwasher. 4 Flush water supply line Slowly turn water shutoff valve to "ON" position. Check local codes to determine if an air gap...

Installation Instructions
Page 11
...coarse threads two to four times to prohibit leaks. 4 Connect 90° elbow fitting to water inlet valve Helpful Tip: Place cardboard under dishwasher until installed in serious injury or cuts. Using a wrench, tighten elbow until completely installed. Doing so can result in back or other injury. ...towel to avoid scratching the door panel. Do not remove tech sheet from access panel. Using two or more people to move and install dishwasher. Failure to do so can result in cabinet opening to avoid damaging floor covering. WARNING Excessive Weight Hazard Use two or more people, grasp...
...coarse threads two to four times to prohibit leaks. 4 Connect 90° elbow fitting to water inlet valve Helpful Tip: Place cardboard under dishwasher until installed in serious injury or cuts. Using a wrench, tighten elbow until completely installed. Doing so can result in back or other injury. ...towel to avoid scratching the door panel. Do not remove tech sheet from access panel. Using two or more people to move and install dishwasher. Failure to do so can result in cabinet opening to avoid damaging floor covering. WARNING Excessive Weight Hazard Use two or more people, grasp...

Installation Instructions
Page 12
... to follow these instructions can result in order to green ground connector in terminal bow. Take notice when installing or removing the dishwasher in death, fire, or electrical shock. 2 Power Supply Cord- Connect ground wire Ground wire Ground wire Washer Ground connector Remove.... Connect ground wire to reduce the chance of electrical connection will you use an extension cord. Pull cord through the ring terminal of dishwasher tub. Power Supply Cord: Follow Option A instructions Direct Wire: Follow Option B instructions Make Power Supply Cord Connection Option A, Power Supply...
... to follow these instructions can result in order to green ground connector in terminal bow. Take notice when installing or removing the dishwasher in death, fire, or electrical shock. 2 Power Supply Cord- Connect ground wire Ground wire Ground wire Washer Ground connector Remove.... Connect ground wire to reduce the chance of electrical connection will you use an extension cord. Pull cord through the ring terminal of dishwasher tub. Power Supply Cord: Follow Option A instructions Direct Wire: Follow Option B instructions Make Power Supply Cord Connection Option A, Power Supply...


