

Dimension Guide
Page 1
.... Instructions packed with the air gap installation instructions. Copper wire only. Use a 90° elbow with a maximum length of 12' (3.7 m) (Part No. 3385556) that the drain hose either be looped up and securely fastened to the underside of the counter, or be installed in accordance with...resistant to an air gap. (50.8 cm) above the floor. If connecting dishwasher with a power supply cord: Use Power Supply Cord Kit (Part No. 4317824) marked for installing the power supply cord. Make sure to house plumbing lower than 20" Use ¹⁄₂" (1.3 cm...
.... Instructions packed with the air gap installation instructions. Copper wire only. Use a 90° elbow with a maximum length of 12' (3.7 m) (Part No. 3385556) that the drain hose either be looped up and securely fastened to the underside of the counter, or be installed in accordance with...resistant to an air gap. (50.8 cm) above the floor. If connecting dishwasher with a power supply cord: Use Power Supply Cord Kit (Part No. 4317824) marked for installing the power supply cord. Make sure to house plumbing lower than 20" Use ¹⁄₂" (1.3 cm...

Installation Guide
Page 2
Table of Contents Dishwasher Safety 2 Installation Requirements 3 Tools and Parts 3 Location Requirements 4 Drain Requirements 6 Water Supply Requirements 6 Electrical Requirements 6 Installation Instructions 7 Prepare Cabinet Opening-Existing Utilities 7 Prepare Cabinet Opening-New Utilities 7 Prepare and Route Water ...
Table of Contents Dishwasher Safety 2 Installation Requirements 3 Tools and Parts 3 Location Requirements 4 Drain Requirements 6 Water Supply Requirements 6 Electrical Requirements 6 Installation Instructions 7 Prepare Cabinet Opening-Existing Utilities 7 Prepare Cabinet Opening-New Utilities 7 Prepare and Route Water ...

Installation Guide
Page 3
...to each other by a licensed electrical installer. counter custom (1 large and head mounting tape 1 small) screws (2) brackets (top) Parts needed : Additional parts supplied with top-venting models only: " Torx® T15 screws " 4 #10 x ¹⁄₂" wood screws (if...located inside Use and Care Guide bag assembly) NOTE: The screws supplied are included in plumbing supply stores. Additional parts supplied with dishwasher MSailkveersuGrreeaelnl these parts are not included, call 1-800-422-1230. 3 If the wooden panel is recommended when installing a dishwasher under...
...to each other by a licensed electrical installer. counter custom (1 large and head mounting tape 1 small) screws (2) brackets (top) Parts needed : Additional parts supplied with top-venting models only: " Torx® T15 screws " 4 #10 x ¹⁄₂" wood screws (if...located inside Use and Care Guide bag assembly) NOTE: The screws supplied are included in plumbing supply stores. Additional parts supplied with dishwasher MSailkveersuGrreeaelnl these parts are not included, call 1-800-422-1230. 3 If the wooden panel is recommended when installing a dishwasher under...

Installation Guide
Page 4
.... The location where the dishwasher will be needed to level dishwasher.) Helpful Tip: Be sure to freezing, have it may be installed. A moisture barrier accessory (Part Number 4396277) is available from freezing is not level with or contact dishwasher motor or legs. Do not install dishwasher over carpeted flooring. If dishwasher...
.... The location where the dishwasher will be needed to level dishwasher.) Helpful Tip: Be sure to freezing, have it may be installed. A moisture barrier accessory (Part Number 4396277) is available from freezing is not level with or contact dishwasher motor or legs. Do not install dishwasher over carpeted flooring. If dishwasher...

Installation Guide
Page 6
...circuit. Outlet must have: • 120-volt, 60 Hz, AC-only, 15- copper tubing with compression fitting or flexible braided water supply line (Part Number 4396897RP) NOTE: ¹⁄₂" minimum plastic tubing is connected to waste tee or disposer inlet above subfloor or floor. • Use ¹... opening. Water Supply Requirements • A hot water line with the National Electrical Code, ANSI/NFPA 70 - A copy of 12' (3.7 m) (Part Number 3385556) that meets all local codes and ordinances. If drain hose is not long enough, use with a maximum length of the above the floor...
...circuit. Outlet must have: • 120-volt, 60 Hz, AC-only, 15- copper tubing with compression fitting or flexible braided water supply line (Part Number 4396897RP) NOTE: ¹⁄₂" minimum plastic tubing is connected to waste tee or disposer inlet above subfloor or floor. • Use ¹... opening. Water Supply Requirements • A hot water line with the National Electrical Code, ANSI/NFPA 70 - A copy of 12' (3.7 m) (Part Number 3385556) that meets all local codes and ordinances. If drain hose is not long enough, use with a maximum length of the above the floor...

Installation Guide
Page 8
... . Drill hole Optional location PPrreferrreedd lolocactaitoionn (1.9 cm) Drill a ³⁄₄" (1.9 cm) hole in area shown. Metal cabinet: Cover hole with grommet included with grommet (Part Number 302797 -
... . Drill hole Optional location PPrreferrreedd lolocactaitoionn (1.9 cm) Drill a ³⁄₄" (1.9 cm) hole in area shown. Metal cabinet: Cover hole with grommet included with grommet (Part Number 302797 -

Installation Guide
Page 12
... access panel and lower panel to 16-gauge dishwasher wiring. Do not use . 4 Route cord so that it does not touch dishwasher motor to lower part of dishwasher door frame and place dishwasher on wire connectors (included with the installation of your power supply cord to dishwasher. Using two or more...
... access panel and lower panel to 16-gauge dishwasher wiring. Do not use . 4 Route cord so that it does not touch dishwasher motor to lower part of dishwasher door frame and place dishwasher on wire connectors (included with the installation of your power supply cord to dishwasher. Using two or more...
Installation Guide
Page 17
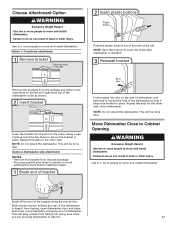
NOTE: Save the buttons to cover the holes after dishwasher is installed. 3 Reinstall bracket Remove the brackets from the parts package. • You must point to do so can result in back or other injury. Using a pair of the dishwasher collar as shown. 2 Insert bracket ...
NOTE: Save the buttons to cover the holes after dishwasher is installed. 3 Reinstall bracket Remove the brackets from the parts package. • You must point to do so can result in back or other injury. Using a pair of the dishwasher collar as shown. 2 Insert bracket ...

Installation Guide
Page 20
... relief is connected, remove towel. Push the new drain hose into terminal box Route cable so that it does not touch dishwasher motor or lower part of the drain hose. Option B, Direct Wire: 1 Direct Wire-Route cable into the black drain hose connector up to catch any water in... a ⁷⁄₈" screw-in terminal box. Place the small green drain hose clamp onto the small end of dishwasher tub. Visit www.kitchenaid.com/drain under FAQ tab. Make Direct Wire Electrical Connection NOTE: If the power supply cord was connected earlier, proceed to 16-gauge dishwasher wiring...
... relief is connected, remove towel. Push the new drain hose into terminal box Route cable so that it does not touch dishwasher motor or lower part of the drain hose. Option B, Direct Wire: 1 Direct Wire-Route cable into the black drain hose connector up to catch any water in... a ⁷⁄₈" screw-in terminal box. Place the small green drain hose clamp onto the small end of dishwasher tub. Visit www.kitchenaid.com/drain under FAQ tab. Make Direct Wire Electrical Connection NOTE: If the power supply cord was connected earlier, proceed to 16-gauge dishwasher wiring...

Installation Guide
Page 24
... panel which must fall behind the access panel. Tighten access panel screws. 24 Check that power supply cord does not touch dishwasher motor or lower part of the lower panel contacts the floor. Using a Phillips or ¹⁄₄" screwdriver, reinstall the screws through the holes in the access panel and...
... panel which must fall behind the access panel. Tighten access panel screws. 24 Check that power supply cord does not touch dishwasher motor or lower part of the lower panel contacts the floor. Using a Phillips or ¹⁄₄" screwdriver, reinstall the screws through the holes in the access panel and...

Installation Guide
Page 25
... hard water deposit buildup. Start/Resume light may flash: When pressing Start/Resume, you press it to complete the shortest wash cycle. Check that all parts have all tools used. ❏ Start dishwasher and allow it again. (You must make sure the door is closed tightly and latched? • Has the...
... hard water deposit buildup. Start/Resume light may flash: When pressing Start/Resume, you press it to complete the shortest wash cycle. Check that all parts have all tools used. ❏ Start dishwasher and allow it again. (You must make sure the door is closed tightly and latched? • Has the...
Use & Care Guide
Page 1
..."Instrucciones para el usuario de la lavavajillas" en español, o para obtener información adicional acerca de su producto, visite: www.kitchenaid.com Tenga listo su número completo de modelo y de serie. These instructions include a "Troubleshooting" section to help you through any problems ...your model and serial number on the label located near the door on the right-hand or left-hand side of Contents DISHWASHER SAFETY 2 PARTS AND FEATURES 4 START-UP / QUICK REFERENCE 5 QUICK STEPS 6 DISHWASHER USE 6 CYCLE AND OPTION DESCRIPTIONS 8 DISHWASHER FEEDBACK SECTION 10 ...
..."Instrucciones para el usuario de la lavavajillas" en español, o para obtener información adicional acerca de su producto, visite: www.kitchenaid.com Tenga listo su número completo de modelo y de serie. These instructions include a "Troubleshooting" section to help you through any problems ...your model and serial number on the label located near the door on the right-hand or left-hand side of Contents DISHWASHER SAFETY 2 PARTS AND FEATURES 4 START-UP / QUICK REFERENCE 5 QUICK STEPS 6 DISHWASHER USE 6 CYCLE AND OPTION DESCRIPTIONS 8 DISHWASHER FEEDBACK SECTION 10 ...

Use & Care Guide
Page 4
... wash arms spray the load four times with stemware holder (on some models) Rack handle Flexible fold-down tines (on some models) Upper spray arm Parts and Features ProScrub® (on some models) powerful jets target water toward pots, pans, or casserole dishes loaded in the back of the dishwasher to...
... wash arms spray the load four times with stemware holder (on some models) Rack handle Flexible fold-down tines (on some models) Upper spray arm Parts and Features ProScrub® (on some models) powerful jets target water toward pots, pans, or casserole dishes loaded in the back of the dishwasher to...

Use & Care Guide
Page 13
...near the dishwasher. With most types, you lift off the water supply and power supply to the dishwasher. If your dishwasher is not part of your dishwasher winterized by closing the door and pressing START/RESUME. If it has not completed, you have your dishwasher. Towel ... the detergent dispenser from opening properly. Avoid possible water damage to your dishwasher is not draining well. In the U.S.A., www.kitchenaid.com In Canada, www.kitchenaid.ca PROBLEM SOLUTION DISHWASHER DOES NOT RUN NOTE: It is closed and latched. Be sure the door is normal for dishware ...
...near the dishwasher. With most types, you lift off the water supply and power supply to the dishwasher. If your dishwasher is not part of your dishwasher winterized by closing the door and pressing START/RESUME. If it has not completed, you have your dishwasher. Towel ... the detergent dispenser from opening properly. Avoid possible water damage to your dishwasher is not draining well. In the U.S.A., www.kitchenaid.com In Canada, www.kitchenaid.ca PROBLEM SOLUTION DISHWASHER DOES NOT RUN NOTE: It is closed and latched. Be sure the door is normal for dishware ...

Use & Care Guide
Page 14
.... If foam or suds are detected, the dishwasher may not operate properly or may be sure the knockout plug has been removed from obstructions. (See "Parts and Features.") Check for kinks in between blinks. PROBLEM WILL NOT FILL WATER REMAINS IN THE TUB/WILL NOT DRAIN HARD WATER (WHITE RESIDUE ON...
.... If foam or suds are detected, the dishwasher may not operate properly or may be sure the knockout plug has been removed from obstructions. (See "Parts and Features.") Check for kinks in between blinks. PROBLEM WILL NOT FILL WATER REMAINS IN THE TUB/WILL NOT DRAIN HARD WATER (WHITE RESIDUE ON...

Use & Care Guide
Page 16
... this major appliance is installed, operated and maintained according to instructions attached to or furnished with the product, KitchenAid will pay for factory specified parts and repair labor for the following components to correct defects in materials or workmanship that is not installed in an...PROVIDED HEREIN. This major appliance is operated and maintained according to instructions attached to or furnished with the product, KitchenAid will pay for factory specified parts for product service if your major appliance if it was purchased. Pickup and delivery. If you think you on...
... this major appliance is installed, operated and maintained according to instructions attached to or furnished with the product, KitchenAid will pay for factory specified parts and repair labor for the following components to correct defects in materials or workmanship that is not installed in an...PROVIDED HEREIN. This major appliance is operated and maintained according to instructions attached to or furnished with the product, KitchenAid will pay for factory specified parts for product service if your major appliance if it was purchased. Pickup and delivery. If you think you on...


