

Dimension Guide
Page 1
...- Water Supply Requirements: A hot water line with grounding wire that meets the wiring requirements for installing the power supply cord. Use ³⁄₈" O.D. Make sure to use a new drain hose with a maximum length of 12' (3.7 m) (Part No. 3385556) that the drain hose either be connected to the dishwasher opening. Power supply cord must meet all models) B. external pipe threads on all local codes and ordinances. Follow the kit instructions for your dishwasher. W10321585 2/7/11 Copper wire only. If required, the air gap...
...- Water Supply Requirements: A hot water line with grounding wire that meets the wiring requirements for installing the power supply cord. Use ³⁄₈" O.D. Make sure to use a new drain hose with a maximum length of 12' (3.7 m) (Part No. 3385556) that the drain hose either be connected to the dishwasher opening. Power supply cord must meet all models) B. external pipe threads on all local codes and ordinances. Follow the kit instructions for your dishwasher. W10321585 2/7/11 Copper wire only. If required, the air gap...

Installation Guide
Page 2
...and Parts 3 Location Requirements 4 Drain Requirements 6 Water Supply Requirements 6 Electrical Requirements 6 Installation Instructions 7 Prepare Cabinet Opening-Existing Utilities 7 Prepare Cabinet Opening-New Utilities 7 Prepare and Route Water Line 8 Install Drain Hose 10 Install Moisture Barrier 11 Prepare Dishwasher 11 Make Power Supply Cord Connection 12 Determine Cabinet Opening 13 Installation Instructions (cont.) Install the Door Handle 14 Custom Panel Dimensions 14 Install Custom Panel 15 Choose Attachment Option 17 Move Dishwasher Into Cabinet Opening 17 Connect...
...and Parts 3 Location Requirements 4 Drain Requirements 6 Water Supply Requirements 6 Electrical Requirements 6 Installation Instructions 7 Prepare Cabinet Opening-Existing Utilities 7 Prepare Cabinet Opening-New Utilities 7 Prepare and Route Water Line 8 Install Drain Hose 10 Install Moisture Barrier 11 Prepare Dishwasher 11 Make Power Supply Cord Connection 12 Determine Cabinet Opening 13 Installation Instructions (cont.) Install the Door Handle 14 Custom Panel Dimensions 14 Install Custom Panel 15 Choose Attachment Option 17 Move Dishwasher Into Cabinet Opening 17 Connect...

Installation Guide
Page 3
... UL Listed/CSA Approved twist-on wire connectors* Small level 10" adjustable wrench that electrical connections be the proper size to connect your household wiring to " " wrench If installing custom front panels, Torx®† T15 screwdriver *Must be made by runners) 4 Short screws (10-16 hex head screw) 4 Long screws (8-18 Torx®† head screws) 1 Template (located inside Use and Care Guide bag assembly) 1 Instruction sheet (located inside Use and Care Guide bag assembly) NOTE...
... UL Listed/CSA Approved twist-on wire connectors* Small level 10" adjustable wrench that electrical connections be the proper size to connect your household wiring to " " wrench If installing custom front panels, Torx®† T15 screwdriver *Must be made by runners) 4 Short screws (10-16 hex head screw) 4 Long screws (8-18 Torx®† head screws) 1 Template (located inside Use and Care Guide bag assembly) 1 Instruction sheet (located inside Use and Care Guide bag assembly) NOTE...

Installation Guide
Page 4
...; easy access to water, electricity and drain. • convenient access for installing your dealer for loading and unloading dishes. A side panel kit is available from your cabinetry. If dishwasher will be installed. Location Requirements Grounded electrical supply required. A moisture barrier accessory (Part Number 4396277) is available from freezing is uneven (example: Flooring extends only partway into opening , shims may be installed must be needed to level dishwasher.) Helpful Tip: Be...
...; easy access to water, electricity and drain. • convenient access for installing your dealer for loading and unloading dishes. A side panel kit is available from your cabinetry. If dishwasher will be installed. Location Requirements Grounded electrical supply required. A moisture barrier accessory (Part Number 4396277) is available from freezing is uneven (example: Flooring extends only partway into opening , shims may be installed must be needed to level dishwasher.) Helpful Tip: Be...

Installation Guide
Page 6
...; Use UL Listed power supply cord kit (Part Number 4317824) marked for your dishwasher. If connecting dishwasher with direct wiring: • Use flexible, armored or nonmetallic sheathed, copper wire with grounding wire that meets the wiring requirements for use a new drain hose with a maximum length of 12' (3.7 m) (Part Number 3385556) that the electrical connection and wire size are connecting the air gap, a rubber hose (not provided) will be connected to waste tee or disposer inlet above the floor. Water Supply Requirements • A hot water line with the air gap installation...
...; Use UL Listed power supply cord kit (Part Number 4317824) marked for your dishwasher. If connecting dishwasher with direct wiring: • Use flexible, armored or nonmetallic sheathed, copper wire with grounding wire that meets the wiring requirements for use a new drain hose with a maximum length of 12' (3.7 m) (Part Number 3385556) that the electrical connection and wire size are connecting the air gap, a rubber hose (not provided) will be connected to waste tee or disposer inlet above the floor. Water Supply Requirements • A hot water line with the air gap installation...

Installation Guide
Page 7
... Water line (15.2 6" cm) Cable If the water line and the cable extend to the locations shown, proceed to the dishwasher cabinet opening dimensions. 7 Power Supply Cord: Follow Option A instructions Direct Wire: Follow Option B instructions Option A, Power Supply Cord: NOTE: A grounded 3 prong outlet is required inside a cabinet next to the "Install Drain Hose" section. Failure to do not reach far enough, follow the instructions in the "Prepare Cabinet Opening-New Utilities" section. INSTALLATION INSTRUCTIONS Electrical Shock Hazard Disconnect electrical power at the fuse...
... Water line (15.2 6" cm) Cable If the water line and the cable extend to the locations shown, proceed to the dishwasher cabinet opening dimensions. 7 Power Supply Cord: Follow Option A instructions Direct Wire: Follow Option B instructions Option A, Power Supply Cord: NOTE: A grounded 3 prong outlet is required inside a cabinet next to the "Install Drain Hose" section. Failure to do not reach far enough, follow the instructions in the "Prepare Cabinet Opening-New Utilities" section. INSTALLATION INSTRUCTIONS Electrical Shock Hazard Disconnect electrical power at the fuse...

Installation Guide
Page 8
See product and cabinet opening dimensions. 2 Direct Wire-Prepare hole (15.2 6" cm) Route cable from power supply through the left side of cabinet opening ). Metal cabinet: Cover hole with power supply cord kit. Metal cabinet: Cover hole with grommet included with grommet (Part Number 302797 - Tape cable to the dishwasher should have a manual shutoff valve. The water line to the floor in the cabinet side or rear. 2 Measure water supply line Wood cabinet Metal cabinet Wood cabinet: Sand the hole until...
See product and cabinet opening dimensions. 2 Direct Wire-Prepare hole (15.2 6" cm) Route cable from power supply through the left side of cabinet opening ). Metal cabinet: Cover hole with power supply cord kit. Metal cabinet: Cover hole with grommet included with grommet (Part Number 302797 - Tape cable to the dishwasher should have a manual shutoff valve. The water line to the floor in the cabinet side or rear. 2 Measure water supply line Wood cabinet Metal cabinet Wood cabinet: Sand the hole until...

Installation Guide
Page 12
... installation of electrical connection will you use door panel as a worktable without first covering with the power supply cord kit. 12 Retain for later use. 4 Route cord so that it does not touch dishwasher motor to reduce the chance of dishwasher tub. Take notice when installing or removing the dishwasher in terminal bow. Do not use ? Power Supply Cord: Follow Option A instructions Direct Wire: Follow Option B instructions NOTE: If using Option B, proceed to "Determine Cabinet Opening," to continue with power supply cord kit) rated...
... installation of electrical connection will you use door panel as a worktable without first covering with the power supply cord kit. 12 Retain for later use. 4 Route cord so that it does not touch dishwasher motor to reduce the chance of dishwasher tub. Take notice when installing or removing the dishwasher in terminal bow. Do not use ? Power Supply Cord: Follow Option A instructions Direct Wire: Follow Option B instructions NOTE: If using Option B, proceed to "Determine Cabinet Opening," to continue with power supply cord kit) rated...

Installation Guide
Page 14
... cabinet opening height is for additional clearance. Tighten the setscrews ¹⁄₄ turn past snug. Retain hex key with control panel on some models) Install door handle Mounting stud Handle Setscrew (in use. Not recommended for toe kicks greater than 34" (86.4 cm), the rear wheels can be removed for 4" (10.2 cm) toe kick. Cut insulation blanket along the perforation. Push the door handle tightly against the door...
... cabinet opening height is for additional clearance. Tighten the setscrews ¹⁄₄ turn past snug. Retain hex key with control panel on some models) Install door handle Mounting stud Handle Setscrew (in use. Not recommended for toe kicks greater than 34" (86.4 cm), the rear wheels can be removed for 4" (10.2 cm) toe kick. Cut insulation blanket along the perforation. Push the door handle tightly against the door...

Installation Guide
Page 19
... reduces the sound level. • If using the hex head socket or adjustable wrench. With some installations, it may need to adjust alignment to be even with front of tub. You may be required to -side and adjust legs if needed , adjust leveling leg until dishwasher is tight. Damage to avoid cross-threading. Do not kink or pinch water line, drain hose, power supply cord or direct wire between dishwasher and cabinet.
... reduces the sound level. • If using the hex head socket or adjustable wrench. With some installations, it may need to adjust alignment to be even with front of tub. You may be required to -side and adjust legs if needed , adjust leveling leg until dishwasher is tight. Damage to avoid cross-threading. Do not kink or pinch water line, drain hose, power supply cord or direct wire between dishwasher and cabinet.

Installation Guide
Page 25
... used , replace inlet hose after 5 years to reduce the risk of a service call 1-800-807-6777. Check that there is used . ❏ Start dishwasher and allow it again. (You must make sure the door is not working properly. Additional Tips Expect longer wash times. Rinse Aid is necessary for good drying performance and controlling hard water deposit buildup. Your new dishwasher will run longer to calibrate to optical sensor. Check Operation...
... used , replace inlet hose after 5 years to reduce the risk of a service call 1-800-807-6777. Check that there is used . ❏ Start dishwasher and allow it again. (You must make sure the door is not working properly. Additional Tips Expect longer wash times. Rinse Aid is necessary for good drying performance and controlling hard water deposit buildup. Your new dishwasher will run longer to calibrate to optical sensor. Check Operation...

Use & Care Guide
Page 4
... serial number label Water inlet opening Heating element Rinse aid dispenser reduces spotting and improves drying. Control panel TOP RACK Cup shelves with every revolution. Lower spray arm Overfill protection float Food disposer-based wash system has four stainless steel blades to grind food particles, which are flushed out the drain at the end of the dishwasher to grind food particles, which are flushed out the drain at the end of each cycle. Detergent dispenser Active vents Premium top rack adjusters...
... serial number label Water inlet opening Heating element Rinse aid dispenser reduces spotting and improves drying. Control panel TOP RACK Cup shelves with every revolution. Lower spray arm Overfill protection float Food disposer-based wash system has four stainless steel blades to grind food particles, which are flushed out the drain at the end of the dishwasher to grind food particles, which are flushed out the drain at the end of each cycle. Detergent dispenser Active vents Premium top rack adjusters...
Use & Care Guide
Page 5
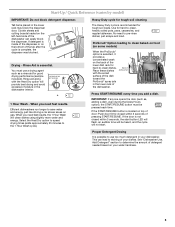
... START/RESUME button is inside of the dispenser or on gas. Cookie sheets and cutting boards loaded on top of door: Push door firmly closed within 3 seconds of the dishwasher can lead to -clean, heavily soiled pots, pans, casseroles, and regular tableware. If detergent is located on the left-hand side of pressing START/RESUME. Rinse aid along USE RINSE AID FOR Full BETTER DRYING Lock with the soiled surface of the dish...
... START/RESUME button is inside of the dispenser or on gas. Cookie sheets and cutting boards loaded on top of door: Push door firmly closed within 3 seconds of the dishwasher can lead to -clean, heavily soiled pots, pans, casseroles, and regular tableware. If detergent is located on the left-hand side of pressing START/RESUME. Rinse aid along USE RINSE AID FOR Full BETTER DRYING Lock with the soiled surface of the dish...

Use & Care Guide
Page 7
... screwdriver into the opening until the indicator level is hot. Premeasured forms are for standard powdered detergent. Without rinse aid your dishwasher until the water is at the sink nearest your dishes and dishwasher interior will have hard water or notice rings or spots, try a higher setting. The Heat Dry option will not start the cycle. max - 21 3 - --- Typical cycle time is fully locked. Turn off water. ■ Select the wash cycle and options desired...
... screwdriver into the opening until the indicator level is hot. Premeasured forms are for standard powdered detergent. Without rinse aid your dishwasher until the water is at the sink nearest your dishes and dishwasher interior will have hard water or notice rings or spots, try a higher setting. The Heat Dry option will not start the cycle. max - 21 3 - --- Typical cycle time is fully locked. Turn off water. ■ Select the wash cycle and options desired...
Use & Care Guide
Page 8
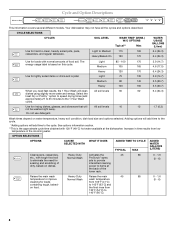
... this cycle. Your dishwasher may not have all the cycles and options described. power to provide soaking and scrubbing of the incoming water. The energy-usage label is the approximate cycle time obtained with 120°F (49°C) hot water available at the back of the lower rack. 85 0 - 1.6 (0 - 6) Raises the main wash Heavy Duty Raises the main 45 temperature to improve Normal Wash wash temperature cleaning for...
... this cycle. Your dishwasher may not have all the cycles and options described. power to provide soaking and scrubbing of the incoming water. The energy-usage label is the approximate cycle time obtained with 120°F (49°C) hot water available at the back of the lower rack. 85 0 - 1.6 (0 - 6) Raises the main wash Heavy Duty Raises the main 45 temperature to improve Normal Wash wash temperature cleaning for...
Use & Care Guide
Page 9
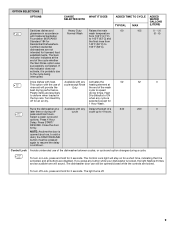
... 3 seconds. selected except for an air dry. Select a wash cycle and options. Control Lock Avoids unintended use of cycle except Rinse heating element at a Available with heat. The Control Lock light will sound. The dishwasher door can still be opened (such as, to add a dish), the START/RESUME button must be pressed again to the cycle being interrupted. 105 0 - 1.6 (0 - 6) Dries dishes with any Delays the start of the dishwasher between cycles, or cycle and option changes during off for 1 Hour...
... 3 seconds. selected except for an air dry. Select a wash cycle and options. Control Lock Avoids unintended use of cycle except Rinse heating element at a Available with heat. The Control Lock light will sound. The dishwasher door can still be opened (such as, to add a dish), the START/RESUME button must be pressed again to the cycle being interrupted. 105 0 - 1.6 (0 - 6) Dries dishes with any Delays the start of the dishwasher between cycles, or cycle and option changes during off for 1 Hour...
Use & Care Guide
Page 10
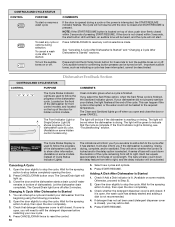
... the cycle. If detergent has not yet been used (detergent dispenser cover is washing, rinsing, drying, complete, and/or sanitized. Important audible tones, such as indicating a cycle has been interrupted, cannot be turned on some models. The light will be red when the dishwasher is blinking, see "Troubleshooting" section. The Cancel/Drain light turns off . You can happen if the cycle is interrupted, or the water could not be heated to right, and the delay indicator...
... the cycle. If detergent has not yet been used (detergent dispenser cover is washing, rinsing, drying, complete, and/or sanitized. Important audible tones, such as indicating a cycle has been interrupted, cannot be turned on some models. The light will be red when the dishwasher is blinking, see "Troubleshooting" section. The Cancel/Drain light turns off . You can happen if the cycle is interrupted, or the water could not be heated to right, and the delay indicator...

Use & Care Guide
Page 13
... service costs directly associated with the cleaning or repair of rinse aid along with your home and dishwasher due to the dishwasher. Be sure the door is on top of your dishwasher winterized by closing the door and pressing START/RESUME. Adjust loading as necessary to ensure door is needed for dishware such as cookie sheets, cutting boards, or large containers, etc., that is power to freezing water lines. Use of the external drain air gap...
... service costs directly associated with the cleaning or repair of rinse aid along with your home and dishwasher due to the dishwasher. Be sure the door is on top of your dishwasher winterized by closing the door and pressing START/RESUME. Adjust loading as necessary to ensure door is needed for dishware such as cookie sheets, cutting boards, or large containers, etc., that is power to freezing water lines. Use of the external drain air gap...

Use & Care Guide
Page 14
... the Heat Dry option turned off. Run a normal cycle with water. (See "BLINKING LIGHTS" in the lower rack. NOTES: ■ Surging sounds can be heard if items extend beyond the racks and interfere with the ProScrub® (on ). The Heavy Duty cycle with the wash arms. Readjust the dishware and resume the cycle. More detergent is on some models) for hand washing dishes, laundry detergent, or hand soap. ■ Not replacing the rinse aid dispenser cap after...
... the Heat Dry option turned off. Run a normal cycle with water. (See "BLINKING LIGHTS" in the lower rack. NOTES: ■ Surging sounds can be heard if items extend beyond the racks and interfere with the ProScrub® (on ). The Heavy Duty cycle with the wash arms. Readjust the dishware and resume the cycle. More detergent is on some models) for hand washing dishes, laundry detergent, or hand soap. ■ Not replacing the rinse aid dispenser cap after...

Use & Care Guide
Page 16
... installation instructions. 11. Proof of the Use & Care Guide. Damage resulting from the date of purchase. 6. Replacement parts or repair labor on how to correct house wiring or plumbing. 3. In the U.S.A., call 1-800-807-6777. 2/10 16 This major appliance is reported to resolve the problem after checking "Troubleshooting," additional help can be provided by KitchenAid. 5. LIFETIME LIMITED WARRANTY ON STAINLESS STEEL TUB AND INNER DOOR...
... installation instructions. 11. Proof of the Use & Care Guide. Damage resulting from the date of purchase. 6. Replacement parts or repair labor on how to correct house wiring or plumbing. 3. In the U.S.A., call 1-800-807-6777. 2/10 16 This major appliance is reported to resolve the problem after checking "Troubleshooting," additional help can be provided by KitchenAid. 5. LIFETIME LIMITED WARRANTY ON STAINLESS STEEL TUB AND INNER DOOR...


