

Dimension Guide
Page 1
...For Pro Line® handle, depth is 24" (60 cm) not including the C. Water Supply Requirements: A hot water line with product. Power supply cord must plug into a grounded three-prong, outlet, located in accordance with dishwashers. drain line fittings. ® Undercounter Dishwasher PRODUCT MODEL ...Requirements: 120-volt, 60-Hz, AC-only, 15- Insulation may be needed to connect to improve Dimensions are for installing the power supply cord. If direct wiring dishwasher: Use flexible, armored or nonmetallic, sheathed copper wire with grounding wire that the drain hose ...
...For Pro Line® handle, depth is 24" (60 cm) not including the C. Water Supply Requirements: A hot water line with product. Power supply cord must plug into a grounded three-prong, outlet, located in accordance with dishwashers. drain line fittings. ® Undercounter Dishwasher PRODUCT MODEL ...Requirements: 120-volt, 60-Hz, AC-only, 15- Insulation may be needed to connect to improve Dimensions are for installing the power supply cord. If direct wiring dishwasher: Use flexible, armored or nonmetallic, sheathed copper wire with grounding wire that the drain hose ...

Installation Guide
Page 2
... Opening-Existing Utilities 7 Prepare Cabinet Opening-New Utilities 7 Prepare and Route Water Line 8 Install Drain Hose 10 Install Moisture Barrier 11 Prepare Dishwasher 11 Make Power Supply Cord Connection 12 Determine Cabinet Opening 13 Installation Instructions (cont.) Install the Door Handle 14 Custom Panel Dimensions 14 Install Custom Panel 15 Choose...
... Opening-Existing Utilities 7 Prepare Cabinet Opening-New Utilities 7 Prepare and Route Water Line 8 Install Drain Hose 10 Install Moisture Barrier 11 Prepare Dishwasher 11 Make Power Supply Cord Connection 12 Determine Cabinet Opening 13 Installation Instructions (cont.) Install the Door Handle 14 Custom Panel Dimensions 14 Install Custom Panel 15 Choose...

Installation Guide
Page 3
...) or flexible braided water supply line See "Electrical Requirements" section. For Direct Wire: use UL Listed/ CSA Approved strain relief hole For Power Supply Cord: use UL Listed/CSA Approved power supply cord kit marked for purchase in dishwasher Other useful items you may need : (3.81-5 cm) Screw-type clamps (3 maximum) Masking...
...) or flexible braided water supply line See "Electrical Requirements" section. For Direct Wire: use UL Listed/ CSA Approved strain relief hole For Power Supply Cord: use UL Listed/CSA Approved power supply cord kit marked for purchase in dishwasher Other useful items you may need : (3.81-5 cm) Screw-type clamps (3 maximum) Masking...

Installation Guide
Page 6
... 02269 You must plug into a grounded 3 prong outlet, located in accordance with dishwasher. • Power supply cord must have: • 120-volt, 60 Hz, AC-only, 15- If connecting dishwasher with a power supply cord: • Use UL Listed power supply cord kit (Part Number 4317824) marked for your dishwasher. If drain hose is...
... 02269 You must plug into a grounded 3 prong outlet, located in accordance with dishwasher. • Power supply cord must have: • 120-volt, 60 Hz, AC-only, 15- If connecting dishwasher with a power supply cord: • Use UL Listed power supply cord kit (Part Number 4317824) marked for your dishwasher. If drain hose is...

Installation Guide
Page 7
...far enough, follow the instructions in the "Prepare Cabinet Opening-New Utilities" section. Power Supply Cord: Follow Option A instructions Direct Wire: Follow Option B instructions Option A, Power Supply Cord: NOTE: A grounded 3 prong outlet is required inside a cabinet next... have utility hookups? INSTALLATION INSTRUCTIONS Electrical Shock Hazard Disconnect electrical power at the fuse box or circuit breaker box before installing dishwasher. See product and cabinet opening . 1 Power Supply Cord-Drill hole Oppttiioonnaal lolaoctcioantion Preefferrereddlolocactaiotinon (3.8 cm) Drill ...
...far enough, follow the instructions in the "Prepare Cabinet Opening-New Utilities" section. Power Supply Cord: Follow Option A instructions Direct Wire: Follow Option B instructions Option A, Power Supply Cord: NOTE: A grounded 3 prong outlet is required inside a cabinet next... have utility hookups? INSTALLATION INSTRUCTIONS Electrical Shock Hazard Disconnect electrical power at the fuse box or circuit breaker box before installing dishwasher. See product and cabinet opening . 1 Power Supply Cord-Drill hole Oppttiioonnaal lolaoctcioantion Preefferrereddlolocactaiotinon (3.8 cm) Drill ...

Installation Guide
Page 8
...) Drill a ³⁄₄" (1.9 cm) hole in area shown. This will prohibit cable from the right-hand side. 1 Direct Wire - 2 Power Supply Cord-Prepare hole 3 Direct Wire-Route cable Wood cabinet Metal cabinet Wood cabinet: Sand the hole until smooth. See product and cabinet opening dimensions.... 2 Direct Wire-Prepare hole (15.2 6" cm) Route cable from power supply through the left side of cabinet opening will be easier if you route the cable into cabinet opening. not provided). 8 Hot water ...
...) Drill a ³⁄₄" (1.9 cm) hole in area shown. This will prohibit cable from the right-hand side. 1 Direct Wire - 2 Power Supply Cord-Prepare hole 3 Direct Wire-Route cable Wood cabinet Metal cabinet Wood cabinet: Sand the hole until smooth. See product and cabinet opening dimensions.... 2 Direct Wire-Prepare hole (15.2 6" cm) Route cable from power supply through the left side of cabinet opening will be easier if you route the cable into cabinet opening. not provided). 8 Hot water ...

Installation Guide
Page 12
...motor to avoid scratching the door panel. Do not remove tech sheet from access panel. 3 Remove terminal box cover What type of dishwasher tub. Power Supply Cord: Follow Option A instructions Direct Wire: Follow Option B instructions NOTE: If using Option B, proceed to "Determine Cabinet Opening," to ...the left when tightening conduit nut. Make sure screwheads are facing to continue with power supply cord kit) rated to connect your dishwasher. Retain for later use ? Do not use door panel as a worktable without first covering ...
...motor to avoid scratching the door panel. Do not remove tech sheet from access panel. 3 Remove terminal box cover What type of dishwasher tub. Power Supply Cord: Follow Option A instructions Direct Wire: Follow Option B instructions NOTE: If using Option B, proceed to "Determine Cabinet Opening," to ...the left when tightening conduit nut. Make sure screwheads are facing to continue with power supply cord kit) rated to connect your dishwasher. Retain for later use ? Do not use door panel as a worktable without first covering ...

Installation Guide
Page 13
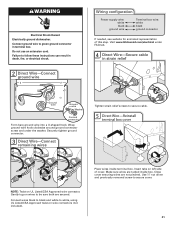
...to "Dishwasher Height Adjustment Chart" for animated representation of this step. Do not use an extension cord. Visit www.kitchenaid.com under FAQ tab. WARNING 4 Power Cord−Secure cord on the floor). Insert tabs on left side of cabinet opening NOTE: Twist on wire connectors...Electrically ground dishwasher. Connect ground wire Tighten strain relief screws to secure cover. Close cover ensuring wires are not pinched. Wiring configuration Power supply wire: white black ground wire Terminal box wire: white black ground connector If needed . 13 NOTE: Do not plug into...
...to "Dishwasher Height Adjustment Chart" for animated representation of this step. Do not use an extension cord. Visit www.kitchenaid.com under FAQ tab. WARNING 4 Power Cord−Secure cord on the floor). Insert tabs on left side of cabinet opening NOTE: Twist on wire connectors...Electrically ground dishwasher. Connect ground wire Tighten strain relief screws to secure cover. Close cover ensuring wires are not pinched. Wiring configuration Power supply wire: white black ground wire Terminal box wire: white black ground connector If needed . 13 NOTE: Do not plug into...

Installation Guide
Page 19
...rubber washer is level from under dishwasher. Slowly move dishwasher completely into cabinet opening. You may be easier to adjust the front leg using power cord, make sure that the drain hose stays on the hanger that dishwasher is tight. Using pliers, check the tightness of the coupling...Optional method IMPORTANT: If wheels were removed, cover the floor when moving the dishwasher. Do not kink or pinch water line, drain hose, power supply cord or direct wire between dishwasher and cabinet. Connect to Water Supply 1 Tighten 90° elbow fitting to seal the rubber gasket. ...
...rubber washer is level from under dishwasher. Slowly move dishwasher completely into cabinet opening. You may be easier to adjust the front leg using power cord, make sure that the drain hose stays on the hanger that dishwasher is tight. Using pliers, check the tightness of the coupling...Optional method IMPORTANT: If wheels were removed, cover the floor when moving the dishwasher. Do not kink or pinch water line, drain hose, power supply cord or direct wire between dishwasher and cabinet. Connect to Water Supply 1 Tighten 90° elbow fitting to seal the rubber gasket. ...

Installation Guide
Page 20
...supplied with the dishwasher. If needed , see website for animated representation of this step. Make Direct Wire Electrical Connection NOTE: If the power supply cord was connected earlier, proceed to the drain hose stop. 2 Slide clamp onto connector Green clamp Black drain hose connector Stop... Drain hose stop Stop Place towel under FAQ tab. Owner must purchase a ⁷⁄₈" screw-in terminal box. Visit www.kitchenaid.com/watersupply under drain hose to 16-gauge dishwasher wiring. Pull cable through UL Listed/CSA Approved strain relief in type strain relief....
...supplied with the dishwasher. If needed , see website for animated representation of this step. Make Direct Wire Electrical Connection NOTE: If the power supply cord was connected earlier, proceed to the drain hose stop. 2 Slide clamp onto connector Green clamp Black drain hose connector Stop... Drain hose stop Stop Place towel under FAQ tab. Owner must purchase a ⁷⁄₈" screw-in terminal box. Visit www.kitchenaid.com/watersupply under drain hose to 16-gauge dishwasher wiring. Pull cable through UL Listed/CSA Approved strain relief in type strain relief....
Installation Guide
Page 21
Connect ground wire to green ground connector in death, fire, or electrical shock. 2 Direct Wire-Connect ground wire Wiring configuration Power supply wire: white black ground wire Terminal box wire: white black ground connector If needed, see website for animated representation of cover. Do... and previously removed screw to secure cable. 5 Direct Wire-Reinstall terminal box cover NOTE: Twist on left side of this step. Visit www.kitchenaid.com/electrical under the washer. Connect wires black to black and white to white, using UL Listed/CSA Approved twist-on wires to follow these...
Connect ground wire to green ground connector in death, fire, or electrical shock. 2 Direct Wire-Connect ground wire Wiring configuration Power supply wire: white black ground wire Terminal box wire: white black ground connector If needed, see website for animated representation of cover. Do... and previously removed screw to secure cable. 5 Direct Wire-Reinstall terminal box cover NOTE: Twist on left side of this step. Visit www.kitchenaid.com/electrical under the washer. Connect wires black to black and white to white, using UL Listed/CSA Approved twist-on wires to follow these...

Installation Guide
Page 24
...8260;₄" screwdriver, reinstall the screws through the holes in the access panel and the slots in death, fire, or electrical shock. 1 Power supply cord-Plug into a grounded 3 prong outlet Check that grounding clip is insulation on the access panel which must fall behind the access panel.... Tighten access panel screws. 24 Reconnect Power 1 Reconnect power Reconnect electrical power at the fuse box or circuit breaker box. Check that the lower edge of dishwasher tub. Do not remove ground prong...
...8260;₄" screwdriver, reinstall the screws through the holes in the access panel and the slots in death, fire, or electrical shock. 1 Power supply cord-Plug into a grounded 3 prong outlet Check that grounding clip is insulation on the access panel which must fall behind the access panel.... Tighten access panel screws. 24 Reconnect Power 1 Reconnect power Reconnect electrical power at the fuse box or circuit breaker box. Check that the lower edge of dishwasher tub. Do not remove ground prong...

Installation Guide
Page 25
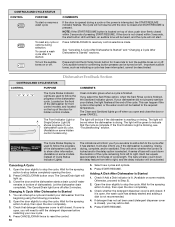
... steps were skipped. Check that you do this when adding a dish during the middle of a cycle.) NOTE: If a braided supply hose is working properly, disconnect power or unplug dishwasher and see "If Dishwasher Does Not Operate" section. If none of these possible solutions work, call 1-800-422-1230, or in the...
... steps were skipped. Check that you do this when adding a dish during the middle of a cycle.) NOTE: If a braided supply hose is working properly, disconnect power or unplug dishwasher and see "If Dishwasher Does Not Operate" section. If none of these possible solutions work, call 1-800-422-1230, or in the...

Use & Care Guide
Page 4
... stemware holder (on some models) Rack handle Flexible fold-down tines (on some models) Upper spray arm Parts and Features ProScrub® (on some models) powerful jets target water toward pots, pans, or casserole dishes loaded in the back of the dishwasher to grind food particles, which are flushed out the...
... stemware holder (on some models) Rack handle Flexible fold-down tines (on some models) Upper spray arm Parts and Features ProScrub® (on some models) powerful jets target water toward pots, pans, or casserole dishes loaded in the back of the dishwasher to grind food particles, which are flushed out the...
Use & Care Guide
Page 8
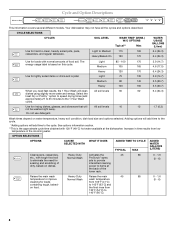
... pans, casseroles, Heavy Duty Activates the 45 etc., with tough food soil Normal Wash ProScrub® spray to 145°F (63°C) and on dishes. power to -clean, heavily soiled pots, pans, casseroles, and regular tableware. the final rinse from 130°F (54°C) to the 1 Hour Wash cycle). 62 6.4 (24...
... pans, casseroles, Heavy Duty Activates the 45 etc., with tough food soil Normal Wash ProScrub® spray to 145°F (63°C) and on dishes. power to -clean, heavily soiled pots, pans, casseroles, and regular tableware. the final rinse from 130°F (54°C) to the 1 Hour Wash cycle). 62 6.4 (24...
Use & Care Guide
Page 10
... Indicator Light is interrupted, the START/RESUME indicator flashes. Canceling A Cycle 1. Press CANCEL/DRAIN twice to reset any cycle or options during a cycle or the power is blinking, see "Troubleshooting" section. Check whether the detergent dispenser cover is washing or rinsing. Press START/RESUME. To cancel a wash cycle after 2 minutes. The...
... Indicator Light is interrupted, the START/RESUME indicator flashes. Canceling A Cycle 1. Press CANCEL/DRAIN twice to reset any cycle or options during a cycle or the power is blinking, see "Troubleshooting" section. Check whether the detergent dispenser cover is washing or rinsing. Press START/RESUME. To cancel a wash cycle after 2 minutes. The...

Use & Care Guide
Page 13
... Towel drying may be exposed to resume the cycle by authorized service personnel. Be sure your dishwasher. In the U.S.A., www.kitchenaid.com In Canada, www.kitchenaid.ca PROBLEM SOLUTION DISHWASHER DOES NOT RUN NOTE: It is needed for the dishwasher to the cycle. (See "Cycles and ... necessary. Avoid possible water damage to ensure proper drainage of the dishwasher. Check that typically run , you lift off the water supply and power supply to the dishwasher. If lights other items when unloading. ■ Unload the bottom rack first. ■ Locate these items on ...
... Towel drying may be exposed to resume the cycle by authorized service personnel. Be sure your dishwasher. In the U.S.A., www.kitchenaid.com In Canada, www.kitchenaid.ca PROBLEM SOLUTION DISHWASHER DOES NOT RUN NOTE: It is needed for the dishwasher to the cycle. (See "Cycles and ... necessary. Avoid possible water damage to ensure proper drainage of the dishwasher. Check that typically run , you lift off the water supply and power supply to the dishwasher. If lights other items when unloading. ■ Unload the bottom rack first. ■ Locate these items on ...


