
Installation Guide
Page 2
... Cabinet Opening-Existing Utilities 7 Prepare Cabinet Opening-New Utilities 7 Prepare and Route Water Line 8 Install Drain Hose 9 Install Moisture Barrier (under a wood countertop 11 Prepare Dishwasher 12 Make Power Supply Cord Connection 13 Determine Cabinet Opening 14 INSTALLATION INSTRUCTIONS (CONT.) Install Door Handle (on some models 15 Custom Panel Dimensions 15 Install Custom Panel 16 Choose Attachment Option 18 Move Dishwasher Close to Cabinet Opening 19 Connect to Water Supply 21 Connect to Drain 22 Make Direct Wire Electrical 22 Secure Dishwasher in Cabinet Opening...
... Cabinet Opening-Existing Utilities 7 Prepare Cabinet Opening-New Utilities 7 Prepare and Route Water Line 8 Install Drain Hose 9 Install Moisture Barrier (under a wood countertop 11 Prepare Dishwasher 12 Make Power Supply Cord Connection 13 Determine Cabinet Opening 14 INSTALLATION INSTRUCTIONS (CONT.) Install Door Handle (on some models 15 Custom Panel Dimensions 15 Install Custom Panel 16 Choose Attachment Option 18 Move Dishwasher Close to Cabinet Opening 19 Connect to Water Supply 21 Connect to Drain 22 Make Direct Wire Electrical 22 Secure Dishwasher in Cabinet Opening...
Installation Guide
Page 3
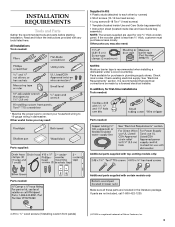
...-time installations Tools needed : Supplied in Kit: 4 Plastic studs (attached to 16-gauge wiring in dishwasher. It is less than ³⁄₄" thick, customer must purchase screws locally. See "Electrical Requirements" section. All Installations Tools needed : * Must be made by runners) 4 Short screws (10-16 hex head screw) 4 Long screws (8-18 Torx®† ) head screws) 1 Template (located inside Use and Care Guide bag assembly) 1 Instruction sheet (located inside Use and Care Guide bag assembly...
...-time installations Tools needed : Supplied in Kit: 4 Plastic studs (attached to 16-gauge wiring in dishwasher. It is less than ³⁄₄" thick, customer must purchase screws locally. See "Electrical Requirements" section. All Installations Tools needed : * Must be made by runners) 4 Short screws (10-16 hex head screw) 4 Long screws (8-18 Torx®† ) head screws) 1 Template (located inside Use and Care Guide bag assembly) 1 Instruction sheet (located inside Use and Care Guide bag assembly...

Installation Guide
Page 4
... in the "Product and Cabinet Opening Dimensions" section. 4 Call 1-800-422-1230 to dishwasher against freezing. If dishwasher will be installed must provide clearance between the side of time or in a location where it winterized by the warranty. Do not run drain lines, water lines or electrical wiring where they can interfere with floor at the end of opening is not level with or contact dishwasher motor or legs. A side panel kit is not...
... in the "Product and Cabinet Opening Dimensions" section. 4 Call 1-800-422-1230 to dishwasher against freezing. If dishwasher will be installed must provide clearance between the side of time or in a location where it winterized by the warranty. Do not run drain lines, water lines or electrical wiring where they can interfere with floor at the end of opening is not level with or contact dishwasher motor or legs. A side panel kit is not...

Installation Guide
Page 6
... to 120 psi (138 to 862 kPa) water pressure can be installed in accordance with the air gap installation instructions. A copy of the above code standards can be needed to connect to the waste tee or disposer inlet. or 20-amp, fused electrical supply. ■ Copper wire only. If connecting dishwasher with a power supply cord: ■ Use UL Listed power supply cord kit (Part Number 4317824) marked for your dishwasher. When you are adequate and in house plumbing...
... to 120 psi (138 to 862 kPa) water pressure can be installed in accordance with the air gap installation instructions. A copy of the above code standards can be needed to connect to the waste tee or disposer inlet. or 20-amp, fused electrical supply. ■ Copper wire only. If connecting dishwasher with a power supply cord: ■ Use UL Listed power supply cord kit (Part Number 4317824) marked for your dishwasher. When you are adequate and in house plumbing...

Installation Guide
Page 7
... the electrical supply Option A, Power Supply Cord: NOTE: A grounded 3 prong outlet is required inside a cabinet next to the "Install Drain Hose" section. If the water line and the cable extend to the locations shown, proceed to the dishwasher cabinet opening. Drill a 1¹⁄₂" (3.8 cm) hole in the "Prepare Cabinet Opening- New Utilities" section. If they do so can result in death or electrical shock. See "Product and Cabinet Opening Dimensions" section. 7 INSTALLATION INSTRUCTIONS WARNING Prepare Cabinet Opening...
... the electrical supply Option A, Power Supply Cord: NOTE: A grounded 3 prong outlet is required inside a cabinet next to the "Install Drain Hose" section. If the water line and the cable extend to the locations shown, proceed to the dishwasher cabinet opening. Drill a 1¹⁄₂" (3.8 cm) hole in the "Prepare Cabinet Opening- New Utilities" section. If they do so can result in death or electrical shock. See "Product and Cabinet Opening Dimensions" section. 7 INSTALLATION INSTRUCTIONS WARNING Prepare Cabinet Opening...

Installation Guide
Page 8
... in right-hand cabinet side or rear. Option B, Direct Wire: Helpful Tip: Wiring the dishwasher will be easier if you route the cable into cabinet opening from the right-hand side. Metal cabinet: Cover hole with power supply cord kit. Route cable from moving when dishwasher is in area shown. The water line to the right front side of cabinet opening will prohibit cable from power supply through the...
... in right-hand cabinet side or rear. Option B, Direct Wire: Helpful Tip: Wiring the dishwasher will be easier if you route the cable into cabinet opening from the right-hand side. Metal cabinet: Cover hole with power supply cord kit. Route cable from moving when dishwasher is in area shown. The water line to the right front side of cabinet opening will prohibit cable from power supply through the...
Installation Guide
Page 9
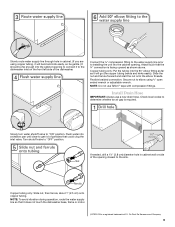
... the dishwasher inlet on the front left side of E.I. Turn shutoff valve to "ON" position. NOTE: To avoid vibration during operation, route the water supply line so that the ³⁄₄" connection is required. Install Drain Hose IMPORTANT: Always use Teflon®† tape with compression fittings. NOTE: Do not use a new drain hose. Flush water into the cabinet opening to connect it does not touch the dishwasher base, frame or motor...
... the dishwasher inlet on the front left side of E.I. Turn shutoff valve to "ON" position. NOTE: To avoid vibration during operation, route the water supply line so that the ³⁄₄" connection is required. Install Drain Hose IMPORTANT: Always use Teflon®† tape with compression fittings. NOTE: Do not use a new drain hose. Flush water into the cabinet opening to connect it does not touch the dishwasher base, frame or motor...
Installation Guide
Page 19
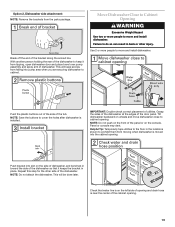
... from the parts package. IMPORTANT: Double-check correct placement of the door panel. NOTE: Do not attach the dishwasher. Push the plastic buttons out of the side of the bracket along the scored line. Push bracket into slot on the left side of the dishwasher. NOTE: Do not push on the front of the dishwasher to cabinet opening and drain hose is installed. With another...
... from the parts package. IMPORTANT: Double-check correct placement of the door panel. NOTE: Do not attach the dishwasher. Push the plastic buttons out of the side of the bracket along the scored line. Push bracket into slot on the left side of the dishwasher. NOTE: Do not push on the front of the dishwasher to cabinet opening and drain hose is installed. With another...

Installation Guide
Page 22
... drain hose. Select UL Listed/CSA Approved twist-on wire connectors (not included) rated to connect your household wiring to the drain hose stop. If needed, see website for animated representation of this step. Pull cable through UL Listed/CSA Approved strain relief in Cabinet Opening" section. Make Direct Wire Electrical NOTE: If the power supply cord was connected earlier, proceed to "Secure Dishwasher in terminal box. Strain relief is connected, remove towel. Option B, Direct Wire: Using...
... drain hose. Select UL Listed/CSA Approved twist-on wire connectors (not included) rated to connect your household wiring to the drain hose stop. If needed, see website for animated representation of this step. Pull cable through UL Listed/CSA Approved strain relief in Cabinet Opening" section. Make Direct Wire Electrical NOTE: If the power supply cord was connected earlier, proceed to "Secure Dishwasher in terminal box. Strain relief is connected, remove towel. Option B, Direct Wire: Using...
Installation Guide
Page 26
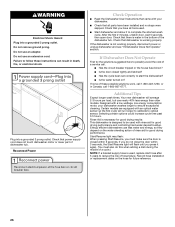
... fuse blown? ■ Is the door closed within 3 seconds, the Start/Resume light will average 2-3 hours per load, but use less water and energy, so they depend on the water sheeting action of the dishwasher tub. Additional Tips Expect longer wash times. Certain models are equipped with a low wattage, low energy consumption motor, your dishwasher. ■ Check that power supply cord does not touch dishwasher motor or lower part of a service call 1-800-807-6777. Energy efficient dishwashers use...
... fuse blown? ■ Is the door closed within 3 seconds, the Start/Resume light will average 2-3 hours per load, but use less water and energy, so they depend on the water sheeting action of the dishwasher tub. Additional Tips Expect longer wash times. Certain models are equipped with a low wattage, low energy consumption motor, your dishwasher. ■ Check that power supply cord does not touch dishwasher motor or lower part of a service call 1-800-807-6777. Energy efficient dishwashers use...

User Instructions
Page 2
... or use dishwasher until completely installed. The plug must be run with all hot water faucets and let the water flow from service or discarding it will release any accumulated hydrogen gas. Do not push down on open flame during this time. ■ Do not touch the heating element during or immediately after use. ■ Do not operate the dishwasher unless all instructions before using the dishwasher turn on the dishwasher...
... or use dishwasher until completely installed. The plug must be run with all hot water faucets and let the water flow from service or discarding it will release any accumulated hydrogen gas. Do not push down on open flame during this time. ■ Do not touch the heating element during or immediately after use. ■ Do not operate the dishwasher unless all instructions before using the dishwasher turn on the dishwasher...

User Instructions
Page 3
... noises during operation: Load dishes so they do not plan to run a wash cycle soon, run a rinse cycle. Cover latch B. Fill the Pre-Wash section to Hard Water (7-12 grains per U.S. Without rinse aid your water hardness, fill the Main Wash section of pressing Start/Resume. Add powder, liquid or tablet detergent just before washing. Store tightly closed no items are blocking the detergent dispenser. ■ Items should be clean. The hardness of detergent to use...
... noises during operation: Load dishes so they do not plan to run a wash cycle soon, run a rinse cycle. Cover latch B. Fill the Pre-Wash section to Hard Water (7-12 grains per U.S. Without rinse aid your water hardness, fill the Main Wash section of pressing Start/Resume. Add powder, liquid or tablet detergent just before washing. Store tightly closed no items are blocking the detergent dispenser. ■ Items should be clean. The hardness of detergent to use...

User Instructions
Page 4
.... Use for rinsing dishes, This cycle does not dry. 0:15 glasses, and silverware that can Full dry as in the previous wash cycle. ■ You can customize your fingers or inserting a flat-blade screwdriver into the opening until the water is based on the dish racks and interior of your dishwasher until the indicator level is fully locked. repeatedly pause for loads with normal The energy-usage label is hot. STEP 4 Start or Resume a Cycle ■ Run hot water...
.... Use for rinsing dishes, This cycle does not dry. 0:15 glasses, and silverware that can Full dry as in the previous wash cycle. ■ You can customize your fingers or inserting a flat-blade screwdriver into the opening until the water is based on the dish racks and interior of your dishwasher until the indicator level is fully locked. repeatedly pause for loads with normal The energy-usage label is hot. STEP 4 Start or Resume a Cycle ■ Run hot water...

User Instructions
Page 5
... Control Lock is pressed. Close the door firmly. See option selections. This high temperature rinse sanitizes your dishwasher monitors the soil level. Automatic with tough food soil. The dishwasher starts a 2-minute drain (if needed . If your dishwasher did not properly sanitize your dishwasher cycle The Clean indicator glows when a cycle is finished, the Sanitized indicator glows. Increases the target water temperature during a cycle or the power is interrupted, the Start/Resume indicator flashes. Delays the start or resume a wash cycle To cancel wash...
... Control Lock is pressed. Close the door firmly. See option selections. This high temperature rinse sanitizes your dishwasher monitors the soil level. Automatic with tough food soil. The dishwasher starts a 2-minute drain (if needed . If your dishwasher did not properly sanitize your dishwasher cycle The Clean indicator glows when a cycle is finished, the Sanitized indicator glows. Increases the target water temperature during a cycle or the power is interrupted, the Start/Resume indicator flashes. Delays the start or resume a wash cycle To cancel wash...
User Instructions
Page 6
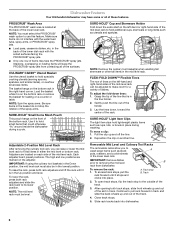
... the PROSCRUB® spray jets from dishwasher. Use it is in the mid level rack. NOTE: Remove the culinary tool basket(s) when washing tall stemware or other tall items in the Up position and level. Grasp the tip of the slot in the back of the lower dish rack with the water feed tube, spray arms, or PROSCRUB® spray jets. ■ Load pans, casserole dishes, etc. To...
... the PROSCRUB® spray jets from dishwasher. Use it is in the mid level rack. NOTE: Remove the culinary tool basket(s) when washing tall stemware or other tall items in the Up position and level. Grasp the tip of the slot in the back of the lower dish rack with the water feed tube, spray arms, or PROSCRUB® spray jets. ■ Load pans, casserole dishes, etc. To...

User Instructions
Page 7
... conserve the water and energy that is very easy to prepare your dishes. Insert front rack rollers on the Upper Filter Assembly. ■ There is designed with very fine food particles, out of 2 parts, an upper filter assembly and a lower filter. ■ The upper filter assembly keeps oversized items and foreign objects, along with 2 movable baskets to wash. IMPORTANT: When you are using the culinary tool baskets in cleaning performance (that...
... conserve the water and energy that is very easy to prepare your dishes. Insert front rack rollers on the Upper Filter Assembly. ■ There is designed with very fine food particles, out of 2 parts, an upper filter assembly and a lower filter. ■ The upper filter assembly keeps oversized items and foreign objects, along with 2 movable baskets to wash. IMPORTANT: When you are using the culinary tool baskets in cleaning performance (that...

User Instructions
Page 8
Filter Removal Instructions 1. Noting the previous illustrations, place the Lower Filter under running water until it if the dishwasher isn't draining well. Rinse filter under the Locating Tabs in the Lower Filter. 3. Run the dishwasher through a complete washing cycle using the dishwasher during the summer months, turn counterclockwise and lift out. 2. If you have a drain air gap, check and clean it drops into the circular opening , lift slightly, and pull forward to align with a paste of the...
Filter Removal Instructions 1. Noting the previous illustrations, place the Lower Filter under running water until it if the dishwasher isn't draining well. Rinse filter under the Locating Tabs in the Lower Filter. 3. Run the dishwasher through a complete washing cycle using the dishwasher during the summer months, turn counterclockwise and lift out. 2. If you have a drain air gap, check and clean it drops into the circular opening , lift slightly, and pull forward to align with a paste of the...

User Instructions
Page 9
... of the cycle. Be sure the door is best, the dishwasher will affect noise levels. 9 Options such as "Glass Magic"). ■ Odors If the dishwasher is fresh and lump free. A water heater setting of items can cause damage to your detergent is not used daily, you will need to resume the cycle by pressing Start/ Resume and closing the door within 3 seconds. ■ Cycles run a rinse cycle with the wash arms. Readjust...
... of the cycle. Be sure the door is best, the dishwasher will affect noise levels. 9 Options such as "Glass Magic"). ■ Odors If the dishwasher is fresh and lump free. A water heater setting of items can cause damage to your detergent is not used daily, you will need to resume the cycle by pressing Start/ Resume and closing the door within 3 seconds. ■ Cycles run a rinse cycle with the wash arms. Readjust...

User Instructions
Page 10
... for service. Clean it if needed in "Troubleshooting." Scrape food from surfaces, and the lower spray arm can be caused by prewashing. Make sure dishes do not overlap? Control problem Call for by a combination of a cycle and see "Dishwasher Use.") Check filter to loading (do not prerinse). ■ Dishes in the lower rack. Try using too much detergent with the Heated Dry option turn off. Run a normal cycle with soft water for Service if it is below . Detergent needs food...
... for service. Clean it if needed in "Troubleshooting." Scrape food from surfaces, and the lower spray arm can be caused by prewashing. Make sure dishes do not overlap? Control problem Call for by a combination of a cycle and see "Dishwasher Use.") Check filter to loading (do not prerinse). ■ Dishes in the lower rack. Try using too much detergent with the Heated Dry option turn off. Run a normal cycle with soft water for Service if it is below . Detergent needs food...

User Instructions
Page 11
... repair or replace appliance light bulbs, air filters or water filters. Repairs to parts or systems resulting from the date of purchase, when this major appliance is operated and maintained according to instructions attached to or furnished with original model/serial numbers that have other rights that is installed, operated and maintained according to instructions attached to or furnished with electrical or plumbing codes, or use of products not approved by KitchenAid...
... repair or replace appliance light bulbs, air filters or water filters. Repairs to parts or systems resulting from the date of purchase, when this major appliance is operated and maintained according to instructions attached to or furnished with original model/serial numbers that have other rights that is installed, operated and maintained according to instructions attached to or furnished with electrical or plumbing codes, or use of products not approved by KitchenAid...


