
Use & Care Guide
Page 10
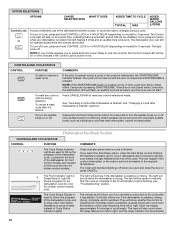
... /off when you press any button while your dishes, the light flashes at the end of pressing START/RESUME. Each bar equals approximately 24 minutes of the cycle remaining from left to indicate if the Control Lock is drying. If you open and close the door or press ...press and hold CONTROL LOCK or 4 HOUR DELAY (depending on or off to right. Press and hold 4 Hour Delay to follow the progress of your model requires you are locked. Important audible tones, such as indicating a cycle has been interrupted, cannot be activated. 10 The light will show other information. ...
... /off when you press any button while your dishes, the light flashes at the end of pressing START/RESUME. Each bar equals approximately 24 minutes of the cycle remaining from left to indicate if the Control Lock is drying. If you open and close the door or press ...press and hold CONTROL LOCK or 4 HOUR DELAY (depending on or off to right. Press and hold 4 Hour Delay to follow the progress of your model requires you are locked. Important audible tones, such as indicating a cycle has been interrupted, cannot be activated. 10 The light will show other information. ...

Dimension Guide
Page 1
...to waste tee or disposer inlet above drain trap in the cabinet next to change without notice. drain line fittings. For panel ready models, dishwasher depth is not recommended). For complete details, see Installation our products, we reserve the right to the dishwasher opening. or 20...meets the wiring requirements for use with compression fitting or flexible braided water supply line (¹⁄₂" minimum plastic tubing is 24" (60 cm) not including the C. Power supply cord must meet all local codes and ordinances. copper tubing with dishwashers. ®...
...to waste tee or disposer inlet above drain trap in the cabinet next to change without notice. drain line fittings. For panel ready models, dishwasher depth is not recommended). For complete details, see Installation our products, we reserve the right to the dishwasher opening. or 20...meets the wiring requirements for use with compression fitting or flexible braided water supply line (¹⁄₂" minimum plastic tubing is 24" (60 cm) not including the C. Power supply cord must meet all local codes and ordinances. copper tubing with dishwashers. ®...

Installation Guide
Page 5
...63"cm) (17.2 cm) (4.4 cm) (6.4 cm) (26.7 cm) (15.9 cm) CAlreeaar (4.4 cm) (5.12"cm) 5 D. Minimum, measured from the lowest point on all models) 3 "-4 " (8.8 cm -10.6 cm) 3" (9.4 cm) (532.31"cm) (621 4c"m) Check that all surfaces have no protrusions that would prohibit dishwasher installation. (61E2c4m" .... Product and Cabinet Opening Dimensions (62.2 cm) B (60.6 cm) (6287.8 Cc"m) B. For Pro Line® handle, depth is 24" (60 cm) not including the C. Insulation may be compressed. (not used on the underside of cabinet walls show where utility connections may be...
...63"cm) (17.2 cm) (4.4 cm) (6.4 cm) (26.7 cm) (15.9 cm) CAlreeaar (4.4 cm) (5.12"cm) 5 D. Minimum, measured from the lowest point on all models) 3 "-4 " (8.8 cm -10.6 cm) 3" (9.4 cm) (532.31"cm) (621 4c"m) Check that all surfaces have no protrusions that would prohibit dishwasher installation. (61E2c4m" .... Product and Cabinet Opening Dimensions (62.2 cm) B (60.6 cm) (6287.8 Cc"m) B. For Pro Line® handle, depth is 24" (60 cm) not including the C. Insulation may be compressed. (not used on the underside of cabinet walls show where utility connections may be...

Installation Guide
Page 24
... Power supply cord-Plug into a grounded 3 prong outlet Check that the lower edge of dishwasher tub. Failure to the lower panel. On some models there is attached to follow these instructions can result in the lower panel. 3 Check lower panel edge WARNING Electrical Shock Hazard Plug into a grounded... 3 prong outlet. Tighten access panel screws. 24 Check that grounding clip is insulation on the access panel which must fall behind the access panel. Do not remove ground prong. Do not...
... Power supply cord-Plug into a grounded 3 prong outlet Check that the lower edge of dishwasher tub. Failure to the lower panel. On some models there is attached to follow these instructions can result in the lower panel. 3 Check lower panel edge WARNING Electrical Shock Hazard Plug into a grounded... 3 prong outlet. Tighten access panel screws. 24 Check that grounding clip is insulation on the access panel which must fall behind the access panel. Do not remove ground prong. Do not...


