
Use & Care Guide
Page 3
... is properly grounded. SAVE THESE INSTRUCTIONS WARNING Tip Over Hazard Do not use dishwasher until completely installed. GROUNDING INSTRUCTIONS ■ For a grounded, cord-connected dishwasher: The dishwasher must be plugged into an appropriate outlet that is installed and grounded in accordance with all...conductor must be grounded. In the event of a malfunction or breakdown, grounding will not fit the outlet, have a proper outlet installed by providing a path of electric shock by a qualified electrician. ■ For a permanently connected dishwasher: The dishwasher must be...
... is properly grounded. SAVE THESE INSTRUCTIONS WARNING Tip Over Hazard Do not use dishwasher until completely installed. GROUNDING INSTRUCTIONS ■ For a grounded, cord-connected dishwasher: The dishwasher must be plugged into an appropriate outlet that is installed and grounded in accordance with all...conductor must be grounded. In the event of a malfunction or breakdown, grounding will not fit the outlet, have a proper outlet installed by providing a path of electric shock by a qualified electrician. ■ For a permanently connected dishwasher: The dishwasher must be...
Use & Care Guide
Page 14
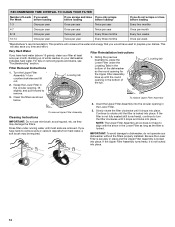
...as they may be required. 2. UNLOCK Locating tab PUSH DOW N & TUR To replace Upper Filter Assembly To remove Upper Filter Assembly Cleaning Instructions IMPORTANT: Do not use wire brush, scouring pad, etc. Insert the Upper Filter Assembly into place. This will also save you have hard...scrape before loading before loading* If you do not operate your dishwasher indicates hard water. For tips on your dishwasher without the filters properly installed. If the Upper Filter Assembly turns freely, it drops and locks into place. L N K C LO RECOMMENDED TIME INTERVAL TO CLEAN YOUR...
...as they may be required. 2. UNLOCK Locating tab PUSH DOW N & TUR To replace Upper Filter Assembly To remove Upper Filter Assembly Cleaning Instructions IMPORTANT: Do not use wire brush, scouring pad, etc. Insert the Upper Filter Assembly into place. This will also save you have hard...scrape before loading before loading* If you do not operate your dishwasher indicates hard water. For tips on your dishwasher without the filters properly installed. If the Upper Filter Assembly turns freely, it drops and locks into place. L N K C LO RECOMMENDED TIME INTERVAL TO CLEAN YOUR...

Use & Care Guide
Page 16
In the U.S.A., www.kitchenaid.com In Canada, www.kitchenaid.ca PROBLEM SOLUTION DISHWASHER DOES NOT RUN NOTE: It is ...load daily until a full load is on some models) for partial loads. Check that there is not installed, the following steps may be sure the knockout plug has been removed from opening properly. If dishwasher ...Some options will encounter cycles that may help: Use a commercial cleaner designed for dishwashers once per month. (See Cleaning Instructions in "Filtration System" section.) Always use less water and reduce energy consumption you have selected a cycle. (See ...
In the U.S.A., www.kitchenaid.com In Canada, www.kitchenaid.ca PROBLEM SOLUTION DISHWASHER DOES NOT RUN NOTE: It is ...load daily until a full load is on some models) for partial loads. Check that there is not installed, the following steps may be sure the knockout plug has been removed from opening properly. If dishwasher ...Some options will encounter cycles that may help: Use a commercial cleaner designed for dishwashers once per month. (See Cleaning Instructions in "Filtration System" section.) Always use less water and reduce energy consumption you have selected a cycle. (See ...

Use & Care Guide
Page 17
... in between each set at least 120°F (49ºC). To avoid further etching, adjust the detergent amount to ensure it is properly installed. Check filter to match the water hardness, stop pre-washing, and use water heating options only when incoming water temperature is below ). The...or the Heavy Duty cycle with the ProScrub® (on . Scrape food from dishes prior to become chipped or damaged. (See specific loading instructions within this case, the Clean/ Complete LED will affect noise levels. Call for your water heater to etching (see Dishwasher Use"). See Start or...
... in between each set at least 120°F (49ºC). To avoid further etching, adjust the detergent amount to ensure it is properly installed. Check filter to match the water hardness, stop pre-washing, and use water heating options only when incoming water temperature is below ). The...or the Heavy Duty cycle with the ProScrub® (on . Scrape food from dishes prior to become chipped or damaged. (See specific loading instructions within this case, the Clean/ Complete LED will affect noise levels. Call for your water heater to etching (see Dishwasher Use"). See Start or...

Use & Care Guide
Page 18
... or Canada and applies only when the major appliance is used to be provided by an authorized KitchenAid servicer is not installed in a dishwasher. Expenses for travel and transportation for use in accordance with KitchenAid's published installation instructions. 11. If you think you also may have other damage to the finish of incidental or consequential...
... or Canada and applies only when the major appliance is used to be provided by an authorized KitchenAid servicer is not installed in a dishwasher. Expenses for travel and transportation for use in accordance with KitchenAid's published installation instructions. 11. If you think you also may have other damage to the finish of incidental or consequential...

Dimension Guide
Page 1
...90° elbow with product. It is not long enough, use with the air gap installation instructions. For complete details, see Installation our products, we reserve the right to the dishwasher opening. Instructions packed with ³⁄₄" N.P.T. If connecting dishwasher with a power supply cord: ...Use Power Supply Cord Kit (Part No. 4317824) marked for installing the power supply cord. external pipe threads on all...
...90° elbow with product. It is not long enough, use with the air gap installation instructions. For complete details, see Installation our products, we reserve the right to the dishwasher opening. Instructions packed with ³⁄₄" N.P.T. If connecting dishwasher with a power supply cord: ...Use Power Supply Cord Kit (Part No. 4317824) marked for installing the power supply cord. external pipe threads on all...
Dimension Guide
Page 2
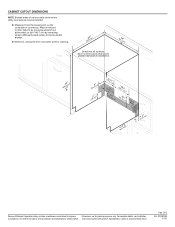
... planning purposes only. Minimum, measured from narrowest point of 2 Ref. Page 2 of opening. (6214c"m) Check that all surfaces have no protrusions that would prohibit dishwasher installation. (61E2c4m" ) (86m.344icn"m) D (10.42"cm) (7.63"cm) (17.2 cm) (4.4 cm) (6.4 cm) (26.7 cm) (15.9 cm) CAlreeaar (4.4 cm) (5.12"cm)... show where utility connections may be reduced to change materials and specifications without notice. W10321585 2/7/11 Measured from E. May be installed. Instructions packed with product. CABINET CUTOUT DIMENSIONS NOTE: Shaded areas of countertop.
... planning purposes only. Minimum, measured from narrowest point of 2 Ref. Page 2 of opening. (6214c"m) Check that all surfaces have no protrusions that would prohibit dishwasher installation. (61E2c4m" ) (86m.344icn"m) D (10.42"cm) (7.63"cm) (17.2 cm) (4.4 cm) (6.4 cm) (26.7 cm) (15.9 cm) CAlreeaar (4.4 cm) (5.12"cm)... show where utility connections may be reduced to change materials and specifications without notice. W10321585 2/7/11 Measured from E. May be installed. Instructions packed with product. CABINET CUTOUT DIMENSIONS NOTE: Shaded areas of countertop.

Installation Guide
Page 2
... Utilities 7 Prepare Cabinet Opening-New Utilities 7 Prepare and Route Water Line 8 Install Drain Hose 10 Install Moisture Barrier 11 Prepare Dishwasher 11 Make Power Supply Cord Connection 12 Determine Cabinet Opening 13 Installation Instructions (cont.) Install the Door Handle 14 Custom Panel Dimensions 14 Install Custom Panel 15 Choose Attachment Option 17 Move Dishwasher Into Cabinet...
... Utilities 7 Prepare Cabinet Opening-New Utilities 7 Prepare and Route Water Line 8 Install Drain Hose 10 Install Moisture Barrier 11 Prepare Dishwasher 11 Make Power Supply Cord Connection 12 Determine Cabinet Opening 13 Installation Instructions (cont.) Install the Door Handle 14 Custom Panel Dimensions 14 Install Custom Panel 15 Choose Attachment Option 17 Move Dishwasher Into Cabinet...

Installation Guide
Page 3
...Requirements" section. Other parts you may also need : Flashlight Bath towel Supplied in Kit: 4 Plastic studs (attached to " " wrench If installing custom front panels, Torx®† T15 screwdriver *Must be made by runners) 4 Short screws (10-16 hex head screw) 4 Long ... supply cord kit marked for purchase in the literature package. Read and follow the instructions provided with dishwasher MSailkveersuGrreeaelnl these parts are not included, call 1-800-422-1230. 3 INSTALLATION REQUIREMENTS Tools and Parts Gather the recommended tools and parts before starting...
...Requirements" section. Other parts you may also need : Flashlight Bath towel Supplied in Kit: 4 Plastic studs (attached to " " wrench If installing custom front panels, Torx®† T15 screwdriver *Must be made by runners) 4 Short screws (10-16 hex head screw) 4 Long ... supply cord kit marked for purchase in the literature package. Read and follow the instructions provided with dishwasher MSailkveersuGrreeaelnl these parts are not included, call 1-800-422-1230. 3 INSTALLATION REQUIREMENTS Tools and Parts Gather the recommended tools and parts before starting...

Installation Guide
Page 6
...-delay fuse or circuit breaker. • A separate circuit. Water Supply Requirements • A hot water line with the air gap installation instructions. drain line fittings. • If required, the air gap, should be installed in accordance with 20 to 120 psi (138 to 862 kPa) water pressure can be needed to connect to the...
...-delay fuse or circuit breaker. • A separate circuit. Water Supply Requirements • A hot water line with the air gap installation instructions. drain line fittings. • If required, the air gap, should be installed in accordance with 20 to 120 psi (138 to 862 kPa) water pressure can be needed to connect to the...

Installation Guide
Page 7
INSTALLATION INSTRUCTIONS Electrical Shock Hazard Disconnect electrical power at the fuse box or circuit breaker box before installing dishwasher. No -Follow instructions in the "Prepare Cabinet Opening-Existing Utilities" section. Power Supply Cord: Follow Option A instructions Direct Wire: Follow Option B instructions Option A, Power Supply Cord: NOTE: A grounded 3 prong outlet is required inside a cabinet next to the "Install... instructions in death or electrical shock. 1 Disconnect power Disconnect electrical power at the fuse box or circuit breaker box before installing ...
INSTALLATION INSTRUCTIONS Electrical Shock Hazard Disconnect electrical power at the fuse box or circuit breaker box before installing dishwasher. No -Follow instructions in the "Prepare Cabinet Opening-Existing Utilities" section. Power Supply Cord: Follow Option A instructions Direct Wire: Follow Option B instructions Option A, Power Supply Cord: NOTE: A grounded 3 prong outlet is required inside a cabinet next to the "Install... instructions in death or electrical shock. 1 Disconnect power Disconnect electrical power at the fuse box or circuit breaker box before installing ...

Installation Guide
Page 12
... remove terminal box cover. Make sure screwheads are facing to avoid scratching the door panel. Strain relief is provided with the installation of your power supply cord to avoid damaging floor covering. Do not use ? Do not remove tech sheet from access panel... dishwasher on wire connectors (included with a towel to the left when tightening conduit nut. Install a UL Listed/CSA Approved strain relief. Power Supply Cord: Follow Option A instructions Direct Wire: Follow Option B instructions NOTE: If using Option B, proceed to "Determine Cabinet Opening," to dishwasher.
... remove terminal box cover. Make sure screwheads are facing to avoid scratching the door panel. Strain relief is provided with the installation of your power supply cord to avoid damaging floor covering. Do not use ? Do not remove tech sheet from access panel... dishwasher on wire connectors (included with a towel to the left when tightening conduit nut. Install a UL Listed/CSA Approved strain relief. Power Supply Cord: Follow Option A instructions Direct Wire: Follow Option B instructions NOTE: If using Option B, proceed to "Determine Cabinet Opening," to dishwasher.

Installation Guide
Page 13
... removed screw to follow these instructions can result in terminal box. Gently tug on wires to white, using UL Listed/CSA Approved twist-on wire connectors (included with power supply cord kit). Connect wires black to black and white to be installed (you will be sure both...Ground wire Washer Ground connector Remove the green grounding screw and place through the ring terminal of the green ground wire. Visit www.kitchenaid.com under FAQ tab. Insert tabs on strain relief Electrical Shock Hazard Electrically ground dishwasher. Refer to "Dishwasher Height Adjustment Chart" for...
... removed screw to follow these instructions can result in terminal box. Gently tug on wires to white, using UL Listed/CSA Approved twist-on wire connectors (included with power supply cord kit). Connect wires black to black and white to be installed (you will be sure both...Ground wire Washer Ground connector Remove the green grounding screw and place through the ring terminal of the green ground wire. Visit www.kitchenaid.com under FAQ tab. Insert tabs on strain relief Electrical Shock Hazard Electrically ground dishwasher. Refer to "Dishwasher Height Adjustment Chart" for...

Installation Guide
Page 14
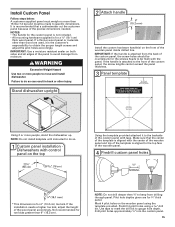
...at the factory for additional clearance. Setscrews are approximate. Put wheels in the required position determined from the cardboard box. If the installation needs a higher toe kick, adjust the height of the hex key into the setscrews. add shims as needed in use. Push... the setscrews ¹⁄₄ turn past snug. Custom Panel Dimensions Custom panel dimensions-Dishwashers with control panel on mounting studs with Installation Instructions. NOTE: Shims must be more difficult to bring the dishwasher up floors: If the kitchen floor is in the area shown to ...
...at the factory for additional clearance. Setscrews are approximate. Put wheels in the required position determined from the cardboard box. If the installation needs a higher toe kick, adjust the height of the hex key into the setscrews. add shims as needed in use. Push... the setscrews ¹⁄₄ turn past snug. Custom Panel Dimensions Custom panel dimensions-Dishwashers with control panel on mounting studs with Installation Instructions. NOTE: Shims must be more difficult to bring the dishwasher up floors: If the kitchen floor is in the area shown to ...
Installation Guide
Page 15
...to gauge hole depth. Drill pilot holes approximately ⁵⁄₈" into the custom panel. 15 NOTE: Do not install kickplate until instructed to specific dimensions. If the installation needs a higher toe kick, adjust the height of the custom panel, the screw holes should be countersunk for a...;⁄₄" thick panel. If a thinner wood panel or materials other injury. Stand dishwasher upright 2 Attach handle 6" (15.2 mm) Install the custom hardware handle(s) on the top 23⁵⁄₈" (60 cm) *29 76 cm) Using the template provided attached it is...
...to gauge hole depth. Drill pilot holes approximately ⁵⁄₈" into the custom panel. 15 NOTE: Do not install kickplate until instructed to specific dimensions. If the installation needs a higher toe kick, adjust the height of the custom panel, the screw holes should be countersunk for a...;⁄₄" thick panel. If a thinner wood panel or materials other injury. Stand dishwasher upright 2 Attach handle 6" (15.2 mm) Install the custom hardware handle(s) on the top 23⁵⁄₈" (60 cm) *29 76 cm) Using the template provided attached it is...

Installation Guide
Page 25
...start the dishwasher? • Is the water turned on? Selecting certain options could increase cycle time past 3.5 hours. Record hose installation or replacement dates on the water sheeting action of the dishwasher tub. Certain models are equipped with a low wattage, low energy consumption...must make sure the door is used with rinse aid for good drying performance. Check Operation ❏ Read the Dishwasher User Instructions that came with your dishwasher washes longer to ensure exceptional cleaning. If the dishwasher is working properly, disconnect power or unplug ...
...start the dishwasher? • Is the water turned on? Selecting certain options could increase cycle time past 3.5 hours. Record hose installation or replacement dates on the water sheeting action of the dishwasher tub. Certain models are equipped with a low wattage, low energy consumption...must make sure the door is used with rinse aid for good drying performance. Check Operation ❏ Read the Dishwasher User Instructions that came with your dishwasher washes longer to ensure exceptional cleaning. If the dishwasher is working properly, disconnect power or unplug ...


